
User Manual
Page 3
... 64-bit Without RAID Functions 31 2.15.2 Installing Windows® VistaTM / VistaTM 64-bit Without RAID Functions 32 2.16 Untied Overclocking Technology 33 3 BIOS SETUP UTILITY 34 3.1 Introduction 34 3.1.1 BIOS Menu Bar 34 3.1.2 Navigation Keys 35 3.2 Main Screen 35 3.3 OC Tweaker Screen 36 3.4 Advanced Screen 46 3.4.1 CPU Configuration 47 3.4.2 Chipset Configuration 49...
... 64-bit Without RAID Functions 31 2.15.2 Installing Windows® VistaTM / VistaTM 64-bit Without RAID Functions 32 2.16 Untied Overclocking Technology 33 3 BIOS SETUP UTILITY 34 3.1 Introduction 34 3.1.1 BIOS Menu Bar 34 3.1.2 Navigation Keys 35 3.2 Main Screen 35 3.3 OC Tweaker Screen 36 3.4 Advanced Screen 46 3.4.1 CPU Configuration 47 3.4.2 Chipset Configuration 49...
User Manual
Page 5
..., the updated version will be available on ASRock website as well. www.asrock.com/support/index.asp 1.1 Package Contents ASRock P43DE3 Motherboard (ATX Form Factor: 12.0-in x 8.0-in, 30.5 cm x 20.3 cm) ASRock P43DE3 Quick Installation Guide ASRock P43DE3 Support CD One 80-conductor Ultra ATA 66.../100/133 IDE Ribbon Cable Two Serial ATA (SATA) Data Cables (Optional) One I/O Panel Shield 5 Because the motherboard specifications and the BIOS software might be updated, the content ...
..., the updated version will be available on ASRock website as well. www.asrock.com/support/index.asp 1.1 Package Contents ASRock P43DE3 Motherboard (ATX Form Factor: 12.0-in x 8.0-in, 30.5 cm x 20.3 cm) ASRock P43DE3 Quick Installation Guide ASRock P43DE3 Support CD One 80-conductor Ultra ATA 66.../100/133 IDE Ribbon Cable Two Serial ATA (SATA) Data Cables (Optional) One I/O Panel Shield 5 Because the motherboard specifications and the BIOS software might be updated, the content ...
User Manual
Page 7
... - EuP Ready (EuP ready power supply is required) (see CAUTION 12) - AMI Legal BIOS - O. ASRock Instant Flash (see CAUTION 16) * For detailed product information, please visit our website: http://www.asrock.com 7 CPU Frequency Stepless Control (see CAUTION 9) BIOS Feature - 8Mb AMI BIOS - Chassis Temperature Sensing - CPU/Chassis/Power Fan Tachometer - SMBIOS 2.3.1 Support - CPU, DRAM...
... - EuP Ready (EuP ready power supply is required) (see CAUTION 12) - AMI Legal BIOS - O. ASRock Instant Flash (see CAUTION 16) * For detailed product information, please visit our website: http://www.asrock.com 7 CPU Frequency Stepless Control (see CAUTION 9) BIOS Feature - 8Mb AMI BIOS - Chassis Temperature Sensing - CPU/Chassis/Power Fan Tachometer - SMBIOS 2.3.1 Support - CPU, DRAM...
User Manual
Page 8
...11 for the CPU FSB frequency and its corresponding memory support frequency. It is no such limitation. 7. ASRock website: http://www.asrock.com 8 About the setting of ASRock OC Tuner. Please check the table on page 17 for possible damage caused by hardware monitor function and ...® VistaTM 64-bit / VistaTM / XP 64-bit / XP SP1 or SP2 / 2000 SP4. 10. FSB1600-CPU will operate in the BIOS, applying Untied Overclocking Technology, or using the thirdparty overclocking tools. channel, 6-channel, and 8-channel modes. Power Management for system usage under Windows®...
...11 for the CPU FSB frequency and its corresponding memory support frequency. It is no such limitation. 7. ASRock website: http://www.asrock.com 8 About the setting of ASRock OC Tuner. Please check the table on page 17 for possible damage caused by hardware monitor function and ...® VistaTM 64-bit / VistaTM / XP 64-bit / XP SP1 or SP2 / 2000 SP4. 10. FSB1600-CPU will operate in the BIOS, applying Untied Overclocking Technology, or using the thirdparty overclocking tools. channel, 6-channel, and 8-channel modes. Power Management for system usage under Windows®...

User Manual
Page 9
... improve heat dissipation, remember to spray thermal grease between the CPU and the heatsink when you to your BIOS only in Flash ROM. It is detected, the system will automatically shutdown. ASRock website: http://www.asrock.com 12. While CPU overheat is recommended to Intel's suggestion, the EuP ready power supply must use...
... improve heat dissipation, remember to spray thermal grease between the CPU and the heatsink when you to your BIOS only in Flash ROM. It is detected, the system will automatically shutdown. ASRock website: http://www.asrock.com 12. While CPU overheat is recommended to Intel's suggestion, the EuP ready power supply must use...
User Manual
Page 10
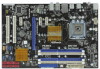
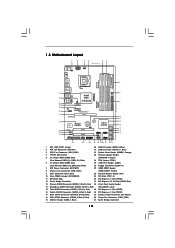
...P43 Top: LINE IN Center: FRONT Bottom: MIC IN Chipset CD1 35 PWR_FAN1 34 PCIE1 33 AUDIO CODEC PCIE2 HD_AUDIO1 32 1 PCI Express 2.0 P43DE3 FSB1600 8 CHA_FAN1 IDE1 9 30.5cm (12.0 in) 31 30 29 28 27 EuP Ready PCIE3 Super I/O RoHS IR1 1 HDMI_SPDIF1 1 ...FLOPPY1 PCIE4 CMOS Battery PCI1 1 CLRCMOS1 PCI2 COM1 1 1 TPM1 8Mb BIOS Intel ICH10 USB10_11 1 SPEAKER1 1 PLED PWRBTN PANEL1 1 HDLED RESET USB8_9 1 USB6_7 1 SATAII_5 (Port 4) SATAII_3 (Port 2) SATAII_1 (Port 0) SATAII_6 (Port 5) SATAII_4 ...
...P43 Top: LINE IN Center: FRONT Bottom: MIC IN Chipset CD1 35 PWR_FAN1 34 PCIE1 33 AUDIO CODEC PCIE2 HD_AUDIO1 32 1 PCI Express 2.0 P43DE3 FSB1600 8 CHA_FAN1 IDE1 9 30.5cm (12.0 in) 31 30 29 28 27 EuP Ready PCIE3 Super I/O RoHS IR1 1 HDMI_SPDIF1 1 ...FLOPPY1 PCIE4 CMOS Battery PCI1 1 CLRCMOS1 PCI2 COM1 1 1 TPM1 8Mb BIOS Intel ICH10 USB10_11 1 SPEAKER1 1 PLED PWRBTN PANEL1 1 HDLED RESET USB8_9 1 USB6_7 1 SATAII_5 (Port 4) SATAII_3 (Port 2) SATAII_1 (Port 0) SATAII_6 (Port 5) SATAII_4 ...
User Manual
Page 20
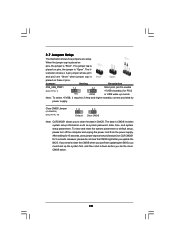
... placed on pins, the jumper is "Open". To clear and reset the system parameters to clear the CMOS when you just finish updating the BIOS, you update the BIOS. When the jumper cap is placed on pins, the jumper is "Short". The il- Clear CMOS Jumper (CLRCMOS1) (see p.10 No. 1) 1_2 +5V...
... placed on pins, the jumper is "Open". To clear and reset the system parameters to clear the CMOS when you just finish updating the BIOS, you update the BIOS. When the jumper cap is placed on pins, the jumper is "Short". The il- Clear CMOS Jumper (CLRCMOS1) (see p.10 No. 1) 1_2 +5V...
User Manual
Page 23
... interface for HD audio panel only. C. You don't need to Ground (GND). If you use AC'97 audio panel, please install it to MIC2_L. Enter BIOS Setup Utility. B. D. Connect Mic_IN (MIC) to the front panel audio header as below: A. High Definition Audio supports Jack Sensing, but the panel wire on the...
... interface for HD audio panel only. C. You don't need to Ground (GND). If you use AC'97 audio panel, please install it to MIC2_L. Enter BIOS Setup Utility. B. D. Connect Mic_IN (MIC) to the front panel audio header as below: A. High Definition Audio supports Jack Sensing, but the panel wire on the...
User Manual
Page 31
...the floppy diskette and copy SATA / SATAII drivers into the floppy drive. Using SATA / SATAII HDDs with NCQ function STEP 1: Set Up BIOS. A. B. Then you install can be auto-detected and listed on your SATA / SATAII HDDs without RAID functions, please follow below steps. ... functions, please follow below procedures according to the OS you see these messages, Please insert a diskette into the floppy diskette. 31 Enter BIOS SETUP UTILITY Advanced screen Storage Configuration. Insert the Support CD into the floppy drive, and press . Start to install Windows® 2000 ...
...the floppy diskette and copy SATA / SATAII drivers into the floppy drive. Using SATA / SATAII HDDs with NCQ function STEP 1: Set Up BIOS. A. B. Then you install can be auto-detected and listed on your SATA / SATAII HDDs without RAID functions, please follow below steps. ... functions, please follow below procedures according to the OS you see these messages, Please insert a diskette into the floppy diskette. 31 Enter BIOS SETUP UTILITY Advanced screen Storage Configuration. Insert the Support CD into the floppy drive, and press . Start to install Windows® 2000 ...
User Manual
Page 32
...UTILITY Advanced screen Storage Configuration. STEP 2: Install Windows® VistaTM / VistaTM 64-bit OS on your system. page, please insert the ASRock Support CD into the optical drive to boot your system, and follow below steps. Using SATA / SATAII HDDs without RAID functions, please...as ", please set the option to install Windows® VistaTM / VistaTM 64-bit OS on your SATA / SATAII HDDs without NCQ function STEP 1: Set up BIOS. Select the driver to install according to install Windows® VistaTM / VistaTM 64-bit OS on your system. A. STEP 2: Install Windows® 2000 /...
...UTILITY Advanced screen Storage Configuration. STEP 2: Install Windows® VistaTM / VistaTM 64-bit OS on your system. page, please insert the ASRock Support CD into the optical drive to boot your system, and follow below steps. Using SATA / SATAII HDDs without RAID functions, please...as ", please set the option to install Windows® VistaTM / VistaTM 64-bit OS on your SATA / SATAII HDDs without NCQ function STEP 1: Set up BIOS. Select the driver to install according to install Windows® VistaTM / VistaTM 64-bit OS on your system. A. STEP 2: Install Windows® 2000 /...
User Manual
Page 33
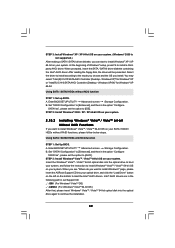
.../ VistaTM 64-bit OS on page 8 for the possible overclocking risk before you enable Untied Overclocking function, please enter "Overclock Mode" option of BIOS setup to set the option to [Manual]. Please refer to the warning on your system. 2.16 Untied Overclocking Technology This motherboard supports Untied Overclocking ...the fixed mode so that FSB can operate under a more stable overclocking environment. B. Set "SATAII Configuration" to fixed PCI / PCIE buses. Enter BIOS SETUP UTILITY Advanced screen Storage Configuration. Using SATA / SATAII HDDs without NCQ function STEP 1: Set up...
.../ VistaTM 64-bit OS on page 8 for the possible overclocking risk before you enable Untied Overclocking function, please enter "Overclock Mode" option of BIOS setup to set the option to [Manual]. Please refer to the warning on your system. 2.16 Untied Overclocking Technology This motherboard supports Untied Overclocking ...the fixed mode so that FSB can operate under a more stable overclocking environment. B. Set "SATAII Configuration" to fixed PCI / PCIE buses. Enter BIOS SETUP UTILITY Advanced screen Storage Configuration. Using SATA / SATAII HDDs without NCQ function STEP 1: Set up...
User Manual
Page 34
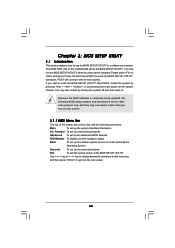
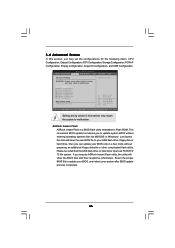
... chip on . You may not exactly match what you see on the system chassis. Chapter 3: BIOS SETUP UTILITY 3.1 Introduction This section explains how to use the BIOS SETUP UTILITY to enter the BIOS SETUP UTILITY, otherwise, POST will continue with the following selections: Main To set up the system... time/date information OC Tweaker To set up overclocking features Advanced To set up the advanced BIOS features H/W Monitor To display current hardware status Boot To set up the default system device to locate and load the Operating System Security...
... chip on . You may not exactly match what you see on the system chassis. Chapter 3: BIOS SETUP UTILITY 3.1 Introduction This section explains how to use the BIOS SETUP UTILITY to enter the BIOS SETUP UTILITY, otherwise, POST will continue with the following selections: Main To set up the system... time/date information OC Tweaker To set up overclocking features Advanced To set up the advanced BIOS features H/W Monitor To display current hardware status Boot To set up the default system device to locate and load the Operating System Security...
User Manual
Page 35
... Item Change Field Select Field General Help Load Defaults Save and Exit Exit v02.54 (C) Copyright 1985-2005, American Megatrends, Inc. BIOS SETUP UTILITY Main OC Tweaker Advanced H/W Monitor Boot Security Exit System Overview System Time System Date [14:00:09] [Wed 07/29/2009...] BIOS Version : P43DE3 P1.00 Processor Type : Intel (R) Core (TM) 2 Duo CPU E8400 @ 3.00GHz (64bit) Processor Speed : 4400MHz Microcode Update : 1067A/A07 Cache Size : 6144KB...
... Item Change Field Select Field General Help Load Defaults Save and Exit Exit v02.54 (C) Copyright 1985-2005, American Megatrends, Inc. BIOS SETUP UTILITY Main OC Tweaker Advanced H/W Monitor Boot Security Exit System Overview System Time System Date [14:00:09] [Wed 07/29/2009...] BIOS Version : P43DE3 P1.00 Processor Type : Intel (R) Core (TM) 2 Duo CPU E8400 @ 3.00GHz (64bit) Processor Speed : 4400MHz Microcode Update : 1067A/A07 Cache Size : 6144KB...
User Manual
Page 36
... Tweaker screen, you can use this option to load CPU EZ overclocking setting. It should be [Auto] for the details of Boot Failure Guard. BIOS SETUP UTILITY Main OC Tweaker Advanced H/W Monitor Boot Security Exit OC Tweaker Settings Load CPU EZ OC Setting [Press Enter] Overclock Mode CPU Frequency ... [Auto] [Enabled] [Auto] [8] [9] DRAM Frequency DRAM Command Rate [Auto] [Auto] DRAM Timing Configuration DRAM RCOMP and tRD Configuration DRAM DLL SKEW Configuration Voltage Configuration ASRock VDrop Control [With VDrop] Overclocking may cause damage to your own risk and expense.
... Tweaker screen, you can use this option to load CPU EZ overclocking setting. It should be [Auto] for the details of Boot Failure Guard. BIOS SETUP UTILITY Main OC Tweaker Advanced H/W Monitor Boot Security Exit OC Tweaker Settings Load CPU EZ OC Setting [Press Enter] Overclock Mode CPU Frequency ... [Auto] [Enabled] [Auto] [8] [9] DRAM Frequency DRAM Command Rate [Auto] [Auto] DRAM Timing Configuration DRAM RCOMP and tRD Configuration DRAM DLL SKEW Configuration Voltage Configuration ASRock VDrop Control [With VDrop] Overclocking may cause damage to your own risk and expense.
User Manual
Page 38
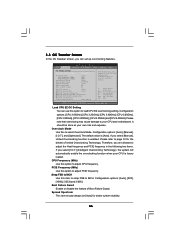
... number of DRAM clocks for TWTR. The default value is [Auto]. Max: 15. Max: 10. Min: 3. Min: 2. Configuration options: [Auto] and [Profile 1]. DRAM Timing Configuation BIOS SETUP UTILITY OC Tweaker Standard Memory Settings XMP Technology [Auto] Profile 1 : DDR3 2000 7-8-7-20 1.65V Standard Memory Settings : 7-8-7-20-78-10-8-7-8 DRAM tCL [Auto] DRAM...
... number of DRAM clocks for TWTR. The default value is [Auto]. Max: 15. Max: 10. Min: 3. Min: 2. Configuration options: [Auto] and [Profile 1]. DRAM Timing Configuation BIOS SETUP UTILITY OC Tweaker Standard Memory Settings XMP Technology [Auto] Profile 1 : DDR3 2000 7-8-7-20 1.65V Standard Memory Settings : 7-8-7-20-78-10-8-7-8 DRAM tCL [Auto] DRAM...
User Manual
Page 40
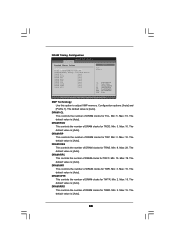
...). Max: 15. The default value is [Auto]. DRAM CH1 G0 (Data) This controls the number of DRAM CH0 RCOMP ODT. DRAM RCOMP and tRD Configuration BIOS SETUP UTILITY OC Tweaker DRAM RCOMP Settings DRAM CH0 RCOMP Settings : 54-0-11-6-6-6-6 DRAM CH0 RCOMP ODT DRAM CH0 G0 (Data) DRAM CH0 G1 (Command...
...). Max: 15. The default value is [Auto]. DRAM CH1 G0 (Data) This controls the number of DRAM CH0 RCOMP ODT. DRAM RCOMP and tRD Configuration BIOS SETUP UTILITY OC Tweaker DRAM RCOMP Settings DRAM CH0 RCOMP Settings : 54-0-11-6-6-6-6 DRAM CH0 RCOMP ODT DRAM CH0 G0 (Data) DRAM CH0 G1 (Command...
User Manual
Page 42
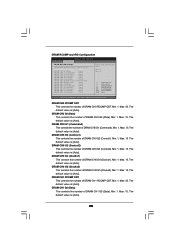
... CH0 CLKSET0 SKEW. DRAM CH0 CLKSET0 SKEW This controls the number of DRAM CH0 CTRL1 SKEW. Configuration options: [Auto], [8] to [827]. DRAM DLL SKEW Settings BIOS SETUP UTILITY OC Tweaker DRAM DLL SKEW Settings DRAM CH0 CLKSET0 SKEW Info:8-2-0-0-0-734 DRAM CH0 CLKSET0 SKEW [Auto] DRAM CH0 CLKSET1 SKEW Info:9-5-0-0-0-856...
... CH0 CLKSET0 SKEW. DRAM CH0 CLKSET0 SKEW This controls the number of DRAM CH0 CTRL1 SKEW. Configuration options: [Auto], [8] to [827]. DRAM DLL SKEW Settings BIOS SETUP UTILITY OC Tweaker DRAM DLL SKEW Settings DRAM CH0 CLKSET0 SKEW Info:8-2-0-0-0-734 DRAM CH0 CLKSET0 SKEW [Auto] DRAM CH0 CLKSET1 SKEW Info:9-5-0-0-0-856...
User Manual
Page 44
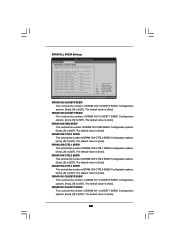
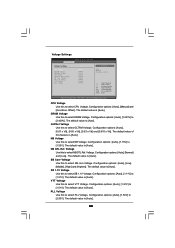
...] to [2.429V]. Voltage Use this feature is [Auto]. The default value is [Auto]. SB Core Voltage Use this to select NB GTL Ref. Voltage Settings BIOS SETUP UTILITY OC Tweaker Voltage Settings CPU Voltage DRAM Voltage GTLRef Voltage NB Voltage NB GTL Ref. The default value is [Auto]. Configuration options: [Auto...
...] to [2.429V]. Voltage Use this feature is [Auto]. The default value is [Auto]. SB Core Voltage Use this to select NB GTL Ref. Voltage Settings BIOS SETUP UTILITY OC Tweaker Voltage Settings CPU Voltage DRAM Voltage GTLRef Voltage NB Voltage NB GTL Ref. The default value is [Auto]. Configuration options: [Auto...
User Manual
Page 46
... Configuration, PCIPnP Configuration, Floppy Configuration, SuperIO Configuration, and USB Configuration. This convenient BIOS update tool allows you execute ASRock Instant Flash utility, the utility will show the BIOS files and their respective information. Please be noted that the USB flash drive or hard...disk or hard drive, then you may cause system to update system BIOS without preparing an additional floppy diskette or other complicated flash utility. ASRock Instant Flash ASRock Instant Flash is a BIOS flash utility embedded in below sections may set the configurations for CPU...
... Configuration, PCIPnP Configuration, Floppy Configuration, SuperIO Configuration, and USB Configuration. This convenient BIOS update tool allows you execute ASRock Instant Flash utility, the utility will show the BIOS files and their respective information. Please be noted that the USB flash drive or hard...disk or hard drive, then you may cause system to update system BIOS without preparing an additional floppy diskette or other complicated flash utility. ASRock Instant Flash ASRock Instant Flash is a BIOS flash utility embedded in below sections may set the configurations for CPU...
User Manual
Page 47
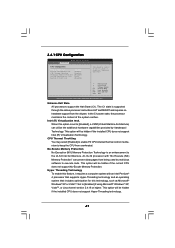
... optimization for this option is set to [Enabled] if using Microsoft® Windows® XP, VistaTM, or Linux kernel version 2.4.18 or higher. 3.4.1 CPU Configuration BIOS SETUP UTILITY Advanced CPU Configuration Enhanced Halt State Intel (R) Virtualization tech. CPU Thermal Throttling No-Execute Memory Protection Intel (R) SpeedStep (tm) tech.
... optimization for this option is set to [Enabled] if using Microsoft® Windows® XP, VistaTM, or Linux kernel version 2.4.18 or higher. 3.4.1 CPU Configuration BIOS SETUP UTILITY Advanced CPU Configuration Enhanced Halt State Intel (R) Virtualization tech. CPU Thermal Throttling No-Execute Memory Protection Intel (R) SpeedStep (tm) tech.


