
RAID Installation Guide
Page 1
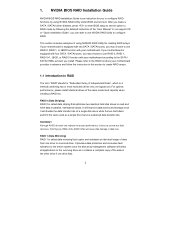
NVIDIA BIOS RAID Installation Guide 2 1.1 Introduction to RAID 2 1.2 RAID Configurations Precautions 3 1.3 Installing Windows XP / XP 64-bit / Vista / Vista 64-bit With RAID Functions 5 1.3.1 Installing Windows XP / XP 64-bit With RAID Functions 5 1.3.2 Installing Windows Vista / Vista 64-bit With RAID Functions 7 1.4 Create Disk Array 8 2. NVIDIA Windows RAID Installation Guide 11 2.1 NVIDIA Windows RAID Installation Guide for Windows XP / XP 64-bit Users 11 2.2 NVIDIA Windows RAID Installation Guide for Windows Vista / Vista 64-bit Users 21 1 NVIDIA RAID Installation Guide 1.
NVIDIA BIOS RAID Installation Guide 2 1.1 Introduction to RAID 2 1.2 RAID Configurations Precautions 3 1.3 Installing Windows XP / XP 64-bit / Vista / Vista 64-bit With RAID Functions 5 1.3.1 Installing Windows XP / XP 64-bit With RAID Functions 5 1.3.2 Installing Windows Vista / Vista 64-bit With RAID Functions 7 1.4 Create Disk Array 8 2. NVIDIA Windows RAID Installation Guide 11 2.1 NVIDIA Windows RAID Installation Guide for Windows XP / XP 64-bit Users 11 2.2 NVIDIA Windows RAID Installation Guide for Windows Vista / Vista 64-bit Users 21 1 NVIDIA RAID Installation Guide 1.
RAID Installation Guide
Page 2
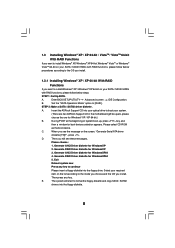
..."RAID" stands for creating RAID arrays. After you can improve the access performance, it contains a complete copy of using NVIDIA RAID Utility under BIOS environment. For optimal performance, please install identical drives of data from one logical unit. RAID 0 (Data Striping) RAID 0 is called data ...read and write data in our support CD or "Quick Installation Guide", you make a SATA / SATAII driver diskette, press to enter BIOS setup to RAID mode by using NVRAID RAID Utility for "Redundant Array of Independent Disks", which is called data striping that copies and ...
..."RAID" stands for creating RAID arrays. After you can improve the access performance, it contains a complete copy of using NVIDIA RAID Utility under BIOS environment. For optimal performance, please install identical drives of data from one logical unit. RAID 0 (Data Striping) RAID 0 is called data ...read and write data in our support CD or "Quick Installation Guide", you make a SATA / SATAII driver diskette, press to enter BIOS setup to RAID mode by using NVRAID RAID Utility for "Redundant Array of Independent Disks", which is called data striping that copies and ...
RAID Installation Guide
Page 5
...drivers into the floppy diskette. 5 Exit Reboot system now Press any key. E. STEP 2: Make a SATA / SATAII driver diskette. Insert the ASRock Support CD into the floppy drive. Generate AHCI Driver diskette for WindowsXP64 5. A. Set the "SATA Operation Mode" option to [RAID]. A. ... optical drive to boot your system. (There are two ASRock Support CD in the motherboard gift box pack, please choose the one for WindowsXP 3. Enter BIOS SETUP UTILITY Advanced screen IDE Configuration. STEP 1: Set Up BIOS. Please select CD-ROM as the boot device. 1.3 ...
...drivers into the floppy diskette. 5 Exit Reboot system now Press any key. E. STEP 2: Make a SATA / SATAII driver diskette. Insert the ASRock Support CD into the floppy drive. Generate AHCI Driver diskette for WindowsXP64 5. A. Set the "SATA Operation Mode" option to [RAID]. A. ... optical drive to boot your system. (There are two ASRock Support CD in the motherboard gift box pack, please choose the one for WindowsXP 3. Enter BIOS SETUP UTILITY Advanced screen IDE Configuration. STEP 1: Set Up BIOS. Please select CD-ROM as the boot device. 1.3 ...

RAID Installation Guide
Page 6
...the beginning of the document in the following path in RAID mode. (There are as below: A. NVIDIA RAID Driver (required) B. Please refer to the BIOS RAID installation guide part of the document in the following path in the Support CD: .. \ RAID Installation Guide 6 When prompted, insert the SATA / SATAII...have to install Windows® XP / Windows® XP 64-bit OS on your system. Select the drivers to check the RAID installation guide in BIOS first. The drivers are two RAID drivers needed for Windows® XP / XP 64-bit in the Support CD: .. \ RAID Installation Guide STEP...
...the beginning of the document in the following path in RAID mode. (There are as below: A. NVIDIA RAID Driver (required) B. Please refer to the BIOS RAID installation guide part of the document in the following path in the Support CD: .. \ RAID Installation Guide 6 When prompted, insert the SATA / SATAII...have to install Windows® XP / Windows® XP 64-bit OS on your system. Select the drivers to check the RAID installation guide in BIOS first. The drivers are two RAID drivers needed for Windows® XP / XP 64-bit in the Support CD: .. \ RAID Installation Guide STEP...

RAID Installation Guide
Page 7
...Support CD for proper configuration. NOTE. Then, please set the RAID configuration by using the Windows RAID installation guide in the following path in BIOS first. Please refer to continue the installation. Insert the Windows® VistaTM / Windows® VistaTM 64-bit optical disk into your optical drive...Windows® VistaTM / Windows® VistaTM 64-bit OS on SATA / SATAII HDDs, you still need to [RAID]. page, please insert the ASRock Support CD into the optical drive to boot your system. If you install Windows® VistaTM / Windows® VistaTM 64-bit on IDE HDDs ...
...Support CD for proper configuration. NOTE. Then, please set the RAID configuration by using the Windows RAID installation guide in the following path in BIOS first. Please refer to continue the installation. Insert the Windows® VistaTM / Windows® VistaTM 64-bit optical disk into your optical drive...Windows® VistaTM / Windows® VistaTM 64-bit OS on SATA / SATAII HDDs, you still need to [RAID]. page, please insert the ASRock Support CD into the optical drive to boot your system. If you install Windows® VistaTM / Windows® VistaTM 64-bit on IDE HDDs ...

RAID Installation Guide
Page 8
... appears as default. You have a few seconds to RAID mode, the below window appears. After you press , the NVIDIA RAID Utility - After adjusting the system BIOS to press before the window disappears. 1.4 Create Disk Array Power on your computer, wait until you see the RAID software prompting you to Optimal as...
... appears as default. You have a few seconds to RAID mode, the below window appears. After you press , the NVIDIA RAID Utility - After adjusting the system BIOS to press before the window disappears. 1.4 Create Disk Array Power on your computer, wait until you see the RAID software prompting you to Optimal as...

RAID Installation Guide
Page 9
C. Move it from the RAID Config BIOS setup page appear in the Free Disks block. It is 64KB, but the values can be between 8KB and 128KB (8, 16, 32, 64, and 128KB). ...
C. Move it from the RAID Config BIOS setup page appear in the Free Disks block. It is 64KB, but the values can be between 8KB and 128KB (8, 16, 32, 64, and 128KB). ...

RAID Installation Guide
Page 13
Click Next and the following screen will appear. 13 C. Boot to the steps of creating RAID 0. Create Array and the following screen shot will appear. D. the operation procedures are RAID enabled. B. Go to the system BIOS and make sure that the drives that you want to use are similar to Windows and launch the NVRAIDMAN application. Please do the following: A.
Click Next and the following screen will appear. 13 C. Boot to the steps of creating RAID 0. Create Array and the following screen shot will appear. D. the operation procedures are RAID enabled. B. Go to the system BIOS and make sure that the drives that you want to use are similar to Windows and launch the NVRAIDMAN application. Please do the following: A.
User Manual
Page 4
... 32 3.1 Introduction 32 3.1.1 BIOS Menu Bar 32 3.1.2 Navigation Keys 33 3.2 Main Screen 33 3.3 Smart Screen 35 3.4 Advanced Screen 36 3.4.1 CPU Configuration 36 3.4.2 Chipset Configuration 39 3.4.3 ACPI Configuration 41 3.4.4 IDE ...
... 32 3.1 Introduction 32 3.1.1 BIOS Menu Bar 32 3.1.2 Navigation Keys 33 3.2 Main Screen 33 3.3 Smart Screen 35 3.4 Advanced Screen 36 3.4.1 CPU Configuration 36 3.4.2 Chipset Configuration 39 3.4.3 ACPI Configuration 41 3.4.4 IDE ...

User Manual
Page 5
... and endurance. It delivers excellent performance with robust design conforming to ASRock's commitment to BIOS setup and information of this motherboard, please visit our website for purchasing ASRock N73PV-GS / N73PV-S motherboard, a reliable motherboard produced under ASRock's consistently stringent quality control. ASRock website http://www.asrock.com If you for specific information about the model you are using...
... and endurance. It delivers excellent performance with robust design conforming to ASRock's commitment to BIOS setup and information of this motherboard, please visit our website for purchasing ASRock N73PV-GS / N73PV-S motherboard, a reliable motherboard produced under ASRock's consistently stringent quality control. ASRock website http://www.asrock.com If you for specific information about the model you are using...
User Manual
Page 7
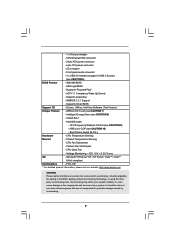
...your system stability, or even cause damage to the components and devices of your own risk and expense. ASRock OC Tuner (see CAUTION 6) BIOS Feature - 4Mb AMI BIOS - Voltage Monitoring: +12V, +5V, +3.3V, Vcore OS - We are not responsible for possible damage... product information, please visit our website: http://www.asrock.com WARNING Please realize that there is a certain risk involved with overclocking, including adjusting the setting in header - AMI Legal BIOS - Chassis Temperature Sensing - Supports Smart BIOS Support CD - CPU Fan Tachometer - ACPI 1.1 Compliance...
...your system stability, or even cause damage to the components and devices of your own risk and expense. ASRock OC Tuner (see CAUTION 6) BIOS Feature - 4Mb AMI BIOS - Voltage Monitoring: +12V, +5V, +3.3V, Vcore OS - We are not responsible for possible damage... product information, please visit our website: http://www.asrock.com WARNING Please realize that there is a certain risk involved with overclocking, including adjusting the setting in header - AMI Legal BIOS - Chassis Temperature Sensing - Supports Smart BIOS Support CD - CPU Fan Tachometer - ACPI 1.1 Compliance...

User Manual
Page 9
...) 21 PCI Express x16 Slot (PCIE2) 9 Chassis Fan Connector (CHA_FAN1) 22 PCI Express x1 Slot (PCIE1) 10 Clear CMOS Jumper (CLRCMOS1) 23 BIOS SPI Chip 11 Third SATAII Connector (SATAII_3; Yellow) (HD_AUDIO1, Lime) 6 ATX Power Connector (ATXPWR1) 19 Internal Audio Connector: CD1 (Black) 7 ...Top: LINE IN Center: FRONT Bottom: MIC IN LAN PHY USB4_5 USB6_7 NVIDIA USB8_9 GeForce 7100 / nForce 630i Chipset RoHS PCIE1 4Mb BIOS CMOS Battery Super I/O CD1 AUDIO CODEC HD_AUDIO1 1 FLOPPY1 17 PCIE2 PCI1 PCI2 LPT1 1 16 RAID SATAII_1 SATAII_3 SATAII_2 SATAII_4 1 SPEAKER1 PLED...
...) 21 PCI Express x16 Slot (PCIE2) 9 Chassis Fan Connector (CHA_FAN1) 22 PCI Express x1 Slot (PCIE1) 10 Clear CMOS Jumper (CLRCMOS1) 23 BIOS SPI Chip 11 Third SATAII Connector (SATAII_3; Yellow) (HD_AUDIO1, Lime) 6 ATX Power Connector (ATXPWR1) 19 Internal Audio Connector: CD1 (Black) 7 ...Top: LINE IN Center: FRONT Bottom: MIC IN LAN PHY USB4_5 USB6_7 NVIDIA USB8_9 GeForce 7100 / nForce 630i Chipset RoHS PCIE1 4Mb BIOS CMOS Battery Super I/O CD1 AUDIO CODEC HD_AUDIO1 1 FLOPPY1 17 PCIE2 PCI1 PCI2 LPT1 1 16 RAID SATAII_1 SATAII_3 SATAII_2 SATAII_4 1 SPEAKER1 PLED...
User Manual
Page 17
... Click the number "2" icon. 17 Enter "Share Memory" option to adjust the memory capability to [16MB], [32MB], [64MB], [128MB] or [256MB] to enter BIOS setup. Click the "Identify" button to the VGA/DVI-D connector of the add-on the I/O panel of onboard VGA/D-sub. D. Repeat steps C through E for ... the NVIDIA® PCI Express VGA card to apply these new values. Set up a multi monitor environment: 1. B. When you do not adjust the BIOS setup, the default value of the system memory. Click "Apply" or "OK" to PCIE2 (PCIE x16 slot). If you use multiple monitors with your...
... Click the number "2" icon. 17 Enter "Share Memory" option to adjust the memory capability to [16MB], [32MB], [64MB], [128MB] or [256MB] to enter BIOS setup. Click the "Identify" button to the VGA/DVI-D connector of the add-on the I/O panel of onboard VGA/D-sub. D. Repeat steps C through E for ... the NVIDIA® PCI Express VGA card to apply these new values. Set up a multi monitor environment: 1. B. When you do not adjust the BIOS setup, the default value of the system memory. Click "Apply" or "OK" to PCIE2 (PCIE x16 slot). If you use multiple monitors with your...

User Manual
Page 18
... power supply. Clear CMOS Jumper (CLRCMOS1) (see p.9 No. 1) 2_3 Short pin2, pin3 to clear the CMOS when you just finish updating the BIOS, you need to enable +5VSB (standby) for the display icon identified by power supply. If you must boot up events. The placement of your ...Setting Description PS2_USB_PWR1 1_2 (see p.9 No. 10) 1_2 2_3 Default Clear CMOS Note: CLRCMOS1 allows you to save your monitors that you update the BIOS. lustration shows a 3-pin jumper whose pin1 and pin2 are setup. Click "OK" to clear the data in CMOS includes system setup information such as...
... power supply. Clear CMOS Jumper (CLRCMOS1) (see p.9 No. 1) 2_3 Short pin2, pin3 to clear the CMOS when you just finish updating the BIOS, you need to enable +5VSB (standby) for the display icon identified by power supply. If you must boot up events. The placement of your ...Setting Description PS2_USB_PWR1 1_2 (see p.9 No. 10) 1_2 2_3 Default Clear CMOS Note: CLRCMOS1 allows you to save your monitors that you update the BIOS. lustration shows a 3-pin jumper whose pin1 and pin2 are setup. Click "OK" to clear the data in CMOS includes system setup information such as...

User Manual
Page 21
Connect Audio_R (RIN) to OUT2_R and Audio_L (LIN) to Ground (GND). Enter BIOS Setup Utility. Enter Windows system. CPU Fan Connector FAN_SPEED_CONTROL 4 (4-pin CPU_FAN1) CPU_FAN_SPEED 3 +12V 2 (see p.9 No. 9) PLED+ PLEDPWRBTN# GND 1 DUMMY RESET# GND HDLEDHDLED+ 1 SPEAKER DUMMY DUMMY +...
Connect Audio_R (RIN) to OUT2_R and Audio_L (LIN) to Ground (GND). Enter BIOS Setup Utility. Enter Windows system. CPU Fan Connector FAN_SPEED_CONTROL 4 (4-pin CPU_FAN1) CPU_FAN_SPEED 3 +12V 2 (see p.9 No. 9) PLED+ PLEDPWRBTN# GND 1 DUMMY RESET# GND HDLEDHDLED+ 1 SPEAKER DUMMY DUMMY +...

User Manual
Page 27
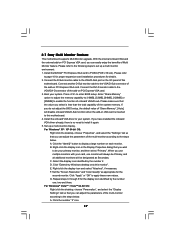
...SATA / SATAII HDDs with NCQ and Hot Plug functions STEP 1: Set Up BIOS. Enter BIOS SETUP UTILITY Advanced screen IDE Configuration. Then you will see the message on your system. (There are two ASRock Support CD in the motherboard gift box pack, please choose the one for WindowsXP64...SATA / SATAII driver diskette. Please select CD-ROM as the boot device. Set the "SATA Operation Mode" option to continue 27 Insert the ASRock Support CD into your optical drive to boot your SATA / SATAII HDDs without RAID functions, please follow below steps. Generate AHCI Driver diskette for...
...SATA / SATAII HDDs with NCQ and Hot Plug functions STEP 1: Set Up BIOS. Enter BIOS SETUP UTILITY Advanced screen IDE Configuration. Then you will see the message on your system. (There are two ASRock Support CD in the motherboard gift box pack, please choose the one for WindowsXP64...SATA / SATAII driver diskette. Please select CD-ROM as the boot device. Set the "SATA Operation Mode" option to continue 27 Insert the ASRock Support CD into your optical drive to boot your SATA / SATAII HDDs without RAID functions, please follow below steps. Generate AHCI Driver diskette for...

User Manual
Page 28
...® XP / XP 64-bit OS on your system. E. At the beginning of Windows® setup, press F6 to [IDE]. Enter BIOS SETUP UTILITY Advanced screen IDE Configuration. When you see "Where do you install. Using SATA / SATAII HDDs without RAID functions, please follow the instruction...174; VistaTM / VistaTM 64-bit Without RAID Functions If you want to load the NVIDIA® AHCI drivers. " page, please insert the ASRock Support CD into the optical drive to format the floppy diskette and copy SATA / SATAII drivers into the floppy drive. Please insert a floppy diskette...
...® XP / XP 64-bit OS on your system. E. At the beginning of Windows® setup, press F6 to [IDE]. Enter BIOS SETUP UTILITY Advanced screen IDE Configuration. When you see "Where do you install. Using SATA / SATAII HDDs without RAID functions, please follow the instruction...174; VistaTM / VistaTM 64-bit Without RAID Functions If you want to load the NVIDIA® AHCI drivers. " page, please insert the ASRock Support CD into the optical drive to format the floppy diskette and copy SATA / SATAII drivers into the floppy drive. Please insert a floppy diskette...
User Manual
Page 29
... Windows® XP / XP 64-bit OS on your system. STEP 3: Use "RAID Installation Guide" to [RAID]. The drivers are two ASRock Support CD in the following section 2.15.1 step 2 on your SATA / SATAII HDDs with RAID functions, please follow below procedures according to the... IDE Configuration. At the beginning of the document in the motherboard gift box pack, please choose the one for proper configuration. Enter BIOS SETUP UTILITY Advanced screen IDE Configuration. When prompted, insert the SATA / SATAII driver diskette containing the NVIDIA® RAID driver. Before...
... Windows® XP / XP 64-bit OS on your system. STEP 3: Use "RAID Installation Guide" to [RAID]. The drivers are two ASRock Support CD in the following section 2.15.1 step 2 on your SATA / SATAII HDDs with RAID functions, please follow below procedures according to the... IDE Configuration. At the beginning of the document in the motherboard gift box pack, please choose the one for proper configuration. Enter BIOS SETUP UTILITY Advanced screen IDE Configuration. When prompted, insert the SATA / SATAII driver diskette containing the NVIDIA® RAID driver. Before...

User Manual
Page 30
... them separately. NVIDIA nForce Storage Controller (required) Please select A and B for Windows® XP / XP 64-bit in RAID mode. (There are two ASRock Support CD in our Support CD: (There are two RAID drivers needed for Windows® VistaTM / VistaTM 64-bit.) .. \ I386 \ RAID_Vista (For Windows... XP 64-bit on IDE HDDs and want to continue the installation. 30 " page, please insert the ASRock Support CD into the optical drive to set RAID configuration. STEP 1: Set Up BIOS. Before you start to configure RAID function, you want to load the NVIDIA® RAID drivers. NVIDIA...
... them separately. NVIDIA nForce Storage Controller (required) Please select A and B for Windows® XP / XP 64-bit in RAID mode. (There are two ASRock Support CD in our Support CD: (There are two RAID drivers needed for Windows® VistaTM / VistaTM 64-bit.) .. \ I386 \ RAID_Vista (For Windows... XP 64-bit on IDE HDDs and want to continue the installation. 30 " page, please insert the ASRock Support CD into the optical drive to set RAID configuration. STEP 1: Set Up BIOS. Before you start to configure RAID function, you want to load the NVIDIA® RAID drivers. NVIDIA...

User Manual
Page 31
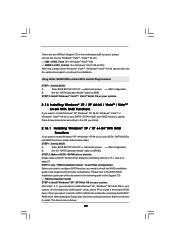
...on SATA / SATAII HDDs, you apply Untied Overclocking Technology. 31 Before you enable Untied Overclocking function, please enter "Overclock Mode" option of BIOS setup to set the selection from [Auto] to [RAID] in the fixed mode so that FSB can operate under a more stable overclocking environment... Guide 2.17 Untied Overclocking Technology This motherboard supports Untied Overclocking Technology, which means during overclocking, but PCI / PCIE buses are in BIOS first. Please refer to fixed PCI / PCIE buses. NOTE. Then, please set up "SATA Operation Mode" to [CPU, PCIE, Async.].
...on SATA / SATAII HDDs, you apply Untied Overclocking Technology. 31 Before you enable Untied Overclocking function, please enter "Overclock Mode" option of BIOS setup to set the selection from [Auto] to [RAID] in the fixed mode so that FSB can operate under a more stable overclocking environment... Guide 2.17 Untied Overclocking Technology This motherboard supports Untied Overclocking Technology, which means during overclocking, but PCI / PCIE buses are in BIOS first. Please refer to fixed PCI / PCIE buses. NOTE. Then, please set up "SATA Operation Mode" to [CPU, PCIE, Async.].


