User Manual
Page 5
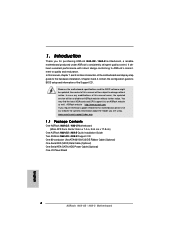
...the updated version will be updated, the content of this motherboard, please visit our website for specific information about the model you for purchasing ASRock N68-GS / N68-S motherboard, a reliable motherboard produced under ASRock's consistently stringent quality control. Chapter 3 and 4 contain... support lists on ASRock website without notice. www.asrock.com/support/index.asp 1.1 Package Contents One ASRock N68-GS / N68-S Motherboard (Micro ATX Form Factor: 9.6-in x 7.0-in, 24.4 cm x 17.8 cm) One ASRock N68-GS / N68-S Quick Installation Guide Two ASRock N68-GS / N68-S Support CD One...
...the updated version will be updated, the content of this motherboard, please visit our website for specific information about the model you for purchasing ASRock N68-GS / N68-S motherboard, a reliable motherboard produced under ASRock's consistently stringent quality control. Chapter 3 and 4 contain... support lists on ASRock website without notice. www.asrock.com/support/index.asp 1.1 Package Contents One ASRock N68-GS / N68-S Motherboard (Micro ATX Form Factor: 9.6-in x 7.0-in, 24.4 cm x 17.8 cm) One ASRock N68-GS / N68-S Quick Installation Guide Two ASRock N68-GS / N68-S Support CD One...
User Manual
Page 11
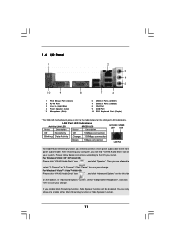
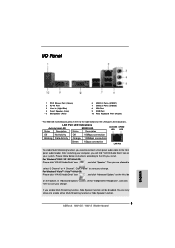
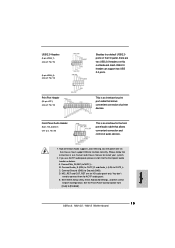
... 3 Line In (Light Blue) 4 Front Speaker (Lime) * 5 Microphone (Pink) 7 6 6 USB 2.0 Ports (USB01) 7 USB 2.0 Ports (USB23) 8 VGA Port 9 COM Port 10 PS/2 Keyboard Port (Purple) * For N68-GS motherboard, please refer to the table below instructions according to the OS you install.
... 3 Line In (Light Blue) 4 Front Speaker (Lime) * 5 Microphone (Pink) 7 6 6 USB 2.0 Ports (USB01) 7 USB 2.0 Ports (USB23) 8 VGA Port 9 COM Port 10 PS/2 Keyboard Port (Purple) * For N68-GS motherboard, please refer to the table below instructions according to the OS you install.
User Manual
Page 14
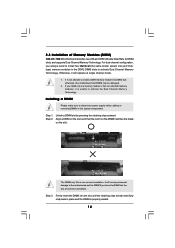
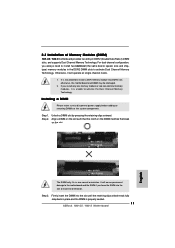
...break The DIMM only fits in one memory module or two non-identical memory modules, it will cause permanent damage to the motherboard and the DIMM if you always need to disconnect power supply before adding or removing DIMMs or the system components. If ...It will operate at single channel mode. 1. Otherwise, it is properly seated. 14 Step 1. Step 3. 2.3 Installation of Memory Modules (DIMM) N68-GS / N68-S motherboard provides two 240-pin DDR2 (Double Data Rate 2) DIMM slots, and supports Dual Channel Memory Technology. Installing a DIMM Please make sure to install ...
...break The DIMM only fits in one memory module or two non-identical memory modules, it will cause permanent damage to the motherboard and the DIMM if you always need to disconnect power supply before adding or removing DIMMs or the system components. If ...It will operate at single channel mode. 1. Otherwise, it is properly seated. 14 Step 1. Step 3. 2.3 Installation of Memory Modules (DIMM) N68-GS / N68-S motherboard provides two 240-pin DDR2 (Double Data Rate 2) DIMM slots, and supports Dual Channel Memory Technology. Installing a DIMM Please make sure to install ...
Quick Installation Guide
Page 1
... this guide may or may apply, see www.dtsc.ca.gov/hazardouswaste/perchlorate" ASRock Website: http://www.asrock.com Published August 2009 Copyright©2009 ASRock INC. In no responsibility for identification or explanation and to infringe. All rights reserved. 1 ASRock N68-GS / N68-S Motherboard English When you discard the Lithium battery in California, USA, please follow the...
... this guide may or may apply, see www.dtsc.ca.gov/hazardouswaste/perchlorate" ASRock Website: http://www.asrock.com Published August 2009 Copyright©2009 ASRock INC. In no responsibility for identification or explanation and to infringe. All rights reserved. 1 ASRock N68-GS / N68-S Motherboard English When you discard the Lithium battery in California, USA, please follow the...

Quick Installation Guide
Page 2
Motherboard Layout English 1 PS2_USB_PW1 Jumper 2 CPU Fan Connector (CPU_FAN1) 3 2 x 240-pin DDR2 DIMM Slots (Dual Channel: DDRII_1, DDRII_2; Yellow) 4 ATX Power Connector (ATXPWR1) 5 SATAII Connector (SATAII_2 (... Slot (PCIE2) 23 PCI Express x1 Slot (PCIE1) 24 ATX 12V Power Connector (ATX12V1) 25 CPU Heatsink Retention Module 26 AM2 940-Pin CPU Socket 2 ASRock N68-GS / N68-S Motherboard
Motherboard Layout English 1 PS2_USB_PW1 Jumper 2 CPU Fan Connector (CPU_FAN1) 3 2 x 240-pin DDR2 DIMM Slots (Dual Channel: DDRII_1, DDRII_2; Yellow) 4 ATX Power Connector (ATXPWR1) 5 SATAII Connector (SATAII_2 (... Slot (PCIE2) 23 PCI Express x1 Slot (PCIE1) 24 ATX 12V Power Connector (ATX12V1) 25 CPU Heatsink Retention Module 26 AM2 940-Pin CPU Socket 2 ASRock N68-GS / N68-S Motherboard
Quick Installation Guide
Page 3
... (Lime) * 5 Microphone (Pink) 6 USB 2.0 Ports (USB01) 7 USB 2.0 Ports (USB23) 8 VGA Port 9 COM Port 10 PS/2 Keyboard Port (Purple) * For N68-GS motherboard, please refer to enable either Multi-Streaming function or Side Speaker function. 3 ASRock N68-GS / N68-S Motherboard English For Windows® 2000 / XP / XP 64-bit OS: Please click "VIA HD Audio Deck" icon , and click...
... (Lime) * 5 Microphone (Pink) 6 USB 2.0 Ports (USB01) 7 USB 2.0 Ports (USB23) 8 VGA Port 9 COM Port 10 PS/2 Keyboard Port (Purple) * For N68-GS motherboard, please refer to enable either Multi-Streaming function or Side Speaker function. 3 ASRock N68-GS / N68-S Motherboard English For Windows® 2000 / XP / XP 64-bit OS: Please click "VIA HD Audio Deck" icon , and click...
Quick Installation Guide
Page 4
.... You may find the latest VGA cards and CPU support lists on ASRock website without notice. www.asrock.com/support/index.asp 1.1 Package Contents One ASRock N68-GS / N68-S Motherboard (Micro ATX Form Factor: 9.6-in x 7.0-in, 24.4 cm x 17.8 cm) One ASRock N68-GS / N68-S Quick Installation Guide Two ASRock N68-GS / N68-S Support CD One 80-conductor Ultra ATA 66/100/133 IDE Ribbon...
.... You may find the latest VGA cards and CPU support lists on ASRock website without notice. www.asrock.com/support/index.asp 1.1 Package Contents One ASRock N68-GS / N68-S Motherboard (Micro ATX Form Factor: 9.6-in x 7.0-in, 24.4 cm x 17.8 cm) One ASRock N68-GS / N68-S Quick Installation Guide Two ASRock N68-GS / N68-S Support CD One 80-conductor Ultra ATA 66/100/133 IDE Ribbon...

Quick Installation Guide
Page 5
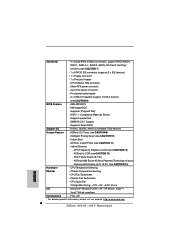
... HD Audio (VIA® VT1708S / VT1705 Audio Codec) - Integrated NVIDIA® GeForce 7025 graphics - N68-GS Realtek Giga PHY RTL8211CL, speed 10/100/1000 Mb/s - N68-S Realtek PHY RTL8201EL / 8201CL, speed 10/100 Mb/s - Support for Socket AM2+ / AM2 processors:... Technology (see CAUTION 3) - 2 x DDR2 DIMM slots - Max. Micro ATX Form Factor: 9.6-in x 7.0-in / Front Speaker / Microphone English 5 ASRock N68-GS / N68-S Motherboard Supports AMD's Cool 'n' QuietTM Technology - NVIDIA® GeForce 7025 / nForce 630a - Dual Channel DDR2 Memory Technology (see CAUTION 2) - DX9.0 VGA, ...
... HD Audio (VIA® VT1708S / VT1705 Audio Codec) - Integrated NVIDIA® GeForce 7025 graphics - N68-GS Realtek Giga PHY RTL8211CL, speed 10/100/1000 Mb/s - N68-S Realtek PHY RTL8201EL / 8201CL, speed 10/100 Mb/s - Support for Socket AM2+ / AM2 processors:... Technology (see CAUTION 3) - 2 x DDR2 DIMM slots - Max. Micro ATX Form Factor: 9.6-in x 7.0-in / Front Speaker / Microphone English 5 ASRock N68-GS / N68-S Motherboard Supports AMD's Cool 'n' QuietTM Technology - NVIDIA® GeForce 7025 / nForce 630a - Dual Channel DDR2 Memory Technology (see CAUTION 2) - DX9.0 VGA, ...
Quick Installation Guide
Page 6
...- 4 pin 12V power connector - Front panel audio header - 2 x USB 2.0 headers (support 4 USB 2.0 ports) (see CAUTION 14) Hardware - AMI Legal BIOS - Hybrid Booster: - ASRock AM2 Boost: ASRock Patented Technology to boost memory performance up to 12.5% (see CAUTION 8) BIOS Feature - 4Mb AMI BIOS - CPU Fan Tachometer - Voltage Monitoring: +12V, +5V, +3.3V...174; 2000 / XP / XP 64-bit / VistaTM / VistaTM 64-bit compliant Certifications - FCC, CE * For detailed product information, please visit our website: http://www.asrock.com 6 ASRock N68-GS / N68-S Motherboard
...- 4 pin 12V power connector - Front panel audio header - 2 x USB 2.0 headers (support 4 USB 2.0 ports) (see CAUTION 14) Hardware - AMI Legal BIOS - Hybrid Booster: - ASRock AM2 Boost: ASRock Patented Technology to boost memory performance up to 12.5% (see CAUTION 8) BIOS Feature - 4Mb AMI BIOS - CPU Fan Tachometer - Voltage Monitoring: +12V, +5V, +3.3V...174; 2000 / XP / XP 64-bit / VistaTM / VistaTM 64-bit compliant Certifications - FCC, CE * For detailed product information, please visit our website: http://www.asrock.com 6 ASRock N68-GS / N68-S Motherboard
Quick Installation Guide
Page 7
... overclocking tools. You can also connect SATA hard disk to 95W. It is a user-friendly ASRock overclocking tool which allows you adopt. CAUTION! 1. This motherboard supports Untied Overclocking Technology. ASRock website http://www.asrock.com 5. ASRock website: http://www.asrock.com 7 ASRock N68-GS / N68-S Motherboard English It should be less than 4GB for the reservation for the operation procedures of...
... overclocking tools. You can also connect SATA hard disk to 95W. It is a user-friendly ASRock overclocking tool which allows you adopt. CAUTION! 1. This motherboard supports Untied Overclocking Technology. ASRock website http://www.asrock.com 5. ASRock website: http://www.asrock.com 7 ASRock N68-GS / N68-S Motherboard English It should be less than 4GB for the reservation for the operation procedures of...
Quick Installation Guide
Page 8
.... In other words, it may cause the instability of your system. 8 ASRock N68-GS / N68-S Motherboard English Please be applicative to access ASRock Instant Flash. If you enable this utility, you can not guarantee the system stability for all CPU/DRAM configurations. This motherboard supports ASRock AM2 Boost overclocking technology. However, we can press key during the POST...
.... In other words, it may cause the instability of your system. 8 ASRock N68-GS / N68-S Motherboard English Please be applicative to access ASRock Instant Flash. If you enable this utility, you can not guarantee the system stability for all CPU/DRAM configurations. This motherboard supports ASRock AM2 Boost overclocking technology. However, we can press key during the POST...
Quick Installation Guide
Page 9
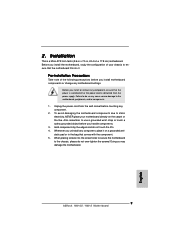
...to do so may damage the motherboard. 9 ASRock N68-GS / N68-S Motherboard English To avoid damaging the motherboard components due to ensure that comes with the component. 5. Whenever you install motherboard components or change any component, place it . Before you install the motherboard, study the configuration of the... or the power cord is a Micro ATX form factor (9.6-in x 7.0-in the bag that the motherboard fits into the screw holes to secure the motherboard to the motherboard, peripherals, and/or components. 1. 2. Doing so may cause severe damage to the chassis, please ...
...to do so may damage the motherboard. 9 ASRock N68-GS / N68-S Motherboard English To avoid damaging the motherboard components due to ensure that comes with the component. 5. Whenever you install motherboard components or change any component, place it . Before you install the motherboard, study the configuration of the... or the power cord is a Micro ATX form factor (9.6-in x 7.0-in the bag that the motherboard fits into the screw holes to secure the motherboard to the motherboard, peripherals, and/or components. 1. 2. Doing so may cause severe damage to the chassis, please ...
Quick Installation Guide
Page 10
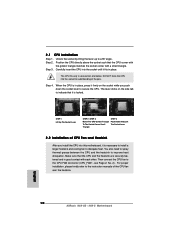
...socket while you install the CPU into the socket to a 90o angle. Then connect the CPU fan to improve heat dissipation. English 10 ASRock N68-GS / N68-S Motherboard Position the CPU directly above the socket such that the CPU and the heatsink are securely fastened and in one correct orientation. Step 4. ...For proper installation, please kindly refer to secure the CPU. DO NOT force the CPU into this motherboard, it fits in place, press it is necessary to install a larger heatsink and cooling fan to dissipate heat. You also need to spray...
...socket while you install the CPU into the socket to a 90o angle. Then connect the CPU fan to improve heat dissipation. English 10 ASRock N68-GS / N68-S Motherboard Position the CPU directly above the socket such that the CPU and the heatsink are securely fastened and in one correct orientation. Step 4. ...For proper installation, please kindly refer to secure the CPU. DO NOT force the CPU into this motherboard, it fits in place, press it is necessary to install a larger heatsink and cooling fan to dissipate heat. You also need to spray...
Quick Installation Guide
Page 11
2.3 Installation of Memory Modules (DIMM) N68-GS / N68-S motherboard provides two 240-pin DDR2 (Double Data Rate 2)...DIMM slot by pressing the retaining clips outward. Step 3. Firmly insert the DIMM into DDR2 slot; otherwise, this motherboard and DIMM may be damaged. 2. For dual channel configuration, you always need to install two identical (the same... correct orientation. English The DIMM only fits in place and the DIMM is properly seated. 11 ASRock N68-GS / N68-S Motherboard It will operate at single channel mode. 1. Installing a DIMM Please make sure to install a...
2.3 Installation of Memory Modules (DIMM) N68-GS / N68-S motherboard provides two 240-pin DDR2 (Double Data Rate 2)...DIMM slot by pressing the retaining clips outward. Step 3. Firmly insert the DIMM into DDR2 slot; otherwise, this motherboard and DIMM may be damaged. 2. For dual channel configuration, you always need to install two identical (the same... correct orientation. English The DIMM only fits in place and the DIMM is properly seated. 11 ASRock N68-GS / N68-S Motherboard It will operate at single channel mode. 1. Installing a DIMM Please make sure to install a...
Quick Installation Guide
Page 12
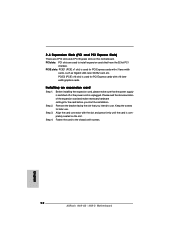
...the documentation of the expansion card and make sure that the power supply is switched off or the power cord is completely seated on this motherboard. Step 3. PCIE2 (PCIE x16 slot) is used to install expansion cards that you start the installation. Step 2. PCIE slots: PCIE1...graphics cards. 2.4 Expansion Slots (PCI and PCI Express Slots) There are used for later use . Align the card connector with screws. 12 ASRock N68-GS / N68-S Motherboard English Fasten the card to use . PCI slots: PCI slots are 2 PCI slots and 2 PCI Express slots on the slot. Installing an...
...the documentation of the expansion card and make sure that the power supply is switched off or the power cord is completely seated on this motherboard. Step 3. PCIE2 (PCIE x16 slot) is used to install expansion cards that you start the installation. Step 2. PCIE slots: PCIE1...graphics cards. 2.4 Expansion Slots (PCI and PCI Express Slots) There are used for later use . Align the card connector with screws. 12 ASRock N68-GS / N68-S Motherboard English Fasten the card to use . PCI slots: PCI slots are 2 PCI slots and 2 PCI Express slots on the slot. Installing an...
Quick Installation Guide
Page 13
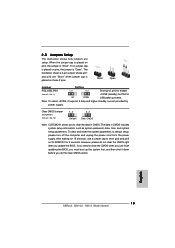
... for PS/2 or USB wake up the system first, and then shut it requires 2 Amp and higher standby current provided by power supply. English 13 ASRock N68-GS / N68-S Motherboard Clear CMOS Jumper (CLRCMOS1) (see p.2, No. 1) +5VSB (standby) for 15 seconds, use a jumper cap to clear the data in CMOS includes system setup information such...
... for PS/2 or USB wake up the system first, and then shut it requires 2 Amp and higher standby current provided by power supply. English 13 ASRock N68-GS / N68-S Motherboard Clear CMOS Jumper (CLRCMOS1) (see p.2, No. 1) +5VSB (standby) for 15 seconds, use a jumper cap to clear the data in CMOS includes system setup information such...
Quick Installation Guide
Page 14
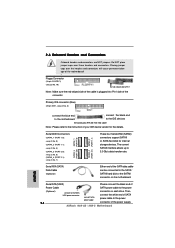
...2.0): see p.2, No. 8) (SATAII_4 (PORT 2.1): see p.2 No. 19) the red-striped side to the power supply connector on the motherboard. The current SATAII interface allows up to the instruction of the power supply. age of the connector. Serial ATA (SATA) Data Cable (...motherboard connect the black end to the IDE devices 80-conductor ATA 66/100/133 cable Note: Please refer to 3.0 Gb/s data transfer rate. Placing jumper caps over these headers and connectors. Do NOT place jumper caps over the headers and connectors will cause permanent dam- ASRock N68-GS / N68-S Motherboard...
...2.0): see p.2, No. 8) (SATAII_4 (PORT 2.1): see p.2 No. 19) the red-striped side to the power supply connector on the motherboard. The current SATAII interface allows up to the instruction of the power supply. age of the connector. Serial ATA (SATA) Data Cable (...motherboard connect the black end to the IDE devices 80-conductor ATA 66/100/133 cable Note: Please refer to 3.0 Gb/s data transfer rate. Placing jumper caps over these headers and connectors. Do NOT place jumper caps over the headers and connectors will cause permanent dam- ASRock N68-GS / N68-S Motherboard...
Quick Installation Guide
Page 15
...LIN) to the front panel audio header as below: A. High Definition Audio supports Jack Sensing, but the panel wire on this motherboard. If you use AC'97 audio panel, please install it to OUT2_L. You don't need to MIC2_L. Front Panel Audio Header ...interface for the front panel audio cable that allows convenient connection of audio devices. 1. E. Connect Ground (GND) to [Enabled]. 15 ASRock N68-GS / N68-S Motherboard English B. Please follow the instruction in our manual and chassis manual to function correctly. D. Enter BIOS Setup Utility. Enter Advanced Settings,...
...LIN) to the front panel audio header as below: A. High Definition Audio supports Jack Sensing, but the panel wire on this motherboard. If you use AC'97 audio panel, please install it to OUT2_L. You don't need to MIC2_L. Front Panel Audio Header ...interface for the front panel audio cable that allows convenient connection of audio devices. 1. E. Connect Ground (GND) to [Enabled]. 15 ASRock N68-GS / N68-S Motherboard English B. Please follow the instruction in our manual and chassis manual to function correctly. D. Enter BIOS Setup Utility. Enter Advanced Settings,...
Quick Installation Guide
Page 16
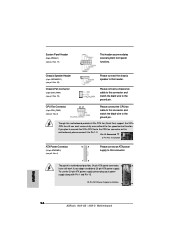
If you plan to connect the 3-Pin CPU fan to the CPU fan connector on this motherboard, please connect it to this connector. 1 13 Though this motherboard provides 24-pin ATX power connector, 12 24 it can work if you adopt a traditional 20-pin ATX power supply. To...power supply, please plug your power supply along with Pin 1 and Pin 13. 20-Pin ATX Power Supply Installation 1 13 English 16 ASRock N68-GS / N68-S Motherboard Though this motherboard provides 4-Pin CPU fan (Quiet Fan) support, the 3-Pin CPU fan still can still work successfully even without the fan speed control ...
If you plan to connect the 3-Pin CPU fan to the CPU fan connector on this motherboard, please connect it to this connector. 1 13 Though this motherboard provides 24-pin ATX power connector, 12 24 it can work if you adopt a traditional 20-pin ATX power supply. To...power supply, please plug your power supply along with Pin 1 and Pin 13. 20-Pin ATX Power Supply Installation 1 13 English 16 ASRock N68-GS / N68-S Motherboard Though this motherboard provides 4-Pin CPU fan (Quiet Fan) support, the 3-Pin CPU fan still can still work successfully even without the fan speed control ...
Quick Installation Guide
Page 17
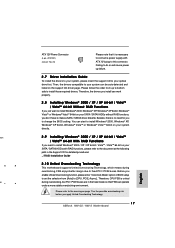
..., Async.]. Please refer to the warning on page 7 for detailed procedures: ..\ RAID Installation Guide 2 . 1 0 Untied Overclocking Technology This motherboard supports Untied Overclocking Technology, which means during overclocking, FSB enjoys better margin due to install Windows® 2000 / XP / XP 64-bit ...bit / VistaTM / VistaTM 64-bit Without RAID Functions If you to this connector. Before you apply Untied Overclocking Technology. 17 ASRock N68-GS / N68-S Motherboard English Failing to do so will cause power up to bottom side to install Windows® 2000, Windows® XP, ...
..., Async.]. Please refer to the warning on page 7 for detailed procedures: ..\ RAID Installation Guide 2 . 1 0 Untied Overclocking Technology This motherboard supports Untied Overclocking Technology, which means during overclocking, FSB enjoys better margin due to install Windows® 2000 / XP / XP 64-bit ...bit / VistaTM / VistaTM 64-bit Without RAID Functions If you to this connector. Before you apply Untied Overclocking Technology. 17 ASRock N68-GS / N68-S Motherboard English Failing to do so will cause power up to bottom side to install Windows® 2000, Windows® XP, ...

