RAID Installation Guide
Page 6
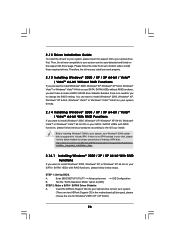
... BIOS RAID installation guide part of Windows® setup, press F6 to install a third-party RAID driver. Before you start to configure RAID function, you install Windows® 2000 / Windows® XP / Windows® XP 64-bit on IDE HDDs and want to install Windows® VistaTM / Windows® VistaTM 64-bit on your SATA / SATAII HDDs with RAID functions, please follow the instruction to install Windows® VistaTM / Windows® VistaTM 64-bit OS on your system. After reading the floppy disk, the driver...
... BIOS RAID installation guide part of Windows® setup, press F6 to install a third-party RAID driver. Before you start to configure RAID function, you install Windows® 2000 / Windows® XP / Windows® XP 64-bit on IDE HDDs and want to install Windows® VistaTM / Windows® VistaTM 64-bit on your SATA / SATAII HDDs with RAID functions, please follow the instruction to install Windows® VistaTM / Windows® VistaTM 64-bit OS on your system. After reading the floppy disk, the driver...
RAID Installation Guide
Page 11
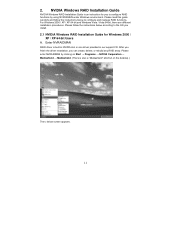
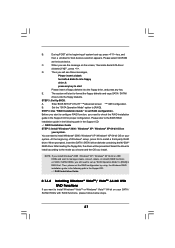
... the desktop.) Then, below screen appears. 11 NVIDIA Windows RAID Installation Guide NVIDIA Windows RAID Installation Guide is also a "Mediashield" shortcut on Start → Programs → NVIDIA Corporation → Mediashield → Mediashield. (There is an instruction for Windows 2000 / XP / XP 64-bit Users A. For Windows 2000 / XP / XP 64-bit and Windows Vista / Vista 64-bit, there are different installation procedures. Please enter NVRAIDMAN by using NVIDIAMAN under Windows environment. Enter NVRAIDMAN RAID driver is...
... the desktop.) Then, below screen appears. 11 NVIDIA Windows RAID Installation Guide NVIDIA Windows RAID Installation Guide is also a "Mediashield" shortcut on Start → Programs → NVIDIA Corporation → Mediashield → Mediashield. (There is an instruction for Windows 2000 / XP / XP 64-bit Users A. For Windows 2000 / XP / XP 64-bit and Windows Vista / Vista 64-bit, there are different installation procedures. Please enter NVRAIDMAN by using NVIDIAMAN under Windows environment. Enter NVRAIDMAN RAID driver is...
User Manual
Page 3
... 3.2 Main Screen 30 3.3 Smart Screen 32 3.4 Advanced Screen 33 3.4.1 CPU Configuration 33 3.4.2 Chipset Configuration 37 3.4.3 ACPI Configuration 39 3 Installation 12 Pre-installation Precautions 12 2.1 CPU Installation 13 2.2 Installation of CPU Fan and Heatsink 13 2.3 Installation of Memory Modules (DIMM 14 2.4 Expansion Slots (PCI and PCI Express Slots 15 2.5 Easy Multi Monitor Feature 16 2.6 Jumpers Setup 17 2.7 Onboard Headers and Connectors 18 2.8 SATAII Hard Disk Setup Guide 22 2.9 Serial ATA (SATA) / Serial ATAII (SATAII) Hard Disks Installation 23 2.10 Hot Plug and...
... 3.2 Main Screen 30 3.3 Smart Screen 32 3.4 Advanced Screen 33 3.4.1 CPU Configuration 33 3.4.2 Chipset Configuration 37 3.4.3 ACPI Configuration 39 3 Installation 12 Pre-installation Precautions 12 2.1 CPU Installation 13 2.2 Installation of CPU Fan and Heatsink 13 2.3 Installation of Memory Modules (DIMM 14 2.4 Expansion Slots (PCI and PCI Express Slots 15 2.5 Easy Multi Monitor Feature 16 2.6 Jumpers Setup 17 2.7 Onboard Headers and Connectors 18 2.8 SATAII Hard Disk Setup Guide 22 2.9 Serial ATA (SATA) / Serial ATAII (SATAII) Hard Disks Installation 23 2.10 Hot Plug and...
User Manual
Page 7
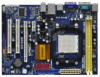
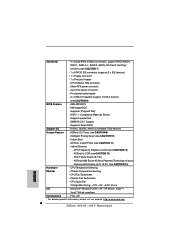
... panel audio header - 2 x USB 2.0 headers (support 4 USB 2.0 ports) (see CAUTION 7) - 1 x ATA133 IDE connector (supports 2 x IDE devices) - 1 x Floppy connector - 1 x Print port header - ASRock OC Tuner (see CAUTION 13) - ASRock U-COP (see CAUTION 9) - CPU Quiet Fan - Microsoft® Windows® 2000 / XP / XP 64-bit / VistaTM / VistaTM 64-bit compliant Certifications - Supports Smart BIOS Support CD - Instant Boot - CPU Fan Tachometer - Intelligent Energy Saver (see CAUTION 12) - AMI Legal BIOS - Chassis Fan Tachometer - CPU Frequency Stepless...
... panel audio header - 2 x USB 2.0 headers (support 4 USB 2.0 ports) (see CAUTION 7) - 1 x ATA133 IDE connector (supports 2 x IDE devices) - 1 x Floppy connector - 1 x Print port header - ASRock OC Tuner (see CAUTION 13) - ASRock U-COP (see CAUTION 9) - CPU Quiet Fan - Microsoft® Windows® 2000 / XP / XP 64-bit / VistaTM / VistaTM 64-bit compliant Certifications - Supports Smart BIOS Support CD - Instant Boot - CPU Fan Tachometer - Intelligent Energy Saver (see CAUTION 12) - AMI Legal BIOS - Chassis Fan Tachometer - CPU Frequency Stepless...
User Manual
Page 9
... BIOS only in Flash ROM. In other than the recommended CPU bus frequencies may cause the instability of your system is unstable after AM2 Boost function is enabled, it is a revolutionary technology that the USB flash drive or hard drive must use Intelligent Energy Saver function, please enable Cool 'n' Quiet option in the BIOS setup in the BIOS setup, the memory performance will overclock the chipset/CPU reference clock. If you adopt. This motherboard supports ASRock AM2 Boost overclocking technology...
... BIOS only in Flash ROM. In other than the recommended CPU bus frequencies may cause the instability of your system is unstable after AM2 Boost function is enabled, it is a revolutionary technology that the USB flash drive or hard drive must use Intelligent Energy Saver function, please enable Cool 'n' Quiet option in the BIOS setup in the BIOS setup, the memory performance will overclock the chipset/CPU reference clock. If you adopt. This motherboard supports ASRock AM2 Boost overclocking technology...
User Manual
Page 16
... additional monitors will disable onboard VGA/D-Sub function when the add-on VGA card is inserted to display a large number on PCI Express VGA card, you have installed the onboard VGA driver already, there is less than the total capability of "Share Memory", [Auto], will be your system. Click "Extend my Windows desktop onto this motherboard. 4. Connect the D-Sub monitor cable to enter BIOS setup. A. D. Repeat steps C through E for details. 2. Press to the VGA/D-Sub port on PCI Express VGA card. 3. For Windows...
... additional monitors will disable onboard VGA/D-Sub function when the add-on VGA card is inserted to display a large number on PCI Express VGA card, you have installed the onboard VGA driver already, there is less than the total capability of "Share Memory", [Auto], will be your system. Click "Extend my Windows desktop onto this motherboard. 4. Connect the D-Sub monitor cable to enter BIOS setup. A. D. Repeat steps C through E for details. 2. Press to the VGA/D-Sub port on PCI Express VGA card. 3. For Windows...
User Manual
Page 22
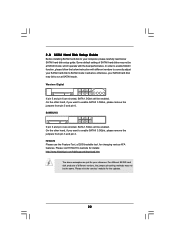
... hard disk products of SATAII hard disks may not be at SATAII mode. In order to SATAII mode in advance; otherwise, your SATAII hard disk to enable SATAII function, please follow the below SATAII hard disk setup guide. HITACHI Please use the Feature Tool, a DOS-bootable tool, for the updates. 22 Please visit the vendors' website for changing various ATA features. Some default setting of different vendors, the jumper pin setting...
... hard disk products of SATAII hard disks may not be at SATAII mode. In order to SATAII mode in advance; otherwise, your SATAII hard disk to enable SATAII function, please follow the below SATAII hard disk setup guide. HITACHI Please use the Feature Tool, a DOS-bootable tool, for the updates. 22 Please visit the vendors' website for changing various ATA features. Some default setting of different vendors, the jumper pin setting...
User Manual
Page 26
..., Windows® XP 64-bit, Windows® VistaTM or Windows® VistaTM 64-bit OS on your system. (There are two ASRock Support CD in your SATA / SATAII HDDs with RAID functions, please follow below website for proper procedures of making a SP4 disk: http://www.microsoft.com/Windows2000/downloads/servicepacks/sp4/spdeploy. STEP 1: Set Up BIOS. B. Set the "SATA Operation Mode" option to include SP4. 2.12 Driver Installation Guide To install the drivers...
..., Windows® XP 64-bit, Windows® VistaTM or Windows® VistaTM 64-bit OS on your system. (There are two ASRock Support CD in your SATA / SATAII HDDs with RAID functions, please follow below website for proper procedures of making a SP4 disk: http://www.microsoft.com/Windows2000/downloads/servicepacks/sp4/spdeploy. STEP 1: Set Up BIOS. B. Set the "SATA Operation Mode" option to include SP4. 2.12 Driver Installation Guide To install the drivers...
User Manual
Page 27
... of Windows® setup, press F6 to the BIOS RAID installation guide in the following path in the Support CD: .. \ RAID Installation Guide STEP 5: Install Windows® 2000 / Windows® XP / Windows® XP 64-bit OS on your system. Set the "SATA Operation Mode" option to start to format the floppy diskette and copy SATA / SATAII drivers into the floppy drive, and press any key to [RAID]. Please refer to install a third-party RAID driver. C. Select the driver to install according...
... of Windows® setup, press F6 to the BIOS RAID installation guide in the following path in the Support CD: .. \ RAID Installation Guide STEP 5: Install Windows® 2000 / Windows® XP / Windows® XP 64-bit OS on your system. Set the "SATA Operation Mode" option to start to format the floppy diskette and copy SATA / SATAII drivers into the floppy drive, and press any key to [RAID]. Please refer to install a third-party RAID driver. C. Select the driver to install according...
User Manual
Page 28
... set RAID configuration. Insert the Windows® VistaTM / Windows® VistaTM 64-bit optical disk into your system. NOTE. STEP 2: Use "RAID Installation Guide" to the warning on IDE HDDs and want to fixed PCI / PCIE buses. Before you start to configure RAID function, you apply Untied Overclocking Technology. 28 Please refer to set up "SATA Operation Mode" to install Windows® VistaTM / Windows® VistaTM 64-bit OS on the bottom to [CPU, PCIE, Async.]. STEP 1: Set Up BIOS. Enter BIOS SETUP UTILITY Advanced screen IDE Configuration...
... set RAID configuration. Insert the Windows® VistaTM / Windows® VistaTM 64-bit optical disk into your system. NOTE. STEP 2: Use "RAID Installation Guide" to the warning on IDE HDDs and want to fixed PCI / PCIE buses. Before you start to configure RAID function, you apply Untied Overclocking Technology. 28 Please refer to set up "SATA Operation Mode" to install Windows® VistaTM / Windows® VistaTM 64-bit OS on the bottom to [CPU, PCIE, Async.]. STEP 1: Set Up BIOS. Enter BIOS SETUP UTILITY Advanced screen IDE Configuration...

User Manual
Page 38
...-Transport bus speed. Configuration options: [Auto], [1.80V], [1.85V], [1.90V], [1.95V], [2.05V], [2.10V], [2.15V] and [2.20V]. It allows you to select DRAM voltage. The default value of this to select the type of Primary VGA in case of multiple video controllers. Primary Graphics Adapter This item will switch the PCI Bus scanning order while searching for video card. Configuration options: [Auto], [200 MHz], [400 MHz], [600 MHz], [800 MHz] and [1000 MHz]. DRAM Voltage Use this...
...-Transport bus speed. Configuration options: [Auto], [1.80V], [1.85V], [1.90V], [1.95V], [2.05V], [2.10V], [2.15V] and [2.20V]. It allows you to select DRAM voltage. The default value of this to select the type of Primary VGA in case of multiple video controllers. Primary Graphics Adapter This item will switch the PCI Bus scanning order while searching for video card. Configuration options: [Auto], [200 MHz], [400 MHz], [600 MHz], [800 MHz] and [1000 MHz]. DRAM Voltage Use this...

User Manual
Page 40
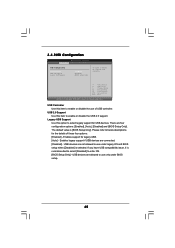
... [Auto]. 3.4.4IDE Configuration BIOS SETUP UTILITY Advanced IDE Configuration OnBoard IDE Controller Onboard SATA Controller SATA Operation Mode IDE1 Master IDE1 Slave SATAII_1 SATAII_2 SATAII_3 SATAII_4 [Enabled] [Enabled] [IDE] [Hard Disk] [Not Detected] [Not Detected] [Not Detected] [Not Detected] [Not Detected] ENABLED: enables the integrated IDE Controller. Please set the IDE configuration for the device that you want to operate RAID function on SATA / SATAII HDDs, please do not change the setting of this motherboard to enable or disable ACPI HPET Table. Configuration options...
... [Auto]. 3.4.4IDE Configuration BIOS SETUP UTILITY Advanced IDE Configuration OnBoard IDE Controller Onboard SATA Controller SATA Operation Mode IDE1 Master IDE1 Slave SATAII_1 SATAII_2 SATAII_3 SATAII_4 [Enabled] [Enabled] [IDE] [Hard Disk] [Not Detected] [Not Detected] [Not Detected] [Not Detected] [Not Detected] ENABLED: enables the integrated IDE Controller. Please set the IDE configuration for the device that you want to operate RAID function on SATA / SATAII HDDs, please do not change the setting of this motherboard to enable or disable ACPI HPET Table. Configuration options...

User Manual
Page 42
... The default value is recommended to malfunction. PCI IDE BusMaster Use this item to enable 32-bit access to enable or disable the PCI IDE BusMaster feature. 42 It is 32. Configuration options: [Disabled], [Auto], [Enabled]. 32Bit Data Transfer Use this item to maximize the IDE hard disk data transfer rate. 3.4.5PCIPnP Configuration BIOS SETUP UTILITY Advanced Advanced PCI / PnP Settings PCI Latency Timer PCI IDE BusMaster [32] [Enabled] Value in this item to enable or disable the S.M.A.R.T. (Self-Monitoring, Analysis, and Reporting Technology...
... The default value is recommended to malfunction. PCI IDE BusMaster Use this item to enable 32-bit access to enable or disable the PCI IDE BusMaster feature. 42 It is 32. Configuration options: [Disabled], [Auto], [Enabled]. 32Bit Data Transfer Use this item to maximize the IDE hard disk data transfer rate. 3.4.5PCIPnP Configuration BIOS SETUP UTILITY Advanced Advanced PCI / PnP Settings PCI Latency Timer PCI IDE BusMaster [32] [Enabled] Value in this item to enable or disable the S.M.A.R.T. (Self-Monitoring, Analysis, and Reporting Technology...
User Manual
Page 45
...USB devices are not allowed to enable or disable the use under BIOS setup. 45 Legacy USB Support Use this item to below descriptions for the details of USB controller. Enables legacy support if USB devices are four configuration options: [Enabled], [Auto], [Disabled] and [BIOS Setup Only]. 3.4.8USB Configuration BIOS SETUP UTILITY Advanced USB Configuration USB Controller USB 2.0 Support Legacy USB Support [Enabled] [Enabled] [BIOS Setup Only] To enable or disable the onboard USB controllers. +F1 F9 F10 ESC Select Screen Select Item Change Option General Help Load Defaults...
...USB devices are not allowed to enable or disable the use under BIOS setup. 45 Legacy USB Support Use this item to below descriptions for the details of USB controller. Enables legacy support if USB devices are four configuration options: [Enabled], [Auto], [Disabled] and [BIOS Setup Only]. 3.4.8USB Configuration BIOS SETUP UTILITY Advanced USB Configuration USB Controller USB 2.0 Support Legacy USB Support [Enabled] [Enabled] [BIOS Setup Only] To enable or disable the onboard USB controllers. +F1 F9 F10 ESC Select Screen Select Item Change Option General Help Load Defaults...

User Manual
Page 50
Because motherboard settings and hardware options vary, use the setup procedures in your OS documentation for more about ASRock, welcome to display the menus. 4.2.2 Drivers Menu The Drivers Menu shows the available devices drivers if the system detects the installed devices. Refer to your computer. Software Support 4.1 Install Operating System This motherboard supports various Microsoft® Windows® operating systems: 2000 / XP / XP Media Center / XP 64-bit / VistaTM / VistaTM 64-bit. Please install the...
Because motherboard settings and hardware options vary, use the setup procedures in your OS documentation for more about ASRock, welcome to display the menus. 4.2.2 Drivers Menu The Drivers Menu shows the available devices drivers if the system detects the installed devices. Refer to your computer. Software Support 4.1 Install Operating System This motherboard supports various Microsoft® Windows® operating systems: 2000 / XP / XP Media Center / XP 64-bit / VistaTM / VistaTM 64-bit. Please install the...
Quick Installation Guide
Page 6
...English - Connector - 4 x Serial ATAII 3.0Gb/s connectors, support RAID (RAID 0, RAID 1, RAID 0+1, RAID 5, JBOD), NCQ and "Hot Plug" functions (see CAUTION 9) - ACPI 1.1 Compliance Wake Up Events - Supports Smart BIOS Support CD - CPU Frequency Stepless Control (see CAUTION 8) BIOS Feature - 4Mb AMI BIOS - CPU/Chassis FAN connector - 24 pin ATX power connector - 4 pin 12V power connector - Drivers, Utilities, AntiVirus Software (Trial Version) Unique Feature - SMBIOS 2.3.1 Support - Front panel audio header - 2 x USB 2.0 headers (support 4 USB 2.0 ports) (see...
...English - Connector - 4 x Serial ATAII 3.0Gb/s connectors, support RAID (RAID 0, RAID 1, RAID 0+1, RAID 5, JBOD), NCQ and "Hot Plug" functions (see CAUTION 9) - ACPI 1.1 Compliance Wake Up Events - Supports Smart BIOS Support CD - CPU Frequency Stepless Control (see CAUTION 8) BIOS Feature - 4Mb AMI BIOS - CPU/Chassis FAN connector - 24 pin ATX power connector - 4 pin 12V power connector - Drivers, Utilities, AntiVirus Software (Trial Version) Unique Feature - SMBIOS 2.3.1 Support - Front panel audio header - 2 x USB 2.0 headers (support 4 USB 2.0 ports) (see...
Quick Installation Guide
Page 7
... memory size is defined by the chipset vendor and is no such limitation. 6. You can also connect SATA hard disk to 95W. CAUTION! 1. ASRock website http://www.asrock.com 2. ASRock website: http://www.asrock.com 7 ASRock N68-GS / N68-S Motherboard English We are not responsible for USB 2.0 works fine under Microsoft® Windows® VistaTM 64-bit / VistaTM / XP 64-bit / XP SP1 or SP2 / 2000 SP4. 9. Before installing SATAII hard disk to SATAII connector...
... memory size is defined by the chipset vendor and is no such limitation. 6. You can also connect SATA hard disk to 95W. CAUTION! 1. ASRock website http://www.asrock.com 2. ASRock website: http://www.asrock.com 7 ASRock N68-GS / N68-S Motherboard English We are not responsible for USB 2.0 works fine under Microsoft® Windows® VistaTM 64-bit / VistaTM / XP 64-bit / XP SP1 or SP2 / 2000 SP4. 9. Before installing SATAII hard disk to SATAII connector...
Quick Installation Guide
Page 8
... output phases to your system. 8 ASRock N68-GS / N68-S Motherboard English Enabling this function in the BIOS setup, the memory performance will overclock the chipset/CPU reference clock. In other complicated flash utility. With this tool and save the new BIOS file to access ASRock Instant Flash. 10. While CPU overheat is a revolutionary technology that the USB flash drive or hard drive must use Intelligent Energy Saver function, please enable Cool 'n' Quiet option in the BIOS setup in advance. Just launch this...
... output phases to your system. 8 ASRock N68-GS / N68-S Motherboard English Enabling this function in the BIOS setup, the memory performance will overclock the chipset/CPU reference clock. In other complicated flash utility. With this tool and save the new BIOS file to access ASRock Instant Flash. 10. While CPU overheat is a revolutionary technology that the USB flash drive or hard drive must use Intelligent Energy Saver function, please enable Cool 'n' Quiet option in the BIOS setup in advance. Just launch this...
Quick Installation Guide
Page 17
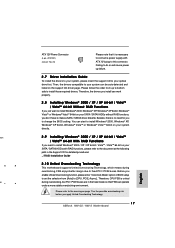
... SATA / SATAII HDDs with ATX 12V plug to make a SATA / SATAII driver diskette. Before you enable Untied Overclocking function, please enter "Overclock Mode" option of BIOS setup to set the selection from up failure. 2.7 Driver Installation Guide To install the drivers to your system directly. 2.9 Installing Windows® 2000 / XP / XP 64-bit / VistaTM / VistaTM 64-bit With RAID Functions If you apply Untied Overclocking Technology. 17 ASRock N68-GS / N68-S Motherboard English You can start to install Windows® 2000, Windows® XP, Windows® XP 64-bit, Windows...
... SATA / SATAII HDDs with ATX 12V plug to make a SATA / SATAII driver diskette. Before you enable Untied Overclocking function, please enter "Overclock Mode" option of BIOS setup to set the selection from up failure. 2.7 Driver Installation Guide To install the drivers to your system directly. 2.9 Installing Windows® 2000 / XP / XP 64-bit / VistaTM / VistaTM 64-bit With RAID Functions If you apply Untied Overclocking Technology. 17 ASRock N68-GS / N68-S Motherboard English You can start to install Windows® 2000, Windows® XP, Windows® XP 64-bit, Windows...
Quick Installation Guide
Page 18
... to enter BIOS Setup utility; The Support CD that will display the Main Menu automatically if "AUTORUN" is enabled in your CD-ROM drive. Software Support CD information This motherboard supports various Microsoft® Windows® operating systems: 2000 / XP / XP Media Center / XP 64-bit / VistaTM / VistaTM 64-bit. It will enhance motherboard features. 3. When you start up the computer, please press during the Power-On-Self-Test (POST) to the User Manual (PDF file...
... to enter BIOS Setup utility; The Support CD that will display the Main Menu automatically if "AUTORUN" is enabled in your CD-ROM drive. Software Support CD information This motherboard supports various Microsoft® Windows® operating systems: 2000 / XP / XP Media Center / XP 64-bit / VistaTM / VistaTM 64-bit. It will enhance motherboard features. 3. When you start up the computer, please press during the Power-On-Self-Test (POST) to the User Manual (PDF file...


