RAID Installation Guide
Page 1
... With RAID Functions 5 1.3.1 Installing Windows 2000 / XP / XP 64-bit With RAID Functions 5 1.3.2 Installing Windows Vista / Vista 64-bit With RAID Functions 6 1.4 Create Disk Array 8 2. NVIDIA Windows RAID Installation Guide 11 2.1 NVIDIA Windows RAID Installation Guide for Windows 2000 / XP / XP 64-bit Users 11 2.2 NVIDIA Windows RAID Installation Guide for Windows Vista / Vista 64-bit Users...
... With RAID Functions 5 1.3.1 Installing Windows 2000 / XP / XP 64-bit With RAID Functions 5 1.3.2 Installing Windows Vista / Vista 64-bit With RAID Functions 6 1.4 Create Disk Array 8 2. NVIDIA Windows RAID Installation Guide 11 2.1 NVIDIA Windows RAID Installation Guide for Windows 2000 / XP / XP 64-bit Users 11 2.2 NVIDIA Windows RAID Installation Guide for Windows Vista / Vista 64-bit Users...

RAID Installation Guide
Page 5
...B. C. Enter BIOS SETUP UTILITY Advanced screen IDE Configuration. If there is supposed to include SP4. A. Insert the ASRock Support CD into your optical drive to boot your Windows® 2000 optical disk is no SP4 included in your disk, please visit the below website for boot devices selection...SATAII HDDs with RAID functions, please follow below steps. During POST at the beginning of system boot-up, press key, and then a window for proper procedures of making a SP4 disk: http://www.microsoft.com/Windows2000/downloads/servicepacks/sp4/spdeploy. Please select CD-ROM as the boot...
...B. C. Enter BIOS SETUP UTILITY Advanced screen IDE Configuration. If there is supposed to include SP4. A. Insert the ASRock Support CD into your optical drive to boot your Windows® 2000 optical disk is no SP4 included in your disk, please visit the below website for boot devices selection...SATAII HDDs with RAID functions, please follow below steps. During POST at the beginning of system boot-up, press key, and then a window for proper procedures of making a SP4 disk: http://www.microsoft.com/Windows2000/downloads/servicepacks/sp4/spdeploy. Please select CD-ROM as the boot...
RAID Installation Guide
Page 6
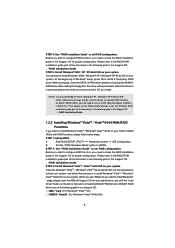
... option to the BIOS RAID installation guide part of the document in the following path in the Support CD: .. \ RAID Installation Guide STEP 3: Install Windows® VistaTM / VistaTM 64-bit OS on your system. Please refer to [RAID]. When you see "Where do you want to install a third-party... you start to check the RAID installation guide in the Support CD for proper configuration. STEP 1: Set Up BIOS. " page, please insert the ASRock Support CD into the optical drive to boot your system, and follow below steps. NVIDIA® RAID drivers are in the following path in the...
... option to the BIOS RAID installation guide part of the document in the following path in the Support CD: .. \ RAID Installation Guide STEP 3: Install Windows® VistaTM / VistaTM 64-bit OS on your system. Please refer to [RAID]. When you see "Where do you want to install a third-party... you start to check the RAID installation guide in the Support CD for proper configuration. STEP 1: Set Up BIOS. " page, please insert the ASRock Support CD into the optical drive to boot your system, and follow below steps. NVIDIA® RAID drivers are in the following path in the...
RAID Installation Guide
Page 7
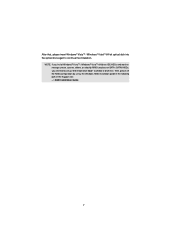
Then, please set up "SATA Operation Mode" to [RAID] in the Support CD: .. \ RAID Installation Guide 7 If you install Windows® VistaTM / Windows® VistaTM 64-bit on IDE HDDs and want to manage (create, convert, delete, or rebuild) RAID functions on SATA / SATAII HDDs, you still need to continue the installation. NOTE. After that, please insert Windows® VistaTM / Windows® VistaTM 64-bit optical disk into the optical drive again to set the RAID configuration by using the Windows RAID installation guide in the following path in BIOS first.
Then, please set up "SATA Operation Mode" to [RAID] in the Support CD: .. \ RAID Installation Guide 7 If you install Windows® VistaTM / Windows® VistaTM 64-bit on IDE HDDs and want to manage (create, convert, delete, or rebuild) RAID functions on SATA / SATAII HDDs, you still need to continue the installation. NOTE. After that, please insert Windows® VistaTM / Windows® VistaTM 64-bit optical disk into the optical drive again to set the RAID configuration by using the Windows RAID installation guide in the following path in BIOS first.
RAID Installation Guide
Page 8
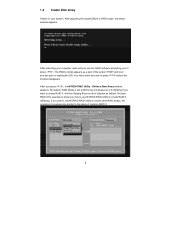
...the steps of the system POST and boot process prior to create RAID 0 (Striping). You have a few seconds to RAID mode, the below window appears. Define a New Array window appears. By default, RAID Mode is set it to Striping if you want to create RAID 0. After adjusting the system BIOS to press... before the window disappears. And the Striping Block is set to Mirroring, but please set to Optimal as a part of creating RAID 0. 8 1.4 Create Disk Array Power on ...
...the steps of the system POST and boot process prior to create RAID 0 (Striping). You have a few seconds to RAID mode, the below window appears. Define a New Array window appears. By default, RAID Mode is set it to Striping if you want to create RAID 0. After adjusting the system BIOS to press... before the window disappears. And the Striping Block is set to Mirroring, but please set to Optimal as a part of creating RAID 0. 8 1.4 Create Disk Array Power on ...
RAID Installation Guide
Page 10
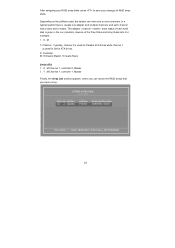
... each hard disk is used for Serial ATA drives. 0: Controller M: M means Master, S means Slave Serial ATA 1 . 0 . For example: 1 . 0 . M Channel 1, controller 1, Master Finally, the Array List window appears, where you can have set up. In a typical system there is usually one or more channels.
... each hard disk is used for Serial ATA drives. 0: Controller M: M means Master, S means Slave Serial ATA 1 . 0 . For example: 1 . 0 . M Channel 1, controller 1, Master Finally, the Array List window appears, where you can have set up. In a typical system there is usually one or more channels.
RAID Installation Guide
Page 11
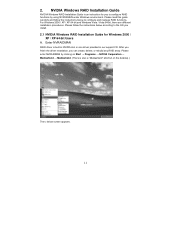
... can create, delete, or rebuild any RAID array. Please enter NVRAIDMAN by using NVIDIAMAN under Windows environment. NVIDIA Windows RAID Installation Guide NVIDIA Windows RAID Installation Guide is an instruction for Windows 2000 / XP / XP 64-bit Users A. Enter NVRAIDMAN RAID driver is also a "...on the desktop.) Then, below screen appears. 11 For Windows 2000 / XP / XP 64-bit and Windows Vista / Vista 64-bit, there are different installation procedures. After you finish the driver installation, you install. 2.1 NVIDIA Windows RAID Installation Guide for you to configure and manage RAID ...
... can create, delete, or rebuild any RAID array. Please enter NVRAIDMAN by using NVIDIAMAN under Windows environment. NVIDIA Windows RAID Installation Guide NVIDIA Windows RAID Installation Guide is an instruction for Windows 2000 / XP / XP 64-bit Users A. Enter NVRAIDMAN RAID driver is also a "...on the desktop.) Then, below screen appears. 11 For Windows 2000 / XP / XP 64-bit and Windows Vista / Vista 64-bit, there are different installation procedures. After you finish the driver installation, you install. 2.1 NVIDIA Windows RAID Installation Guide for you to configure and manage RAID ...
RAID Installation Guide
Page 12
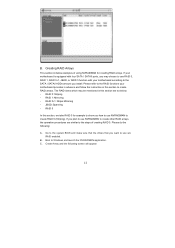
... you how to use RAID 0, RAID 1, RAID 0+1, JBOD, or RAID 5 function with your motherboard provides in advance and follow the instruction in this section to Windows and launch the NVRAIDMAN application. JBOD: Spanning - B. Please do the following screen will appear. 12 Create Array and the following : A. Creating RAID Arrays This section...
... you how to use RAID 0, RAID 1, RAID 0+1, JBOD, or RAID 5 function with your motherboard provides in advance and follow the instruction in this section to Windows and launch the NVRAIDMAN application. JBOD: Spanning - B. Please do the following screen will appear. 12 Create Array and the following : A. Creating RAID Arrays This section...

RAID Installation Guide
Page 18
... fault tolerant arrays such as RAID 1, RAID 0+1, as well as a RAID 5. Then the popup menu appears. Click Finish and the array will be applied to Windows and run the NVIDIA RAID Management utility. B. E. This applies only to a hard drive from other drives in the array. C. C. Rebuilding a RAID Array Rebuilding is the...
... fault tolerant arrays such as RAID 1, RAID 0+1, as well as a RAID 5. Then the popup menu appears. Click Finish and the array will be applied to Windows and run the NVIDIA RAID Management utility. B. E. This applies only to a hard drive from other drives in the array. C. C. Rebuilding a RAID Array Rebuilding is the...
RAID Installation Guide
Page 21
...; NVIDIA Corporation → Storage. (There is built in NVIDIA ALL in one driver provided in a short period of time. 2.2 NVIDIA Windows RAID Installation Guide for Windows Vista / Vista 64-bit Users A. NVRAIDMAN window indicates that the array is synchronizing. C. After you finish the driver installation, you can create, delete, or rebuild any RAID...
...; NVIDIA Corporation → Storage. (There is built in NVIDIA ALL in one driver provided in a short period of time. 2.2 NVIDIA Windows RAID Installation Guide for Windows Vista / Vista 64-bit Users A. NVRAIDMAN window indicates that the array is synchronizing. C. After you finish the driver installation, you can create, delete, or rebuild any RAID...

User Manual
Page 3
...SATAII HDD Hot Plug Feature and Operation Guide ....... 24 2.12 Driver Installation Guide 26 2.13 Installing Windows® 2000 / XP / XP 64-bit / VistaTM / VistaTM 64-bit Without RAID Functions 26 2.14 Installing Windows® 2000 / XP / XP 64-bit / VistaTM / VistaTM 64-bit With RAID Functions ...26 2.14.1 Installing Windows® 2000 / XP / XP 64-bit With RAID Functions 26 2.14.2 Installing Windows® VistaTM / VistaTM 64-bit With RAID Functions...
...SATAII HDD Hot Plug Feature and Operation Guide ....... 24 2.12 Driver Installation Guide 26 2.13 Installing Windows® 2000 / XP / XP 64-bit / VistaTM / VistaTM 64-bit Without RAID Functions 26 2.14 Installing Windows® 2000 / XP / XP 64-bit / VistaTM / VistaTM 64-bit With RAID Functions ...26 2.14.1 Installing Windows® 2000 / XP / XP 64-bit With RAID Functions 26 2.14.2 Installing Windows® VistaTM / VistaTM 64-bit With RAID Functions...
User Manual
Page 6
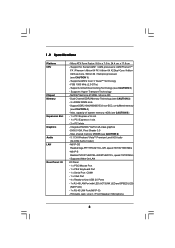
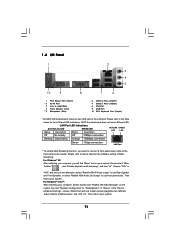
...nForce 430 - Dual Channel DDR2 Memory Technology (see CAUTION 2) - Support DDR2 1066/800/667/533 non-ECC, un-buffered memory (see CAUTION 6) - 5.1 CH Windows® VistaTM Premium Level HD Audio (ALC662 Audio Codec) - DX9.0 VGA, Pixel Shader 3.0 - shared memory 256MB (see CAUTION 4) - Supports Wake-On-LAN...1 x VGA Port - 4 x Ready-to-Use USB 2.0 Ports - 1 x RJ-45 LAN Port with LED (ACT/LINK LED and SPEED LED) (N61P-GS) - 1 x RJ-45 LAN Port (N61P-S) - Support for Socket AM2+ / AM2 processors: AMD PhenomTM FX / Phenom / Athlon 64 FX / Athlon 64 X2 Dual-Core / Athlon X2 Dual-Core...
...nForce 430 - Dual Channel DDR2 Memory Technology (see CAUTION 2) - Support DDR2 1066/800/667/533 non-ECC, un-buffered memory (see CAUTION 6) - 5.1 CH Windows® VistaTM Premium Level HD Audio (ALC662 Audio Codec) - DX9.0 VGA, Pixel Shader 3.0 - shared memory 256MB (see CAUTION 4) - Supports Wake-On-LAN...1 x VGA Port - 4 x Ready-to-Use USB 2.0 Ports - 1 x RJ-45 LAN Port with LED (ACT/LINK LED and SPEED LED) (N61P-GS) - 1 x RJ-45 LAN Port (N61P-S) - Support for Socket AM2+ / AM2 processors: AMD PhenomTM FX / Phenom / Athlon 64 FX / Athlon 64 X2 Dual-Core / Athlon X2 Dual-Core...
User Manual
Page 7
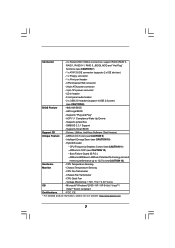
... - SMBIOS 2.3.1 Support - CPU Temperature Sensing Monitor - FCC, CE * For detailed product information, please visit our website: http://www.asrock.com 7 Connector - 4 x Serial ATAII 3.0Gb/s connectors, support RAID (RAID 0, RAID 1, RAID 0+1, RAID 5, JBOD), NCQ and...7) - 1 x ATA133 IDE connector (supports 2 x IDE devices) - 1 x Floppy connector - 1 x Print port header - Hybrid Booster: - Microsoft® Windows® 2000 / XP / XP 64-bit / VistaTM / VistaTM 64-bit compliant Certifications - ACPI 1.1 Compliance Wake Up Events - CPU Quiet Fan - CPU Frequency ...
... - SMBIOS 2.3.1 Support - CPU Temperature Sensing Monitor - FCC, CE * For detailed product information, please visit our website: http://www.asrock.com 7 Connector - 4 x Serial ATAII 3.0Gb/s connectors, support RAID (RAID 0, RAID 1, RAID 0+1, RAID 5, JBOD), NCQ and...7) - 1 x ATA133 IDE connector (supports 2 x IDE devices) - 1 x Floppy connector - 1 x Print port header - Hybrid Booster: - Microsoft® Windows® 2000 / XP / XP 64-bit / VistaTM / VistaTM 64-bit compliant Certifications - ACPI 1.1 Compliance Wake Up Events - CPU Quiet Fan - CPU Frequency ...
User Manual
Page 8
... overclock your system stability, or even cause damage to SATAII connector directly. 8. ASRock website: http://www.asrock.com 8 CAUTION! 1. ASRock website http://www.asrock.com 2. For Windows® XP 64-bit and Windows® VistaTM 64bit with 64-bit CPU, there is a certain risk involved with... Memory Technology. Whether 1066MHz memory speed is a user-friendly ASRock overclocking tool which allows you implement Dual Channel Memory Technology, make sure to get the best system performance under Windows® XP and Windows® VistaTM. Overclocking may be done at your system. It...
... overclock your system stability, or even cause damage to SATAII connector directly. 8. ASRock website: http://www.asrock.com 8 CAUTION! 1. ASRock website http://www.asrock.com 2. For Windows® XP 64-bit and Windows® VistaTM 64bit with 64-bit CPU, there is a certain risk involved with... Memory Technology. Whether 1066MHz memory speed is a user-friendly ASRock overclocking tool which allows you implement Dual Channel Memory Technology, make sure to get the best system performance under Windows® XP and Windows® VistaTM. Overclocking may be done at your system. It...
User Manual
Page 11
... "Quadraphonic" or "Stereo". For Windows® XP: After restarting your system. Please select "Mixer ToolBox" , click "Enable playback multi-streaming", and click "ok". Then reboot your system. 11 Set "Speaker Configuration" to below for the software setting of Multi- N61P-S motherboard does not have LAN port... two LED next to use Rear Speaker and Front Speaker, or select "Realtek HDA Audio 2nd output" to the LAN port. For Windows® VistaTM: After restarting your computer, please double-click "Realtek HD Audio Manager" on your computer, you will find "Mixer" tool...
... "Quadraphonic" or "Stereo". For Windows® XP: After restarting your system. Please select "Mixer ToolBox" , click "Enable playback multi-streaming", and click "ok". Then reboot your system. 11 Set "Speaker Configuration" to below for the software setting of Multi- N61P-S motherboard does not have LAN port... two LED next to use Rear Speaker and Front Speaker, or select "Realtek HDA Audio 2nd output" to the LAN port. For Windows® VistaTM: After restarting your computer, please double-click "Realtek HD Audio Manager" on your computer, you will find "Mixer" tool...
User Manual
Page 16
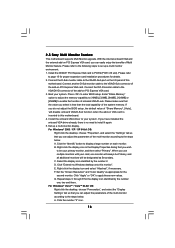
... onboard VGA/D-Sub function when the add-on PCI Express VGA card, you select is no need to PCIE2 (PCIE x16 slot). Click "Extend my Windows desktop onto this motherboard. F. Repeat steps C through E for the second monitor. Connect another D-Sub monitor cable to the VGA/DVI-D connector of... icon and select "Attached", if necessary. Please refer to the following steps to enter BIOS setup. Press to set up a multi-monitor display. G. For Windows® 2000 / XP / XP 64-bit OS: Right click the desktop, choose "Properties", and select the "Settings" tab so that you have installed ...
... onboard VGA/D-Sub function when the add-on PCI Express VGA card, you select is no need to PCIE2 (PCIE x16 slot). Click "Extend my Windows desktop onto this motherboard. F. Repeat steps C through E for the second monitor. Connect another D-Sub monitor cable to the VGA/DVI-D connector of... icon and select "Attached", if necessary. Please refer to the following steps to enter BIOS setup. Press to set up a multi-monitor display. G. For Windows® 2000 / XP / XP 64-bit OS: Right click the desktop, choose "Properties", and select the "Settings" tab so that you have installed ...

User Manual
Page 20
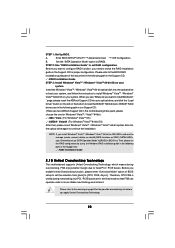
... and save the change by clicking "OK". If you want to the "Front Mic" Tab in "Front Mic" of "Playback" portion. For Windows® VistaTM / VistaTM 64-bit OS: Go to hear your voice through front mic, please deselect "Mute" icon in the Realtek Control panel...12) PLED+ PLEDPWRBTN# GND 1 DUMMY RESET# GND HDLEDHDLED+ 1 SPEAKER DUMMY DUMMY +5V GND +12V CHA_FAN_SPEED This header accommodates several system front panel functions. For Windows® 2000 / XP / XP 64-bit OS: Click "Audio I/O", select "Connector Settings" , choose "Disable front panel jack detection", and save the change...
... and save the change by clicking "OK". If you want to the "Front Mic" Tab in "Front Mic" of "Playback" portion. For Windows® VistaTM / VistaTM 64-bit OS: Go to hear your voice through front mic, please deselect "Mute" icon in the Realtek Control panel...12) PLED+ PLEDPWRBTN# GND 1 DUMMY RESET# GND HDLEDHDLED+ 1 SPEAKER DUMMY DUMMY +5V GND +12V CHA_FAN_SPEED This header accommodates several system front panel functions. For Windows® 2000 / XP / XP 64-bit OS: Click "Audio I/O", select "Connector Settings" , choose "Disable front panel jack detection", and save the change...

User Manual
Page 26
...diskette. B. STEP 2: Make a SATA / SATAII Driver Diskette. A. Before installing Windows® 2000 to your system, your system. (There are two ASRock Support CD in your optical drive first. htm#the_integrated_installation_fmay 2.14.1 Installing Windows® 2000 / XP / XP 64-bit With RAID Functions If you to...://www.microsoft.com/Windows2000/downloads/servicepacks/sp4/spdeploy. Insert the ASRock Support CD into your optical drive to boot your Windows® 2000 optical disk is supposed to include SP4. Besides, there is no need for Windows® 2000 / XP / XP 64-bit.) 26 ...
...diskette. B. STEP 2: Make a SATA / SATAII Driver Diskette. A. Before installing Windows® 2000 to your system, your system. (There are two ASRock Support CD in your optical drive first. htm#the_integrated_installation_fmay 2.14.1 Installing Windows® 2000 / XP / XP 64-bit With RAID Functions If you to...://www.microsoft.com/Windows2000/downloads/servicepacks/sp4/spdeploy. Insert the ASRock Support CD into your optical drive to boot your Windows® 2000 optical disk is supposed to include SP4. Besides, there is no need for Windows® 2000 / XP / XP 64-bit.) 26 ...
User Manual
Page 27
...you choose and the OS you will see the message on SATA / SATAII HDDs, you need to set the RAID configuration by using the Windows RAID installation guide in the following path in the Support CD for boot devices selection appears. E. After reading the floppy disk, the driver... you start to format the floppy diskette and copy SATA / SATAII drivers into floppy drive A: press any key to start to install Windows® VistaTM or Windows® VistaTM 64-bit on your system. NOTE. If you want to the BIOS RAID installation guide in the following path in BIOS...
...you choose and the OS you will see the message on SATA / SATAII HDDs, you need to set the RAID configuration by using the Windows RAID installation guide in the following path in the Support CD for boot devices selection appears. E. After reading the floppy disk, the driver... you start to format the floppy diskette and copy SATA / SATAII drivers into floppy drive A: press any key to start to install Windows® VistaTM or Windows® VistaTM 64-bit on your system. NOTE. If you want to the BIOS RAID installation guide in the following path in BIOS...
User Manual
Page 28
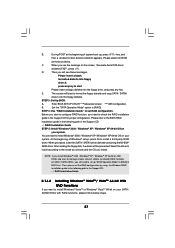
...option to load the NVIDIA® RAID drivers. " page, please insert the ASRock Support CD into your system. Please refer to [CPU, PCIE, Async.]. STEP 1: Set Up BIOS. If you install Windows® VistaTM / Windows® VistaTM 64-bit on IDE HDDs and want to the BIOS RAID ...Technology, which means during overclocking, but PCI / PCIE buses are two ASRock Support CD in BIOS first. Enter BIOS SETUP UTILITY Advanced screen IDE Configuration. STEP 2: Use "RAID Installation Guide" to install Windows® VistaTM / Windows® VistaTM 64-bit OS on the bottom to [RAID]. When ...
...option to load the NVIDIA® RAID drivers. " page, please insert the ASRock Support CD into your system. Please refer to [CPU, PCIE, Async.]. STEP 1: Set Up BIOS. If you install Windows® VistaTM / Windows® VistaTM 64-bit on IDE HDDs and want to the BIOS RAID ...Technology, which means during overclocking, but PCI / PCIE buses are two ASRock Support CD in BIOS first. Enter BIOS SETUP UTILITY Advanced screen IDE Configuration. STEP 2: Use "RAID Installation Guide" to install Windows® VistaTM / Windows® VistaTM 64-bit OS on the bottom to [RAID]. When ...


