User Manual
Page 3
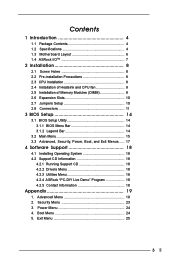
... 25 3 Contents 1 Introduction 4 1.1 Package Contents 4 1.2 Specifications 4 1.3 Motherboard Layout 6 1.4 ASRock I/OTM 7 2 Installation 8 2.1 Screw Holes 8 2.2 Pre-installation Precautions 8 2.3 CPU Installation 8 2.4 Installation of Heatsink and CPU fan 9 2.5 Installation of Memory Modules (DIMM 9 2.6 Expansion Slots 10 2.7 Jumpers Setup 10 2.8 Connectors 11 3 BIOS Setup 14 3.1 BIOS Setup Utility 14 3.1.1 BIOS Menu Bar 14 3.1.2 Legend Bar 14 3.2 Main Menu 15...
... 25 3 Contents 1 Introduction 4 1.1 Package Contents 4 1.2 Specifications 4 1.3 Motherboard Layout 6 1.4 ASRock I/OTM 7 2 Installation 8 2.1 Screw Holes 8 2.2 Pre-installation Precautions 8 2.3 CPU Installation 8 2.4 Installation of Heatsink and CPU fan 9 2.5 Installation of Memory Modules (DIMM 9 2.6 Expansion Slots 10 2.7 Jumpers Setup 10 2.8 Connectors 11 3 BIOS Setup 14 3.1 BIOS Setup Utility 14 3.1.1 BIOS Menu Bar 14 3.1.2 Legend Bar 14 3.2 Main Menu 15...

User Manual
Page 4
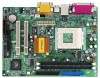
... and step-bystep installation guide for new DIY system builders. Chapter 3 and 4 contain basic BIOS setup and support CD information. ASRock website http://www.asrock.com 1.1 Package Contents ASRock M810LMR motherboard (Micro ATX form factor: 9.6" x 7.0", 24.4 x 17.8 cm) ASRock M810LMR Quick Installation Guide ASRock AMD-VIA Series Support CD 1 cable for IDE devices (1 x ATA 66/100) 1 cable for...
... and step-bystep installation guide for new DIY system builders. Chapter 3 and 4 contain basic BIOS setup and support CD information. ASRock website http://www.asrock.com 1.1 Package Contents ASRock M810LMR motherboard (Micro ATX form factor: 9.6" x 7.0", 24.4 x 17.8 cm) ASRock M810LMR Quick Installation Guide ASRock AMD-VIA Series Support CD 1 cable for IDE devices (1 x ATA 66/100) 1 cable for...

User Manual
Page 5
...; While CPU overheat is not recommended to perform over clocking, other than the recommended CPU bus frequencies may cause the instability of M810LMR is set to perform over clocking. When the CPU frequency of the system or damage the CPU and the motherboard. 5 Voltage ... support; Audio: PCI LAN: Hardware Monitor: PCI slots: AMR slot: ASRock I/OTM: BIOS: OS: 2 channels AC'97 Audio Speed: 802.3u (10/100 Ethernet), supports Wake-On-LAN CPU temperature sensing (ASRock U-COP); Although M810LMR offers stepless control, it is detected, the system will also be overclocked ...
...; While CPU overheat is not recommended to perform over clocking, other than the recommended CPU bus frequencies may cause the instability of M810LMR is set to perform over clocking. When the CPU frequency of the system or damage the CPU and the motherboard. 5 Voltage ... support; Audio: PCI LAN: Hardware Monitor: PCI slots: AMR slot: ASRock I/OTM: BIOS: OS: 2 channels AC'97 Audio Speed: 802.3u (10/100 Ethernet), supports Wake-On-LAN CPU temperature sensing (ASRock U-COP); Although M810LMR offers stepless control, it is detected, the system will also be overclocked ...

User Manual
Page 14
...Management features BOOT Configures the default system device that is used to locate and load the Operating System EXIT Exits the current menu or the BIOS Setup To access the menu bar items, press the right or left arrow key on the keyboard until the desired item is highlighted. 3.1.2... system configuration ADVANCED Sets up the advanced features SECURITY Sets up the computer, there is a menu-driven program, which allows you wish to enter the BIOS Setup after POST, restart the system by pressing + + , or by turning the system off and then back on. It is a chance for reference...
...Management features BOOT Configures the default system device that is used to locate and load the Operating System EXIT Exits the current menu or the BIOS Setup To access the menu bar items, press the right or left arrow key on the keyboard until the desired item is highlighted. 3.1.2... system configuration ADVANCED Sets up the advanced features SECURITY Sets up the computer, there is a menu-driven program, which allows you wish to enter the BIOS Setup after POST, restart the system by pressing + + , or by turning the system off and then back on. It is a chance for reference...

User Manual
Page 15
... Help ] Month: Jan - Floppy Drives Use this to set the type of floppy drives installed. Main Advanced System Date System Time Floppy Drives IDE Devices BIOS Version Processor Type Processor Speed L1 Cache Size L2 Cache Size Total Memory SDR1 SDR2 AMIBIOS SETUP UTILITY - Use keys to move between the Month... Dec), Day: (1 to 31), Year: (up a selected menu for a highlighted field Loads all the setup items to 2099). Dec Day: 01 - 31 Year: 1980 - 2099 M810LMR BIOS P1.00 AMD Athlon(tm) XP 2200+ 1800 MHz 128 KB 256 KB 224 MB + 32 MB Share Memory 256 MB / 133 MHz None F1...
... Help ] Month: Jan - Floppy Drives Use this to set the type of floppy drives installed. Main Advanced System Date System Time Floppy Drives IDE Devices BIOS Version Processor Type Processor Speed L1 Cache Size L2 Cache Size Total Memory SDR1 SDR2 AMIBIOS SETUP UTILITY - Use keys to move between the Month... Dec), Day: (1 to 31), Year: (up a selected menu for a highlighted field Loads all the setup items to 2099). Dec Day: 01 - 31 Year: 1980 - 2099 M810LMR BIOS P1.00 AMD Athlon(tm) XP 2200+ 1800 MHz 128 KB 256 KB 224 MB + 32 MB Share Memory 256 MB / 133 MHz None F1...

User Manual
Page 16
...User] to configure a hard disk drive, make configuration of cylinders, heads, and sectors per track for the remaining fields on an older system, the BIOS Setup may detect incorrect parameters. Make sure to set the parameters of the Primary IDE hard disk drives to make sure you can write or...Select Sub-Menu F9:Setup Defaults F10:Save & Exit [USER]: It allows user to automatically detect hard disk drive. If autodetection is successful, the BIOS Setup automatically fills in whcih the hard disk drive field will display the size of the IDE device, first, please select "IDE Devices" on ...
...User] to configure a hard disk drive, make configuration of cylinders, heads, and sectors per track for the remaining fields on an older system, the BIOS Setup may detect incorrect parameters. Make sure to set the parameters of the Primary IDE hard disk drives to make sure you can write or...Select Sub-Menu F9:Setup Defaults F10:Save & Exit [USER]: It allows user to automatically detect hard disk drive. If autodetection is successful, the BIOS Setup automatically fills in whcih the hard disk drive field will display the size of the IDE device, first, please select "IDE Devices" on ...

User Manual
Page 17
.../DVD]: This is used for IDE CD/DVD drives. [ARMD]: This is used for IDE ARMD (ATAPI Removable Media Device), such as calculated by the BIOS based on the drive information you entered. Write Pre-compensation Enter Write Pre-compensation sector. for Netware and UNIX user, select [Off] to determine the...
.../DVD]: This is used for IDE CD/DVD drives. [ARMD]: This is used for IDE ARMD (ATAPI Removable Media Device), such as calculated by the BIOS based on the drive information you entered. Write Pre-compensation Enter Write Pre-compensation sector. for Netware and UNIX user, select [Off] to determine the...

User Manual
Page 19
...by the jumper-setting. [Manual]: This allows user to set to enable or disable the feature of spread spectrum.. Advanced BIOS Setup Menu Main Advanced AMIBIOS SETUP UTILITY - Chipset Configuration Resource Configuration Peripheral Configuration System Hardware Monitor F1:Help Esc:Exit :Select... should always be [Disabled] for better system stability. However, this is recommended to select this option, which will introduce you the following BIOS Setup menus: "Advanced," "Security," "Power," "Boot," and "Exit." 1. SDRAM Frequency: If set CPU host frequency manually. Wrong setup...
...by the jumper-setting. [Manual]: This allows user to set to enable or disable the feature of spread spectrum.. Advanced BIOS Setup Menu Main Advanced AMIBIOS SETUP UTILITY - Chipset Configuration Resource Configuration Peripheral Configuration System Hardware Monitor F1:Help Esc:Exit :Select... should always be [Disabled] for better system stability. However, this is recommended to select this option, which will introduce you the following BIOS Setup menus: "Advanced," "Security," "Power," "Boot," and "Exit." 1. SDRAM Frequency: If set CPU host frequency manually. Wrong setup...

User Manual
Page 23
...Press to create a new password. If [Always] option is selected, the "Password Check" is performed before both boot-up and BIOS setup. 23 Password Check Setup F1:Help Esc:Exit :Select Item :Select Menu +/-:Change Values Enter:Select Sub-Menu F9:Setup Defaults...Clear Clear [ Enter ] [ Enter ] [ Setup Help ] Specifies the supervisor password. If [Setup] option is selected, the "Password Check" is performed before BIOS setup. 2. Set User Password: Press to 6 alphanumeric characters combination. Valid password can be a 1 to create a new p assword. Password Check: Select the ...
...Press to create a new password. If [Always] option is selected, the "Password Check" is performed before both boot-up and BIOS setup. 23 Password Check Setup F1:Help Esc:Exit :Select Item :Select Menu +/-:Change Values Enter:Select Sub-Menu F9:Setup Defaults...Clear Clear [ Enter ] [ Enter ] [ Setup Help ] Specifies the supervisor password. If [Setup] option is selected, the "Password Check" is performed before BIOS setup. 2. Set User Password: Press to 6 alphanumeric characters combination. Valid password can be a 1 to create a new p assword. Password Check: Select the ...

User Manual
Page 25
Boot Device Priority: This allows you will exit the BIOS Setup Utility without saving changes" will appear. All changes are discarded. 25 Boot To OS/2: If this is set to [On], it will boot-up ...:Save & Exit Exit Saving Changes: After you press , original values will be restored. If you press , it will save the current settings and exit the BIOS SETUP Utility. If you press , it will load the default values for all the setup configuration. Discard Changes: After you enter the submenu, the message...
Boot Device Priority: This allows you will exit the BIOS Setup Utility without saving changes" will appear. All changes are discarded. 25 Boot To OS/2: If this is set to [On], it will boot-up ...:Save & Exit Exit Saving Changes: After you press , original values will be restored. If you press , it will save the current settings and exit the BIOS SETUP Utility. If you press , it will load the default values for all the setup configuration. Discard Changes: After you enter the submenu, the message...


