User Manual
Page 3
...Specifications 5 1.3 Motherboard Layout 7 1.4 ASRock I/OTM 8 2 Installation 9 2.1 Screw Holes 9 2.2 Pre-installation Precautions 9 2.3 CPU Installation 10 2.4 Installation of CPU fan and Heatsink 10 2.5 Installation of Memory Modules (DIMM 11 2.6 Expansion Slots 12 2.7 Jumpers Setup 13 2.8 Connectors 14 3 BIOS Setup 16 3.1 BIOS Setup Utility 16 3.2 BIOS Setup Utility Main Menu 16 3.3 Legend... 28 4.2 Support CD Information 28 4.2.1 Running The Support CD 28 4.2.2 Drivers Menu 28 4.2.3 Utilities Menu 28 4.2.4 ASRock "PC-DIY Live Demo" Program 28 4.2.5 Contact Information 28 3
...Specifications 5 1.3 Motherboard Layout 7 1.4 ASRock I/OTM 8 2 Installation 9 2.1 Screw Holes 9 2.2 Pre-installation Precautions 9 2.3 CPU Installation 10 2.4 Installation of CPU fan and Heatsink 10 2.5 Installation of Memory Modules (DIMM 11 2.6 Expansion Slots 12 2.7 Jumpers Setup 13 2.8 Connectors 14 3 BIOS Setup 16 3.1 BIOS Setup Utility 16 3.2 BIOS Setup Utility Main Menu 16 3.3 Legend... 28 4.2 Support CD Information 28 4.2.1 Running The Support CD 28 4.2.2 Drivers Menu 28 4.2.3 Utilities Menu 28 4.2.4 ASRock "PC-DIY Live Demo" Program 28 4.2.5 Contact Information 28 3
User Manual
Page 4
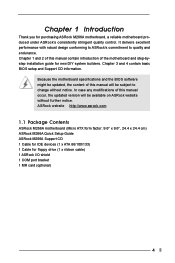
...Because the motherboard specifications and the BIOS software might be subject to quality and endurance. ASRock website http://www.asrock.com 1.1 Package Contents ASRock M266A motherboard (Micro ATX form factor: 9.6" x 9.6", 24.4 x 24.4 cm) ASRock M266A Quick Setup Guide ASRock M266A Support CD 1 Cable for IDE...bystep installation guide for floppy drive (1 x ribbon cable) 1 ASRock I/O shield 1 COM port bracket 1 MR card (optional) 4 Chapter 1 Introduction Thank you for purchasing ASRock M266A motherboard, a reliable motherboard produced under ASRock's consistently stringent quality control.
...Because the motherboard specifications and the BIOS software might be subject to quality and endurance. ASRock website http://www.asrock.com 1.1 Package Contents ASRock M266A motherboard (Micro ATX form factor: 9.6" x 9.6", 24.4 x 24.4 cm) ASRock M266A Quick Setup Guide ASRock M266A Support CD 1 Cable for IDE...bystep installation guide for floppy drive (1 x ribbon cable) 1 ASRock I/O shield 1 COM port bracket 1 MR card (optional) 4 Chapter 1 Introduction Thank you for purchasing ASRock M266A motherboard, a reliable motherboard produced under ASRock's consistently stringent quality control.

User Manual
Page 5
...Ultra DMA Mode 6; Voltage monitoring: +12V, +5V, +3V, Vcore; Audio Jack: Line Out / Line In / Microphone + 1 Game port BIOS: AMI BIOS; ACPI 1.1 compliance wake up to protect CPU life (ASRock U-COP)(see CAUTION 2) PS/2: 1 keyboard port / 1 mouse port; 1 RJ 45 port; 4 rear default USB 2.0 ports; 1 VGA ...Audio: 2 channels AC'97 Audio LAN: Speed: 802.3u (10/100 Ethernet), supports Wake-On-LAN Hardware Monitor: CPU temperature sensing (ASRock U-COP); Chassis fan tachometer PCI slots: 3 slots with PCI Specification 2.2 AGP slot: 1 universal AGP slot, supports 3.3V/1.5V, 4X...
...Ultra DMA Mode 6; Voltage monitoring: +12V, +5V, +3V, Vcore; Audio Jack: Line Out / Line In / Microphone + 1 Game port BIOS: AMI BIOS; ACPI 1.1 compliance wake up to protect CPU life (ASRock U-COP)(see CAUTION 2) PS/2: 1 keyboard port / 1 mouse port; 1 RJ 45 port; 4 rear default USB 2.0 ports; 1 VGA ...Audio: 2 channels AC'97 Audio LAN: Speed: 802.3u (10/100 Ethernet), supports Wake-On-LAN Hardware Monitor: CPU temperature sensing (ASRock U-COP); Chassis fan tachometer PCI slots: 3 slots with PCI Specification 2.2 AGP slot: 1 universal AGP slot, supports 3.3V/1.5V, 4X...
User Manual
Page 7
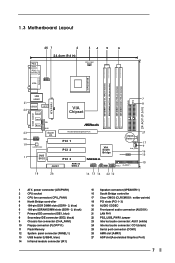
... Chipset 23 20 19 11 LLIinninee in MMIniicc in AUDIO1 CD1 AUX1 Super I/O AUDIO CODEC 2MB BIOS AMR1 Accelerated Graphics Port PCI 1 01 23 01 23 CMOS Battery CLRCMOS1 PCI 2 PCI 3 VIA South Bridge CHA_FAN1 SPEAKER1 M266A USB45 IR1 PLED PWRBTN PANEL1 PS2_USB_PWR1 HDLED RST FLOPPY1 27 17 9 16 15 10 18...
... Chipset 23 20 19 11 LLIinninee in MMIniicc in AUDIO1 CD1 AUX1 Super I/O AUDIO CODEC 2MB BIOS AMR1 Accelerated Graphics Port PCI 1 01 23 01 23 CMOS Battery CLRCMOS1 PCI 2 PCI 3 VIA South Bridge CHA_FAN1 SPEAKER1 M266A USB45 IR1 PLED PWRBTN PANEL1 PS2_USB_PWR1 HDLED RST FLOPPY1 27 17 9 16 15 10 18...
User Manual
Page 16
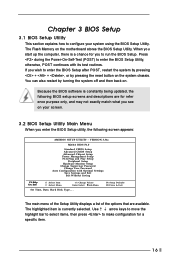
...not exactly match what you see on the system chassis. When you start up the computer, there is currently selected. VERSION 3.31a M266A BIOS P1.0 Standard CMOS Setup Advanced CMOS Setup Advanced Chipset Setup Power Management Setup PCI / Plug and Play Setup Peripheral Setup Hardware Monitor ...Setup Change Supervisor Password Change User Password Auto Configuration with its test routines. Press during the Power-On-Self-Test (POST) to enter the BIOS Setup Utility, otherwise, POST continues with Optimal Settings Save Savings and Exit Exit Without Saving F1: Help Esc: Exit : Select Item :...
...not exactly match what you see on the system chassis. When you start up the computer, there is currently selected. VERSION 3.31a M266A BIOS P1.0 Standard CMOS Setup Advanced CMOS Setup Advanced Chipset Setup Power Management Setup PCI / Plug and Play Setup Peripheral Setup Hardware Monitor ...Setup Change Supervisor Password Change User Password Auto Configuration with its test routines. Press during the Power-On-Self-Test (POST) to enter the BIOS Setup Utility, otherwise, POST continues with Optimal Settings Save Savings and Exit Exit Without Saving F1: Help Esc: Exit : Select Item :...
User Manual
Page 17
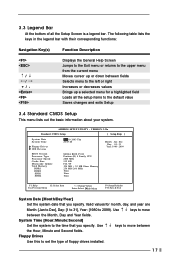
... 3.31a Standard CMOS Setup [ Setup Help ] System Date System Time Floppy Drives IDE Devices BIOS Version Processor Type Processor Speed Cache Size Microcode Update Total Memory DDR1 DDR2 SDR1 SDR2 Apr 10 2003 Thu 20:07:40 M266A BIOS P1.00 Pentium (R) 4 Family CPU 2400 MHz 512 KB F24 / 0F 224 MB + 32...
... 3.31a Standard CMOS Setup [ Setup Help ] System Date System Time Floppy Drives IDE Devices BIOS Version Processor Type Processor Speed Cache Size Microcode Update Total Memory DDR1 DDR2 SDR1 SDR2 Apr 10 2003 Thu 20:07:40 M266A BIOS P1.00 Pentium (R) 4 Family CPU 2400 MHz 512 KB F24 / 0F 224 MB + 32...
User Manual
Page 18
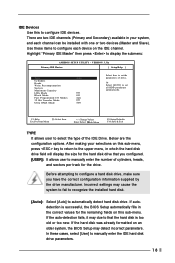
... track for the remaining fields on this sub-menu, press key to return to the upper menu, in your selections on an older system, the BIOS Setup may detect incorrect parameters. Below are two IDE channels (Primary and Secondary) available in whcih the hard disk drive field will display the size... for the hard disk drive that the hard disk is successful, the BIOS Setup automatically fills in the correct values for the drive. If the auto-detection fails, it may cause the system to fail to recognize the...
... track for the remaining fields on this sub-menu, press key to return to the upper menu, in your selections on an older system, the BIOS Setup may detect incorrect parameters. Below are two IDE channels (Primary and Secondary) available in whcih the hard disk drive field will display the size... for the hard disk drive that the hard disk is successful, the BIOS Setup automatically fills in the correct values for the drive. If the auto-detection fails, it may cause the system to fail to recognize the...

User Manual
Page 19
...allows improved transfer speeds and data integrity for a hard disk > 512 MB under DOS and Windows; After entering the hard disk information into BIOS, use a disk utility, such as calculated by reading or writing more data during each transfer. Write Pre-compensation Enter Write Pre-compensation sector....correct value. Maximum Capacity This field shows the drive's maximum capacity as FDISK, to [On] will enhance hard disk performance by the BIOS based on the drive information you can write or read /write heads. Block Mode Set the block mode to partition and format new IDE...
...allows improved transfer speeds and data integrity for a hard disk > 512 MB under DOS and Windows; After entering the hard disk information into BIOS, use a disk utility, such as calculated by reading or writing more data during each transfer. Write Pre-compensation Enter Write Pre-compensation sector....correct value. Maximum Capacity This field shows the drive's maximum capacity as FDISK, to [On] will enhance hard disk performance by the BIOS based on the drive information you can write or read /write heads. Block Mode Set the block mode to partition and format new IDE...

User Manual
Page 20
...order of the devices that your system searches for "Password Check". If [Always] option is selected, the "Password Check" is performed before BIOS setup. Boot Device Priority Use this option is performed before both boot-up time. 20 3.5 Advanced CMOS Setup AMIBIOS SETUP UTILITY - Boot... Lock function after boot up routine by skipping memory retestings. P assword Check Select the check point for an operating system at start-up and BIOS setup. Configuration options: [Setup], [Always]. VERSION 3.31a Advanced CMOS Setup [ Setup Help ] Quick Boot Mode Boot Up Num-Lock Boot ...
...order of the devices that your system searches for "Password Check". If [Always] option is selected, the "Password Check" is performed before BIOS setup. Boot Device Priority Use this option is performed before both boot-up time. 20 3.5 Advanced CMOS Setup AMIBIOS SETUP UTILITY - Boot... Lock function after boot up routine by skipping memory retestings. P assword Check Select the check point for an operating system at start-up and BIOS setup. Configuration options: [Setup], [Always]. VERSION 3.31a Advanced CMOS Setup [ Setup Help ] Quick Boot Mode Boot Up Num-Lock Boot ...

User Manual
Page 27
.... Valid password can cause fatal errors or instability if you select this item and press to monitor the parameters for all appropriate items in the BIOS Setup Utility. AMIBIOS SETUP UTILITY - Press to 6 alphanumeric characters combination. 3.12 Auto Configuration with Optimal Settings When you install the optimized defaults when your... system. You can be greater than the performance level of the hardware on the system that you have made and exit the BIOS Setup Utility. 3.14 Exit Without Saving Select this option, it will pop up a dialog box that lets you to exit the...
.... Valid password can cause fatal errors or instability if you select this item and press to monitor the parameters for all appropriate items in the BIOS Setup Utility. AMIBIOS SETUP UTILITY - Press to 6 alphanumeric characters combination. 3.12 Auto Configuration with Optimal Settings When you install the optimized defaults when your... system. You can be greater than the performance level of the hardware on the system that you have made and exit the BIOS Setup Utility. 3.14 Exit Without Saving Select this option, it will pop up a dialog box that lets you to exit the...


