
User Manual
Page 3
... 25 3.1 Introduction 25 3.1.1 BIOS Menu Bar 25 3.1.2 Navigation Keys 26 3.2 Main Screen 26 3.3 Advanced Screen 27 3.3.1 CPU Configuration 28 3.3.2 Chipset Configuration 30 3.3.3 ACPI Configuration 32 3.3.4 IDE Configuration 33 3.3.5 PCIPnP ... 2.7 Serial ATA (SATA) Hard Disks Installation 21 2.8 Hot Plug and Hot Swap Functions for Windows® VistaTM Premium 2007 and Basic Logo 9 1.4 Motherboard Layout 10 1.5 ASRock 8CH I/O 11 2 .
... 25 3.1 Introduction 25 3.1.1 BIOS Menu Bar 25 3.1.2 Navigation Keys 26 3.2 Main Screen 26 3.3 Advanced Screen 27 3.3.1 CPU Configuration 28 3.3.2 Chipset Configuration 30 3.3.3 ACPI Configuration 32 3.3.4 IDE Configuration 33 3.3.5 PCIPnP ... 2.7 Serial ATA (SATA) Hard Disks Installation 21 2.8 Hot Plug and Hot Swap Functions for Windows® VistaTM Premium 2007 and Basic Logo 9 1.4 Motherboard Layout 10 1.5 ASRock 8CH I/O 11 2 .
User Manual
Page 5
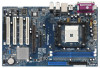
... design conforming to ASRock's commitment to BIOS setup and information of this manual will be subject to the hardware installation. Chapter 3 and 4 contain the configuration guide to quality and endurance. 1. ASRock website http://www.asrock.com 1.1 Package Contents 1 x ASRock K8NF3-VSTA Motherboard (ATX Form Factor: 12.0-in x 7.5-in, 30.5 cm x 19.1 cm) 1 x ASRock K8NF3-VSTA Quick Installation Guide 1 x ASRock K8NF3-VSTA Support CD...
... design conforming to ASRock's commitment to BIOS setup and information of this manual will be subject to the hardware installation. Chapter 3 and 4 contain the configuration guide to quality and endurance. 1. ASRock website http://www.asrock.com 1.1 Package Contents 1 x ASRock K8NF3-VSTA Motherboard (ATX Form Factor: 12.0-in x 7.5-in, 30.5 cm x 19.1 cm) 1 x ASRock K8NF3-VSTA Quick Installation Guide 1 x ASRock K8NF3-VSTA Support CD...

User Manual
Page 7
...64-bit compliant (see CAUTION 6) - 4Mb AMI BIOS - We are shared with overclocking, including adjusting the setting in the BIOS, applying Untied Overclocking Technology, or using the thirdparty overclocking tools. AMI Legal BIOS - Chassis Fan Tachometer - Overclocking may affect your ...and devices of them are not responsible for possible damage caused by overclocking. 7 ACPI 1.1 Compliance Wake Up Events - CPU Temperature Sensing - BIOS Feature Support CD Hardware Monitor OS Certifications - CPU Quiet Fan - Front panel audio connector - 2 x USB 2.0 headers (support 4 USB...
...64-bit compliant (see CAUTION 6) - 4Mb AMI BIOS - We are shared with overclocking, including adjusting the setting in the BIOS, applying Untied Overclocking Technology, or using the thirdparty overclocking tools. AMI Legal BIOS - Chassis Fan Tachometer - Overclocking may affect your ...and devices of them are not responsible for possible damage caused by overclocking. 7 ACPI 1.1 Compliance Wake Up Events - CPU Temperature Sensing - BIOS Feature Support CD Hardware Monitor OS Certifications - CPU Quiet Fan - Front panel audio connector - 2 x USB 2.0 headers (support 4 USB...
User Manual
Page 16
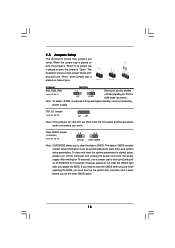
... jumper whose pin1 and pin2 are setup. Note: To select +5VSB, it down before you do not clear the CMOS right after you update the BIOS. After waiting for PS/2 or USB wake up the system first, and then shut it requires 2 Amp and higher standby current provided by power supply... Jumper (CLRCMOS2) (see p.10, No. 14) 1_2 2_3 Default Clear CMOS Note: CLRCMOS2 allows you to clear the CMOS when you just finish updating the BIOS, you need to clear the data in CMOS includes system setup information such as system password, date, time, and system setup parameters. The data in...
... jumper whose pin1 and pin2 are setup. Note: To select +5VSB, it down before you do not clear the CMOS right after you update the BIOS. After waiting for PS/2 or USB wake up the system first, and then shut it requires 2 Amp and higher standby current provided by power supply... Jumper (CLRCMOS2) (see p.10, No. 14) 1_2 2_3 Default Clear CMOS Note: CLRCMOS2 allows you to clear the CMOS when you just finish updating the BIOS, you need to clear the data in CMOS includes system setup information such as system password, date, time, and system setup parameters. The data in...
User Manual
Page 22
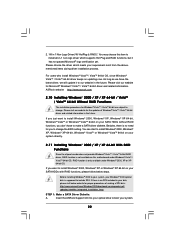
Please visit our website for Windows® VistaTM / VistaTM 64-bit are subject to change the BIOS setting. If you want to install Windows® 2000, Windows® XP, Windows® XP 64-bit, Windows® VistaTM or Windows® VistaTM 64-... included in the future. 2. If you just want to our website in your requirement most from the abovementioned items during driver installation process. Insert the ASRock Support CD into your system. 22 Before installing Windows® 2000 to your system, your Windows® 2000 optical disk is only available under Windows...
Please visit our website for Windows® VistaTM / VistaTM 64-bit are subject to change the BIOS setting. If you want to install Windows® 2000, Windows® XP, Windows® XP 64-bit, Windows® VistaTM or Windows® VistaTM 64-... included in the future. 2. If you just want to our website in your requirement most from the abovementioned items during driver installation process. Insert the ASRock Support CD into your system. 22 Before installing Windows® 2000 to your system, your Windows® 2000 optical disk is only available under Windows...

User Manual
Page 23
... for Windows", which is located in the folder at the beginning of Windows® setup, press F6 to [RAID]. Please refer to the document in BIOS first. B. During POST at the following path: .. \Information\Manual\RAID Installation Guide STEP 4: Install Windows® 2000 / Windows® XP / Windows..., "Guide to the mode you choose and the OS you will be presented. Please select CD- ROM as the boot device. Enter BIOS SETUP UTILITY Advanced screen IDE Configuration. Please refer to the document in the Support CD, "Guide to SATA Hard Disks Installation and RAID Configuration...
... for Windows", which is located in the folder at the beginning of Windows® setup, press F6 to [RAID]. Please refer to the document in BIOS first. B. During POST at the following path: .. \Information\Manual\RAID Installation Guide STEP 4: Install Windows® 2000 / Windows® XP / Windows..., "Guide to the mode you choose and the OS you will be presented. Please select CD- ROM as the boot device. Enter BIOS SETUP UTILITY Advanced screen IDE Configuration. Please refer to the document in the Support CD, "Guide to SATA Hard Disks Installation and RAID Configuration...

User Manual
Page 24
Please refer to [CPU, AGP, Async.]. Before you enable Untied Overclocking function, please enter "Overclock Mode" option of BIOS setup to set the selection from [Auto] to the warning on page 7 for the possible overclocking risk before you apply Untied Overclocking Technology. 24 Therefore, ...
Please refer to [CPU, AGP, Async.]. Before you enable Untied Overclocking function, please enter "Overclock Mode" option of BIOS setup to set the selection from [Auto] to the warning on page 7 for the possible overclocking risk before you apply Untied Overclocking Technology. 24 Therefore, ...

User Manual
Page 25
... is constantly being updated, the following selections: Main To set up the system time/date information Advanced To set up the advanced BIOS features H/W Monitor To display current hardware status Boot To set up the default system device to locate and load the Operating System Security To ...and then back on the system chassis. The Flash Memory on the menu bar, and then press to enter the BIOS SETUP UTILITY, otherwise, POST will continue with the following BIOS setup screens and descriptions are for reference purpose only, and they may not exactly match what you see on your ...
... is constantly being updated, the following selections: Main To set up the system time/date information Advanced To set up the advanced BIOS features H/W Monitor To display current hardware status Boot To set up the default system device to locate and load the Operating System Security To ...and then back on the system chassis. The Flash Memory on the menu bar, and then press to enter the BIOS SETUP UTILITY, otherwise, POST will continue with the following BIOS setup screens and descriptions are for reference purpose only, and they may not exactly match what you see on your ...

User Manual
Page 26
... UTILITY Main Advanced H/W Monitor Boot Security Exit System Overview System Time System Date [17:00:09] [Mon 01/22/2007] BIOS Version : K8NF3-VSTA BIOS P1.0 Processor Type : AMD Athlon(tm) 64 Processor 3000+ (64-bit supported) Processor Speed : 1800MHz Microcode Update : 50FF2/68 L1 Cache Size : ...Use this item to select a field. 3.1.2 Navigation Keys Please check the following table for all the settings To save changes and exit the BIOS SETUP UTILITY To jump to configure system Time. +Tab F1 F9 F10 ESC Select Screen Select Item Change Field Select Field General Help Load Defaults...
... UTILITY Main Advanced H/W Monitor Boot Security Exit System Overview System Time System Date [17:00:09] [Mon 01/22/2007] BIOS Version : K8NF3-VSTA BIOS P1.0 Processor Type : AMD Athlon(tm) 64 Processor 3000+ (64-bit supported) Processor Speed : 1800MHz Microcode Update : 50FF2/68 L1 Cache Size : ...Use this item to select a field. 3.1.2 Navigation Keys Please check the following table for all the settings To save changes and exit the BIOS SETUP UTILITY To jump to configure system Time. +Tab F1 F9 F10 ESC Select Screen Select Item Change Field Select Field General Help Load Defaults...
User Manual
Page 27
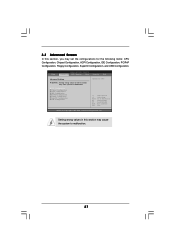
... Configuration, IDE Configuration, PCIPnP Configuration, Floppy Configuration, SuperIO Configuration, and USB Configuration. 3.3 Advanced Screen In this section may cause the system to malfunction. 27 Main BIOS SETUP UTILITY Advanced H/W Monitor Boot Security Exit Advanced Settings WARNING : Setting wrong values in this section, you may set the configurations for CPU Select Screen...
... Configuration, IDE Configuration, PCIPnP Configuration, Floppy Configuration, SuperIO Configuration, and USB Configuration. 3.3 Advanced Screen In this section may cause the system to malfunction. 27 Main BIOS SETUP UTILITY Advanced H/W Monitor Boot Security Exit Advanced Settings WARNING : Setting wrong values in this section, you may set the configurations for CPU Select Screen...

User Manual
Page 28
... of Boot Failure Guard. Please note that enabling this item to [Disable] if above issue occurs. Overclock Mode Use this item to [Enabled]. 3.3.1 CPU Configuration BIOS SETUP UTILITY Advanced CPU Configuration Overclock Mode CPU Frequency (MHz) AGP Frequency (MHz) Boot Failure Guard Spread Spectrum Cool' n' Quiet Processor Maximum Multiplier Processor Maximum...
... of Boot Failure Guard. Please note that enabling this item to [Disable] if above issue occurs. Overclock Mode Use this item to [Enabled]. 3.3.1 CPU Configuration BIOS SETUP UTILITY Advanced CPU Configuration Overclock Mode CPU Frequency (MHz) AGP Frequency (MHz) Boot Failure Guard Spread Spectrum Cool' n' Quiet Processor Maximum Multiplier Processor Maximum...
User Manual
Page 29
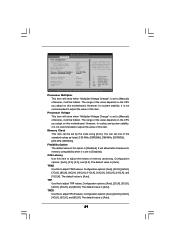
...motherboard. If Manual, multiplier and voltage will allow better tolerance for safety and system stability, it is set to [Enabled]. Advanced BIOS SETUP UTILITY CPU Configuration Overclock Mode CPU Frequency (MHz) AGP Frequency (MHz) Boot Failure Guard Spread Spectrum Cool' n' Quiet ...] [Auto] [Disabled] [Auto] [Auto] If AUTO, multiplier and voltage will show when "Multiplier/Voltage Change" is set to [Manual]; BIOS SETUP UTILITY Processor Multiplier This item will be hidden. otherwise, it will be left at the rated frequency/voltage. Processor Voltage This item will be...
...motherboard. If Manual, multiplier and voltage will allow better tolerance for safety and system stability, it is set to [Enabled]. Advanced BIOS SETUP UTILITY CPU Configuration Overclock Mode CPU Frequency (MHz) AGP Frequency (MHz) Boot Failure Guard Spread Spectrum Cool' n' Quiet ...] [Auto] [Disabled] [Auto] [Auto] If AUTO, multiplier and voltage will show when "Multiplier/Voltage Change" is set to [Manual]; BIOS SETUP UTILITY Processor Multiplier This item will be hidden. otherwise, it will be left at the rated frequency/voltage. Processor Voltage This item will be...

User Manual
Page 30
... value is [8X]. Burst Length Burst length can be spread out over banks on the same node, or accross nodes, decreasing access contention. 3.3.2 Chipset Configuration BIOS SETUP UTILITY Advanced Chipset Settings OnBoard UAA Audio OnBoard LAN [Auto] [Enabled] AGP Data Rate AGP Aperture Size AGP Fast Write AGP SideBand Address Primary...
... value is [8X]. Burst Length Burst length can be spread out over banks on the same node, or accross nodes, decreasing access contention. 3.3.2 Chipset Configuration BIOS SETUP UTILITY Advanced Chipset Settings OnBoard UAA Audio OnBoard LAN [Auto] [Enabled] AGP Data Rate AGP Aperture Size AGP Fast Write AGP SideBand Address Primary...

User Manual
Page 32
... power-soft-off when the power recovers. Suspend to RAM Use this item to select whether to boot up when the power recovers. 3.3.3 ACPI Configuration BIOS SETUP UTILITY Advanced ACPI Settings Suspend To RAM Restore on the system from the power-soft-off mode.
... power-soft-off when the power recovers. Suspend to RAM Use this item to select whether to boot up when the power recovers. 3.3.3 ACPI Configuration BIOS SETUP UTILITY Advanced ACPI Settings Suspend To RAM Restore on the system from the power-soft-off mode.
User Manual
Page 33
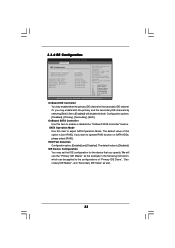
... and Exit Exit v02.54 (C) Copyright 1985-2003, American Megatrends, Inc. SATA Operation Mode Use this item to adjust SATA Operation Mode. 3.3.4 IDE Configuration Advanced BIOS SETUP UTILITY IDE Configuration OnBoard IDE Controller OnBoard SATA Controller SATA Operation Mode HDD Fast Detection Primary IDE Master Primary IDE Slave Secondary IDE Master...
... and Exit Exit v02.54 (C) Copyright 1985-2003, American Megatrends, Inc. SATA Operation Mode Use this item to adjust SATA Operation Mode. 3.3.4 IDE Configuration Advanced BIOS SETUP UTILITY IDE Configuration OnBoard IDE Controller OnBoard SATA Controller SATA Operation Mode HDD Fast Detection Primary IDE Master Primary IDE Slave Secondary IDE Master...

User Manual
Page 34
BIOS SETUP UTILITY Advanced Primary IDE Master Device Vendor Size LBA Mode Block Mode PIO Mode Async DMA Ultra DMA S.M.A.R.T. :Hard Disk :MAXTOR 6L080J4 :80.0 GB :... Transfer [Auto] [Auto] [Auto] [Auto] [Auto] [Disabled] [Disabled] Select the type of the IDE device that you specify. After selecting the hard disk information into BIOS, use of this item to set the partition of the Primary IDE hard disk drives to select the LBA/Large mode for IDE ARMD (ATAPI...
BIOS SETUP UTILITY Advanced Primary IDE Master Device Vendor Size LBA Mode Block Mode PIO Mode Async DMA Ultra DMA S.M.A.R.T. :Hard Disk :MAXTOR 6L080J4 :80.0 GB :... Transfer [Auto] [Auto] [Auto] [Auto] [Auto] [Disabled] [Disabled] Select the type of the IDE device that you specify. After selecting the hard disk information into BIOS, use of this item to set the partition of the Primary IDE hard disk drives to select the LBA/Large mode for IDE ARMD (ATAPI...

User Manual
Page 35
... expansion cards' specifications require other settings. S.M.A.R.T. PCI Latency Timer The default value is recommended to maximize the IDE hard disk data transfer rate. 3.3.5 PCIPnP Configuration BIOS SETUP UTILITY Advanced Advanced PCI / PnP Settings PCI Latency Timer PCI IDE BusMaster [32] [Enabled] Value in this item to malfunction. Use this section may...
... expansion cards' specifications require other settings. S.M.A.R.T. PCI Latency Timer The default value is recommended to maximize the IDE hard disk data transfer rate. 3.3.5 PCIPnP Configuration BIOS SETUP UTILITY Advanced Advanced PCI / PnP Settings PCI Latency Timer PCI IDE BusMaster [32] [Enabled] Value in this item to malfunction. Use this section may...

User Manual
Page 36
... Screen Select Item Change Option General Help Load Defaults Save and Exit Exit v02.54 (C) Copyright 1985-2003, American Megatrends, Inc. 3.3.7 Super IO Configuration BIOS SETUP UTILITY Advanced Configure Super IO Chipset OnBoard Floppy Controller Serial Port Address Infrared Port Address Parallel Port Address Parallel Port Mode EPP Version ECP... Mode DMA Channel Parallel Port IRQ OnBoard Game Port OnBoard MIDI Port [Enabled] [3F8 / IRQ4] [Disabled] [378] [ECP + EPP] [1.9] [DMA3] [IRQ7] [Enabled] [Disabled] Allow BIOS to set the address for the onboard infrared port or disable it .
... Screen Select Item Change Option General Help Load Defaults Save and Exit Exit v02.54 (C) Copyright 1985-2003, American Megatrends, Inc. 3.3.7 Super IO Configuration BIOS SETUP UTILITY Advanced Configure Super IO Chipset OnBoard Floppy Controller Serial Port Address Infrared Port Address Parallel Port Address Parallel Port Mode EPP Version ECP... Mode DMA Channel Parallel Port IRQ OnBoard Game Port OnBoard MIDI Port [Enabled] [3F8 / IRQ4] [Disabled] [378] [ECP + EPP] [1.9] [DMA3] [IRQ7] [Enabled] [Disabled] Allow BIOS to set the address for the onboard infrared port or disable it .

User Manual
Page 38
... you may select [Auto] so that the system will disable the legacy USB support. 38 USB Controller Use this item to auto-detect; 3.3.8 USB Configuration BIOS SETUP UTILITY Advanced USB Configuration USB Controller USB 2.0 Support Legacy USB Support [Enabled] [Enabled] [Disabled] To enable or disable the onboard USB controllers. +F1 F9...
... you may select [Auto] so that the system will disable the legacy USB support. 38 USB Controller Use this item to auto-detect; 3.3.8 USB Configuration BIOS SETUP UTILITY Advanced USB Configuration USB Controller USB 2.0 Support Legacy USB Support [Enabled] [Enabled] [Disabled] To enable or disable the onboard USB controllers. +F1 F9...
User Manual
Page 39
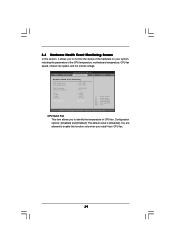
The default value is [Disabled]. BIOS SETUP UTILITY Main Advanced H/W Monitor Boot Security Exit Hardware Health Event Monitoring CPU Temperature M / B Temperature CPU Fan Speed Chassis Fan Speed Vcore + 3.30V + 5.00V + 12....
The default value is [Disabled]. BIOS SETUP UTILITY Main Advanced H/W Monitor Boot Security Exit Hardware Health Event Monitoring CPU Temperature M / B Temperature CPU Fan Speed Chassis Fan Speed Vcore + 3.30V + 5.00V + 12....


