
User Manual
Page 3
BIOS Setup 20 3.1 BIOS Setup Utility 20 3.1.1 BIOS Menu Bar 20 3.1.2 Legend Bar 21 3.2 Main Menu 21 3.3 Advanced, Security, Power, Boot, and Exit Menus 23 4. Advanced BIOS Setup Menu 25 2. Power Setup Menu 31 4. Software Support 24 4.1 Install Operating System 24 4.2 Support CD ...Information 24 4.2.1 Running Support CD 24 4.2.2 Drivers Menu 24 4.2.3 Utilities Menu 24 4.2.4 ASRock "PC-DIY Live Demo" Program 24 4.2.5 ...
BIOS Setup 20 3.1 BIOS Setup Utility 20 3.1.1 BIOS Menu Bar 20 3.1.2 Legend Bar 21 3.2 Main Menu 21 3.3 Advanced, Security, Power, Boot, and Exit Menus 23 4. Advanced BIOS Setup Menu 25 2. Power Setup Menu 31 4. Software Support 24 4.1 Install Operating System 24 4.2 Support CD ...Information 24 4.2.1 Running Support CD 24 4.2.2 Drivers Menu 24 4.2.3 Utilities Menu 24 4.2.4 ASRock "PC-DIY Live Demo" Program 24 4.2.5 ...

User Manual
Page 4
...BIOS setup can be available on ASRock website without notice. Chapter 3 and 4 contain basic BIOS setup and support CD information. More information of this manual occur, the updated version will be subject to quality and endurance. Because the motherboard specifications and the BIOS...SATA) HDD Power Cable (Optional) 1 x ASRock I/O PlusTM Shield 4 ASRock website http://www.asrock.com 1.1 Package Contents 1 x ASRock K7VT6 Motherboard (ATX Form Factor: 12.0-in x 7.0-in, 30.5 cm x 17.8 cm) 1 x ASRock K7VT6 Quick Installation Guide 1 x ASRock K7VT6 Support CD 1 x Ultra ATA 66/100/...
...BIOS setup can be available on ASRock website without notice. Chapter 3 and 4 contain basic BIOS setup and support CD information. More information of this manual occur, the updated version will be subject to quality and endurance. Because the motherboard specifications and the BIOS...SATA) HDD Power Cable (Optional) 1 x ASRock I/O PlusTM Shield 4 ASRock website http://www.asrock.com 1.1 Package Contents 1 x ASRock K7VT6 Motherboard (ATX Form Factor: 12.0-in x 7.0-in, 30.5 cm x 17.8 cm) 1 x ASRock K7VT6 Quick Installation Guide 1 x ASRock K7VT6 Support CD 1 x Ultra ATA 66/100/...

User Manual
Page 6
...motherboard is determined by jumper-setting. Frequencies other than the recommended CPU bus frequencies may cause the instability of "User Manual" in BIOS. To improve heat dissipation, remember to Microsoft® official document at http://www.microsoft.com/whdc/hwdev/bus/USB/USB2support.mspx ..., and page 25 of the system or damage the CPU. While CPU overheat is not recommended to the FSB of this motherboard! BIOS: OS: AMI legal BIOS, Supports "Plug and Play", ACPI 1.1 Compliance Wake-Up Events, SMBIOS 2.3.1 Support, CPU Frequency Stepless Control (only for USB 2.0...
...motherboard is determined by jumper-setting. Frequencies other than the recommended CPU bus frequencies may cause the instability of "User Manual" in BIOS. To improve heat dissipation, remember to Microsoft® official document at http://www.microsoft.com/whdc/hwdev/bus/USB/USB2support.mspx ..., and page 25 of the system or damage the CPU. While CPU overheat is not recommended to the FSB of this motherboard! BIOS: OS: AMI legal BIOS, Supports "Plug and Play", ACPI 1.1 Compliance Wake-Up Events, SMBIOS 2.3.1 Support, CPU Frequency Stepless Control (only for USB 2.0...

User Manual
Page 7
... USB 2.0 T: USB0 Top: RJ-45 B: USB1 USB 2.0 T: USB4 1 B: USB5 JUSB45 VIA KT600 CHIPSET Top: Line In Center: Line Out Bottom: Mic In 27 2MB BIOS AGP 8X K7VT6 LAN PHY SUPER I/O 1.5V_AGP1 IDE1 IDE2 7 8 9 26 25 24 23 22 GAME1 1 DDR400 PCI1 PCI2 1 FSB_SEL0 1 FSB_SEL1 1 FSB_SEL2 1 AUDIO1 JR1 JL1 CMOS BATTERY USB2...
... USB 2.0 T: USB0 Top: RJ-45 B: USB1 USB 2.0 T: USB4 1 B: USB5 JUSB45 VIA KT600 CHIPSET Top: Line In Center: Line Out Bottom: Mic In 27 2MB BIOS AGP 8X K7VT6 LAN PHY SUPER I/O 1.5V_AGP1 IDE1 IDE2 7 8 9 26 25 24 23 22 GAME1 1 DDR400 PCI1 PCI2 1 FSB_SEL0 1 FSB_SEL1 1 FSB_SEL2 1 AUDIO1 JR1 JL1 CMOS BATTERY USB2...

User Manual
Page 13
... Jumpers (see p.7 item 1) +5V +5VSB +5VSB (standby) for 5 seconds. If you need to clear the CMOS when you just finish updating the BIOS, you must adjust "FSB Select Jumpers" according to enable (see p.7 item 23) JR1 JL1 Note: If JR1 and JL1 Jumpers are setup. When the ... must boot up events. Jumper FSB Select Jumpers (FSB_SEL0, FSB_SEL1, FSB_SEL2) (see p.7 item 22) 2-pin jumper Note: CLRCMOS2 allows you update the BIOS. After shorting the Clear CMOS jumper, please remove the jumper cap. PS2_USB_PWR1 1_2 2_3 Short pin2, pin3 to the FSB of this motherboard is placed...
... Jumpers (see p.7 item 1) +5V +5VSB +5VSB (standby) for 5 seconds. If you need to clear the CMOS when you just finish updating the BIOS, you must adjust "FSB Select Jumpers" according to enable (see p.7 item 23) JR1 JL1 Note: If JR1 and JL1 Jumpers are setup. When the ... must boot up events. Jumper FSB Select Jumpers (FSB_SEL0, FSB_SEL1, FSB_SEL2) (see p.7 item 22) 2-pin jumper Note: CLRCMOS2 allows you update the BIOS. After shorting the Clear CMOS jumper, please remove the jumper cap. PS2_USB_PWR1 1_2 2_3 Short pin2, pin3 to the FSB of this motherboard is placed...

User Manual
Page 19
...configuration before you start to format the floppy diskette and copy SATA drivers into the floppy drive. Before you start to use "VT8237 SATA RAID BIOS" to set the RAID configuration by using "VIA RAID Tool" in the Support CD for boot devices selection appears. Please insert a floppy ... .. \ VIA RAID Tool 19 2.9 Making An SATA Driver Diskette If you want to generate Serial ATA driver diskette [YN]?", press . STEP 1: Insert the ASRock Support CD into your optical drive to format and copy files [YN]? WARNING! Start to boot your system. (Do NOT insert any floppy diskette into...
...configuration before you start to format the floppy diskette and copy SATA drivers into the floppy drive. Before you start to use "VT8237 SATA RAID BIOS" to set the RAID configuration by using "VIA RAID Tool" in the Support CD for boot devices selection appears. Please insert a floppy ... .. \ VIA RAID Tool 19 2.9 Making An SATA Driver Diskette If you want to generate Serial ATA driver diskette [YN]?", press . STEP 1: Insert the ASRock Support CD into your optical drive to format and copy files [YN]? WARNING! Start to boot your system. (Do NOT insert any floppy diskette into...
User Manual
Page 20
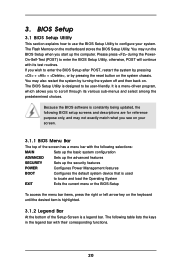
... PowerOn-Self-Test (POST) to be user-friendly. If you to locate and load the Operating System EXIT Exits the current menu or the BIOS Setup To access the menu bar items, press the right or left arrow key on your system. The following table lists the keys in the...: MAIN Sets up the basic system configuration ADVANCED Sets up the advanced features SECURITY Sets up the computer. BIOS Setup 3.1 BIOS Setup Utility This section explains how to use the BIOS Setup Utility to enter the BIOS Setup after POST, restart the system by pressing + + , or by turning the system off and then...
... PowerOn-Self-Test (POST) to be user-friendly. If you to locate and load the Operating System EXIT Exits the current menu or the BIOS Setup To access the menu bar items, press the right or left arrow key on your system. The following table lists the keys in the...: MAIN Sets up the basic system configuration ADVANCED Sets up the advanced features SECURITY Sets up the computer. BIOS Setup 3.1 BIOS Setup Utility This section explains how to use the BIOS Setup Utility to enter the BIOS Setup after POST, restart the system by pressing + + , or by turning the system off and then...
User Manual
Page 21
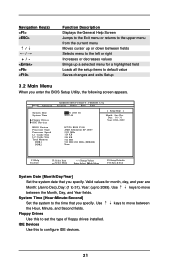
... Loads all the setup items to default value Saves changes and exits Setup 3.2 Main Menu When you specify. Dec Day: 01 - 31 Year: 1980 - 2099 K7VT6 BIOS P1.00 AMD Athlon(tm) XP 2600+ 2133 MHz 128 KB 256 KB 512 MB 512 MB / 200 MHz (DDR400) None F1:Help Esc:Exit... +/-:Change Values Enter:Select Sub-Menu F9:Setup Defaults F10:Save & Exit System Date [Month/Day/Year] Set the system date that you enter the BIOS Setup Utility, the following screen appears. Navigation Key(s) / / + / Function Description Displays the General Help Screen Jumps to the Exit menu or returns to the upper...
... Loads all the setup items to default value Saves changes and exits Setup 3.2 Main Menu When you specify. Dec Day: 01 - 31 Year: 1980 - 2099 K7VT6 BIOS P1.00 AMD Athlon(tm) XP 2600+ 2133 MHz 128 KB 256 KB 512 MB 512 MB / 200 MHz (DDR400) None F1:Help Esc:Exit... +/-:Change Values Enter:Select Sub-Menu F9:Setup Defaults F10:Save & Exit System Date [Month/Day/Year] Set the system date that you enter the BIOS Setup Utility, the following screen appears. Navigation Key(s) / / + / Function Description Displays the General Help Screen Jumps to the Exit menu or returns to the upper...

User Manual
Page 22
... Main menu and press to partition and format the new IDE hard disk drives. This is necessary so that the hard disk is successful, the BIOS Setup automatically fills in the correct values for the drive. Main AMIBIOS SETUP UTILITY - VERSION 3.31a Primary IDE Master [ Setup Help ] Type... all HDD parameters automatically. TYPE To set the type of the IDE device, first, please select "IDE Devices" on an older system, the BIOS Setup may detect incorrect parameters. In these cases, select [User] to automatically detect hard disk drive. Incorrect settings may cause the system to fail...
... Main menu and press to partition and format the new IDE hard disk drives. This is necessary so that the hard disk is successful, the BIOS Setup automatically fills in the correct values for the drive. Main AMIBIOS SETUP UTILITY - VERSION 3.31a Primary IDE Master [ Setup Help ] Type... all HDD parameters automatically. TYPE To set the type of the IDE device, first, please select "IDE Devices" on an older system, the BIOS Setup may detect incorrect parameters. In these cases, select [User] to automatically detect hard disk drive. Incorrect settings may cause the system to fail...
User Manual
Page 23
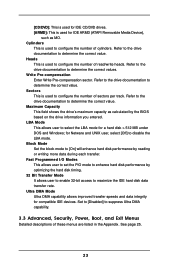
.../DVD]: This is used for IDE CD/DVD drives. [ARMD]: This is used for IDE ARMD (ATAPI Removable Media Device), such as calculated by the BIOS based on the drive information you entered. Refer to the drive documentation to determine the correct value. Refer to the drive documentation to determine the...
.../DVD]: This is used for IDE CD/DVD drives. [ARMD]: This is used for IDE ARMD (ATAPI Removable Media Device), such as calculated by the BIOS based on the drive information you entered. Refer to the drive documentation to determine the correct value. Refer to the drive documentation to determine the...

User Manual
Page 25
...detect the inserted memory module(s) and automatically assign appropriate frequency. It will introduce you thoroughly know the feature. Appendix: Advanced BIOS Setup This section will allow better tolerance for better system stability. This is recommended to select this motherboard is determined by the... AMD CPU before you use this option is [Disabled]. Wrong setup may select other value as the FSB setting in BIOS setup to [Enabled]. 25 Chipset Configuration Resource Configuration Peripheral Configuration System Hardware Monitor F1:Help Esc:Exit :Select Item :Select...
...detect the inserted memory module(s) and automatically assign appropriate frequency. It will introduce you thoroughly know the feature. Appendix: Advanced BIOS Setup This section will allow better tolerance for better system stability. This is recommended to select this motherboard is determined by the... AMD CPU before you use this option is [Disabled]. Wrong setup may select other value as the FSB setting in BIOS setup to [Enabled]. 25 Chipset Configuration Resource Configuration Peripheral Configuration System Hardware Monitor F1:Help Esc:Exit :Select Item :Select...

User Manual
Page 30
...Setup], [Always]. Valid password can be a 1 to set the supervisor password. If [Setup] option is selected, the "Password Check" is performed before BIOS setup. User Password: This field shows the status of the Supervisor Password. [Clear]: No password has been set. [Set]: Supervisor password has been set.... If [Always] option is selected, the "Password Check" is performed before both boot-up and BIOS setup. 30 If you already have a password, you need to enter your current password first in order to set . 2. VERSION 3.31a ...
...Setup], [Always]. Valid password can be a 1 to set the supervisor password. If [Setup] option is selected, the "Password Check" is performed before BIOS setup. User Password: This field shows the status of the Supervisor Password. [Clear]: No password has been set. [Set]: Supervisor password has been set.... If [Always] option is selected, the "Password Check" is performed before both boot-up and BIOS setup. 30 If you already have a password, you need to enter your current password first in order to set . 2. VERSION 3.31a ...
User Manual
Page 32
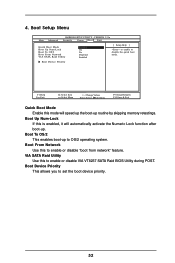
... +/-:Change Values Enter:Select Sub-Menu F9:Setup Defaults F10:Save & Exit Quick Boot Mode Enable this to enable or disable VIA VT8237 SATA Raid BIOS Utility during POST. VERSION 3.31a Security Power Boot Exit Quick Boot Mode Boot Up Num-Lock Boot To OS/2 Boot From Network VIA SATA Raid...
... +/-:Change Values Enter:Select Sub-Menu F9:Setup Defaults F10:Save & Exit Quick Boot Mode Enable this to enable or disable VIA VT8237 SATA Raid BIOS Utility during POST. VERSION 3.31a Security Power Boot Exit Quick Boot Mode Boot Up Num-Lock Boot To OS/2 Boot From Network VIA SATA Raid...

User Manual
Page 33
... you enter the submenu, the message "Load default settings" will load the default values for all changes are discarded. 33 If you will exit the BIOS Setup Utility without saving changes" will appear. Discard Changes After you enter the sub-menu, the message "Save current settings and exit" will appear. Exit...:Save & Exit Exit Saving Changes After you enter the sub-menu, the message "Load setup original values" will save the current settings and exit the BIOS SETUP Utility. 5.
... you enter the submenu, the message "Load default settings" will load the default values for all changes are discarded. 33 If you will exit the BIOS Setup Utility without saving changes" will appear. Discard Changes After you enter the sub-menu, the message "Save current settings and exit" will appear. Exit...:Save & Exit Exit Saving Changes After you enter the sub-menu, the message "Load setup original values" will save the current settings and exit the BIOS SETUP Utility. 5.


