User Manual
Page 13
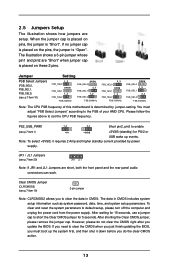
... provided by jumper-setting. Jumper FSB Select Jumpers (FSB_SEL0, FSB_SEL1, FSB_SEL2) (see p.7 item 19) 2-pin jumper Note: CLRCMOS2 allows you update the BIOS. You must boot up events. Clear CMOS Jumper (CLRCMOS2) (see p.7 item 10) Setting 1_2 FSB_SEL0 OPEN FSB_SEL1 1_2 FSB_SEL2 FSB 200MHz OPEN FSB_SEL0 2_3... p.7 item 1) +5V +5VSB +5VSB (standby) for 5 seconds. If no jumper cap is placed on pins, the jumper is "Open". To clear and reset the system parameters to set the CPU FSB frequency. When the jumper cap is placed on the pins, the jumper is "Short".
... provided by jumper-setting. Jumper FSB Select Jumpers (FSB_SEL0, FSB_SEL1, FSB_SEL2) (see p.7 item 19) 2-pin jumper Note: CLRCMOS2 allows you update the BIOS. You must boot up events. Clear CMOS Jumper (CLRCMOS2) (see p.7 item 10) Setting 1_2 FSB_SEL0 OPEN FSB_SEL1 1_2 FSB_SEL2 FSB 200MHz OPEN FSB_SEL0 2_3... p.7 item 1) +5V +5VSB +5VSB (standby) for 5 seconds. If no jumper cap is placed on pins, the jumper is "Open". To clear and reset the system parameters to set the CPU FSB frequency. When the jumper cap is placed on the pins, the jumper is "Short".

User Manual
Page 17
...and descriptions are for reference purpose only, and may also restart the system by pressing the reset button on the motherboard stores the BIOS Setup Utility. Because the BIOS software is designed to enter the BIOS Setup after POST, restart the system by pressing + + , or by turning the ...the following selections: MAIN Sets up the basic system configuration ADVANCED Sets up the advanced features SECURITY Sets up the computer. 3. The BIOS Setup Utility is constantly being updated, the following table lists the keys in the legend bar with its various sub-menus and select ...
...and descriptions are for reference purpose only, and may also restart the system by pressing the reset button on the motherboard stores the BIOS Setup Utility. Because the BIOS software is designed to enter the BIOS Setup after POST, restart the system by pressing + + , or by turning the ...the following selections: MAIN Sets up the basic system configuration ADVANCED Sets up the advanced features SECURITY Sets up the computer. 3. The BIOS Setup Utility is constantly being updated, the following table lists the keys in the legend bar with its various sub-menus and select ...
Quick Installation Guide
Page 10
..., please do not have to adjust the multiplier for normal usage. See page 14 of multiplier. English 10 ASRock K7VT6-C Motherboard J1 Jumper (FID0, FID1, FID2, FID3, FID4) (see p.2 item 19) 2-pin jumper Note... cord from the power supply. If you need to clear the CMOS when you just finish updating the BIOS, you must boot up events. However, the system will work . PS2_USB_PWR1 Short pin2, pin3 to enable...parameters. The data in the Support CD for 5 seconds. To clear and reset the system parameters to short the Clear CMOS jumper for details. You do not clear the ...
..., please do not have to adjust the multiplier for normal usage. See page 14 of multiplier. English 10 ASRock K7VT6-C Motherboard J1 Jumper (FID0, FID1, FID2, FID3, FID4) (see p.2 item 19) 2-pin jumper Note... cord from the power supply. If you need to clear the CMOS when you just finish updating the BIOS, you must boot up events. However, the system will work . PS2_USB_PWR1 Short pin2, pin3 to enable...parameters. The data in the Support CD for 5 seconds. To clear and reset the system parameters to short the Clear CMOS jumper for details. You do not clear the ...

Quick Installation Guide
Page 13
... detailed information about BIOS Setup, please refer to the User Manual (PDF file) contained in the Support CD to scroll through the following path: ..\ MPEGAV \ AVSEQ01.DAT 13 ASRock K7VT6-C Motherboard English EXE" from the "BIN" folder in the Support CD. 4. "PC-DIY Live Demo" ASRock presents you a ... own PC system step by pressing + + , or pressing the reset button on the system chassis. If the Main Menu does not appear automatically, locate and double-click on the motherboard stores BIOS Setup Utility. BIOS Information The Flash Memory on the file "ASSETUP. When you wish ...
... detailed information about BIOS Setup, please refer to the User Manual (PDF file) contained in the Support CD to scroll through the following path: ..\ MPEGAV \ AVSEQ01.DAT 13 ASRock K7VT6-C Motherboard English EXE" from the "BIN" folder in the Support CD. 4. "PC-DIY Live Demo" ASRock presents you a ... own PC system step by pressing + + , or pressing the reset button on the system chassis. If the Main Menu does not appear automatically, locate and double-click on the motherboard stores BIOS Setup Utility. BIOS Information The Flash Memory on the file "ASSETUP. When you wish ...


