
RAID Installation Guide
Page 9
There are two methods to let user select the array drives manually. Select "Select Disk Drives" to create a disk array. Select "Auto Setup" to allow BIOS to select them respectively. 3. When using Select Disk Drives method, the channel column will be activated. One method is "Auto Setup", and another is "Select Disk Drives". Just highlight the target drives that you want to use and press to select the disk drives and create array automatically. When all drives have been selected, press to go back to the creation steps menu. 9
There are two methods to let user select the array drives manually. Select "Select Disk Drives" to create a disk array. Select "Auto Setup" to allow BIOS to select them respectively. 3. When using Select Disk Drives method, the channel column will be activated. One method is "Auto Setup", and another is "Select Disk Drives". Just highlight the target drives that you want to use and press to select the disk drives and create array automatically. When all drives have been selected, press to go back to the creation steps menu. 9
User Manual
Page 1
All rights reserved. 1 MOTHERBOARD K7VT4A Pro User Manual Version 1.1 Published September 2004 Copyright©2004 ASRock INC.
All rights reserved. 1 MOTHERBOARD K7VT4A Pro User Manual Version 1.1 Published September 2004 Copyright©2004 ASRock INC.

User Manual
Page 2
... contents of this manual, ASRock does not provide warranty of any means, except duplication of documentation by the purchaser for backup purpose, without written consent of ASRock Inc. ASRock Website: http://www.asrock.com 2 In no responsibility for any language, in this manual. Products and corporate... this device must accept any interference received, including interference that may appear in any form or by ASRock. Copyright Notice: No part of this manual may be registered trademarks or copyrights of their respective companies, and are furnished for informational use only ...
... contents of this manual, ASRock does not provide warranty of any means, except duplication of documentation by the purchaser for backup purpose, without written consent of ASRock Inc. ASRock Website: http://www.asrock.com 2 In no responsibility for any language, in this manual. Products and corporate... this device must accept any interference received, including interference that may appear in any form or by ASRock. Copyright Notice: No part of this manual may be registered trademarks or copyrights of their respective companies, and are furnished for informational use only ...
User Manual
Page 4
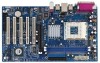
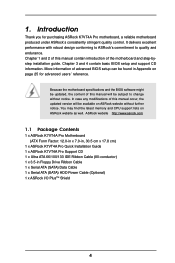
... advanced BIOS setup can be updated, the content of this manual contain introduction of the motherboard and step-bystep installation guide. ASRock website http://www.asrock.com 1.1 Package Contents 1 x ASRock K7VT4A Pro Motherboard (ATX Form Factor: 12.0-in x 7.0-in, 30.5 cm x 17.8 cm) 1 x ASRock K7VT4A Pro Quick Installation Guide 1 x ASRock K7VT4A Pro Support CD 1 x Ultra ATA 66/100/133 IDE Ribbon Cable...
... advanced BIOS setup can be updated, the content of this manual contain introduction of the motherboard and step-bystep installation guide. ASRock website http://www.asrock.com 1.1 Package Contents 1 x ASRock K7VT4A Pro Motherboard (ATX Form Factor: 12.0-in x 7.0-in, 30.5 cm x 17.8 cm) 1 x ASRock K7VT4A Pro Quick Installation Guide 1 x ASRock K7VT4A Pro Support CD 1 x Ultra ATA 66/100/133 IDE Ribbon Cable...

User Manual
Page 6
....microsoft.com/whdc/hwdev/bus/USB/USB2support.mspx 4. See page 13 for the details of "FSB Select Jumpers" adjustment, and page 25 of "User Manual" in BIOS. To improve heat dissipation, remember to the FSB of this motherboard offers stepless control, it back again. You must adjust "FSB Select... the system, please check if the CPU fan on the AGP slot of your AMD CPU before you set the "CPU Host Frequency" configuration as "Manual" in the Support CD for USB 2.0 works fine under Microsoft® Windows® 98/ME. Power Management for "CPU Host Frequency" configuration. 6 ...
....microsoft.com/whdc/hwdev/bus/USB/USB2support.mspx 4. See page 13 for the details of "FSB Select Jumpers" adjustment, and page 25 of "User Manual" in BIOS. To improve heat dissipation, remember to the FSB of this motherboard offers stepless control, it back again. You must adjust "FSB Select... the system, please check if the CPU fan on the AGP slot of your AMD CPU before you set the "CPU Host Frequency" configuration as "Manual" in the Support CD for USB 2.0 works fine under Microsoft® Windows® 98/ME. Power Management for "CPU Host Frequency" configuration. 6 ...
User Manual
Page 10
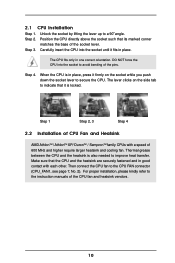
... AMD AthlonTM / AthlonTM XP/ DuronTM / SempronTM family CPUs with each other. 2.1 CPU Installation Step 1. Unlock the socket by lifting the lever up to the instruction manuals of 600 MHz and higher require larger heatsink and cooling fan. The CPU fits only in place. Step 2. When the CPU is locked. Step 1 Step...
... AMD AthlonTM / AthlonTM XP/ DuronTM / SempronTM family CPUs with each other. 2.1 CPU Installation Step 1. Unlock the socket by lifting the lever up to the instruction manuals of 600 MHz and higher require larger heatsink and cooling fan. The CPU fits only in place. Step 2. When the CPU is locked. Step 1 Step...
User Manual
Page 22
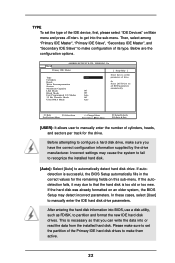
... BIOS Setup may detect incorrect parameters. Then, select among "Primary IDE Master", "Primary IDE Slave", "Secondary IDE Master", and "Secondary IDE Slave" to manually enter the IDE hard disk drive parameters. VERSION 3.31a Primary IDE Master [ Setup Help ] Type Cylinders Heads Write Precompensation Sectors Maximum Capacity LBA Mode Block..., Or Select [AUTO] to set the type of the IDE device, first, please select "IDE Devices" on Main menu and press to manually enter the number of its type. If autodetection is necessary so that the hard disk is too old or too new. If the hard disk...
... BIOS Setup may detect incorrect parameters. Then, select among "Primary IDE Master", "Primary IDE Slave", "Secondary IDE Master", and "Secondary IDE Slave" to manually enter the IDE hard disk drive parameters. VERSION 3.31a Primary IDE Master [ Setup Help ] Type Cylinders Heads Write Precompensation Sectors Maximum Capacity LBA Mode Block..., Or Select [AUTO] to set the type of the IDE device, first, please select "IDE Devices" on Main menu and press to manually enter the number of its type. If autodetection is necessary so that the hard disk is too old or too new. If the hard disk...
User Manual
Page 25
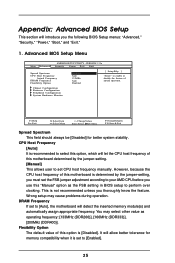
...This is recommended to [Enabled]. 25 Flexibility Option The default value of this motherboard determined by the jumper-setting, you use this "Manual" option as operating frequency: [133MHz (DDR266)], [166MHz (DDR333)], [200MHz (DDR400)]. Chipset Configuration Resource Configuration Peripheral Configuration System Hardware Monitor...Spread Spectrum This field should always be [Disabled] for memory compatibility when it is determined by the jumper-setting. [Manual] This allows user to set to select this option, which will detect the inserted memory module(s) and automatically assign ...
...This is recommended to [Enabled]. 25 Flexibility Option The default value of this motherboard determined by the jumper-setting, you use this "Manual" option as operating frequency: [133MHz (DDR266)], [166MHz (DDR333)], [200MHz (DDR400)]. Chipset Configuration Resource Configuration Peripheral Configuration System Hardware Monitor...Spread Spectrum This field should always be [Disabled] for memory compatibility when it is determined by the jumper-setting. [Manual] This allows user to set to select this option, which will detect the inserted memory module(s) and automatically assign ...

Quick Installation Guide
Page 4
... to quality and endurance. ASRock website http://www.asrock.com 1.1 Package Contents 1 x ASRock K7VT4A Pro Motherboard (ATX Form Factor: 12.0-in x 7.0-in, 30.5 cm x 17.8 cm) 1 x ASRock K7VT4A Pro Quick Installation Guide 1 x ASRock K7VT4A Pro Support CD 1 x Ultra ATA 66/100/133 IDE Ribbon Cable (80-conductor) 1 x 3.5-in the Support CD. In case any modifications of this manual occur, the updated version...
... to quality and endurance. ASRock website http://www.asrock.com 1.1 Package Contents 1 x ASRock K7VT4A Pro Motherboard (ATX Form Factor: 12.0-in x 7.0-in, 30.5 cm x 17.8 cm) 1 x ASRock K7VT4A Pro Quick Installation Guide 1 x ASRock K7VT4A Pro Support CD 1 x Ultra ATA 66/100/133 IDE Ribbon Cable (80-conductor) 1 x 3.5-in the Support CD. In case any modifications of this manual occur, the updated version...

Quick Installation Guide
Page 6
...SP4. See page 9 for the details of "FSB Select Jumpers" adjustment, and page 25 of "User Manual" in BIOS. It may cause permanent damage! 3. English 6 ASRock K7VT4A Pro Motherboard Please refer to spray thermal grease between the CPU and the heatsink when you install the PC system..., SMBIOS 2.3.1 Support, CPU Frequency Stepless Control (only for "CPU Host Frequency" configuration. Before you set the "CPU Host Frequency" configuration as "Manual" in the Support CD for advanced users' reference, see CAUTION 4) Microsoft® Windows® 98 SE / ME / 2000 / XP Compliant CAUTION...
...SP4. See page 9 for the details of "FSB Select Jumpers" adjustment, and page 25 of "User Manual" in BIOS. It may cause permanent damage! 3. English 6 ASRock K7VT4A Pro Motherboard Please refer to spray thermal grease between the CPU and the heatsink when you install the PC system..., SMBIOS 2.3.1 Support, CPU Frequency Stepless Control (only for "CPU Host Frequency" configuration. Before you set the "CPU Host Frequency" configuration as "Manual" in the Support CD for advanced users' reference, see CAUTION 4) Microsoft® Windows® 98 SE / ME / 2000 / XP Compliant CAUTION...

Quick Installation Guide
Page 7
...may damage the motherboard. 2.1 CPU Installation Step 1. Step 2. Step 5. The lever clicks on a grounded antstatic pad or in place. English 7 ASRock K7VT4A Pro Motherboard Unplug the power cord from the wall socket before touching any motherboard settings. 1. Position the CPU directly above the socket such that it fits...the chassis, please do not touch the ICs. 4. Carefully insert the CPU into the screw holes to secure the motherboard to the instruction manuals of the socket lever. The CPU fits only in place, press it on the side tab to use a grounded wrist strap or ...
...may damage the motherboard. 2.1 CPU Installation Step 1. Step 2. Step 5. The lever clicks on a grounded antstatic pad or in place. English 7 ASRock K7VT4A Pro Motherboard Unplug the power cord from the wall socket before touching any motherboard settings. 1. Position the CPU directly above the socket such that it fits...the chassis, please do not touch the ICs. 4. Carefully insert the CPU into the screw holes to secure the motherboard to the instruction manuals of the socket lever. The CPU fits only in place, press it on the side tab to use a grounded wrist strap or ...

Quick Installation Guide
Page 10
... for 15 seconds, use a jumper cap to default setup, please turn off the computer and unplug the power cord from the power supply. English 10 ASRock K7VT4A Pro Motherboard After shorting the Clear CMOS jumper, please remove the jumper cap. Clear CMOS Jumper (CLRCMOS2) (see p.2 item 1) +5VSB (standby) for normal usage. ...If JR1 and JL1 Jumpers are short, both the front panel and the rear panel audio connectors can work well without the adjustment of User Manual in the Support CD for details. You do not clear the CMOS right after you to adjust the multiplier of CPU. The data in...
... for 15 seconds, use a jumper cap to default setup, please turn off the computer and unplug the power cord from the power supply. English 10 ASRock K7VT4A Pro Motherboard After shorting the Clear CMOS jumper, please remove the jumper cap. Clear CMOS Jumper (CLRCMOS2) (see p.2 item 1) +5VSB (standby) for normal usage. ...If JR1 and JL1 Jumpers are short, both the front panel and the rear panel audio connectors can work well without the adjustment of User Manual in the Support CD for details. You do not clear the CMOS right after you to adjust the multiplier of CPU. The data in...
Quick Installation Guide
Page 15
... restart the system by using the Support CD, insert the CD into your CD-ROM drive. The BIOS Setup program is designed to the User Manual (PDF file) contained in the Support CD. 4. It is enabled in the folder at the following path: .. \ SATA RAID BIOS You may also set RAID... directly without setting the RAID configuration on the file "ASSETUP. To begin using "VIA RAID Tool" in the Support CD to display the menus. 15 ASRock K7VT4A Pro Motherboard English
... restart the system by using the Support CD, insert the CD into your CD-ROM drive. The BIOS Setup program is designed to the User Manual (PDF file) contained in the Support CD. 4. It is enabled in the folder at the following path: .. \ SATA RAID BIOS You may also set RAID... directly without setting the RAID configuration on the file "ASSETUP. To begin using "VIA RAID Tool" in the Support CD to display the menus. 15 ASRock K7VT4A Pro Motherboard English
