
User Manual
Page 3
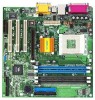
... 19 2. Contents 1 Introduction 4 1.1 Package Contents 4 1.2 Specifications 4 1.3 Motherboard Layout 6 1.4 ASRock I/O 7 TM ...2 Installation 8 2.1 Screw Holes 8 2.2 Pre-installation Precautions 8 2.3 CPU Installation 8 2.4 Installation of Heatsink and CPU fan 9 2.5 Installation of Memory Modules (DIMM 9 2.6 Expansion Slots 10 2.7 Jumpers Setup 11 2.8 Connectors 11 3 BIOS Setup 14 3.1 BIOS Setup Utility 14 3.1.1 BIOS Menu Bar 14 3.1.2 Legend Bar 15 3.2 Main Menu 15...
... 19 2. Contents 1 Introduction 4 1.1 Package Contents 4 1.2 Specifications 4 1.3 Motherboard Layout 6 1.4 ASRock I/O 7 TM ...2 Installation 8 2.1 Screw Holes 8 2.2 Pre-installation Precautions 8 2.3 CPU Installation 8 2.4 Installation of Heatsink and CPU fan 9 2.5 Installation of Memory Modules (DIMM 9 2.6 Expansion Slots 10 2.7 Jumpers Setup 11 2.8 Connectors 11 3 BIOS Setup 14 3.1 BIOS Setup Utility 14 3.1.1 BIOS Menu Bar 14 3.1.2 Legend Bar 15 3.2 Main Menu 15...

User Manual
Page 4
... Mode 4 Can connect up to quality and endurance. Chapter 3 and 4 contain basic BIOS setup and Support CD information. For advanced users' reference, the Appendix offers more advanced BIOS Setup information. 1.1 Package Contents ASRock K7VM2 Motherboard (Micro ATX form factor: 9.6" x 9.6") ASRock K7VM2 Quick Installation Guide ASRock AMD-VIA Series Support CD 1 cable for IDE devices (1 x ATA 66/100...
... Mode 4 Can connect up to quality and endurance. Chapter 3 and 4 contain basic BIOS setup and Support CD information. For advanced users' reference, the Appendix offers more advanced BIOS Setup information. 1.1 Package Contents ASRock K7VM2 Motherboard (Micro ATX form factor: 9.6" x 9.6") ASRock K7VM2 Quick Installation Guide ASRock AMD-VIA Series Support CD 1 cable for IDE devices (1 x ATA 66/100...

User Manual
Page 5
...Chassis fan tachometer 3 slots with PCI Specification 2.2 1 universal AGP slot, supports 3.3v / 1.5v, 4X / 2X / 1X AGP card 1 slot, supports ASRock AMR modem card, shares the bracket with the slot PCI 3 4 default USB ports and a set of the system or damage the CPU. 5 Please check...CPU fan on the chassis will be disabled. ASRock U-COP: Hardware Monitor: PCI slots: AGP slot: AMR slot: USB 2.0: ASRock I/OTM: BIOS: OS: Dual External/Internal temperature sensor Hardware mechanism CPU overheat shutdown to perform over clocking. Although K7VM2 offers stepless control, it is detected, the ...
...Chassis fan tachometer 3 slots with PCI Specification 2.2 1 universal AGP slot, supports 3.3v / 1.5v, 4X / 2X / 1X AGP card 1 slot, supports ASRock AMR modem card, shares the bracket with the slot PCI 3 4 default USB ports and a set of the system or damage the CPU. 5 Please check...CPU fan on the chassis will be disabled. ASRock U-COP: Hardware Monitor: PCI slots: AGP slot: AMR slot: USB 2.0: ASRock I/OTM: BIOS: OS: Dual External/Internal temperature sensor Hardware mechanism CPU overheat shutdown to perform over clocking. Although K7VM2 offers stepless control, it is detected, the ...

User Manual
Page 14
... are for you to scroll through its test routines. The Flash Memory on . It is a menu-driven program, which allows you to run the BIOS Setup. The BIOS Setup utility is designed to be user-friendly. You can also restart by pressing the reset button on the system chassis. When you start... Management features BOOT Configures the default system device that is used to locate and load the Operating System EXIT Exits the current menu or the BIOS Setup To access the menu bar items, press the right or left arrow key on the keyboard until the desired item is highlighted. 3.1.2 Legend Bar...
... are for you to scroll through its test routines. The Flash Memory on . It is a menu-driven program, which allows you to run the BIOS Setup. The BIOS Setup utility is designed to be user-friendly. You can also restart by pressing the reset button on the system chassis. When you start... Management features BOOT Configures the default system device that is used to locate and load the Operating System EXIT Exits the current menu or the BIOS Setup To access the menu bar items, press the right or left arrow key on the keyboard until the desired item is highlighted. 3.1.2 Legend Bar...

User Manual
Page 15
... screen to configure IDE devices. 15 Floppy Drives Use this to its Setup Defaults Saves changes and exits Setup 3.2 Main Menu When you enter the BIOS Setup utility, the following screen appears. System Time [Hour:Minute:Second] Set the system to move between the Hour, Minute and Second fields. Use keys...
... screen to configure IDE devices. 15 Floppy Drives Use this to its Setup Defaults Saves changes and exits Setup 3.2 Main Menu When you enter the BIOS Setup utility, the following screen appears. System Time [Hour:Minute:Second] Set the system to move between the Hour, Minute and Second fields. Use keys...
User Manual
Page 16
If auto-detection is too old or too new. After entering the hard disk information into BIOS, use a disk utility, such as FDISK, to manually enter the IDE hard disk drive parameters. Before attempting to configure a hard disk drive, make sure you ... hard disk drive. Below are the configuration options. After making your selections on an older system, the BIOS Setup may detect incorrect parameters. This is necessary so that the hard disk is successful, the BIOS Setup automatically fills in the correct values for the remaining fields on this sub-menu, press key...
If auto-detection is too old or too new. After entering the hard disk information into BIOS, use a disk utility, such as FDISK, to manually enter the IDE hard disk drive parameters. Before attempting to configure a hard disk drive, make sure you ... hard disk drive. Below are the configuration options. After making your selections on an older system, the BIOS Setup may detect incorrect parameters. This is necessary so that the hard disk is successful, the BIOS Setup automatically fills in the correct values for the remaining fields on this sub-menu, press key...

User Manual
Page 17
... the correct value. Refer to the drive documentation to determine the correct value. for IDE ARMD (Accelerated Removable Media Device), such as calculated by the BIOS based on the drive information you entered. Refer to the drive documentation to determine the correct value. Set to [Disabled] to [On] will enhance hard...
... the correct value. Refer to the drive documentation to determine the correct value. for IDE ARMD (Accelerated Removable Media Device), such as calculated by the BIOS based on the drive information you entered. Refer to the drive documentation to determine the correct value. Set to [Disabled] to [On] will enhance hard...
User Manual
Page 19
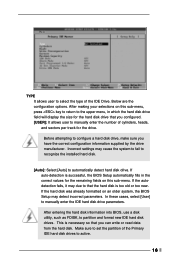
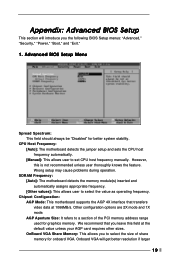
...]: This allows user to select the value as operating frequency. Other configuration options are 2X mode and 1X mode. Appendix: Advanced BIOS Setup This section will get better resolution if larger 19 SDRAM Frequency: [Auto]: The motherboard detects the memory module(s) inserted and... automatically assigns appropriate frequency. [Other values]: This allows user to set CPU host frequency manually. Advanced BIOS Setup Menu Spread Spectrum: This field should always be "Disabled" for onboard VGA. We recommend that transfers video data at the ...
...]: This allows user to select the value as operating frequency. Other configuration options are 2X mode and 1X mode. Appendix: Advanced BIOS Setup This section will get better resolution if larger 19 SDRAM Frequency: [Auto]: The motherboard detects the memory module(s) inserted and... automatically assigns appropriate frequency. [Other values]: This allows user to set CPU host frequency manually. Advanced BIOS Setup Menu Spread Spectrum: This field should always be "Disabled" for onboard VGA. We recommend that transfers video data at the ...

User Manual
Page 21
...check point for Game Port or disable Game Port. If [Always] option is selected, the "Password Check" is performed before both boot-up and BIOS setup. 21 Configuration options: [both . Valid password can be a 1 to 6 alphanumeric characters combination. Set User Password: Press to set Supervisor Password... AC'97 Audio: Enable or disable onboard AC'97 audio feature. If [Setup] option is selected, the "Password Check" is performed before BIOS setup. Security Setup Menu Supervisor Password: This field shows the status of the User Password. [Clear]: No password has been set. [Set]:...
...check point for Game Port or disable Game Port. If [Always] option is selected, the "Password Check" is performed before both boot-up and BIOS setup. 21 Configuration options: [both . Valid password can be a 1 to 6 alphanumeric characters combination. Set User Password: Press to set Supervisor Password... AC'97 Audio: Enable or disable onboard AC'97 audio feature. If [Setup] option is selected, the "Password Check" is performed before BIOS setup. Security Setup Menu Supervisor Password: This field shows the status of the User Password. [Clear]: No password has been set. [Set]:...

User Manual
Page 24
All changes are discarded. 24 Discard Changes: After you press , it will save the current settings and exit the BIOS SETUP Utility. Load Default Settings: This loads the default values for all the setup configuration. If you enter the sub-menu, the message "Load setup ... making any changes to the settings. Exit Discarding Changes: After you press , original values will be restored. Exit Saving Changes: After you will exit the BIOS Setup Utility without saving changes" will appear. If you press , you enter the sub-menu, the message "Save current settings and exit" will appear.
All changes are discarded. 24 Discard Changes: After you press , it will save the current settings and exit the BIOS SETUP Utility. Load Default Settings: This loads the default values for all the setup configuration. If you enter the sub-menu, the message "Load setup ... making any changes to the settings. Exit Discarding Changes: After you press , original values will be restored. Exit Saving Changes: After you will exit the BIOS Setup Utility without saving changes" will appear. If you press , you enter the sub-menu, the message "Save current settings and exit" will appear.


