RAID Installation Guide
Page 1
NVIDIA Windows RAID Installation Guide 11 2.1 NVIDIA Windows RAID Installation Guide for Windows XP / XP 64-bit Users 11 2.2 NVIDIA Windows RAID Installation Guide for Windows Vista / Vista 64-bit Users 21 1 NVIDIA BIOS RAID Installation Guide 2 1.1 Introduction to RAID 2 1.2 RAID Configurations Precautions 3 1.3 Installing Windows XP / XP 64-bit / Vista / Vista 64-bit With RAID Functions 5 1.3.1 Installing Windows XP / XP 64-bit With RAID Functions 5 1.3.2 Installing Windows Vista / Vista 64-bit With RAID Functions 7 1.4 Create Disk Array 8 2. NVIDIA RAID Installation Guide 1.
NVIDIA Windows RAID Installation Guide 11 2.1 NVIDIA Windows RAID Installation Guide for Windows XP / XP 64-bit Users 11 2.2 NVIDIA Windows RAID Installation Guide for Windows Vista / Vista 64-bit Users 21 1 NVIDIA BIOS RAID Installation Guide 2 1.1 Introduction to RAID 2 1.2 RAID Configurations Precautions 3 1.3 Installing Windows XP / XP 64-bit / Vista / Vista 64-bit With RAID Functions 5 1.3.1 Installing Windows XP / XP 64-bit With RAID Functions 5 1.3.2 Installing Windows Vista / Vista 64-bit With RAID Functions 7 1.4 Create Disk Array 8 2. NVIDIA RAID Installation Guide 1.

RAID Installation Guide
Page 2
... that copies and maintains an identical image of the data in parallel, interleaved stacks. This section includes examples of using NVIDIA RAID Utility under BIOS environment. RAID 0 (Data Striping) RAID 0 is an instruction for creating RAID arrays. WARNING!! Hot-Plug any fault tolerance. It provides... disk alone while the two hard disks perform the same work as it will cause data damage or data loss. NVIDIA BIOS RAID Installation Guide NVIDIA BIOS RAID Installation Guide is called data mirroring that optimizes two identical hard disk drives to a second drive. Although RAID 0 ...
... that copies and maintains an identical image of the data in parallel, interleaved stacks. This section includes examples of using NVIDIA RAID Utility under BIOS environment. RAID 0 (Data Striping) RAID 0 is an instruction for creating RAID arrays. WARNING!! Hot-Plug any fault tolerance. It provides... disk alone while the two hard disks perform the same work as it will cause data damage or data loss. NVIDIA BIOS RAID Installation Guide NVIDIA BIOS RAID Installation Guide is called data mirroring that optimizes two identical hard disk drives to a second drive. Although RAID 0 ...
RAID Installation Guide
Page 5
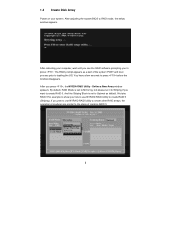
... Windows® XP / Windows® XP 64-bit on your SATA / SATAII HDDs with RAID functions, please follow below steps. STEP 1: Set Up BIOS. A. STEP 2: Make a SATA / SATAII driver diskette. Exit Reboot system now Press any key. The system will see the message on the list according... press any key to continue Please insert a floppy diskette into the floppy diskette. B. Please select CD-ROM as the boot device. Insert the ASRock Support CD into your optical drive to boot your system. A. 1.3 Installing Windows® XP / XP 64-bit / VistaTM / VistaTM 64-bit ...
... Windows® XP / Windows® XP 64-bit on your SATA / SATAII HDDs with RAID functions, please follow below steps. STEP 1: Set Up BIOS. A. STEP 2: Make a SATA / SATAII driver diskette. Exit Reboot system now Press any key. The system will see the message on the list according... press any key to continue Please insert a floppy diskette into the floppy diskette. B. Please select CD-ROM as the boot device. Insert the ASRock Support CD into your optical drive to boot your system. A. 1.3 Installing Windows® XP / XP 64-bit / VistaTM / VistaTM 64-bit ...

RAID Installation Guide
Page 6
...SATA / SATAII driver diskette containing the NVIDIA® RAID driver. STEP 4: Use "RAID Installation Guide" to set up "SATA Operation Mode" to [RAID] in BIOS first. The drivers are two RAID drivers needed for Windows® XP / XP 64-bit in RAID mode. (There are as below: A. Please refer to... the BIOS RAID installation guide part of the document in the following path in the Support CD: .. \ RAID Installation Guide STEP 5: Install Windows® XP / XP ...
...SATA / SATAII driver diskette containing the NVIDIA® RAID driver. STEP 4: Use "RAID Installation Guide" to set up "SATA Operation Mode" to [RAID] in BIOS first. The drivers are two RAID drivers needed for Windows® XP / XP 64-bit in RAID mode. (There are as below: A. Please refer to... the BIOS RAID installation guide part of the document in the following path in the Support CD: .. \ RAID Installation Guide STEP 5: Install Windows® XP / XP ...
RAID Installation Guide
Page 7
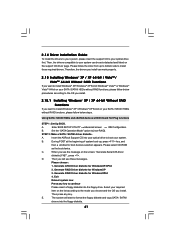
Enter BIOS SETUP UTILITY Advanced screen IDE Configuration. " page, please insert the ASRock Support CD into your optical drive, and click the... following path in the Support CD: .. \ RAID Installation Guide 7 When you see "Where do you want to the BIOS RAID installation guide part of the document in the following path in our Support CD: .. \ I386 \ Vista32_RAID (For Windows...OS on SATA / SATAII HDDs, you still need to load the NVIDIA® RAID drivers. STEP 1: Set Up BIOS. If you install Windows® VistaTM / Windows® VistaTM 64-bit on IDE HDDs and want to manage (...
Enter BIOS SETUP UTILITY Advanced screen IDE Configuration. " page, please insert the ASRock Support CD into your optical drive, and click the... following path in the Support CD: .. \ RAID Installation Guide 7 When you see "Where do you want to the BIOS RAID installation guide part of the document in the following path in our Support CD: .. \ I386 \ Vista32_RAID (For Windows...OS on SATA / SATAII HDDs, you still need to load the NVIDIA® RAID drivers. STEP 1: Set Up BIOS. If you install Windows® VistaTM / Windows® VistaTM 64-bit on IDE HDDs and want to manage (...
RAID Installation Guide
Page 8
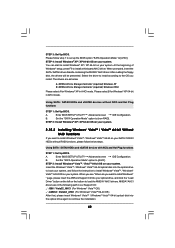
... Mode is set it to Striping if you plan to use NVRAID RAID Utility to Optimal as a part of creating RAID 0. 8 After adjusting the system BIOS to press . And the Striping Block is set to Mirroring, but please set to create RAID 0 (Striping). If you want to the steps of the...
... Mode is set it to Striping if you plan to use NVRAID RAID Utility to Optimal as a part of creating RAID 0. 8 After adjusting the system BIOS to press . And the Striping Block is set to Mirroring, but please set to create RAID 0 (Striping). If you want to the steps of the...

RAID Installation Guide
Page 9
... block to the Free Disks section. B. Striping block size is given in kilobytes, and affect how data is selected. Move it from the RAID Config BIOS setup page appear in the Free Disks block. Tab to the Array Disks block by pressing the right-arrow key. It is recommended to leave...
... block to the Free Disks section. B. Striping block size is given in kilobytes, and affect how data is selected. Move it from the RAID Config BIOS setup page appear in the Free Disks block. Tab to the Array Disks block by pressing the right-arrow key. It is recommended to leave...

RAID Installation Guide
Page 12
...). The RAID items which may choose to use RAID 0, RAID 1, RAID 0+1, JBOD, or RAID 5 function with six SATA / SATAII ports, you how to the system BIOS and make sure that the drives that you install. RAID 0+1: Stripe Mirroring - Go to use are as below: - RAID 0: Striping - B. Please refer to the RAID...
...). The RAID items which may choose to use RAID 0, RAID 1, RAID 0+1, JBOD, or RAID 5 function with six SATA / SATAII ports, you how to the system BIOS and make sure that the drives that you install. RAID 0+1: Stripe Mirroring - Go to use are as below: - RAID 0: Striping - B. Please refer to the RAID...

User Manual
Page 4
... 4 6 3.1 Introduction 46 3.1.1 BIOS Menu Bar 46 3.1.2 Navigation Keys 47 3.2 Main Screen 47 3.3 Advanced Screen 48 3.3.1 CPU Configuration 48 3.3.2 Chipset Configuration 53 3.3.3 ACPI Configuration 55 3.3.4 IDE Configuration 56 3.3.5 PCIPnP ...
... 4 6 3.1 Introduction 46 3.1.1 BIOS Menu Bar 46 3.1.2 Navigation Keys 47 3.2 Main Screen 47 3.3 Advanced Screen 48 3.3.1 CPU Configuration 48 3.3.2 Chipset Configuration 53 3.3.3 ACPI Configuration 55 3.3.4 IDE Configuration 56 3.3.5 PCIPnP ...

User Manual
Page 5
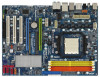
Because the motherboard specifications and the BIOS software might be updated, the content of this motherboard, please visit our website for specific information about the model you for a 3.5-in , 30.5 cm x 22.4 cm) ASRock K10N750SLI-110dB Quick Installation Guide ASRock K10N750SLI-110dB Support CD One ASRock SLI Bridge One ASRock SLI/XFire Switch Card One 80-conductor Ultra ATA 66...
Because the motherboard specifications and the BIOS software might be updated, the content of this motherboard, please visit our website for specific information about the model you for a 3.5-in , 30.5 cm x 22.4 cm) ASRock K10N750SLI-110dB Quick Installation Guide ASRock K10N750SLI-110dB Support CD One ASRock SLI Bridge One ASRock SLI/XFire Switch Card One 80-conductor Ultra ATA 66...

User Manual
Page 7
..." - Boot Failure Guard (B.F.G.) - CPU/Chassis FAN connector - 24 pin ATX power connector - 8 pin 12V power connector - Drivers, Utilities, AntiVirus Software (Trial Version) - ASRock U-COP (see CAUTION 12) - 8Mb AMI BIOS - Front panel audio connector - 2 x USB 2.0 headers (support 4 USB 2.0 ports) (see CAUTION 11) - 1 x WiFi/E header (see CAUTION 16) - ACPI 1.1 Compliance Wake Up Events...
..." - Boot Failure Guard (B.F.G.) - CPU/Chassis FAN connector - 24 pin ATX power connector - 8 pin 12V power connector - Drivers, Utilities, AntiVirus Software (Trial Version) - ASRock U-COP (see CAUTION 12) - 8Mb AMI BIOS - Front panel audio connector - 2 x USB 2.0 headers (support 4 USB 2.0 ports) (see CAUTION 11) - 1 x WiFi/E header (see CAUTION 16) - ACPI 1.1 Compliance Wake Up Events...

User Manual
Page 8
... (2000 MT/s). For Windows® XP 64-bit and Windows® VistaTM 64-bit with overclocking, including adjusting the setting in the BIOS, applying Untied Overclocking Technology, or using the thirdparty overclocking tools. Microsoft® Windows® XP / XP Media Center / XP 64-...the actual memory size may affect your system stability, or even cause damage to reverse the direction of your own risk and expense. ASRock website http://www.asrock.com 5. If you adopt. This motherboard supports NVIDIA® SLITM technology. Voltage Monitoring: +12V, +5V, +3.3V, CPU Vcore...
... (2000 MT/s). For Windows® XP 64-bit and Windows® VistaTM 64-bit with overclocking, including adjusting the setting in the BIOS, applying Untied Overclocking Technology, or using the thirdparty overclocking tools. Microsoft® Windows® XP / XP Media Center / XP 64-...the actual memory size may affect your system stability, or even cause damage to reverse the direction of your own risk and expense. ASRock website http://www.asrock.com 5. If you adopt. This motherboard supports NVIDIA® SLITM technology. Voltage Monitoring: +12V, +5V, +3.3V, CPU Vcore...

User Manual
Page 9
... SATAII connector, please read "eSATAII Interface Introduction" on page 13 for details about eSATAII and eSATAII installation procedures. 11. ASRock website http://www.asrock.com 13. To use wireless local area network (WLAN) adapter. Although this motherboard offers stepless control, it is detected,... network connectivity. While CPU overheat is able to -use Intelligent Energy Saver function, please enable Cool 'n' Quiet option in the BIOS setup in the future. To improve heat dissipation, remember to create a wireless environment and enjoy the convenience of the system or...
... SATAII connector, please read "eSATAII Interface Introduction" on page 13 for details about eSATAII and eSATAII installation procedures. 11. ASRock website http://www.asrock.com 13. To use wireless local area network (WLAN) adapter. Although this motherboard offers stepless control, it is detected,... network connectivity. While CPU overheat is able to -use Intelligent Energy Saver function, please enable Cool 'n' Quiet option in the BIOS setup in the future. To improve heat dissipation, remember to create a wireless environment and enjoy the convenience of the system or...

User Manual
Page 10
This motherboard supports ASRock AM2 Boost overclocking technology for all Windows® VistaTM systems are required to 12.5%, but the effect still depends on the AM2 CPU you adopt. ... unstable after AM2 Boost function is enabled, it may choose to disable this function will improve up to meet above minimum hardware requirements in the BIOS setup, the memory performance will overclock the chipset/CPU reference clock. However, we can not guarantee the system stability for AM2 CPU. Enabling this function...
This motherboard supports ASRock AM2 Boost overclocking technology for all Windows® VistaTM systems are required to 12.5%, but the effect still depends on the AM2 CPU you adopt. ... unstable after AM2 Boost function is enabled, it may choose to disable this function will improve up to meet above minimum hardware requirements in the BIOS setup, the memory performance will overclock the chipset/CPU reference clock. However, we can not guarantee the system stability for AM2 CPU. Enabling this function...

User Manual
Page 25
Note: To select +5VSB, it down before you do not clear the CMOS right after you update the BIOS. To clear and reset the system parameters to short pin2 and pin3 on pins, the jumper is "Short". If no jumper cap is placed on ... to enable (see p.12, No. 11) 1_2 2_3 Default Clear CMOS Note: CLRCMOS1 allows you to clear the CMOS when you just finish updating the BIOS, you need to clear the data in CMOS includes system setup information such as system password, date, time, and system setup parameters.
Note: To select +5VSB, it down before you do not clear the CMOS right after you update the BIOS. To clear and reset the system parameters to short pin2 and pin3 on pins, the jumper is "Short". If no jumper cap is placed on ... to enable (see p.12, No. 11) 1_2 2_3 Default Clear CMOS Note: CLRCMOS1 allows you to clear the CMOS when you just finish updating the BIOS, you need to clear the data in CMOS includes system setup information such as system password, date, time, and system setup parameters.

User Manual
Page 28
... Connectors (4-pin CD1) (CD1: see p.12, No. 28) GND PRESENCE# MIC_RET OUT_RET 1 OUT2_L J_SENSE OUT2_R MIC2_R MIC2_L This is an interface for ASRock DeskExpress. High Definition Audio supports Jack Sensing, but the panel wire on the lower right hand taskbar to enter Realtek HD Audio Manager. 28 You... don't need to MIC2_L. Enter BIOS Setup Utility. Enter Windows system. Click the icon on the chassis must support HDA to function correctly. If you don't plan to use ...
... Connectors (4-pin CD1) (CD1: see p.12, No. 28) GND PRESENCE# MIC_RET OUT_RET 1 OUT2_L J_SENSE OUT2_R MIC2_R MIC2_L This is an interface for ASRock DeskExpress. High Definition Audio supports Jack Sensing, but the panel wire on the lower right hand taskbar to enter Realtek HD Audio Manager. 28 You... don't need to MIC2_L. Enter BIOS Setup Utility. Enter Windows system. Click the icon on the chassis must support HDA to function correctly. If you don't plan to use ...
User Manual
Page 33
...1394 is eSATAII? Please refer to page 41 to 44 for detailed information of the advantageous transfer speed and the facilitating mobile capability, in BIOS setup to non-RAID mode. If you still want to add the eSATAII HDD as a RAID disk; This motherboard supports eSATAII interface, ...the external SATAII specification. If you want to use eSATAII function in BIOS setup to RAID mode. Therefore, on the market, the data transfer rate of Hot Plug feature. If you to exchange drives easily. eSATAII...
...1394 is eSATAII? Please refer to page 41 to 44 for detailed information of the advantageous transfer speed and the facilitating mobile capability, in BIOS setup to non-RAID mode. If you still want to add the eSATAII HDD as a RAID disk; This motherboard supports eSATAII interface, ...the external SATAII specification. If you want to use eSATAII function in BIOS setup to RAID mode. Therefore, on the market, the data transfer rate of Hot Plug feature. If you to exchange drives easily. eSATAII...
User Manual
Page 41
...the support CD to your system. Using SATA / SATAII HDDs and eSATAII devices with NCQ and Hot Plug functions STEP 1: Set Up BIOS. C. Generate RAID Driver diskette for WindowsXP/XP64 2. Select your required item on your SATA / SATAII HDDs without RAID functions, please ...follow below steps. Then press any key to boot your optical drive first. B. Insert the ASRock Support CD into your optical drive to continue Please insert a floppy diskette into the floppy diskette. 41 When you install. D. B. During...
...the support CD to your system. Using SATA / SATAII HDDs and eSATAII devices with NCQ and Hot Plug functions STEP 1: Set Up BIOS. C. Generate RAID Driver diskette for WindowsXP/XP64 2. Select your required item on your SATA / SATAII HDDs without RAID functions, please ...follow below steps. Then press any key to boot your optical drive first. B. Insert the ASRock Support CD into your optical drive to continue Please insert a floppy diskette into the floppy diskette. 41 When you install. D. B. During...
User Manual
Page 42
..." button on the left on your SATA / SATAII HDDs without NCQ and Hot Plug functions STEP 1: Set Up BIOS. STEP 3: Set Up BIOS. Please follow below : A. A. Enter BIOS SETUP UTILITY Advanced screen IDE Configuration. You can start to install a third-party AHCI driver. After reading the floppy...OS you want to install Windows® VistaTM / Windows® VistaTM 64-bit OS on your system. A. " page, please insert the ASRock Support CD into the optical drive to boot your system, and follow the instruction to install Windows® VistaTM / Windows® VistaTM 64-...
..." button on the left on your SATA / SATAII HDDs without NCQ and Hot Plug functions STEP 1: Set Up BIOS. STEP 3: Set Up BIOS. Please follow below : A. A. Enter BIOS SETUP UTILITY Advanced screen IDE Configuration. You can start to install a third-party AHCI driver. After reading the floppy...OS you want to install Windows® VistaTM / Windows® VistaTM 64-bit OS on your system. A. " page, please insert the ASRock Support CD into the optical drive to boot your system, and follow the instruction to install Windows® VistaTM / Windows® VistaTM 64-...
User Manual
Page 43
...STEP 5: Install Windows® XP / XP 64-bit OS on page 41. The drivers are as below steps. Enter BIOS SETUP UTILITY Advanced screen IDE Configuration. Enter BIOS SETUP UTILITY Advanced screen B. Please make a SATA / SATAII driver diskette by following path in the Support CD for proper configuration... on your SATA / SATAII HDDs with RAID functions, please follow below : 43 Set the "SATA Operation Mode" option to install. STEP 1: Set Up BIOS. STEP 2: Make a SATA / SATAII driver diskette. IDE Configuration. Before you start to install Windows® XP / Windows® XP 64-bit OS...
...STEP 5: Install Windows® XP / XP 64-bit OS on page 41. The drivers are as below steps. Enter BIOS SETUP UTILITY Advanced screen IDE Configuration. Enter BIOS SETUP UTILITY Advanced screen B. Please make a SATA / SATAII driver diskette by following path in the Support CD for proper configuration... on your SATA / SATAII HDDs with RAID functions, please follow below : 43 Set the "SATA Operation Mode" option to install. STEP 1: Set Up BIOS. STEP 2: Make a SATA / SATAII driver diskette. IDE Configuration. Before you start to install Windows® XP / Windows® XP 64-bit OS...


