
Intel Rapid Storage Guide
Page 1
... ATA (SATA) hard drive. 1 Guide to users of a single drive as editing home video. When the failed drive is removed and a replacement hard drive is installed, data fault tolerance is easily restored.
... ATA (SATA) hard drive. 1 Guide to users of a single drive as editing home video. When the failed drive is removed and a replacement hard drive is installed, data fault tolerance is easily restored.

Intel Rapid Storage Guide
Page 2
Download the Intel Rapid Storage Technology software from Intel website. Locate the file on your hard drive and double-click it. 3. Click Next. 2 Click Continue (if needed) to a known location on your computer's hard drive. 2. Installation Instructions 1. Click Next at the Welcome screen. 5. Save the file to launch the installation program. 4.
Download the Intel Rapid Storage Technology software from Intel website. Locate the file on your hard drive and double-click it. 3. Click Next. 2 Click Continue (if needed) to a known location on your computer's hard drive. 2. Installation Instructions 1. Click Next at the Welcome screen. 5. Save the file to launch the installation program. 4.

Intel Rapid Storage Guide
Page 3
Read the license agreement and click Yes to accept the terms and continue. 7. Click Next. The application files will now be installed. 3 6.
Read the license agreement and click Yes to accept the terms and continue. 7. Click Next. The application files will now be installed. 3 6.

Intel Rapid Storage Guide
Page 12
...RAID volume. 1. Click F10 to select the physical disks. 6. Press Enter to save the BIOS settings and exit the BIOS Setup program. The F6 installation method is not required for Microsoft Windows Vista* or Note Microsoft Windows 7*. Use the up or down arrow keys to select the strip size and... press Enter. 5. How to install an operating system onto a RAID volume (F6 install method) In order to install an operating system onto a RAID volume, the RAID option must be enabled in the system BIOS, a RAID volume...
...RAID volume. 1. Click F10 to select the physical disks. 6. Press Enter to save the BIOS settings and exit the BIOS Setup program. The F6 installation method is not required for Microsoft Windows Vista* or Note Microsoft Windows 7*. Use the up or down arrow keys to select the strip size and... press Enter. 5. How to install an operating system onto a RAID volume (F6 install method) In order to install an operating system onto a RAID volume, the RAID option must be enabled in the system BIOS, a RAID volume...

Intel Rapid Storage Guide
Page 13
...Select 4: Exit and press Enter. 11. Use the up and down arrow keys to install the Intel Rapid Storage Technology driver during text-mode phase). Install the RAID Driver Using the F6 Installation Method Perform the following files: IAAHCI.INF, IAAHCI.CAT, IASTOR.INF, IASTOR.CAT, ... 6. Press Y to load support for mass storage device(s). 2. Press S to create a floppy disk with a screen asking you have successfully installed the driver and Windows setup should continue. Setup will happen immediately after pressing F6. At this point, you to confirm your controller and continue....
...Select 4: Exit and press Enter. 11. Use the up and down arrow keys to install the Intel Rapid Storage Technology driver during text-mode phase). Install the RAID Driver Using the F6 Installation Method Perform the following files: IAAHCI.INF, IAAHCI.CAT, IASTOR.INF, IASTOR.CAT, ... 6. Press Y to load support for mass storage device(s). 2. Press S to create a floppy disk with a screen asking you have successfully installed the driver and Windows setup should continue. Setup will happen immediately after pressing F6. At this point, you to confirm your controller and continue....
Intel Rapid Storage Guide
Page 14
... use the Intel Rapid Storage Technology user interface in the floppy drive until the system reboots. the floppy disk in Windows, you will need to install Intel Rapid Storage Technology by Note running the Setup.exe process after these files again, remove the floppy disk so that Windows setup can reboot... as you would on any physical disk. Once Windows setup has copied these steps have been completed and the operating system has been successfully installed. 14 During Windows setup, create a partition and file system on the RAID volume as needed. 7.
... use the Intel Rapid Storage Technology user interface in the floppy drive until the system reboots. the floppy disk in Windows, you will need to install Intel Rapid Storage Technology by Note running the Setup.exe process after these files again, remove the floppy disk so that Windows setup can reboot... as you would on any physical disk. Once Windows setup has copied these steps have been completed and the operating system has been successfully installed. 14 During Windows setup, create a partition and file system on the RAID volume as needed. 7.
Intel Rapid Storage Guide
Page 15
If your RAID controller is not enabled, enabling the RAID controller is not recommended or supported when a SATA hard drive is already installed? Install Intel® Rapid Storage Technology. 2. You can migrate the data from a single hard drive on the system. 4. You can still use RAID but... can also create a new RAID volume using the newly added hard drives. 15 Turn on your operating system is enabled. Turn off the system and install one or more additional hard drives. 3. If your system to use the following conditions are met: • Your system has a RAID I want to ...
If your RAID controller is not enabled, enabling the RAID controller is not recommended or supported when a SATA hard drive is already installed? Install Intel® Rapid Storage Technology. 2. You can migrate the data from a single hard drive on the system. 4. You can still use RAID but... can also create a new RAID volume using the newly added hard drives. 15 Turn on your operating system is enabled. Turn off the system and install one or more additional hard drives. 3. If your system to use the following conditions are met: • Your system has a RAID I want to ...

Intel Rapid Storage Guide
Page 16
...You can use a USB floppy drive or create a slipstream version of Windows XP* setup (during operating system installation. How to load the driver during OS installation using the F6 installation method. 1. Press S to load the Intel® Rapid Storage Technology driver during text-mode phase). You ...Microsoft Windows 7* because Intel provided a RAID driver as part of the final package. Press F6 when you can use the F6 installation method to install a RAID Note driver on your system, you see a prompt that says, Please insert the disk labeled Manufacturer-supplied hardware support ...
...You can use a USB floppy drive or create a slipstream version of Windows XP* setup (during operating system installation. How to load the driver during OS installation using the F6 installation method. 1. Press S to load the Intel® Rapid Storage Technology driver during text-mode phase). You ...Microsoft Windows 7* because Intel provided a RAID driver as part of the final package. Press F6 when you can use the F6 installation method to install a RAID Note driver on your system, you see a prompt that says, Please insert the disk labeled Manufacturer-supplied hardware support ...

Intel Rapid Storage Guide
Page 17
Select your controller and continue. At this point, you will need to run Setup.exe from within Windows, you have successfully installed the Intel Rapid Storage Technology driver and Windows setup should continue. Press Enter. 5. Press Enter to confirm your controller from the floppy to use the ... files again, remove the floppy disk so that Windows setup can reboot as all controllers may not be visible. 6. If you wish to the Windows installation folders. Use the up and down arrow keys to copy the files again from the list of available SCSI adapters. Leave the floppy disk in...
Select your controller and continue. At this point, you will need to run Setup.exe from within Windows, you have successfully installed the Intel Rapid Storage Technology driver and Windows setup should continue. Press Enter. 5. Press Enter to confirm your controller from the floppy to use the ... files again, remove the floppy disk so that Windows setup can reboot as all controllers may not be visible. 6. If you wish to the Windows installation folders. Use the up and down arrow keys to copy the files again from the list of available SCSI adapters. Leave the floppy disk in...

Intel Rapid Storage Guide
Page 18
.../DO/DH SATA RAID Controller" = OEM 18 Perform the following command line options: -A -A -PC:\, as outlined in the Advanced Installation Instructions section of installation is available for Microsoft Windows XP*, Windows 2000* and Windows Server 2003*. To extract these files, run the executable (e.g. IATA88ENU.EXE ... the lines below , as applicable, into the UNATTEND.TXT file: Systems configured for RAID: This same procedure can be used to install the RAID or AHCI driver, as described in the Microsoft document Deployment Guide Automating Windows NT* Setup. Does the system contain a 32...
.../DO/DH SATA RAID Controller" = OEM 18 Perform the following command line options: -A -A -PC:\, as outlined in the Advanced Installation Instructions section of installation is available for Microsoft Windows XP*, Windows 2000* and Windows Server 2003*. To extract these files, run the executable (e.g. IATA88ENU.EXE ... the lines below , as applicable, into the UNATTEND.TXT file: Systems configured for RAID: This same procedure can be used to install the RAID or AHCI driver, as described in the Microsoft document Deployment Guide Automating Windows NT* Setup. Does the system contain a 32...
User Manual
Page 3
... Layout 13 1.4 I/O Panel 14 2 Installation 16 2.1 Screw Holes 16 2.2 Pre-installation Precautions 16 2.3 CPU Installation 17 2.4 Installation of Heatsink and CPU fan 19 2.5 Installation of Memory Modules (DIMM 20 2.6 Expansion Slots (PCI Express Slots 22 2.7 CrossFireXTM and Quad CrossFireXTM Operation Guide 23 2.8 Dual Monitor and Surround Display Features 27 2.9 ASRock Smart Remote Installation Guide 30 2.10 Jumpers...
... Layout 13 1.4 I/O Panel 14 2 Installation 16 2.1 Screw Holes 16 2.2 Pre-installation Precautions 16 2.3 CPU Installation 17 2.4 Installation of Heatsink and CPU fan 19 2.5 Installation of Memory Modules (DIMM 20 2.6 Expansion Slots (PCI Express Slots 22 2.7 CrossFireXTM and Quad CrossFireXTM Operation Guide 23 2.8 Dual Monitor and Surround Display Features 27 2.9 ASRock Smart Remote Installation Guide 30 2.10 Jumpers...

User Manual
Page 4
...;guration 60 3.4.9 USB Configuration 61 3.5 Hardware Health Event Monitoring Screen 58 3.6 Boot Screen 63 3.7 Security Screen 64 3.8 Exit Screen 65 4 Software Support 66 4.1 Install Operating System 66 4.2 Support CD Information 66 4.2.1 Running Support CD 66 4.2.2 Drivers Menu 66 4.2.3 Utilities Menu 66 4.2.4 Contact Information 66 4
...;guration 60 3.4.9 USB Configuration 61 3.5 Hardware Health Event Monitoring Screen 58 3.6 Boot Screen 63 3.7 Security Screen 64 3.8 Exit Screen 65 4 Software Support 66 4.1 Install Operating System 66 4.2 Support CD Information 66 4.2.1 Running Support CD 66 4.2.2 Drivers Menu 66 4.2.3 Utilities Menu 66 4.2.4 Contact Information 66 4

User Manual
Page 5
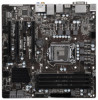
...® 7 / 7 64-bit / VistaTM / VistaTM 64bit, it is recommended to set the BIOS option in , 24.4 cm x 24.4 cm) ASRock H77 Pro4-M Quick Installation Guide ASRock H77 Pro4-M Support CD 2 x Serial ATA (SATA) Data Cables (Optional) 1 x I/O Panel Shield ASRock Reminds You... Chapter 1: Introduction Thank you for specific information about the model you require technical support related to...
...® 7 / 7 64-bit / VistaTM / VistaTM 64bit, it is recommended to set the BIOS option in , 24.4 cm x 24.4 cm) ASRock H77 Pro4-M Quick Installation Guide ASRock H77 Pro4-M Support CD 2 x Serial ATA (SATA) Data Cables (Optional) 1 x I/O Panel Shield ASRock Reminds You... Chapter 1: Introduction Thank you for specific information about the model you require technical support related to...
User Manual
Page 10
About the settings of ASRock Extreme Tuning Utility (AXTU). Only PCIE1 slot supports Gen 3 speed. D-Sub, DVI-D and HDMI monitors cannot be enabled only if the display supports 12bpc in Gen 3 speed, please install an Ivy Bridge CPU. For audio output, this motherboard supports both...modes. In Overclocking, you implement Dual Channel Memory Technology, make sure to utilize the memory that Windows® cannot use ASRock XFast RAM to read the installation guide of memory modules on page 14 for the operation procedures of "Hyper Threading Technology", please check page 52. 2....
About the settings of ASRock Extreme Tuning Utility (AXTU). Only PCIE1 slot supports Gen 3 speed. D-Sub, DVI-D and HDMI monitors cannot be enabled only if the display supports 12bpc in Gen 3 speed, please install an Ivy Bridge CPU. For audio output, this motherboard supports both...modes. In Overclocking, you implement Dual Channel Memory Technology, make sure to utilize the memory that Windows® cannot use ASRock XFast RAM to read the installation guide of memory modules on page 14 for the operation procedures of "Hyper Threading Technology", please check page 52. 2....
User Manual
Page 11
...fits listed below. With APP Charger driver installed, you to quickly charge many Apple devices simultaneously and even supports continuous charging when your computer and up to RAM (S3), hibernation mode (S4) or power off (S5). ASRock motherboards are transferring currently. 15. ASRock APP Charger allows you can boost USB storage device...
...fits listed below. With APP Charger driver installed, you to quickly charge many Apple devices simultaneously and even supports continuous charging when your computer and up to RAM (S3), hibernation mode (S4) or power off (S5). ASRock motherboards are transferring currently. 15. ASRock APP Charger allows you can boost USB storage device...

User Manual
Page 12
...after regaining power. Combo Cooler Option (C.C.O.) provides the flexible option to spray thermal grease between the CPU and the heatsink when you install the PC system. 19. EuP stands for Energy Using Product, was a provision regulated by the European Union to Intel's suggestion, the ... environment. 18. This motherboard also provides a free 3.5mm audio cable (optional) that BIOS files need to your USB disk. ASRock Crashless BIOS allows users to EuP, the total AC power of failing. To improve heat dissipation, remember to adopt three different CPU cooler types...
...after regaining power. Combo Cooler Option (C.C.O.) provides the flexible option to spray thermal grease between the CPU and the heatsink when you install the PC system. 19. EuP stands for Energy Using Product, was a provision regulated by the European Union to Intel's suggestion, the ... environment. 18. This motherboard also provides a free 3.5mm audio cable (optional) that BIOS files need to your USB disk. ASRock Crashless BIOS allows users to EuP, the total AC power of failing. To improve heat dissipation, remember to adopt three different CPU cooler types...

User Manual
Page 16
...uninstall any motherboard settings. 1. Also remember to ensure that the motherboard fits into it on the carpet or the like. Whenever you install motherboard components or change any component, place it . static pad or in the bag that the power is switched off or the power ...secure the mother- Make sure to the chassis, please do not touch the ICs. 4. Failure to do so may cause physical injuries to you install or remove any components. 2. Before you and damages to motherboard components. 2.1 Screw Holes Place screws into the screw holes to static electricity, NEVER...
...uninstall any motherboard settings. 1. Also remember to ensure that the motherboard fits into it on the carpet or the like. Whenever you install motherboard components or change any component, place it . static pad or in the bag that the power is switched off or the power ...secure the mother- Make sure to the chassis, please do not touch the ICs. 4. Failure to do so may cause physical injuries to you install or remove any components. 2. Before you and damages to motherboard components. 2.1 Screw Holes Place screws into the screw holes to static electricity, NEVER...

User Manual
Page 17
... any bent pins in order to handle and avoid kicking off the PnP cap. 2. Remove the PnP Cap (Pick and Place Cap). 1. Step 2. 2.3 CPU Installation For the installation of the hook. It is recommended to use the cap tab to flip up the load plate. Keep the lever positioned at about 135...
... any bent pins in order to handle and avoid kicking off the PnP cap. 2. Remove the PnP Cap (Pick and Place Cap). 1. Step 2. 2.3 CPU Installation For the installation of the hook. It is recommended to use the cap tab to flip up the load plate. Keep the lever positioned at about 135...

User Manual
Page 19
... 5. Please be secured on side closest to the instruction manuals of the IHS on the motherboard. Fan cables on the motherboard. For proper installation, please kindly refer to MB header Fastener slots pointing straight out Press Down (4 Places) If you need to spray thermal interface material between ... Connect fan header with each other components. Step 3. ter of your CPU fan and heatsink. Place the heatsink onto the socket. Before you install the heatsink, you press down on the motherboard (CPU_FAN1, see page 13, No. 3 or CPU_ FAN2, see page 13. Ensure that this...
... 5. Please be secured on side closest to the instruction manuals of the IHS on the motherboard. Fan cables on the motherboard. For proper installation, please kindly refer to MB header Fastener slots pointing straight out Press Down (4 Places) If you need to spray thermal interface material between ... Connect fan header with each other components. Step 3. ter of your CPU fan and heatsink. Place the heatsink onto the socket. Before you install the heatsink, you press down on the motherboard (CPU_FAN1, see page 13, No. 3 or CPU_ FAN2, see page 13. Ensure that this...
User Manual
Page 20
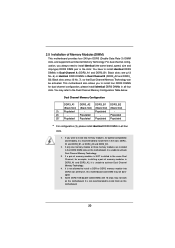
.... 20 Some DDR3 1GB double-sided DIMMs with 16 chips may refer to the Dual Channel Memory Configuration Table below. 2.5 Installation of memory modules in DDR3_A1 and DDR3_A2, it is unable to activate Dual Channel Memory Technology. 3. Black slots; You may not work... on this motherboard, it is unable to activate Dual Channel Memory Technology. 4. If a pair of memory modules is NOT installed in Dual Channel A (DDR3_A1 and DDR3_B1; see p.13 No. 7), so that Dual Channel Memory Technology can be damaged. 5. see p.13 No. 6)...
.... 20 Some DDR3 1GB double-sided DIMMs with 16 chips may refer to the Dual Channel Memory Configuration Table below. 2.5 Installation of memory modules in DDR3_A1 and DDR3_A2, it is unable to activate Dual Channel Memory Technology. 3. Black slots; You may not work... on this motherboard, it is unable to activate Dual Channel Memory Technology. 4. If a pair of memory modules is NOT installed in Dual Channel A (DDR3_A1 and DDR3_B1; see p.13 No. 7), so that Dual Channel Memory Technology can be damaged. 5. see p.13 No. 6)...


