User Manual
Page 10
... mode (S1), Suspend to 40% faster than before. SmartView, a new function of accessing your Apple devices, such as iPhone/iPod/iPad Touch, ASRock has prepared a wonderful solution for a more personal Internet experience. To use SmartView feature, please make sure your OS version is Windows® 7 ...off (S5). Before you can lower the latency in order to adopt three different CPU cooler types, Socket LGA 775, LGA 1155 and LGA 1156. ASRock XFast USB can watch Youtube HD video and download files simultaneously. And it back again. 7. With APP Charger driver...
... mode (S1), Suspend to 40% faster than before. SmartView, a new function of accessing your Apple devices, such as iPhone/iPod/iPad Touch, ASRock has prepared a wonderful solution for a more personal Internet experience. To use SmartView feature, please make sure your OS version is Windows® 7 ...off (S5). Before you can lower the latency in order to adopt three different CPU cooler types, Socket LGA 775, LGA 1155 and LGA 1156. ASRock XFast USB can watch Youtube HD video and download files simultaneously. And it back again. 7. With APP Charger driver...

User Manual
Page 12
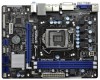
... 1 1 LPT1 USB8_9 1 SATA2_3 SATA2_1 SPEAKER1 1 CHA_FAN1 8 COM1 USB6_7 PLED PWRBTN 1 1 1 HDLED RESET PANEL1 SATA2_2 SATA2_0 19 18 17 16 15 14 13 12 11 10 9 1 1155-Pin CPU Socket 2 ATX 12V Power Connector (ATX12V1) 3 CPU Fan Connector (CPU_FAN1) 4 ATX Power Connector (ATXPWR1) 5 2 x 240-pin DDR3 DIMM Slots (Dual Channel: DDR3_A1, DDR3_B1...
... 1 1 LPT1 USB8_9 1 SATA2_3 SATA2_1 SPEAKER1 1 CHA_FAN1 8 COM1 USB6_7 PLED PWRBTN 1 1 1 HDLED RESET PANEL1 SATA2_2 SATA2_0 19 18 17 16 15 14 13 12 11 10 9 1 1155-Pin CPU Socket 2 ATX 12V Power Connector (ATX12V1) 3 CPU Fan Connector (CPU_FAN1) 4 ATX Power Connector (ATXPWR1) 5 2 x 240-pin DDR3 DIMM Slots (Dual Channel: DDR3_A1, DDR3_B1...
User Manual
Page 15
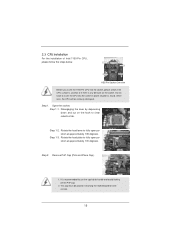
... approximately 100 degrees. Disengaging the lever by depressing down and out on the socket. Step 1-3. Step 2. 2.3 CPU Installation For the installation of Intel 1155-Pin CPU, please follow the steps below. Open the socket: Step 1-1. This cap must be seriously damaged. It is recommended to use the cap...check if the CPU surface is unclean or if there is found. Load Plate Load Lever Contact Array Socket Body 1155-Pin Socket Overview Before you insert the 1155-Pin CPU into the socket if above situation is any bent pin on the hook to fully open position at ...
... approximately 100 degrees. Disengaging the lever by depressing down and out on the socket. Step 1-3. Step 2. 2.3 CPU Installation For the installation of Intel 1155-Pin CPU, please follow the steps below. Open the socket: Step 1-1. This cap must be seriously damaged. It is recommended to use the cap...check if the CPU surface is unclean or if there is found. Load Plate Load Lever Contact Array Socket Body 1155-Pin Socket Overview Before you insert the 1155-Pin CPU into the socket if above situation is any bent pin on the hook to fully open position at ...
User Manual
Page 16
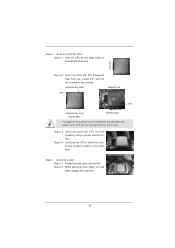
orientation key notch alignment key Pin1 Pin1 orientation key notch 1155-Pin CPU alignment key 1155-Pin Socket For proper inserting, please ensure to the orient keys. Carefully place the CPU into the socket by the edge where is within the ... pressing down lightly on load plate, engage the load lever. 16 Orient the CPU with the two alignment keys of the socket. Step 3-4. Insert the 1155-Pin CPU: Step 3-1.
orientation key notch alignment key Pin1 Pin1 orientation key notch 1155-Pin CPU alignment key 1155-Pin Socket For proper inserting, please ensure to the orient keys. Carefully place the CPU into the socket by the edge where is within the ... pressing down lightly on load plate, engage the load lever. 16 Orient the CPU with the two alignment keys of the socket. Step 3-4. Insert the 1155-Pin CPU: Step 3-1.
User Manual
Page 17
.... Step 5. 2.4 Installation of CPU Fan and Heatsink This motherboard is an example to illustrate the installation of the heatsink for Socket LGA 1155/1156 CPU fan. 17 Ensure fan cables are for 1155-Pin CPU. Then connect the CPU fan to adopt three different CPU cooler types, Socket LGA 775, LGA... 1155 and LGA 1156. Step 3. Align fasteners with remaining fasteners. Step 6. Ensure that this motherboard supports Combo Cooler Option (C.C.O.), which provides the flexible option ...
.... Step 5. 2.4 Installation of CPU Fan and Heatsink This motherboard is an example to illustrate the installation of the heatsink for Socket LGA 1155/1156 CPU fan. 17 Ensure fan cables are for 1155-Pin CPU. Then connect the CPU fan to adopt three different CPU cooler types, Socket LGA 775, LGA... 1155 and LGA 1156. Step 3. Align fasteners with remaining fasteners. Step 6. Ensure that this motherboard supports Combo Cooler Option (C.C.O.), which provides the flexible option ...

Quick Installation Guide
Page 2
... 1 1 LPT1 USB8_9 1 SATA2_3 SATA2_1 SPEAKER1 1 CHA_FAN1 8 COM1 USB6_7 PLED PWRBTN 1 1 1 HDLED RESET PANEL1 SATA2_2 SATA2_0 19 18 17 16 15 14 13 12 11 10 9 1 1155-Pin CPU Socket 2 ATX 12V Power Connector (ATX12V1) 3 CPU Fan Connector (CPU_FAN1) 4 ATX Power Connector (ATXPWR1) 5 2 x 240-pin DDR3 DIMM Slots (Dual Channel: DDR3_A1, DDR3_B1..., White) 20 PCI Express 2.0 x1 Slot (PCIE2, White) 21 Clear CMOS Jumper (CLRCMOS1) 22 PCI Express 3.0 x16 Slot (PCIE1, Blue) 23 Power Fan Connector (PWR_FAN1) 2 ASRock H71M-DGS Motherboard English
... 1 1 LPT1 USB8_9 1 SATA2_3 SATA2_1 SPEAKER1 1 CHA_FAN1 8 COM1 USB6_7 PLED PWRBTN 1 1 1 HDLED RESET PANEL1 SATA2_2 SATA2_0 19 18 17 16 15 14 13 12 11 10 9 1 1155-Pin CPU Socket 2 ATX 12V Power Connector (ATX12V1) 3 CPU Fan Connector (CPU_FAN1) 4 ATX Power Connector (ATXPWR1) 5 2 x 240-pin DDR3 DIMM Slots (Dual Channel: DDR3_A1, DDR3_B1..., White) 20 PCI Express 2.0 x1 Slot (PCIE2, White) 21 Clear CMOS Jumper (CLRCMOS1) 22 PCI Express 3.0 x16 Slot (PCIE1, Blue) 23 Power Fan Connector (PWR_FAN1) 2 ASRock H71M-DGS Motherboard English

Quick Installation Guide
Page 9
...application priority ideally and/or add new programs. Lower Latency in touch with the SmartView utility that cannot be used . 9 ASRock H71M-DGS Motherboard English LAN Application Prioritization: You can configure your browser version is the smart start page for IE that not all the ...ASRock XFast RAM is detected, the system will automatically shutdown. Before you to quickly charge many Apple devices simultaneously and even supports continuous charging when your real-time newsfeed into Standby mode (S1), Suspend to adopt three different CPU cooler types, Socket LGA 775, LGA 1155...
...application priority ideally and/or add new programs. Lower Latency in touch with the SmartView utility that cannot be used . 9 ASRock H71M-DGS Motherboard English LAN Application Prioritization: You can configure your browser version is the smart start page for IE that not all the ...ASRock XFast RAM is detected, the system will automatically shutdown. Before you to quickly charge many Apple devices simultaneously and even supports continuous charging when your real-time newsfeed into Standby mode (S1), Suspend to adopt three different CPU cooler types, Socket LGA 775, LGA 1155...

Quick Installation Guide
Page 11
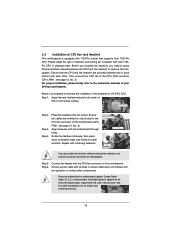
... into the screw holes to the chassis, please do not touch the ICs. 4. English 11 ASRock H71M-DGS Motherboard When placing screws into the socket if above situation is any component. Installation Pre-installation Precautions Take note of Intel 1155-Pin CPU, please follow the steps below. Failure to use a grounded wrist strap or...
... into the screw holes to the chassis, please do not touch the ICs. 4. English 11 ASRock H71M-DGS Motherboard When placing screws into the socket if above situation is any component. Installation Pre-installation Precautions Take note of Intel 1155-Pin CPU, please follow the steps below. Failure to use a grounded wrist strap or...
Quick Installation Guide
Page 12
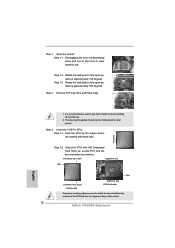
... with black lines. Rotate the load plate to match the two orientation key notches of the socket. 12 ASRock H71M-DGS Motherboard Step 2. black line English 1. Insert the 1155-Pin CPU: Step 3-1. Step 1. Open the socket: Step 1-1. orientation key notch alignment key Pin1 Pin1 ...orientation key notch 1155-Pin CPU alignment key 1155-Pin Socket For proper inserting, please ensure to fully open position at approximately 100 degrees. Step 3. Orient the...
... with black lines. Rotate the load plate to match the two orientation key notches of the socket. 12 ASRock H71M-DGS Motherboard Step 2. black line English 1. Insert the 1155-Pin CPU: Step 3-1. Step 1. Open the socket: Step 1-1. orientation key notch alignment key Pin1 Pin1 ...orientation key notch 1155-Pin CPU alignment key 1155-Pin Socket For proper inserting, please ensure to fully open position at approximately 100 degrees. Step 3. Orient the...
Quick Installation Guide
Page 13
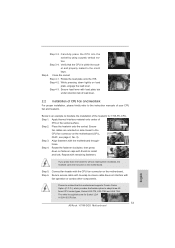
...instruction manuals of your CPU fan and heatsink. Place the heatsink onto the socket. Ensure Apply Thermal Interface Material fan cables are for 1155-Pin CPU. Step 3-3. Close the socket: Step 4-1. Secure load lever with fan operation or contact other components. Below is within ...mated to adopt three different CPU cooler types, Socket LGA 775, LGA 1155 and LGA 1156. Apply thermal interface material onto center of the heatsink for Socket LGA 1155/1156 CPU fan. 13 ASRock H71M-DGS Motherboard English Secure excess cable with tie-wrap to ensure cable does ...
...instruction manuals of your CPU fan and heatsink. Place the heatsink onto the socket. Ensure Apply Thermal Interface Material fan cables are for 1155-Pin CPU. Step 3-3. Close the socket: Step 4-1. Secure load lever with fan operation or contact other components. Below is within ...mated to adopt three different CPU cooler types, Socket LGA 775, LGA 1155 and LGA 1156. Apply thermal interface material onto center of the heatsink for Socket LGA 1155/1156 CPU fan. 13 ASRock H71M-DGS Motherboard English Secure excess cable with tie-wrap to ensure cable does ...