
Intel Rapid Storage Guide
Page 1
... data protection can be accessed on each drive simultaneously, speeding up response time on one or multiple hard drives, users can take advantage of faster boot times and data reads. When using one or more than one of three fault-tolerant RAID levels: RAID 1, RAID 5, and RAID 10. By seamlessly storing...
... data protection can be accessed on each drive simultaneously, speeding up response time on one or multiple hard drives, users can take advantage of faster boot times and data reads. When using one or more than one of three fault-tolerant RAID levels: RAID 1, RAID 5, and RAID 10. By seamlessly storing...
Intel Rapid Storage Guide
Page 15
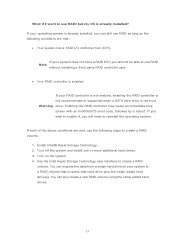
..., you can still use RAID as long as the following steps to use the following conditions are met, use RAID but my OS is the boot Warning drive. If both of the above conditions are met: • Your system has a RAID I want to create a RAID volume. 1. You can also create a new...
..., you can still use RAID as long as the following steps to use the following conditions are met, use RAID but my OS is the boot Warning drive. If both of the above conditions are met: • Your system has a RAID I want to create a RAID volume. 1. You can also create a new...

User Manual
Page 4
... 3.3.8 Super IO Con guration 52 3.3.9 Voltage Con guration 53 3.3.10 ACPI Con guration 54 3.3.11 USB Con guration 55 3.4 Hardware Health Event Monitoring Screen 56 3.5 Boot Screen 57 3.6 Security Screen 58 3.7 Exit Screen 59 4 Software Support 60 4.1 Install Operating System 60 4.2 Support CD Information 60 4.2.1 Running Support CD 60 4.2.2 Drivers Menu...
... 3.3.8 Super IO Con guration 52 3.3.9 Voltage Con guration 53 3.3.10 ACPI Con guration 54 3.3.11 USB Con guration 55 3.4 Hardware Health Event Monitoring Screen 56 3.5 Boot Screen 57 3.6 Security Screen 58 3.7 Exit Screen 59 4 Software Support 60 4.1 Install Operating System 60 4.2 Support CD Information 60 4.2.1 Running Support CD 60 4.2.2 Drivers Menu...
User Manual
Page 8
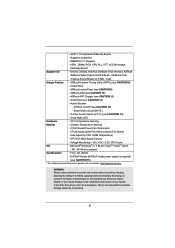
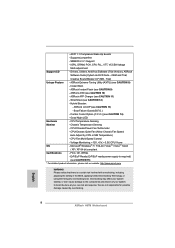
Creative Sound Blaster X-Fi MB - ASRock APP Charger (see CAUTION 8) - Boot Failure Guard (B.F.G.) - Chassis Temperature Sensing - CPU/Chassis/Power Fan Tachometer - We are not responsible for possible damage caused by CPU or MB ...5V, +3.3V, CPU Vcore OS - FCC, CE, WHQL - It should be done at your system. Instant Boot - CPU Temperature Sensing Monitor - IGPU, DRAM, PCH, CPU PLL, VTT, VCCSA Voltage Multi-adjustment Support CD - ASRock Extreme Tuning Utility (AXTU) (see CAUTION 11) - SmartView (see CAUTION 9) - Overclocking may affect your system...
Creative Sound Blaster X-Fi MB - ASRock APP Charger (see CAUTION 8) - Boot Failure Guard (B.F.G.) - Chassis Temperature Sensing - CPU/Chassis/Power Fan Tachometer - We are not responsible for possible damage caused by CPU or MB ...5V, +3.3V, CPU Vcore OS - FCC, CE, WHQL - It should be done at your system. Instant Boot - CPU Temperature Sensing Monitor - IGPU, DRAM, PCH, CPU PLL, VTT, VCCSA Voltage Multi-adjustment Support CD - ASRock Extreme Tuning Utility (AXTU) (see CAUTION 11) - SmartView (see CAUTION 9) - Overclocking may affect your system...

User Manual
Page 21
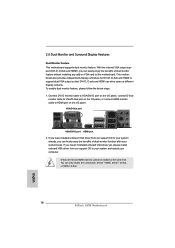
..., you can freely enjoy the bene ts of dual monitor feature without installing any add-on VGA card to your system and restart your system boots. With the internal VGA output support (DVI-D, D-Sub and HDMI), you can easily enjoy the bene ts of dual monitor function after your computer. You...
..., you can freely enjoy the bene ts of dual monitor feature without installing any add-on VGA card to your system and restart your system boots. With the internal VGA output support (DVI-D, D-Sub and HDMI), you can easily enjoy the bene ts of dual monitor function after your computer. You...

User Manual
Page 22
... 20 for proper expansion card installation procedures for the second monitor. If you do not adjust the BIOS setup, the default value of VGA/D-sub. G. Boot your primary monitor, and then select "Primary". Surround Display Feature This motherboard supports surround display upgrade. If you have installed the drivers already, there is...
... 20 for proper expansion card installation procedures for the second monitor. If you do not adjust the BIOS setup, the default value of VGA/D-sub. G. Boot your primary monitor, and then select "Primary". Surround Display Feature This motherboard supports surround display upgrade. If you have installed the drivers already, there is...

User Manual
Page 24
... "Short" when jumper cap is placed on these 2 pins. If you need to clear the CMOS when you just nish updating the BIOS, you must boot up the system rst, and then shut it down before you do not clear the CMOS right after you to default setup, please turn off...
... "Short" when jumper cap is placed on these 2 pins. If you need to clear the CMOS when you just nish updating the BIOS, you must boot up the system rst, and then shut it down before you do not clear the CMOS right after you to default setup, please turn off...
User Manual
Page 34
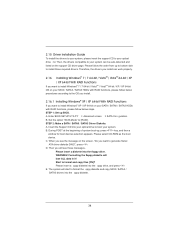
...-bit / VistaTM / VistaTM 64-bit / XP / XP 64-bit OS on the support CD driver page. A. B. During POST at the beginning of system boot-up BIOS. When you install can be auto-detected and listed on your SATA / SATAII / SATA3 HDDs with RAID functions, please follow the order from...side to install those required drivers. WARNING! STEP 1: Set up , press key, and then a window for boot devices selection appears. Please insert a oppy diskette into your optical drive to boot your SATA / SATAII / SATA3 HDDs with RAID functions, please follow below steps. Set the option "SATA Mode"...
...-bit / VistaTM / VistaTM 64-bit / XP / XP 64-bit OS on the support CD driver page. A. B. During POST at the beginning of system boot-up BIOS. When you install can be auto-detected and listed on your SATA / SATAII / SATA3 HDDs with RAID functions, please follow the order from...side to install those required drivers. WARNING! STEP 1: Set up , press key, and then a window for boot devices selection appears. Please insert a oppy diskette into your optical drive to boot your SATA / SATAII / SATA3 HDDs with RAID functions, please follow below steps. Set the option "SATA Mode"...

User Manual
Page 35
... Rapid Storage Information If you start to SATA Hard Disks Installation and RAID Con guration", which is located in the folder at a later date by booting from the Support CD again so that "Intel Rapid Storage" will be presented. A "RAID Ready" system can also set up system BIOS as step 2 of...
... Rapid Storage Information If you start to SATA Hard Disks Installation and RAID Con guration", which is located in the folder at a later date by booting from the Support CD again so that "Intel Rapid Storage" will be presented. A "RAID Ready" system can also set up system BIOS as step 2 of...

User Manual
Page 36
... and format the empty space created when the two hard drive capacities are combined. After setting up a "RAID Ready" system as the source hard drive. 1. Boot Windows®, install the Intel(R) Rapid Storage software, if not already installed, using the setup package obtained from a CD-ROM or from the Actions menu...
... and format the empty space created when the two hard drive capacities are combined. After setting up a "RAID Ready" system as the source hard drive. 1. Boot Windows®, install the Intel(R) Rapid Storage software, if not already installed, using the setup package obtained from a CD-ROM or from the Actions menu...

User Manual
Page 40
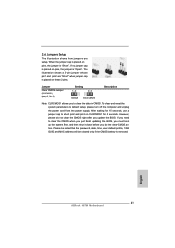
... following selections: Main To set up the system time/date information Advanced To set up the advanced UEFI features H/W Monitor To display current hardware status Boot To set up the default system device to locate and load the Operating System Security To set up the computer. Chapter 3: UEFI SETUP UTILITY 3.1 Introduction...
... following selections: Main To set up the system time/date information Advanced To set up the advanced UEFI features H/W Monitor To display current hardware status Boot To set up the default system device to locate and load the Operating System Security To set up the computer. Chapter 3: UEFI SETUP UTILITY 3.1 Introduction...

User Manual
Page 49
... VGA Share Memory This allows you to enable or disable IGD Multi-Monitor by Internal Graphics Device. GT Over Clock Use this to select the boot graphic adapter priority. Con guration options: [Onboard], [PCI Express] and [PCI].
... VGA Share Memory This allows you to enable or disable IGD Multi-Monitor by Internal Graphics Device. GT Over Clock Use this to select the boot graphic adapter priority. Con guration options: [Onboard], [PCI Express] and [PCI].

User Manual
Page 50
... Card is selected, the AC/power resumes and the system starts to enable or disable ACPI HPET Table. ACPI HPET Table Use this item to boot up when the power recovers. Onboard HD Audio Select [Auto], [Enabled] or [Disabled] for the onboard HD Audio Front Panel. 3.3.6 South Bridge Configuration Restore on...
... Card is selected, the AC/power resumes and the system starts to enable or disable ACPI HPET Table. ACPI HPET Table Use this item to boot up when the power recovers. Onboard HD Audio Select [Auto], [Enabled] or [Disabled] for the onboard HD Audio Front Panel. 3.3.6 South Bridge Configuration Restore on...

User Manual
Page 57
...key. 65535(0XFFFF) means inde nite waiting. Full Screen Logo Use this option to con gure the boot settings and the boot priority. Boot Failure Guard Count Enable or disable the feature of Boot Failure Guard. The default value is [Enabled]. If you enable the option "Full Screen Logo" but...]. The default value is [Enabled]. Setup Prompt Timeout This shows the number of seconds to wait for you want to enable or disable the Boot From Onboard LAN feature. Con guration options: [Enabled] and [Disabled]. AddOn ROM Display Use this item to [On], it will automatically activate...
...key. 65535(0XFFFF) means inde nite waiting. Full Screen Logo Use this option to con gure the boot settings and the boot priority. Boot Failure Guard Count Enable or disable the feature of Boot Failure Guard. The default value is [Enabled]. If you enable the option "Full Screen Logo" but...]. The default value is [Enabled]. Setup Prompt Timeout This shows the number of seconds to wait for you want to enable or disable the Boot From Onboard LAN feature. Con guration options: [Enabled] and [Disabled]. AddOn ROM Display Use this item to [On], it will automatically activate...

User Manual
Page 61
... make sure to install the operating system. 1. Set AHCI Mode in UEFI Setup Utility > Boot > Boot Option #1. ("xxx" is the device which contains your Windows® installation files. Choose the item "UEFI:xxx" to boot in UEFI Setup Utility > Advanced > Storage Configuration > SATA Mode. 3. Please install...GUID Partition Table). Press or at system POST and choose the item "UEFI:xxx" to launch boot menu at system POST. Normally it is an optical drive.) You can also press to boot. 4. Please follow below procedure to use Windows® VistaTM 64-bit (with SP1 or above...
... make sure to install the operating system. 1. Set AHCI Mode in UEFI Setup Utility > Boot > Boot Option #1. ("xxx" is the device which contains your Windows® installation files. Choose the item "UEFI:xxx" to boot in UEFI Setup Utility > Advanced > Storage Configuration > SATA Mode. 3. Please install...GUID Partition Table). Press or at system POST and choose the item "UEFI:xxx" to launch boot menu at system POST. Normally it is an optical drive.) You can also press to boot. 4. Please follow below procedure to use Windows® VistaTM 64-bit (with SP1 or above...
Quick Installation Guide
Page 8
...) - Creative Sound Blaster X-Fi MB - CPU Temperature Sensing Monitor - ACPI 1.1 Compliance Wake Up Events - Supports jumperfree - ASRock Extreme Tuning Utility (AXTU) (see CAUTION 14) - Hybrid Booster: - Boot Failure Guard (B.F.G.) - Combo Cooler Option (C.C.O.) (see CAUTION 8) - CPU Fan Multi-Speed Control - Voltage Monitoring: +12V, +5V, +3.3V, CPU Vcore OS - FCC, CE, WHQL - English 8 ASRock H67M Motherboard
...) - Creative Sound Blaster X-Fi MB - CPU Temperature Sensing Monitor - ACPI 1.1 Compliance Wake Up Events - Supports jumperfree - ASRock Extreme Tuning Utility (AXTU) (see CAUTION 14) - Hybrid Booster: - Boot Failure Guard (B.F.G.) - Combo Cooler Option (C.C.O.) (see CAUTION 8) - CPU Fan Multi-Speed Control - Voltage Monitoring: +12V, +5V, +3.3V, CPU Vcore OS - FCC, CE, WHQL - English 8 ASRock H67M Motherboard
Quick Installation Guide
Page 18
...;ts of dual monitor function after your system boots. If you have installed onboard VGA driver from our support CD to support dual VGA output so that DVI-D, D-sub and HDMI can only choose the combination: DVI-D + HDMI, DVI-D + D-Sub, or HDMI + D-Sub. 18 ASRock H67M Motherboard English With the internal VGA output...
...;ts of dual monitor function after your system boots. If you have installed onboard VGA driver from our support CD to support dual VGA output so that DVI-D, D-sub and HDMI can only choose the combination: DVI-D + HDMI, DVI-D + D-Sub, or HDMI + D-Sub. 18 ASRock H67M Motherboard English With the internal VGA output...

Quick Installation Guide
Page 19
Please refer to the following steps to this monitor". Boot your primary monitor, and then select "Primary". If you do not adjust the BIOS setup, the default value of surround display feature. If you can ... of the add-on PCI Express VGA card on the I /O panel, or connect HDMI monitor cable to your card, one , two, three and four 19 ASRock H67M Motherboard English Install the onboard VGA driver and the add-on PCI Express VGA card driver to HDMI port on PCIE1 slot. 3. B. When you can...
Please refer to the following steps to this monitor". Boot your primary monitor, and then select "Primary". If you do not adjust the BIOS setup, the default value of surround display feature. If you can ... of the add-on PCI Express VGA card on the I /O panel, or connect HDMI monitor cable to your card, one , two, three and four 19 ASRock H67M Motherboard English Install the onboard VGA driver and the add-on PCI Express VGA card driver to HDMI port on PCIE1 slot. 3. B. When you can...
Quick Installation Guide
Page 21
...) (see p.2, No. 9) Setting Default Clear CMOS Description Note: CLRCMOS1 allows you update the BIOS. English 21 ASRock H67M Motherboard If you need to clear the CMOS when you just finish updating the BIOS, you must boot up the system first, and then shut it down before you do not clear the...
...) (see p.2, No. 9) Setting Default Clear CMOS Description Note: CLRCMOS1 allows you update the BIOS. English 21 ASRock H67M Motherboard If you need to clear the CMOS when you just finish updating the BIOS, you must boot up the system first, and then shut it down before you do not clear the...

Quick Installation Guide
Page 170
...; 어 170 ASRock H67M Motherboard IGPU, DRAM, PCH, CPU PLL, VTT, VCCSA 조절 지원 CD ASRock 소 CyberLink DVD X-Fi MB) (OEM - ASRock Instant Flash ( 주의 9 참조 ) - ASRock U-COP ( 주의 13 참조 ) - SmartView ( 주의 12 참조 ) - ASRock AIWI ( 주의 10 참조 ) - CPU 도계 - B.F.G..(Boot Failure Guard...
...; 어 170 ASRock H67M Motherboard IGPU, DRAM, PCH, CPU PLL, VTT, VCCSA 조절 지원 CD ASRock 소 CyberLink DVD X-Fi MB) (OEM - ASRock Instant Flash ( 주의 9 참조 ) - ASRock U-COP ( 주의 13 참조 ) - SmartView ( 주의 12 참조 ) - ASRock AIWI ( 주의 10 참조 ) - CPU 도계 - B.F.G..(Boot Failure Guard...

