
User Manual
Page 33
... the 2.5" drive bay of the chassis. The Installation Guide of Front USB 3.0 Panel Step 1 Prepare the bundled Front USB 3.0 Panel, four Step 2 Screw the 2.5" HDD/SSD to use. Step 4 Screw the Front USB 3.0 Panel to the drive bay with four HDD screws. Step 5 Plug the Front USB 3.0 cable into the chassis...
... the 2.5" drive bay of the chassis. The Installation Guide of Front USB 3.0 Panel Step 1 Prepare the bundled Front USB 3.0 Panel, four Step 2 Screw the 2.5" HDD/SSD to use. Step 4 Screw the Front USB 3.0 Panel to the drive bay with four HDD screws. Step 5 Plug the Front USB 3.0 cable into the chassis...

Quick Installation Guide
Page 29
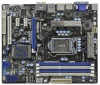
... Installation Guide of Front USB 3.0 Panel Step 1 Prepare the bundled Front USB 3.0 Panel, four Step 2 Screw the 2.5" HDD/SSD to the drive bay with four HDD screws. Step 3 Screw the two screws into the chassis. 29 ASRock H67M-GE/HT Motherboard header (USB_12_13) on the motherboard. USB 3.0 bracket together. USB 3.0 Panel with six chassis screws.
... Installation Guide of Front USB 3.0 Panel Step 1 Prepare the bundled Front USB 3.0 Panel, four Step 2 Screw the 2.5" HDD/SSD to the drive bay with four HDD screws. Step 3 Screw the two screws into the chassis. 29 ASRock H67M-GE/HT Motherboard header (USB_12_13) on the motherboard. USB 3.0 bracket together. USB 3.0 Panel with six chassis screws.
