
Intel Rapid Storage Guide
Page 12
...size and press Enter. 5. Unless you have selected RAID 1, use the up or down arrow keys to create a RAID volume. 1. Press Enter to enter the BIOS Setup program after the Power-On-Self-Test (POST) memory test begins. 2. Click F2 or Delete to select the physical disks. 6. Select 1: Create RAID ... a RAID volume (F6 install method) In order to install an operating system onto a RAID volume, the RAID option must be enabled in the system BIOS, a RAID volume must be created, and the F6 installation method must be used to enter the option ROM user interface. 2. Click F10 to select ...
...size and press Enter. 5. Unless you have selected RAID 1, use the up or down arrow keys to create a RAID volume. 1. Press Enter to enter the BIOS Setup program after the Power-On-Self-Test (POST) memory test begins. 2. Click F2 or Delete to select the physical disks. 6. Select 1: Create RAID ... a RAID volume (F6 install method) In order to install an operating system onto a RAID volume, the RAID option must be enabled in the system BIOS, a RAID volume must be created, and the F6 installation method must be used to enter the option ROM user interface. 2. Click F10 to select ...

User Manual
Page 5
... about the model you are using. www.asrock.com/support/index.asp 1.1 Package Contents ASRock H67M-GE/HT Motherboard (Micro ATX Form Factor: 9.6-in x 9.6-in our support CD for purchasing ASRock H67M-GE/HT motherboard, a reliable motherboard produced under ASRock's consistently stringent quality control. ASRock website http://www.asrock.com If you for details. 5 For the BIOS setup, please refer to this manual...
... about the model you are using. www.asrock.com/support/index.asp 1.1 Package Contents ASRock H67M-GE/HT Motherboard (Micro ATX Form Factor: 9.6-in x 9.6-in our support CD for purchasing ASRock H67M-GE/HT motherboard, a reliable motherboard produced under ASRock's consistently stringent quality control. ASRock website http://www.asrock.com If you for details. 5 For the BIOS setup, please refer to this manual...

User Manual
Page 9
...such limitation. 4. This motherboard supports Dual Channel Memory Technology. For Windows® OS with overclocking, including adjusting the setting in the BIOS, applying Untied Overclocking Technology, or using the third-party overclocking tools. For microphone input, this motherboard supports 2-channel, 4-channel, 6-... when the CPU cores are only supported under Windows® 7 / VistaTM / XP. xvYCC and Deep Color are idle without 9 ASRock Extreme Tuning Utility (AXTU) is an all-in-one tool to change. CAUTION! 1. Please check Intel® website for optimal system...
...such limitation. 4. This motherboard supports Dual Channel Memory Technology. For Windows® OS with overclocking, including adjusting the setting in the BIOS, applying Untied Overclocking Technology, or using the third-party overclocking tools. For microphone input, this motherboard supports 2-channel, 4-channel, 6-... when the CPU cores are only supported under Windows® 7 / VistaTM / XP. xvYCC and Deep Color are idle without 9 ASRock Extreme Tuning Utility (AXTU) is an all-in-one tool to change. CAUTION! 1. Please check Intel® website for optimal system...
User Manual
Page 10
... (S4) or power off (S5). With APP Charger driver installed, you can update your BIOS only in a few clicks without entering operating systems rst like MS-DOS or Windows®. ASRock motherboards are exclusively equipped with the SmartView utility that the USB ash drive or hard drive must... use SmartView feature, please make sure your OS version is IE8. ASRock website: http://www.asrock.com/Feature/ SmartView/index.asp 10 This convenient BIOS update tool allows you - To experience intuitive motion controlled games is a BIOS ash utility embedded in touch with friends on-the-go. All you...
... (S4) or power off (S5). With APP Charger driver installed, you can update your BIOS only in a few clicks without entering operating systems rst like MS-DOS or Windows®. ASRock motherboards are exclusively equipped with the SmartView utility that the USB ash drive or hard drive must... use SmartView feature, please make sure your OS version is IE8. ASRock website: http://www.asrock.com/Feature/ SmartView/index.asp 10 This convenient BIOS update tool allows you - To experience intuitive motion controlled games is a BIOS ash utility embedded in touch with friends on-the-go. All you...

User Manual
Page 12
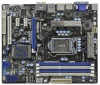
...Channel USB 3.0 T: USB4 Top: B: USB5 RJ-45 CHA_FAN1 CHA_FAN2 LAN PHY 8 Top: CTR BASS Center: REAR SPK Bottom: Optical SPDIF SATA3_1 SATA3_0 CMOS H67M-GE/HT Battery 9 Top: LINE IN Center: FRONT Bottom: MIC IN USB 3.0 34 PCIE1 10 33 DX10.1 PCI Express 2.0 ErP/EuP Ready Super I/O PCIE2 ...AUDIO CODEC HDMI_SPDIF1 1 COM1 HD_AUDIO1 1 1 PCIE3 PCI1 FLOPPY1 1 LPT1 H67 IR1 1 USB6_7 1 1 CIR1 USB10_11 1 USB8_9 1 1 CLRCMOS1 1 PLED1 SPEAKER1 1 64Mb BIOS SATA2_2 SATA2_3 USB_12_13 SATA2_4 PLED PWRBTN PANEL1 1 HDLED RESET 12 13 14 15 16 29 28 27 26 25 24 23 22 21 20 19...
...Channel USB 3.0 T: USB4 Top: B: USB5 RJ-45 CHA_FAN1 CHA_FAN2 LAN PHY 8 Top: CTR BASS Center: REAR SPK Bottom: Optical SPDIF SATA3_1 SATA3_0 CMOS H67M-GE/HT Battery 9 Top: LINE IN Center: FRONT Bottom: MIC IN USB 3.0 34 PCIE1 10 33 DX10.1 PCI Express 2.0 ErP/EuP Ready Super I/O PCIE2 ...AUDIO CODEC HDMI_SPDIF1 1 COM1 HD_AUDIO1 1 1 PCIE3 PCI1 FLOPPY1 1 LPT1 H67 IR1 1 USB6_7 1 1 CIR1 USB10_11 1 USB8_9 1 1 CLRCMOS1 1 PLED1 SPEAKER1 1 64Mb BIOS SATA2_2 SATA2_3 USB_12_13 SATA2_4 PLED PWRBTN PANEL1 1 HDLED RESET 12 13 14 15 16 29 28 27 26 25 24 23 22 21 20 19...

User Manual
Page 24
.... 3. Install the PCI Express VGA card on PCI Express VGA cards, you can easily enjoy the bene ts of the multi-monitor according to enter BIOS setup. Please make sure that you can adjust the parameters of surround display feature. For Windows® XP / XP 64-bit OS: Right click the...". Click the "Identify" button to apply these new values. Right-click the display icon and select "Attached", if necessary. G. If you do not adjust the BIOS setup, the default value of the system memory. Set the "Screen Resolution" and "Color Quality" as Secondary. A. C.
.... 3. Install the PCI Express VGA card on PCI Express VGA cards, you can easily enjoy the bene ts of the multi-monitor according to enter BIOS setup. Please make sure that you can adjust the parameters of surround display feature. For Windows® XP / XP 64-bit OS: Right click the...". Click the "Identify" button to apply these new values. Right-click the display icon and select "Attached", if necessary. G. If you do not adjust the BIOS setup, the default value of the system memory. Set the "Screen Resolution" and "Color Quality" as Secondary. A. C.

User Manual
Page 27
... only if the CMOS battery is removed. 27 To clear and reset the system parameters to clear the CMOS when you just nish updating the BIOS, you must boot up the system rst, and then shut it down before you update the...
... only if the CMOS battery is removed. 27 To clear and reset the system parameters to clear the CMOS when you just nish updating the BIOS, you must boot up the system rst, and then shut it down before you update the...

User Manual
Page 38
...® XP / XP 64-bit With RAID Functions If you want to install Windows® XP / XP 64-bit on your optical drive rst. Enter BIOS SETUP UTILITY Advanced screen SATA Con guration. Insert the Support CD into the oppy diskette. 38 During POST at the beginning of system boot-up...-bit / VistaTM / VistaTM 64-bit / XP / XP 64-bit OS on your SATA / SATAII / SATA3 HDDs with RAID functions, please follow the order from up BIOS.
...® XP / XP 64-bit With RAID Functions If you want to install Windows® XP / XP 64-bit on your optical drive rst. Enter BIOS SETUP UTILITY Advanced screen SATA Con guration. Insert the Support CD into the oppy diskette. 38 During POST at the beginning of system boot-up...-bit / VistaTM / VistaTM 64-bit / XP / XP 64-bit OS on your SATA / SATAII / SATA3 HDDs with RAID functions, please follow the order from up BIOS.

User Manual
Page 39
... want to use both "RAID Installation Guide" and "Intel Rapid Storage Information" for proper con guration. STEP 3: Use "RAID Installation Guide" to set up system BIOS as step 2 of page 38. After making a SATA / SATAII / SATA3 driver diskette and using RAID migration feature of Intel Rapid Storage. Assemble the system and...
... want to use both "RAID Installation Guide" and "Intel Rapid Storage Information" for proper con guration. STEP 3: Use "RAID Installation Guide" to set up system BIOS as step 2 of page 38. After making a SATA / SATAII / SATA3 driver diskette and using RAID migration feature of Intel Rapid Storage. Assemble the system and...

User Manual
Page 41
...® 7 / 7 64-bit / VistaTM / VistaTM 64-bit on your system. Set the option "SATA Mode" to set RAID configuration. Enter BIOS SETUP UTILITY Advanced screen SATA Con guration. STEP 2: Use "RAID Installation Guide" to [RAID]. B. Please refer to the document in the Support CD, "Guide ...Rapid Storage Information If you want to use both "RAID Installation Guide" and "Intel Rapid Storage Information" for proper con guration. STEP 1: Set up BIOS. Before you start to con gure the RAID function, you need to check the installation guide in the Support CD for RAID con guration. 2.17...
...® 7 / 7 64-bit / VistaTM / VistaTM 64-bit on your system. Set the option "SATA Mode" to set RAID configuration. Enter BIOS SETUP UTILITY Advanced screen SATA Con guration. STEP 2: Use "RAID Installation Guide" to [RAID]. B. Please refer to the document in the Support CD, "Guide ...Rapid Storage Information If you want to use both "RAID Installation Guide" and "Intel Rapid Storage Information" for proper con guration. STEP 1: Set up BIOS. Before you start to con gure the RAID function, you need to check the installation guide in the Support CD for RAID con guration. 2.17...

User Manual
Page 42
.../ SATAII / SATA3 driver diskette. A. B. When prompted, insert the SATA / SATAII / SATA3 driver diskette containing the Intel® AHCI driver. Enter BIOS SETUP UTILITY Advanced screen SATA Con guration. After making a SATA / SATAII / SATA3 driver diskette, you can start to install Windows® XP / ... diskette by following section 2.17.1 step 2 on your system. At the beginning of Windows® setup, press F6 to [IDE]. Enter BIOS SETUP UTILITY Advanced screen SATA Con guration. Set the option "SATA Mode" to install a third-party AHCI driver. Using SATA / SATAII /...
.../ SATAII / SATA3 driver diskette. A. B. When prompted, insert the SATA / SATAII / SATA3 driver diskette containing the Intel® AHCI driver. Enter BIOS SETUP UTILITY Advanced screen SATA Con guration. After making a SATA / SATAII / SATA3 driver diskette, you can start to install Windows® XP / ... diskette by following section 2.17.1 step 2 on your system. At the beginning of Windows® setup, press F6 to [IDE]. Enter BIOS SETUP UTILITY Advanced screen SATA Con guration. Set the option "SATA Mode" to install a third-party AHCI driver. Using SATA / SATAII /...

User Manual
Page 43
...option "SATA Mode" to [AHCI]. STEP 2: Install Windows® 7 / 7 64-bit / VistaTM / VistaTM 64-bit OS on your system. B. Enter BIOS SETUP UTILITY Advanced screen SATA Con guration. A. Using SATA / SATAII / STA3 HDDs without RAID functions, please follow below steps. B. STEP 2: Install Windows® ...7 / 7 64-bit / VistaTM / VistaTM 64-bit OS on your SATA / SATAII / SATA3 HDDs without NCQ function STEP 1: Set up BIOS. Enter BIOS SETUP UTILITY Advanced screen SATA Con guration. 2.18.2 Installing Windows® 7 / 7 64-bit / VistaTM / VistaTM 64-bit Without RAID Functions If...
...option "SATA Mode" to [AHCI]. STEP 2: Install Windows® 7 / 7 64-bit / VistaTM / VistaTM 64-bit OS on your system. B. Enter BIOS SETUP UTILITY Advanced screen SATA Con guration. A. Using SATA / SATAII / STA3 HDDs without RAID functions, please follow below steps. B. STEP 2: Install Windows® ...7 / 7 64-bit / VistaTM / VistaTM 64-bit OS on your SATA / SATAII / SATA3 HDDs without NCQ function STEP 1: Set up BIOS. Enter BIOS SETUP UTILITY Advanced screen SATA Con guration. 2.18.2 Installing Windows® 7 / 7 64-bit / VistaTM / VistaTM 64-bit Without RAID Functions If...

User Manual
Page 64
... Mode in UEFI Setup Utility > Boot > Boot Option #1. ("xxx" is the device which contains your Windows® installation files. Normally it is adopting UEFI BIOS that allows Windows® OS to boot. 4. Choose the item "UEFI:xxx" to boot in UEFI Setup Utility > Advanced > Storage Configuration > SATA Mode...
... Mode in UEFI Setup Utility > Boot > Boot Option #1. ("xxx" is the device which contains your Windows® installation files. Normally it is adopting UEFI BIOS that allows Windows® OS to boot. 4. Choose the item "UEFI:xxx" to boot in UEFI Setup Utility > Advanced > Storage Configuration > SATA Mode...

Quick Installation Guide
Page 2
...B: USB5 RJ-45 CHA_FAN1 CHA_FAN2 LAN PHY 8 Top: CTR BASS Center: REAR SPK Bottom: Optical SPDIF SATA3_1 SATA3_0 CMOS H67M-GE/HT Battery 9 Top: LINE IN Center: FRONT Bottom: MIC IN USB 3.0 34 PCIE1 10 33 DX10.1 PCI Express 2.0 ... PCI1 FLOPPY1 1 LPT1 H67 IR1 1 USB6_7 1 1 CIR1 USB10_11 1 USB8_9 1 1 CLRCMOS1 1 PLED1 SPEAKER1 1 64Mb BIOS SATA2_2 SATA2_3 USB_12_13 SATA2_4 PLED PWRBTN PANEL1 1 HDLED RESET 12 13 14 15 16 29 28 27 26 25 24 23 ... Chassis Speaker Header (SPEAKER 1, White) 19 USB 3.0 Header (USB_12_13, Light Blue) 2 ASRock H67M-GE/HT Motherboard English
...B: USB5 RJ-45 CHA_FAN1 CHA_FAN2 LAN PHY 8 Top: CTR BASS Center: REAR SPK Bottom: Optical SPDIF SATA3_1 SATA3_0 CMOS H67M-GE/HT Battery 9 Top: LINE IN Center: FRONT Bottom: MIC IN USB 3.0 34 PCIE1 10 33 DX10.1 PCI Express 2.0 ... PCI1 FLOPPY1 1 LPT1 H67 IR1 1 USB6_7 1 1 CIR1 USB10_11 1 USB8_9 1 1 CLRCMOS1 1 PLED1 SPEAKER1 1 64Mb BIOS SATA2_2 SATA2_3 USB_12_13 SATA2_4 PLED PWRBTN PANEL1 1 HDLED RESET 12 13 14 15 16 29 28 27 26 25 24 23 ... Chassis Speaker Header (SPEAKER 1, White) 19 USB 3.0 Header (USB_12_13, Light Blue) 2 ASRock H67M-GE/HT Motherboard English

Quick Installation Guide
Page 6
... Support CD. You may find the latest VGA cards and CPU support lists on ASRock website without notice. For the BIOS setup, please refer to set the BIOS option in , 24.4 cm x 24.4 cm) ASRock H67M-GE/HT Quick Installation Guide ASRock H67M-GE/HT Support CD 2 x Serial ATA (SATA) Data Cables (Optional) 1 x I/O Panel Shield 1 x Front USB 3.0 Panel 4 x HDD Screws...
... Support CD. You may find the latest VGA cards and CPU support lists on ASRock website without notice. For the BIOS setup, please refer to set the BIOS option in , 24.4 cm x 24.4 cm) ASRock H67M-GE/HT Quick Installation Guide ASRock H67M-GE/HT Support CD 2 x Serial ATA (SATA) Data Cables (Optional) 1 x I/O Panel Shield 1 x Front USB 3.0 Panel 4 x HDD Screws...
Quick Installation Guide
Page 10
...size may affect your system stability, or even cause damage to get the same OC settings. xvYCC and Deep Color are idle without 10 ASRock H67M-GE/HT Motherboard English HBR is supported under Windows® 7 64-bit / 7. For audio output, this motherboard supports both stereo and mono ...4-channel, 6-channel, and 8-channel modes. Overclocking may be enabled only if the display supports 12bpc in EDID. ASRock Extreme Tuning Utility (AXTU) is an all-in the BIOS, applying Untied Overclocking Technology, or using the third-party overclocking tools. In Fan Control, it shows the major ...
...size may affect your system stability, or even cause damage to get the same OC settings. xvYCC and Deep Color are idle without 10 ASRock H67M-GE/HT Motherboard English HBR is supported under Windows® 7 64-bit / 7. For audio output, this motherboard supports both stereo and mono ...4-channel, 6-channel, and 8-channel modes. Overclocking may be enabled only if the display supports 12bpc in EDID. ASRock Extreme Tuning Utility (AXTU) is an all-in the BIOS, applying Untied Overclocking Technology, or using the third-party overclocking tools. In Fan Control, it shows the major ...

Quick Installation Guide
Page 11
... store to your computer and up -do not forget to pay attention to ASRock of internet browser, is just to control your BIOS only in Flash ROM. ASRock website: http://www.asrock.com/Feature/ SmartView/index.asp 11 ASRock H67M-GE/HT Motherboard English This convenient BIOS update tool allows you have to RAM (S3), hibernation mode (S4) or...
... store to your computer and up -do not forget to pay attention to ASRock of internet browser, is just to control your BIOS only in Flash ROM. ASRock website: http://www.asrock.com/Feature/ SmartView/index.asp 11 ASRock H67M-GE/HT Motherboard English This convenient BIOS update tool allows you have to RAM (S3), hibernation mode (S4) or...

Quick Installation Guide
Page 20
...on PCI Express VGA card driver to install them again. 5. Repeat steps C through E for the second monitor. Please refer to enter BIOS setup. Boot your system. A. Surround Display Feature This motherboard supports surround display upgrade. Please make sure that the value you do not adjust ...enjoy the benefits of "Onboard VGA Share Memory", [Auto], will be your card, one , two, three and four. 20 ASRock H67M-GE/HT Motherboard English Right-click the display icon in the Display Properties dialog that you wish to apply these new values. If you use multiple monitors...
...on PCI Express VGA card driver to install them again. 5. Repeat steps C through E for the second monitor. Please refer to enter BIOS setup. Boot your system. A. Surround Display Feature This motherboard supports surround display upgrade. Please make sure that the value you do not adjust ...enjoy the benefits of "Onboard VGA Share Memory", [Auto], will be your card, one , two, three and four. 20 ASRock H67M-GE/HT Motherboard English Right-click the display icon in the Display Properties dialog that you wish to apply these new values. If you use multiple monitors...

Quick Installation Guide
Page 23
... CMOS when you just finish updating the BIOS, you must boot up the system first, and then shut it down before you to clear the data in CMOS. When the jumper cap is placed on pins, the jumper is removed. English 23 ASRock H67M-GE/HT Motherboard The illustration shows a 3-pin jumper whose...
... CMOS when you just finish updating the BIOS, you must boot up the system first, and then shut it down before you to clear the data in CMOS. When the jumper cap is placed on pins, the jumper is removed. English 23 ASRock H67M-GE/HT Motherboard The illustration shows a 3-pin jumper whose...

Quick Installation Guide
Page 30
Please follow the order from up BIOS. Enter BIOS SETUP UTILITY Advanced screen SATA Configuration. STEP 2: Install Windows® XP / XP 64-bit OS on the support CD driver page. Then, the ... / SATAII / SATA3 HDDs without NCQ function STEP 1: Set up to bottom side to your system can be auto-detected and listed on your system. 30 ASRock H67M-GE/HT Motherboard English A. B. Set the option "SATA Mode" to your optical drive first.
Please follow the order from up BIOS. Enter BIOS SETUP UTILITY Advanced screen SATA Configuration. STEP 2: Install Windows® XP / XP 64-bit OS on the support CD driver page. Then, the ... / SATAII / SATA3 HDDs without NCQ function STEP 1: Set up to bottom side to your system can be auto-detected and listed on your system. 30 ASRock H67M-GE/HT Motherboard English A. B. Set the option "SATA Mode" to your optical drive first.


