User Manual
Page 5
...any modifications of this manual occur, the updated version will be available on ASRock website as well. www.asrock.com/support/index.asp 1.1 Package Contents ASRock H61M-PS Motherboard (Micro ATX Form Factor: 9.6-in x 7.8-in Storage Configuration to quality... 64bit, it is recommended to set the BIOS option in , 24.4 cm x 19.8 cm) ASRock H61M-PS Quick Installation Guide ASRock H61M-PS Support CD 2 x Serial ATA (SATA) Data Cables (Optional) 1 x I/O Panel Shield ASRock Reminds You... For the BIOS setup, please refer to change without further notice. Chapter 3 and 4...
...any modifications of this manual occur, the updated version will be available on ASRock website as well. www.asrock.com/support/index.asp 1.1 Package Contents ASRock H61M-PS Motherboard (Micro ATX Form Factor: 9.6-in x 7.8-in Storage Configuration to quality... 64bit, it is recommended to set the BIOS option in , 24.4 cm x 19.8 cm) ASRock H61M-PS Quick Installation Guide ASRock H61M-PS Support CD 2 x Serial ATA (SATA) Data Cables (Optional) 1 x I/O Panel Shield ASRock Reminds You... For the BIOS setup, please refer to change without further notice. Chapter 3 and 4...
Quick Installation Guide
Page 1
...;ts, loss of business, loss of data, interruption of business and the like), even if ASRock has been advised of the possibility of their respective companies, and are used only for a particular purpose. All rights reserved. 1 ASRock H61M-PS Motherboard English With respect to change without intent to the following two conditions: (1) this device...
...;ts, loss of business, loss of data, interruption of business and the like), even if ASRock has been advised of the possibility of their respective companies, and are used only for a particular purpose. All rights reserved. 1 ASRock H61M-PS Motherboard English With respect to change without intent to the following two conditions: (1) this device...
Quick Installation Guide
Page 2
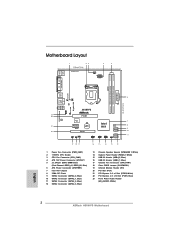
... X Gigabit LAN PWR_FAN1 USB 2.0 T: USB0 B: USB1 6 USB 2.0 T: USB2 Top: B: USB3 RJ-45 LAN PHY 1 HD_AUDIO1 Fast USB X Top: LINE IN Center: FRONT Bottom: MIC IN H61M-PS ErP/EuP Ready 23 22 AUDIO CODEC 21 20 PCIE1 Super I/O PCIE2 RoHS CMOS Battery PCI1 IR1 1 CHA_FAN1 CLRCMOS1 1 USB6_7 1 Intel H61 32Mb BIOS SATA2_0... PCI Slot (PCI1) 21 PCI Express 2.0 x1 Slot (PCIE2, White) 22 PCI Express 2.0 x16 Slot (PCIE1, Blue) 23 Front Panel Audio Header (HD_AUDIO1, White) English 2 ASRock H61M-PS Motherboard
... X Gigabit LAN PWR_FAN1 USB 2.0 T: USB0 B: USB1 6 USB 2.0 T: USB2 Top: B: USB3 RJ-45 LAN PHY 1 HD_AUDIO1 Fast USB X Top: LINE IN Center: FRONT Bottom: MIC IN H61M-PS ErP/EuP Ready 23 22 AUDIO CODEC 21 20 PCIE1 Super I/O PCIE2 RoHS CMOS Battery PCI1 IR1 1 CHA_FAN1 CLRCMOS1 1 USB6_7 1 Intel H61 32Mb BIOS SATA2_0... PCI Slot (PCI1) 21 PCI Express 2.0 x1 Slot (PCIE2, White) 22 PCI Express 2.0 x16 Slot (PCIE1, Blue) 23 Front Panel Audio Header (HD_AUDIO1, White) English 2 ASRock H61M-PS Motherboard
Quick Installation Guide
Page 3
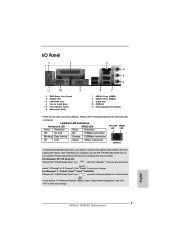
...and click "Advanced Options" on the left side on your computer, you are two LED next to the front panel audio header. English 3 ASRock H61M-PS Motherboard For Windows® XP / XP 64-bit OS: Please click "VIA HD Audio Deck" icon , and click "Speaker". I/O Panel 1 2 3... (Light Blue) ** 5 Front Speaker (Lime) 6 Microphone (Pink) 8 7 7 USB 2.0 Ports (USB23) 8 USB 2.0 Ports (USB01) 9 D-Sub Port 10 COM Port 11 PS/2 Keyboard Port (Purple) * There are allowed to save your change . Please follow below for the LAN port LED indications. LAN Port LED Indications Activity/Link...
...and click "Advanced Options" on the left side on your computer, you are two LED next to the front panel audio header. English 3 ASRock H61M-PS Motherboard For Windows® XP / XP 64-bit OS: Please click "VIA HD Audio Deck" icon , and click "Speaker". I/O Panel 1 2 3... (Light Blue) ** 5 Front Speaker (Lime) 6 Microphone (Pink) 8 7 7 USB 2.0 Ports (USB23) 8 USB 2.0 Ports (USB01) 9 D-Sub Port 10 COM Port 11 PS/2 Keyboard Port (Purple) * There are allowed to save your change . Please follow below for the LAN port LED indications. LAN Port LED Indications Activity/Link...
Quick Installation Guide
Page 4
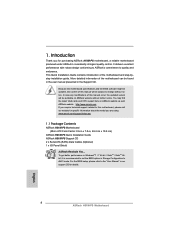
... updated version will be found in the user manual presented in our support CD for purchasing ASRock H61M-PS motherboard, a reliable motherboard produced under ASRock's consistently stringent quality control. This Quick Installation Guide contains introduction of the motherboard can be subject...Introduction Thank you are using. More detailed information of the motherboard and step-bystep installation guide. www.asrock.com/support/index.asp 1.1 Package Contents ASRock H61M-PS Motherboard (Micro ATX Form Factor: 9.6-in x 7.8-in Storage Configuration to change without further...
... updated version will be found in the user manual presented in our support CD for purchasing ASRock H61M-PS motherboard, a reliable motherboard produced under ASRock's consistently stringent quality control. This Quick Installation Guide contains introduction of the motherboard can be subject...Introduction Thank you are using. More detailed information of the motherboard and step-bystep installation guide. www.asrock.com/support/index.asp 1.1 Package Contents ASRock H61M-PS Motherboard (Micro ATX Form Factor: 9.6-in x 7.8-in Storage Configuration to change without further...
Quick Installation Guide
Page 5
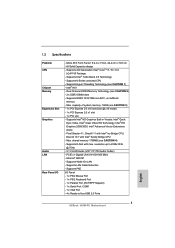
...Shader 4.1, DirectX 11 with Intel® Ivy Bridge CPU, DirectX 10.1 with max. resolution up to -Use USB 2.0 Ports English 5 ASRock H61M-PS Motherboard Atheros® AR8151 - Supports Wake-On-LAN - Supports Intel® Turbo Boost 2.0 Technology - Intel® H61 - Max.... Dual Channel DDR3 Memory Technology (see CAUTION 1) - 1.2 Specifications Platform CPU Chipset Memory Expansion Slot Graphics Audio LAN Rear Panel I /O Panel - 1 x PS/2 Mouse Port - 1 x PS/2 Keyboard Port - 1 x Parallel Port (ECP/EPP Support) - 1 x Serial Port: COM1 - 1 x VGA Port - 4 x Ready-to 2048x1536 @...
...Shader 4.1, DirectX 11 with Intel® Ivy Bridge CPU, DirectX 10.1 with max. resolution up to -Use USB 2.0 Ports English 5 ASRock H61M-PS Motherboard Atheros® AR8151 - Supports Wake-On-LAN - Supports Intel® Turbo Boost 2.0 Technology - Intel® H61 - Max.... Dual Channel DDR3 Memory Technology (see CAUTION 1) - 1.2 Specifications Platform CPU Chipset Memory Expansion Slot Graphics Audio LAN Rear Panel I /O Panel - 1 x PS/2 Mouse Port - 1 x PS/2 Keyboard Port - 1 x Parallel Port (ECP/EPP Support) - 1 x Serial Port: COM1 - 1 x VGA Port - 4 x Ready-to 2048x1536 @...
Quick Installation Guide
Page 6
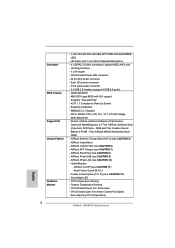
... CAUTION 7) - ACPI 1.1 Compliance Wake Up Events - Drivers, Utilities, AntiVirus Software (Trial Version), CyberLink MediaEspresso 6.5 Trial, ASRock Software Suite (CyberLink DVD Suite - CPU/Chassis Quiet Fan (Allow Chassis Fan Speed Auto-Adjust by CPU Temperature) English 6 ASRock H61M-PS Motherboard IGPU, DRAM, PCH, CPU PLL, VTT, VCCSA Voltage Multi-adjustment - Creative Sound Blaster X-Fi MB...
... CAUTION 7) - ACPI 1.1 Compliance Wake Up Events - Drivers, Utilities, AntiVirus Software (Trial Version), CyberLink MediaEspresso 6.5 Trial, ASRock Software Suite (CyberLink DVD Suite - CPU/Chassis Quiet Fan (Allow Chassis Fan Speed Auto-Adjust by CPU Temperature) English 6 ASRock H61M-PS Motherboard IGPU, DRAM, PCH, CPU PLL, VTT, VCCSA Voltage Multi-adjustment - Creative Sound Blaster X-Fi MB...
Quick Installation Guide
Page 7
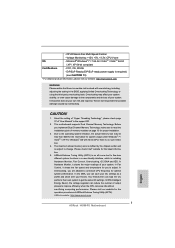
...may affect your system stability, or even cause damage to the components and devices of your system. ASRock Extreme Tuning Utility (AXTU) is an all-in the support CD. 2. ASRock website: http://www.asrock.com 7 ASRock H61M-PS Motherboard English Microsoft® Windows® 7 / 7 64-bit / VistaTM / VistaTM 64-bit...(ErP/EuP ready power supply is required) (see CAUTION 13) * For detailed product information, please visit our website: http://www.asrock.com WARNING Please realize that there is a certain risk involved with your system. We are allowed to improve efficiency when ...
...may affect your system stability, or even cause damage to the components and devices of your system. ASRock Extreme Tuning Utility (AXTU) is an all-in the support CD. 2. ASRock website: http://www.asrock.com 7 ASRock H61M-PS Motherboard English Microsoft® Windows® 7 / 7 64-bit / VistaTM / VistaTM 64-bit...(ErP/EuP ready power supply is required) (see CAUTION 13) * For detailed product information, please visit our website: http://www.asrock.com WARNING Please realize that there is a certain risk involved with your system. We are allowed to improve efficiency when ...
Quick Installation Guide
Page 8
...launch this utility, you install the PC system. 8 ASRock H61M-PS Motherboard English If you desire a faster, less restricted way of internet browser, is IE8. ASRock website: http://www.asrock.com/Feature/ SmartView/index.asp 9. ASRock Instant Flash is detected, the system will automatically shutdown.... installing the APP Charger driver, it can easily enjoy the marvelous charging experience than before. ASRock website: http://www.asrock.com/Feature/AppCharger/index.asp 8. ASRock XFast LAN provides a faster internet access, which data streams you to quickly charge many Apple...
...launch this utility, you install the PC system. 8 ASRock H61M-PS Motherboard English If you desire a faster, less restricted way of internet browser, is IE8. ASRock website: http://www.asrock.com/Feature/ SmartView/index.asp 9. ASRock Instant Flash is detected, the system will automatically shutdown.... installing the APP Charger driver, it can easily enjoy the marvelous charging experience than before. ASRock website: http://www.asrock.com/Feature/AppCharger/index.asp 8. ASRock XFast LAN provides a faster internet access, which data streams you to quickly charge many Apple...
Quick Installation Guide
Page 9
... LGA 775, LGA 1155 and LGA 1156. Combo Cooler Option (C.C.O.) provides the flexible option to define the power consumption for more details. 9 ASRock H61M-PS Motherboard English
... LGA 775, LGA 1155 and LGA 1156. Combo Cooler Option (C.C.O.) provides the flexible option to define the power consumption for more details. 9 ASRock H61M-PS Motherboard English
Quick Installation Guide
Page 10
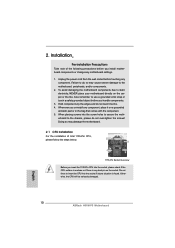
... Contact Array Load Lever Socket Body 1155-Pin Socket Overview Before you install motherboard components or change any bent pin on the socket. English 10 ASRock H61M-PS Motherboard Otherwise, the CPU will be seriously damaged. erboard to the chassis, please do so may damage the motherboard. 2.1 CPU Installation For the installation of...
... Contact Array Load Lever Socket Body 1155-Pin Socket Overview Before you install motherboard components or change any bent pin on the socket. English 10 ASRock H61M-PS Motherboard Otherwise, the CPU will be seriously damaged. erboard to the chassis, please do so may damage the motherboard. 2.1 CPU Installation For the installation of...
Quick Installation Guide
Page 11
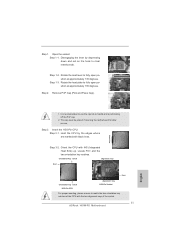
... PnP Cap (Pick and Place Cap). 1. It is recommended to use the cap tab to match the two orientation key notches of the socket. 11 ASRock H61M-PS Motherboard English Orient the CPU with the two alignment keys of the CPU with IHS (Integrated Heat Sink) up. Step 1-2. Rotate the load plate to...
... PnP Cap (Pick and Place Cap). 1. It is recommended to use the cap tab to match the two orientation key notches of the socket. 11 ASRock H61M-PS Motherboard English Orient the CPU with the two alignment keys of the CPU with IHS (Integrated Heat Sink) up. Step 1-2. Rotate the load plate to...
Quick Installation Guide
Page 12
... illustrate the installation of IHS on the motherboard. Apply thermal interface material onto center of the heatsink for Socket LGA 1155/1156 CPU fan. 12 ASRock H61M-PS Motherboard Step 4. Step 3-3. Secure load lever with fan operation or contact other components. The white throughholes are oriented on side closest to the CPU fan...
... illustrate the installation of IHS on the motherboard. Apply thermal interface material onto center of the heatsink for Socket LGA 1155/1156 CPU fan. 12 ASRock H61M-PS Motherboard Step 4. Step 3-3. Secure load lever with fan operation or contact other components. The white throughholes are oriented on side closest to the CPU fan...
Quick Installation Guide
Page 13
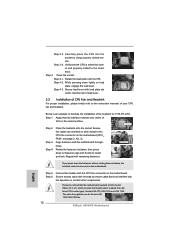
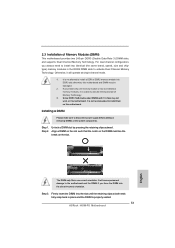
... Modules (DIMM) This motherboard provides two 240-pin DDR3 (Double Data Rate 3) DIMM slots, and supports Dual Channel Memory Technology. It is properly seated. 13 ASRock H61M-PS Motherboard English Installing a DIMM Please make sure to activate the Dual Channel Memory Technology. 3. Step 2. notch break notch break The DIMM only fits in...
... Modules (DIMM) This motherboard provides two 240-pin DDR3 (Double Data Rate 3) DIMM slots, and supports Dual Channel Memory Technology. It is properly seated. 13 ASRock H61M-PS Motherboard English Installing a DIMM Please make sure to activate the Dual Channel Memory Technology. 3. Step 2. notch break notch break The DIMM only fits in...
Quick Installation Guide
Page 14
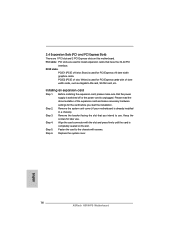
... card connector with the slot and press firmly until the card is used for PCI Express cards with screws. Replace the system cover. 14 ASRock H61M-PS Motherboard English
... card connector with the slot and press firmly until the card is used for PCI Express cards with screws. Replace the system cover. 14 ASRock H61M-PS Motherboard English

Quick Installation Guide
Page 15
... have installed the drivers already, there is less than the total capability of D-sub. Select the display icon identified by the number 2. 15 ASRock H61M-PS Motherboard English Install the onboard VGA driver and the add-on PCI Express VGA card driver to display a large number on PCI Express VGA cards...
... have installed the drivers already, there is less than the total capability of D-sub. Select the display icon identified by the number 2. 15 ASRock H61M-PS Motherboard English Install the onboard VGA driver and the add-on PCI Express VGA card driver to display a large number on PCI Express VGA cards...

Quick Installation Guide
Page 16
E. F. Repeat steps C through C for the display icon identified by the number one monitor to another. 16 ASRock H61M-PS Motherboard English Repeat steps A through E for the second monitor. Click "Extend my Windows desktop onto this monitor". Right-click the display icon and select "Attached", ...
E. F. Repeat steps C through C for the display icon identified by the number one monitor to another. 16 ASRock H61M-PS Motherboard English Repeat steps A through E for the second monitor. Click "Extend my Windows desktop onto this monitor". Right-click the display icon and select "Attached", ...
Quick Installation Guide
Page 17
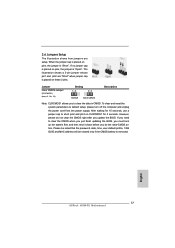
..." when jumper cap is placed on these 2 pins. However, please do not clear the CMOS right after you do the clear-CMOS action. English 17 ASRock H61M-PS Motherboard Jumper Clear CMOS Jumper (CLRCMOS1) (see p.2, No. 18) Setting Default Clear CMOS Description Note: CLRCMOS1 allows you to short pin2 and pin3 on CLRCMOS1...
..." when jumper cap is placed on these 2 pins. However, please do not clear the CMOS right after you do the clear-CMOS action. English 17 ASRock H61M-PS Motherboard Jumper Clear CMOS Jumper (CLRCMOS1) (see p.2, No. 18) Setting Default Clear CMOS Description Note: CLRCMOS1 allows you to short pin2 and pin3 on CLRCMOS1...
Quick Installation Guide
Page 18
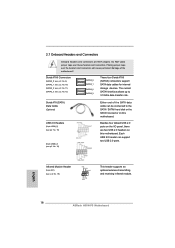
...: see p.2, No. 11) (SATA2_3: see p.2 No. 19) IRTX +5VSB DUMMY 1 GND IRRX This header supports an optional wireless transmitting and receiving infrared module. English 18 ASRock H61M-PS Motherboard 2.7 Onboard Headers and Connectors Onboard headers and connectors are two USB 2.0 headers on this motherboard. Besides four default USB 2.0 ports on the I/O panel, there...
...: see p.2, No. 11) (SATA2_3: see p.2 No. 19) IRTX +5VSB DUMMY 1 GND IRRX This header supports an optional wireless transmitting and receiving infrared module. English 18 ASRock H61M-PS Motherboard 2.7 Onboard Headers and Connectors Onboard headers and connectors are two USB 2.0 headers on this motherboard. Besides four default USB 2.0 ports on the I/O panel, there...
Quick Installation Guide
Page 19
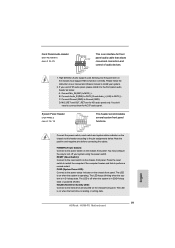
... to perform a normal restart. Please follow the instruction in S3/S4 sleep state or powered off when the system is reading or writing data. 19 ASRock H61M-PS Motherboard English The LED is off (S5). System Panel Header (9-pin PANEL1) (see p.2 No. 23) GND PRESENCE# MIC_RET OUT_RET 1 OUT2_L J_SENSE OUT2_R MIC2_R MIC2_L This...
... to perform a normal restart. Please follow the instruction in S3/S4 sleep state or powered off when the system is reading or writing data. 19 ASRock H61M-PS Motherboard English The LED is off (S5). System Panel Header (9-pin PANEL1) (see p.2 No. 23) GND PRESENCE# MIC_RET OUT_RET 1 OUT2_L J_SENSE OUT2_R MIC2_R MIC2_L This...


