
User Manual
Page 3
...® XP / XP 64-bit 29 2.14.2 Installing Windows® 7 / 7 64-bit / VistaTM / VistaTM 64-bit 29 2.15 Untied Overclocking Technology 30 3 BIOS SETUP UTILITY 31 3.1 Introduction 31 3.1.1 BIOS Menu Bar 31 3.1.2 Navigation Keys 31 3.2 Main Screen 32 3.3 OC Tweaker Screen 33 3.4 Advanced Screen 37 3.4.1 CPU Configuration 38 3.4.2 Chipset Configuration 40 3.4.3 ACPI...
...® XP / XP 64-bit 29 2.14.2 Installing Windows® 7 / 7 64-bit / VistaTM / VistaTM 64-bit 29 2.15 Untied Overclocking Technology 30 3 BIOS SETUP UTILITY 31 3.1 Introduction 31 3.1.1 BIOS Menu Bar 31 3.1.2 Navigation Keys 31 3.2 Main Screen 32 3.3 OC Tweaker Screen 33 3.4 Advanced Screen 37 3.4.1 CPU Configuration 38 3.4.2 Chipset Configuration 40 3.4.3 ACPI...

User Manual
Page 5
...BIOS software might be updated, the content of this manual occur, the updated version will be available on ASRock website as well. ASRock website http://www.asrock.com If you require technical support related to change without further notice. www.asrock.com/support/index.asp 1.1 Package Contents ASRock H55M-GE... Motherboard (Micro ATX Form Factor: 9.6-in x 8.7-in, 24.4 cm x 22.1 cm) ASRock H55M-GE Quick Installation Guide ASRock H55M-GE Support CD 2 x Serial ATA (SATA) ...
...BIOS software might be updated, the content of this manual occur, the updated version will be available on ASRock website as well. ASRock website http://www.asrock.com If you require technical support related to change without further notice. www.asrock.com/support/index.asp 1.1 Package Contents ASRock H55M-GE... Motherboard (Micro ATX Form Factor: 9.6-in x 8.7-in, 24.4 cm x 22.1 cm) ASRock H55M-GE Quick Installation Guide ASRock H55M-GE Support CD 2 x Serial ATA (SATA) ...
User Manual
Page 7
... Support CD Unique Feature - Supports "Plug and Play" - Supports jumperfree - ASRock Instant Flash (see CAUTION 11) - 16Mb AMI Legal BIOS - LAN Rear Panel I /O Panel - 1 x PS/2 Keyboard Port - 1 x VGA/D-Sub Port - 1 x VGA/DVI-D Port - 1 x HDMI Port - 6 x Ready-to-Use USB 2.0 Ports... Intelligent Energy Saver (see CAUTION 12) - Realtek RTL8111E - CPU/Chassis/Power FAN connector - 24 pin ATX power connector - 4 pin 12V power connector - ASRock OC Tuner (see CAUTION 13) - HD Audio Jack: Line in/Front Speaker/Microphone - 6 x SATAII 3.0Gb/s connectors, support NCQ, AHCI and "Hot...
... Support CD Unique Feature - Supports "Plug and Play" - Supports jumperfree - ASRock Instant Flash (see CAUTION 11) - 16Mb AMI Legal BIOS - LAN Rear Panel I /O Panel - 1 x PS/2 Keyboard Port - 1 x VGA/D-Sub Port - 1 x VGA/DVI-D Port - 1 x HDMI Port - 6 x Ready-to-Use USB 2.0 Ports... Intelligent Energy Saver (see CAUTION 12) - Realtek RTL8111E - CPU/Chassis/Power FAN connector - 24 pin ATX power connector - 4 pin 12V power connector - ASRock OC Tuner (see CAUTION 13) - HD Audio Jack: Line in/Front Speaker/Microphone - 6 x SATAII 3.0Gb/s connectors, support NCQ, AHCI and "Hot...

User Manual
Page 8
... Quiet Fan - We are not responsible for possible damage caused by overclocking. 8 ASRock OC DNA (see CAUTION 19) * For detailed product information, please visit our website: http://www.asrock.com WARNING Please realize that there is required) (see CAUTION 15) - Voltage Monitoring... Guard (B.F.G.) - Turbo 50 / Turbo 100 GPU Overclocking (Requires a Processor with overclocking, including adjusting the setting in the BIOS, applying Untied Overclocking Technology, or using the thirdparty overclocking tools. Overclocking may affect your system stability, or even cause damage to...
... Quiet Fan - We are not responsible for possible damage caused by overclocking. 8 ASRock OC DNA (see CAUTION 19) * For detailed product information, please visit our website: http://www.asrock.com WARNING Please realize that there is required) (see CAUTION 15) - Voltage Monitoring... Guard (B.F.G.) - Turbo 50 / Turbo 100 GPU Overclocking (Requires a Processor with overclocking, including adjusting the setting in the BIOS, applying Untied Overclocking Technology, or using the thirdparty overclocking tools. Overclocking may affect your system stability, or even cause damage to...
User Manual
Page 10
...that not all the 775 CPU Fan can press key during the POST or press key to BIOS setup menu to save your OC settings as yours! OC DNA, an exclusive utility developed by ASRock, provides a convenient way for Energy Using Product, was a provision regulated by European Union ...to update system BIOS without preparing an additional floppy diskette or other than 50% under 1.00W in Flash ROM. ...
...that not all the 775 CPU Fan can press key during the POST or press key to BIOS setup menu to save your OC settings as yours! OC DNA, an exclusive utility developed by ASRock, provides a convenient way for Energy Using Product, was a provision regulated by European Union ...to update system BIOS without preparing an additional floppy diskette or other than 50% under 1.00W in Flash ROM. ...

User Manual
Page 11
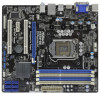
...T: USB0 B: USB1 Top: RJ-45 Top: LINE IN Center: FRONT Bottom: MIC IN LAN PHY 1 HD_AUDIO1 RoHS AUDIO CODEC Super I/O COM1 1 LPT1 1 CHA_FAN1 H55M-GE PCI Express 2.0 PCIE1 Designed in Taipei DDR3 2600+ PCI1 PCIE2 CMOS Battery ErP/EuP Ready PCI2 CLRCMOS1 1 CI1 1 IR1 1 TPMS1 1 USB_PWR3 1 USB10_11 USB8_9 1 ...1 Intel H55 SATAII_3 SATAII_6 USB6_7 1 PANEL1 PLED PWRBTN 1 HDLED RESET HDMI_SPDIF1 1 SATAII_5 SATAII_2 16Mb BIOS 1 SPEAKER1 SATAII_4 SATAII_1 9 10 11 12 13 14 15 16 17 31 30 29 28 27 26 25 24 23 22 21 20 19 18...
...T: USB0 B: USB1 Top: RJ-45 Top: LINE IN Center: FRONT Bottom: MIC IN LAN PHY 1 HD_AUDIO1 RoHS AUDIO CODEC Super I/O COM1 1 LPT1 1 CHA_FAN1 H55M-GE PCI Express 2.0 PCIE1 Designed in Taipei DDR3 2600+ PCI1 PCIE2 CMOS Battery ErP/EuP Ready PCI2 CLRCMOS1 1 CI1 1 IR1 1 TPMS1 1 USB_PWR3 1 USB10_11 USB8_9 1 ...1 Intel H55 SATAII_3 SATAII_6 USB6_7 1 PANEL1 PLED PWRBTN 1 HDLED RESET HDMI_SPDIF1 1 SATAII_5 SATAII_2 16Mb BIOS 1 SPEAKER1 SATAII_4 SATAII_1 9 10 11 12 13 14 15 16 17 31 30 29 28 27 26 25 24 23 22 21 20 19 18...
User Manual
Page 20
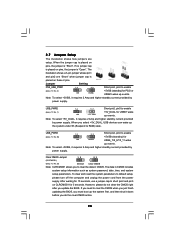
... USB23 wake up the system under S3 (Suspend to enable (see p.11, No. 23) Default Clear CMOS Note: CLRCMOS1 allows you update the BIOS. If no jumper cap is placed on pins, the jumper is "Open". Jumper Setting PS2_USB_PWR1 1_2 2_3 Short pin2, pin3 to RAM) state. The... and higher standby current provided by power supply. To clear and reset the system parameters to clear the CMOS when you just finish updating the BIOS, you select +5V_DUAL, USB devices can wake up events. The illustration shows a 3-pin jumper whose pin1 and pin2 are setup. Note: To ...
... USB23 wake up the system under S3 (Suspend to enable (see p.11, No. 23) Default Clear CMOS Note: CLRCMOS1 allows you update the BIOS. If no jumper cap is placed on pins, the jumper is "Open". Jumper Setting PS2_USB_PWR1 1_2 2_3 Short pin2, pin3 to RAM) state. The... and higher standby current provided by power supply. To clear and reset the system parameters to clear the CMOS when you just finish updating the BIOS, you select +5V_DUAL, USB devices can wake up events. The illustration shows a 3-pin jumper whose pin1 and pin2 are setup. Note: To ...

User Manual
Page 21
... SATA data cable can support two USB 2.0 ports. 21 The current SATAII interface allows up to clear the record of the motherboard! Please adjust the BIOS option "Clear Status" to 3.0 Gb/s data transfer rate. Placing jumper caps over these headers and connectors. Besides six default USB 2.0 ports on the I/O panel, there...
... SATA data cable can support two USB 2.0 ports. 21 The current SATAII interface allows up to clear the record of the motherboard! Please adjust the BIOS option "Clear Status" to 3.0 Gb/s data transfer rate. Placing jumper caps over these headers and connectors. Besides six default USB 2.0 ports on the I/O panel, there...
User Manual
Page 29
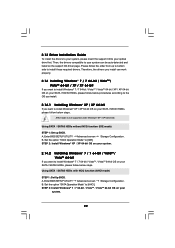
... VistaTM 64-bit OS on your SATA / SATAII HDDs, please follow below steps. Enter BIOS SETUP UTILITY Advanced screen Storage Configuration. Using SATA / SATAII HDDs with NCQ function (AHCI mode) STEP 1: Set Up BIOS. Enter BIOS SETUP UTILITY Advanced screen Storage Configuration. Please follow below procedures according to the OS you install..." to install Windows® 7 / 7 64-bit / VistaTM / VistaTM 64-bit OS on your SATA / SATAII HDDs, please follow the order from up BIOS. B. Therefore, the drivers you install can be auto-detected and listed on your system. 29
... VistaTM 64-bit OS on your SATA / SATAII HDDs, please follow below steps. Enter BIOS SETUP UTILITY Advanced screen Storage Configuration. Using SATA / SATAII HDDs with NCQ function (AHCI mode) STEP 1: Set Up BIOS. Enter BIOS SETUP UTILITY Advanced screen Storage Configuration. Please follow below procedures according to the OS you install..." to install Windows® 7 / 7 64-bit / VistaTM / VistaTM 64-bit OS on your SATA / SATAII HDDs, please follow the order from up BIOS. B. Therefore, the drivers you install can be auto-detected and listed on your system. 29
User Manual
Page 30
... untied during overclocking, FSB enjoys better margin due to fixed PCI / PCIE buses. Using SATA / SATAII HDDs without NCQ function (IDE mode) STEP 1: Set up BIOS. Set the option "SATA Operation Mode" to [Manual]. Before you apply Untied Overclocking Technology. 30 Please refer to the warning on your system. 2.15 Untied...-bit / VistaTM / VistaTM 64-bit OS on page 8 for the possible overclocking risk before you enable Untied Overclocking function, please enter "Overclock Mode" option of BIOS setup to set the selection from [Auto] to [IDE]. Enter...
... untied during overclocking, FSB enjoys better margin due to fixed PCI / PCIE buses. Using SATA / SATAII HDDs without NCQ function (IDE mode) STEP 1: Set up BIOS. Set the option "SATA Operation Mode" to [Manual]. Before you apply Untied Overclocking Technology. 30 Please refer to the warning on your system. 2.15 Untied...-bit / VistaTM / VistaTM 64-bit OS on page 8 for the possible overclocking risk before you enable Untied Overclocking function, please enter "Overclock Mode" option of BIOS setup to set the selection from [Auto] to [IDE]. Enter...

User Manual
Page 31
... they may not exactly match what you see on the menu bar, and then press to get into the sub screen. 31 Because the BIOS software is constantly being updated, the following selections: Main To set up the system time/date information OC Tweaker To set up overclocking features ...Advanced To set up the advanced BIOS features H/W Monitor To display current hardware status Boot To set up the default system device to locate and load the Operating System Security To ...
... they may not exactly match what you see on the menu bar, and then press to get into the sub screen. 31 Because the BIOS software is constantly being updated, the following selections: Main To set up the system time/date information OC Tweaker To set up overclocking features ...Advanced To set up the advanced BIOS features H/W Monitor To display current hardware status Boot To set up the default system device to locate and load the Operating System Security To ...

User Manual
Page 32
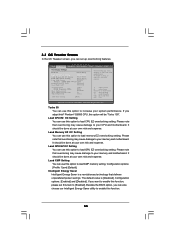
... UTILITY Main OC Tweaker Advanced H/W Monitor Boot Security Exit System Overview System Time System Date [14:00:09] [Fri 05/14/2010] BIOS Version : H55M-GE P1.00 Processor Type : Intel (R) Core (TM) i5 CPU K 655 @ 3.20GHz (64bit) Processor Speed : 3200MHz Microcode Update : 20655/2 Cache Size : 4096KB Total Memory ... (C) Copyright 1985-2005, American Megatrends, Inc. 3.1.2Navigation Keys Please check the following table for all the settings To save changes and exit the BIOS SETUP UTILITY To jump to the Exit Screen or exit the current screen 3.2 Main Screen When you enter the...
... UTILITY Main OC Tweaker Advanced H/W Monitor Boot Security Exit System Overview System Time System Date [14:00:09] [Fri 05/14/2010] BIOS Version : H55M-GE P1.00 Processor Type : Intel (R) Core (TM) i5 CPU K 655 @ 3.20GHz (64bit) Processor Speed : 3200MHz Microcode Update : 20655/2 Cache Size : 4096KB Total Memory ... (C) Copyright 1985-2005, American Megatrends, Inc. 3.1.2Navigation Keys Please check the following table for all the settings To save changes and exit the BIOS SETUP UTILITY To jump to the Exit Screen or exit the current screen 3.2 Main Screen When you enter the...
User Manual
Page 33
... memory and motherboard. It should be done at your own risk and expense. It should be done at your own risk and expense. Besides the BIOS option, you can use this option to your CPU and motherboard. It should be done at your own risk and expense.... BIOS SETUP UTILITY Main OC Tweaker Advanced H/W Monitor Boot Security Exit OC Tweaker Settings Turbo 50 [Press Enter] Load CPU EZ OC Setting [Press Enter] Load ...
... memory and motherboard. It should be done at your own risk and expense. It should be done at your own risk and expense. Besides the BIOS option, you can use this option to your CPU and motherboard. It should be done at your own risk and expense.... BIOS SETUP UTILITY Main OC Tweaker Advanced H/W Monitor Boot Security Exit OC Tweaker Settings Turbo 50 [Press Enter] Load CPU EZ OC Setting [Press Enter] Load ...

User Manual
Page 35
... Timing Control DRAM tCL DRAM tRCD DRAM tRP DRAM tRAS DRAM tRFC DRAM tWR DRAM tWTR DRAM tRRD DRAM tRTP DRAM tFAW DRAM Command Rate BIOS SETUP UTILITY 9 [Auto] 9 [Auto] 9 [Auto] 24 [Auto] 74 [Auto] 10 [Auto] 5 [Auto] 4 [Auto] 5 [Auto] 20 [Auto] [Auto] DRAM tCL Min = 6 Max = 11 +F1 F9 F10...
... Timing Control DRAM tCL DRAM tRCD DRAM tRP DRAM tRAS DRAM tRFC DRAM tWR DRAM tWTR DRAM tRRD DRAM tRTP DRAM tFAW DRAM Command Rate BIOS SETUP UTILITY 9 [Auto] 9 [Auto] 9 [Auto] 24 [Auto] 74 [Auto] 10 [Auto] 5 [Auto] 4 [Auto] 5 [Auto] 20 [Auto] [Auto] DRAM tCL Min = 6 Max = 11 +F1 F9 F10...
User Manual
Page 37
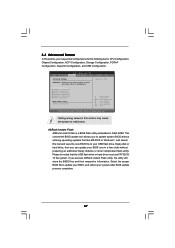
..., floppy disk or hard drive, then you can update your system after BIOS update process completes. 37 If you execute ASRock Instant Flash utility, the utility will show the BIOS files and their respective information. Please be noted that the USB flash drive... SuperIO Configuration, and USB Configuration. CPU Configuration Chipset Configuration ACPI Configuration Storage Configuration PCIPnP Configuration SuperIO Configuration USB Configuration BIOS Update Utility ASRock Instant Flash Select Screen Select Item Enter Go to Sub Screen F1 General Help F9 Load Defaults F10 Save and Exit...
..., floppy disk or hard drive, then you can update your system after BIOS update process completes. 37 If you execute ASRock Instant Flash utility, the utility will show the BIOS files and their respective information. Please be noted that the USB flash drive... SuperIO Configuration, and USB Configuration. CPU Configuration Chipset Configuration ACPI Configuration Storage Configuration PCIPnP Configuration SuperIO Configuration USB Configuration BIOS Update Utility ASRock Instant Flash Select Screen Select Item Enter Go to Sub Screen F1 General Help F9 Load Defaults F10 Save and Exit...
User Manual
Page 38
...; processor that supports Hyper-Threading technology and an operating system that includes optimization for this item appear to the IA-32 Intel Architecture. 3.4.1CPU Configuration BIOS SETUP UTILITY Advanced Configure advanded CPU settings Intel (R) Core (TM) CPU 870 @ 2.93GHz Frequency :2.93GHz Cache L1 :128 KB Cache L2 :1024 KB Cache L3...
...; processor that supports Hyper-Threading technology and an operating system that includes optimization for this item appear to the IA-32 Intel Architecture. 3.4.1CPU Configuration BIOS SETUP UTILITY Advanced Configure advanded CPU settings Intel (R) Core (TM) CPU 870 @ 2.93GHz Frequency :2.93GHz Cache L1 :128 KB Cache L2 :1024 KB Cache L3...
User Manual
Page 40
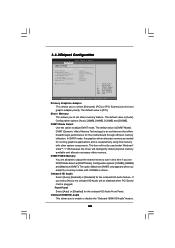
3.4.2Chipset Configuration BIOS SETUP UTILITY Advanced Chipset Settings Primary Graphics Adapter Share Memory DVMT Mode Select DVMT/FIXED Memory Onboard HD Audio Front Panel Onboard HDMI HD Audio ...
3.4.2Chipset Configuration BIOS SETUP UTILITY Advanced Chipset Settings Primary Graphics Adapter Share Memory DVMT Mode Select DVMT/FIXED Memory Onboard HD Audio Front Panel Onboard HDMI HD Audio ...

User Manual
Page 41
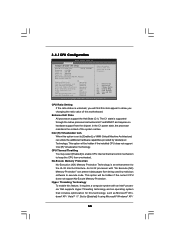
The default value of this feature is [Disabled]. 3.4.3 ACPI Configuration BIOS SETUP UTILITY Advanced ACPI Configuration Suspend To RAM Restore on AC/Power Loss This allows you to enable or disable the "OnBoard Lan" feature. Restore ...
The default value of this feature is [Disabled]. 3.4.3 ACPI Configuration BIOS SETUP UTILITY Advanced ACPI Configuration Suspend To RAM Restore on AC/Power Loss This allows you to enable or disable the "OnBoard Lan" feature. Restore ...
User Manual
Page 42
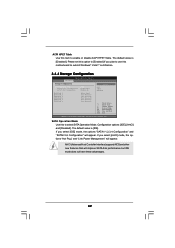
...] mode, the options "Hot Plug" and "Link Power Management" will appear. ACPI HPET Table Use this item to submit Windows® VistaTM certification. 3.4.4 Storage Configuration BIOS SETUP UTILITY Advanced Storage Configuration SATA Operation Mode SATAII 1,2,3,4 Configuration SATAII 5,6 Configuration [IDE] [Compatible] [Enhanced] SATAII_1 SATAII_2 SATAII_3 SATAII_4 SATAII_5 SATAII_6 [Hard Disk] [Not Detected...
...] mode, the options "Hot Plug" and "Link Power Management" will appear. ACPI HPET Table Use this item to submit Windows® VistaTM certification. 3.4.4 Storage Configuration BIOS SETUP UTILITY Advanced Storage Configuration SATA Operation Mode SATAII 1,2,3,4 Configuration SATAII 5,6 Configuration [IDE] [Compatible] [Enhanced] SATAII_1 SATAII_2 SATAII_3 SATAII_4 SATAII_5 SATAII_6 [Hard Disk] [Not Detected...

User Manual
Page 43
After selecting the hard disk information into BIOS, use a disk utility, such as the example in the following instruction. Type LBA/Large Mode Block (Multi-Sector Transfer) PIO Mode DMA Mode S.M.A.R.T. 32Bit Data ... the PIO mode to automatically detect the hard disk drive. PIO Mode Use this item to partition and format the new IDE hard disk drives. BIOS SETUP UTILITY Advanced Primary IDE Master Device Vendor Size LBA Mode Block Mode PIO Mode Async DMA Ultra DMA S.M.A.R.T. Make sure to set the partition...
After selecting the hard disk information into BIOS, use a disk utility, such as the example in the following instruction. Type LBA/Large Mode Block (Multi-Sector Transfer) PIO Mode DMA Mode S.M.A.R.T. 32Bit Data ... the PIO mode to automatically detect the hard disk drive. PIO Mode Use this item to partition and format the new IDE hard disk drives. BIOS SETUP UTILITY Advanced Primary IDE Master Device Vendor Size LBA Mode Block Mode PIO Mode Async DMA Ultra DMA S.M.A.R.T. Make sure to set the partition...


