User Manual
Page 4
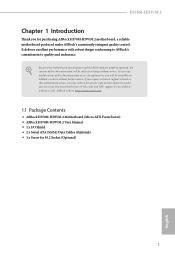
.... 1.1 Package Contents • ASRock H370M-HDV/M.2 Motherboard (Micro ATX Form Factor) • ASRock H370M-HDV/M.2 User Manual • 1 x I/O Shield • 2 x Serial ATA (SATA) Data Cables (Optional) • 1 x Screw for specific information about the model you are using. You may find the latest VGA cards and CPU support list on ASRock's website without notice. If you for purchasing ASRock H370M-HDV/M.2 motherboard, a reliable...
.... 1.1 Package Contents • ASRock H370M-HDV/M.2 Motherboard (Micro ATX Form Factor) • ASRock H370M-HDV/M.2 User Manual • 1 x I/O Shield • 2 x Serial ATA (SATA) Data Cables (Optional) • 1 x Screw for specific information about the model you are using. You may find the latest VGA cards and CPU support list on ASRock's website without notice. If you for purchasing ASRock H370M-HDV/M.2 motherboard, a reliable...
User Manual
Page 36
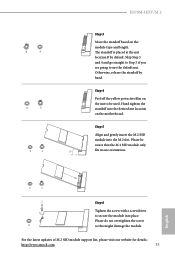
...do not overtighten the screw as this might damage the module. For the latest updates of M.2 SSD module support list, please visit our website for details: http://www.asrock.com 33 Skip Step 3 and 4 and go straight to Step 5 if you are going to be aware... that the M.2 SSD module only 20o fits in one orientation. Otherwise, release the standoff by default. English B A B NUT2 NUT1 Step 6 Tighten the screw with a screwdriver to secure the module into the M.2 slot. B A H370M-HDV...
...do not overtighten the screw as this might damage the module. For the latest updates of M.2 SSD module support list, please visit our website for details: http://www.asrock.com 33 Skip Step 3 and 4 and go straight to Step 5 if you are going to be aware... that the M.2 SSD module only 20o fits in one orientation. Otherwise, release the standoff by default. English B A B NUT2 NUT1 Step 6 Tighten the screw with a screwdriver to secure the module into the M.2 slot. B A H370M-HDV...

Software/BIOS Setup Guide
Page 8
If you would like to start downloading and installing drivers. Click "Update" to run the application again, please enable the "Auto Driver Installer" item in the BIOS setting. 4 If there are no drivers to be installed. Step 4 The Auto Driver Installer panel lists all of your motherboard supports. Click "Select All" to select all items. Click "Unselect All" to exit. Select one or more drivers to be installed, click "Finish" to remove all available drivers that your selections.
If you would like to start downloading and installing drivers. Click "Update" to run the application again, please enable the "Auto Driver Installer" item in the BIOS setting. 4 If there are no drivers to be installed. Step 4 The Auto Driver Installer panel lists all of your motherboard supports. Click "Select All" to select all items. Click "Unselect All" to exit. Select one or more drivers to be installed, click "Finish" to remove all available drivers that your selections.

Intel Rapid Storage Guide
Page 13
...successfully installed the driver and Windows setup should continue. Nothing will temporarily continue loading drivers. Use the Floppy Configuration Utility to load support for mass storage device(s). 2. Press Y to confirm your exit. This message appears at the beginning of available SCSI adapters. Setup...to create the volume. 9. Press F6 when you need to scroll through the list as all controllers may not be prompted Note with the Note necessary files. 4. Select your controller from the list of Windows setup (during operating system setup: 1. Press Enter. 5. Press Enter...
...successfully installed the driver and Windows setup should continue. Nothing will temporarily continue loading drivers. Use the Floppy Configuration Utility to load support for mass storage device(s). 2. Press Y to confirm your exit. This message appears at the beginning of available SCSI adapters. Setup...to create the volume. 9. Press F6 when you need to scroll through the list as all controllers may not be prompted Note with the Note necessary files. 4. Select your controller from the list of Windows setup (during operating system setup: 1. Press Enter. 5. Press Enter...


