
User Manual
Page 4
... 1 1.1 Package Contents 1 1.2 Specifications 2 1.3 Motherboard Layout 6 1.4 I/O Panel 8 Chapter 2 Installation 10 2.1 Installing the CPU 11 2.2 Installing the CPU Fan and Heatsink 14 2.3 Installing Memory Modules (DIMM) 15 2.4 Expansion Slots (PCI Express Slots) 17 2.5 Onboard Headers and Connectors 18 Chapter 3 Software and Utilities Operation 22 3.1 Installing Drivers 22 3.2 ASRock Live Update & APP Shop 23 3.2.1 UI...
... 1 1.1 Package Contents 1 1.2 Specifications 2 1.3 Motherboard Layout 6 1.4 I/O Panel 8 Chapter 2 Installation 10 2.1 Installing the CPU 11 2.2 Installing the CPU Fan and Heatsink 14 2.3 Installing Memory Modules (DIMM) 15 2.4 Expansion Slots (PCI Express Slots) 17 2.5 Onboard Headers and Connectors 18 Chapter 3 Software and Utilities Operation 22 3.1 Installing Drivers 22 3.2 ASRock Live Update & APP Shop 23 3.2.1 UI...
User Manual
Page 6
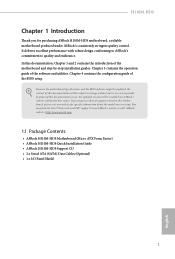
... content of this documentation will be subject to change without further notice. ASRock website http://www.asrock.com. 1.1 Package Contents • ASRock H110M-HDS Motherboard (Micro ATX Form Factor) • ASRock H110M-HDS Quick Installation Guide • ASRock H110M-HDS Support CD • 2 x Serial ATA (SATA) Data Cables (Optional) • 1 x I/O Panel Shield 1 English You may find the latest VGA cards and CPU...
... content of this documentation will be subject to change without further notice. ASRock website http://www.asrock.com. 1.1 Package Contents • ASRock H110M-HDS Motherboard (Micro ATX Form Factor) • ASRock H110M-HDS Quick Installation Guide • ASRock H110M-HDS Support CD • 2 x Serial ATA (SATA) Data Cables (Optional) • 1 x I/O Panel Shield 1 English You may find the latest VGA cards and CPU...
User Manual
Page 8
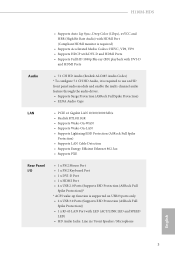
H110M-HDS • Supports Auto Lip Sync, Deep Color (12bpc), xvYCC and HBR (High Bit Rate Audio) with HDMI Port (Compliant HDMI monitor is required) • Supports Accelerated Media Codecs: HEVC, VP8, VP9 • Supports HDCP with DVI-D and HDMI Ports • Supports Full HD 1080p Blu-...HDMI Ports Audio • 7.1 CH HD Audio (Realtek ALC887 Audio Codec) * To configure 7.1 CH HD Audio, it is required to use an HD front panel audio module and enable the multi-channel audio feature through the audio driver. • Supports Surge Protection (ASRock Full Spike Protection) • ELNA ...
H110M-HDS • Supports Auto Lip Sync, Deep Color (12bpc), xvYCC and HBR (High Bit Rate Audio) with HDMI Port (Compliant HDMI monitor is required) • Supports Accelerated Media Codecs: HEVC, VP8, VP9 • Supports HDCP with DVI-D and HDMI Ports • Supports Full HD 1080p Blu-...HDMI Ports Audio • 7.1 CH HD Audio (Realtek ALC887 Audio Codec) * To configure 7.1 CH HD Audio, it is required to use an HD front panel audio module and enable the multi-channel audio feature through the audio driver. • Supports Surge Protection (ASRock Full Spike Protection) • ELNA ...
User Manual
Page 9
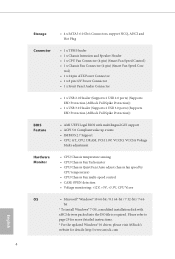
...For the updated Windows® 10 driver, please visit ASRock's website for details: http://www.asrock.com English 4 trol) • 1 x 24 pin ATX Power Connector • 1 x 8 pin 12V Power Connector • 1 x Front Panel Audio Connector • 1 x USB 2.0 Header (Supports... 2 USB 2.0 ports) (Supports ESD Protection (ASRock Full Spike Protection)) • 1 x USB 3.0 Header (Supports 2 USB 3.0 ports) (Supports ESD Protection (ASRock Full Spike Protection)) BIOS Feature • AMI UEFI ...
...For the updated Windows® 10 driver, please visit ASRock's website for details: http://www.asrock.com English 4 trol) • 1 x 24 pin ATX Power Connector • 1 x 8 pin 12V Power Connector • 1 x Front Panel Audio Connector • 1 x USB 2.0 Header (Supports... 2 USB 2.0 ports) (Supports ESD Protection (ASRock Full Spike Protection)) • 1 x USB 3.0 Header (Supports 2 USB 3.0 ports) (Supports ESD Protection (ASRock Full Spike Protection)) BIOS Feature • AMI UEFI ...
User Manual
Page 12
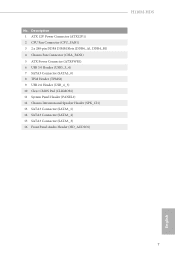
Description 1 ATX 12V Power Connector (ATX12V1) 2 CPU Fan Connector (CPU_FAN1) 3 2 x 288-pin DDR4 DIMM Slots (DDR4_A1, DDR4_B1) 4 Chassis Fan Connector (CHA_FAN1) 5 ATX Power Connector (ATXPWR1) 6 USB 3.0 Header (USB3_3_4) 7 SATA3 Connector (SATA3_0) 8 TPM Header (TPMS1) 9 USB 2.0 Header (USB_4_5) 10 Clear CMOS Pad (CLRMOS1) 11 System Panel Header (PANEL1) 12 Chassis Intrusion and Speaker Header (SPK_CI1) 13 SATA3 Connector (SATA3_1) 14 SATA3 Connector (SATA3_2) 15 SATA3 Connector (SATA3_3) 16 Front Panel Audio Header (HD_AUDIO1) H110M-HDS English 7 No.
Description 1 ATX 12V Power Connector (ATX12V1) 2 CPU Fan Connector (CPU_FAN1) 3 2 x 288-pin DDR4 DIMM Slots (DDR4_A1, DDR4_B1) 4 Chassis Fan Connector (CHA_FAN1) 5 ATX Power Connector (ATXPWR1) 6 USB 3.0 Header (USB3_3_4) 7 SATA3 Connector (SATA3_0) 8 TPM Header (TPMS1) 9 USB 2.0 Header (USB_4_5) 10 Clear CMOS Pad (CLRMOS1) 11 System Panel Header (PANEL1) 12 Chassis Intrusion and Speaker Header (SPK_CI1) 13 SATA3 Connector (SATA3_1) 14 SATA3 Connector (SATA3_2) 15 SATA3 Connector (SATA3_3) 16 Front Panel Audio Header (HD_AUDIO1) H110M-HDS English 7 No.
User Manual
Page 13
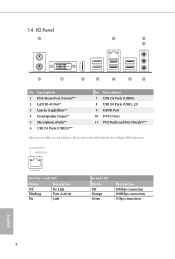
... LED Status Off Blinking On Description No Link Data Activity Link Speed LED Status Off Orange Green Description 10Mbps connection 100Mbps connection 1Gbps connection English 8 1.4 I/O Panel 1 2 3 4 11 10 9 8 7 6 5 No. Description 1 PS/2 Mouse Port (Green)*** 2 LAN RJ-45 Port* 3 Line In (Light Blue)** 4 Front Speaker (Lime)** 5 Microphone (Pink)** 6 USB 2.0 Ports (USB23)*** No...
... LED Status Off Blinking On Description No Link Data Activity Link Speed LED Status Off Orange Green Description 10Mbps connection 100Mbps connection 1Gbps connection English 8 1.4 I/O Panel 1 2 3 4 11 10 9 8 7 6 5 No. Description 1 PS/2 Mouse Port (Green)*** 2 LAN RJ-45 Port* 3 Line In (Light Blue)** 4 Front Speaker (Lime)** 5 Microphone (Pink)** 6 USB 2.0 Ports (USB23)*** No...
User Manual
Page 14
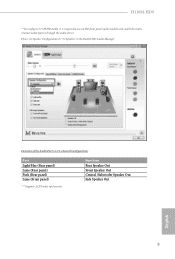
H110M-HDS ** To configure 7.1 CH HD Audio, it is required to "7.1 Speaker"in 7.1-channel Configuration: Port Light Blue (Rear panel) Lime (Rear panel) Pink (Rear panel) Lime (Front panel) *** Supports ACPI wake-up function Function Rear Speaker Out Front Speaker Out Central /Subwoofer Speaker Out Side Speaker Out 9 English Function of the Audio Ports in the Realtek HD Audio Manager. Please set Speaker Configuration to use an HD front panel audio module and enable the multichannel audio feature through the audio driver.
H110M-HDS ** To configure 7.1 CH HD Audio, it is required to "7.1 Speaker"in 7.1-channel Configuration: Port Light Blue (Rear panel) Lime (Rear panel) Pink (Rear panel) Lime (Front panel) *** Supports ACPI wake-up function Function Rear Speaker Out Front Speaker Out Central /Subwoofer Speaker Out Side Speaker Out 9 English Function of the Audio Ports in the Realtek HD Audio Manager. Please set Speaker Configuration to use an HD front panel audio module and enable the multichannel audio feature through the audio driver.
User Manual
Page 23
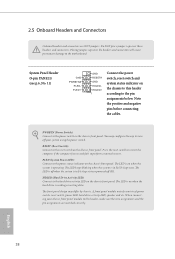
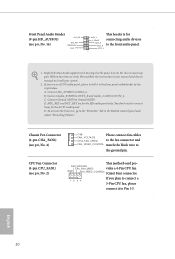
... No. 11) GND PWRBTN# PLEDPLED+ GND RESET# GND HDLEDHDLED+ 1 Connect the power switch, reset switch and system status indicator on the chassis front panel. Note the positive and negative pins before connecting the cables. Press the reset switch to restart the computer if the computer freezes and fails to... the hard drive activity LED on when the hard drive is operating. A front panel module mainly consists of power switch, reset switch, power LED, hard drive activity LED, speaker and etc. When connecting your system using ...
... No. 11) GND PWRBTN# PLEDPLED+ GND RESET# GND HDLEDHDLED+ 1 Connect the power switch, reset switch and system status indicator on the chassis front panel. Note the positive and negative pins before connecting the cables. Press the reset switch to restart the computer if the computer freezes and fails to... the hard drive activity LED on when the hard drive is operating. A front panel module mainly consists of power switch, reset switch, power LED, hard drive activity LED, speaker and etc. When connecting your system using ...
User Manual
Page 24
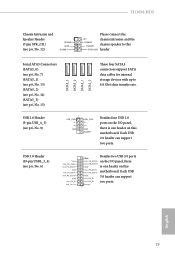
H110M-HDS Chassis Intrusion and Speaker Header (7-pin SPK_CI1) (see p.6, No. 12) 1 SIGNAL GND DUMMY Please connect the +5V chassis intrusion and the DUMMY chassis speaker to 6.0 Gb/s data transfer rate. 1 USB_PWR PP+ GND USB_PWR PP+ GND DUMMY Besides four USB 2.0 ports on the I /O panel, ...+ GND is one header on this DUMMY SPEAKER header. Each USB GND IntA_PB_DIntA_PB_D+ Dummy 3.0 header can support two ports. on the I /O panel, there is one header on this IntA_PB_SSTX- Each USB 2.0 header can support two ports. 1 English 19 USB 3.0 Header (19-pin USB3_3_4...
H110M-HDS Chassis Intrusion and Speaker Header (7-pin SPK_CI1) (see p.6, No. 12) 1 SIGNAL GND DUMMY Please connect the +5V chassis intrusion and the DUMMY chassis speaker to 6.0 Gb/s data transfer rate. 1 USB_PWR PP+ GND USB_PWR PP+ GND DUMMY Besides four USB 2.0 ports on the I /O panel, ...+ GND is one header on this DUMMY SPEAKER header. Each USB GND IntA_PB_DIntA_PB_D+ Dummy 3.0 header can support two ports. on the I /O panel, there is one header on this IntA_PB_SSTX- Each USB 2.0 header can support two ports. 1 English 19 USB 3.0 Header (19-pin USB3_3_4...
User Manual
Page 25
...GN D This header is for OUT2_L J_SENSE connecting audio devices OUT2_R MIC2_R to Ground (GND). Connect Ground (GND) to the front audio panel. CPU Fan Connector (4-pin CPU_FAN1) (see p.6, No. 4) GND FAN_VOLTAGE CHA_FAN_SPEED Please connect fan cables to the fan connector and FAN_SPEED_CONTROL ...2) This motherboard pro- B. You don't need to OUT2_L. Connect Audio_R (RIN) to OUT2_R and Audio_L (LIN) to connect them for the HD audio panel only. E. To activate the front mic, go to MIC2_L. Connect Mic_IN (MIC) to the "FrontMic" Tab in our manual and chassis manual ...
...GN D This header is for OUT2_L J_SENSE connecting audio devices OUT2_R MIC2_R to Ground (GND). Connect Ground (GND) to the front audio panel. CPU Fan Connector (4-pin CPU_FAN1) (see p.6, No. 4) GND FAN_VOLTAGE CHA_FAN_SPEED Please connect fan cables to the fan connector and FAN_SPEED_CONTROL ...2) This motherboard pro- B. You don't need to OUT2_L. Connect Audio_R (RIN) to OUT2_R and Audio_L (LIN) to connect them for the HD audio panel only. E. To activate the front mic, go to MIC2_L. Connect Mic_IN (MIC) to the "FrontMic" Tab in our manual and chassis manual ...
User Manual
Page 28
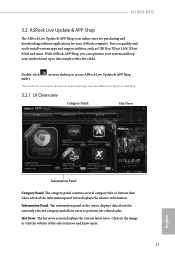
...download apps from the ASRock Live Update & APP Shop. 3.2.1 UI Overview Category Panel Hot News Information Panel Category Panel: The category panel contains several category tabs or buttons that when selected the information panel below displays the relative information. Information Panel: The information panel in the center ... XFast LAN, XFast RAM and more . 23 English on the image to perform job-related tasks. H110M-HDS 3.2 ASRock Live Update & APP Shop The ASRock Live Update & APP Shop is an online store for purchasing and downloading software applications for your desktop to ...
...download apps from the ASRock Live Update & APP Shop. 3.2.1 UI Overview Category Panel Hot News Information Panel Category Panel: The category panel contains several category tabs or buttons that when selected the information panel below displays the relative information. Information Panel: The information panel in the center ... XFast LAN, XFast RAM and more . 23 English on the image to perform job-related tasks. H110M-HDS 3.2 ASRock Live Update & APP Shop The ASRock Live Update & APP Shop is an online store for purchasing and downloading software applications for your desktop to ...
User Manual
Page 54
... [Power On] is installed. Onboard LAN Enable or disable the onboard network interface controller. Onboard HD Audio Enable/disable onboard HD audio. If [Power Off] is installed. Set to Auto to enable onboard HD audio and automatically disable it when a sound card is selected, the power will start to boot.... Select enable to keep the integrated graphics enabled at all PCH DMI devices. Share Memory Configure the size of the DMI Link. H110M-HDS DMI ASPM Support This option enables/disables the control of ASPM on AC/Power Loss Select the power state after a power failure. Front...
... [Power On] is installed. Onboard LAN Enable or disable the onboard network interface controller. Onboard HD Audio Enable/disable onboard HD audio. If [Power Off] is installed. Set to Auto to enable onboard HD audio and automatically disable it when a sound card is selected, the power will start to boot.... Select enable to keep the integrated graphics enabled at all PCH DMI devices. Share Memory Configure the size of the DMI Link. H110M-HDS DMI ASPM Support This option enables/disables the control of ASPM on AC/Power Loss Select the power state after a power failure. Front...

