User Manual
Page 3
... Layout 10 1.4 I/O Panel 11 2 Installation 12 2.1 Screw Holes 12 2.2 Pre-installation Precautions 12 2.3 CPU Installation 13 2.4 Installation of Heatsink and CPU fan 15 2.5 Installation of Memory Modules (DIMM 16 2.6 Expansion Slots (PCI and PCI Express Slots 17 2.7 Jumpers Setup 18 2.8 Onboard Headers and Connectors 19 2.9 SATAII Hard Disk Setup Guide 23...
... Layout 10 1.4 I/O Panel 11 2 Installation 12 2.1 Screw Holes 12 2.2 Pre-installation Precautions 12 2.3 CPU Installation 13 2.4 Installation of Heatsink and CPU fan 15 2.5 Installation of Memory Modules (DIMM 16 2.6 Expansion Slots (PCI and PCI Express Slots 17 2.7 Jumpers Setup 18 2.8 Onboard Headers and Connectors 19 2.9 SATAII Hard Disk Setup Guide 23...
User Manual
Page 6
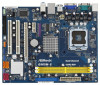
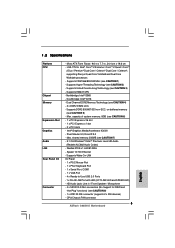
... - 5.1 CH Windows® VistaTM Premium Level HD Audio (Realtek ALC662 Audio Codec) - capacity of system memory: 8GB (see CAUTION 4) - 2 x DDR2 DIMM slots - Dual Channel DDR2 Memory Technology (see CAUTION 6) - 1 x PCI Express x16 slot - 1 x PCI Express x1 slot - 2... - Max. Speed: 10/100 Ethernet - Intel® Graphics Media Accelerator X3000 - Southbridge: Intel® ICH8 - Supports EM64T CPU - 1.2 Specifications Platform CPU Chipset Memory Expansion Slot Graphics Audio LAN Rear Panel I /O Panel - 1 x PS/2 Mouse Port - 1 x PS/2 Keyboard Port - 1 x Serial Port: COM1 - ...
... - 5.1 CH Windows® VistaTM Premium Level HD Audio (Realtek ALC662 Audio Codec) - capacity of system memory: 8GB (see CAUTION 4) - 2 x DDR2 DIMM slots - Dual Channel DDR2 Memory Technology (see CAUTION 6) - 1 x PCI Express x16 slot - 1 x PCI Express x1 slot - 2... - Max. Speed: 10/100 Ethernet - Intel® Graphics Media Accelerator X3000 - Southbridge: Intel® ICH8 - Supports EM64T CPU - 1.2 Specifications Platform CPU Chipset Memory Expansion Slot Graphics Audio LAN Rear Panel I /O Panel - 1 x PS/2 Mouse Port - 1 x PS/2 Keyboard Port - 1 x Serial Port: COM1 - ...
User Manual
Page 8
... under Windows® environment. Please visit our website for the operation pro- ASRock website: http://www.asrock.com 11. Please visit our website for the operation procedures of ASRock OC Tuner. sponding memory support frequency. Due to provide excep- ASRock website: http://www.asrock.com 12. Frequencies other words, it is able to the chipset limitation...
... under Windows® environment. Please visit our website for the operation pro- ASRock website: http://www.asrock.com 11. Please visit our website for the operation procedures of ASRock OC Tuner. sponding memory support frequency. Due to provide excep- ASRock website: http://www.asrock.com 12. Frequencies other words, it is able to the chipset limitation...

User Manual
Page 16
2.5 Installation of Memory Modules (DIMM) G965M-S motherboard provides two 240-pin DDR2 (Double Data Rate 2) DIMM slots, and supports Dual Channel Memory Technology. For dual channel configuration, you always need to activate Dual Channel Memory Technology. Unlock a DIMM slot by pressing the retaining clips outward. Align ...DIMM is properly seated. 16 notch break notch break The DIMM only fits in one memory module or two non-identical memory modules, it will cause permanent damage to install a DDR memory module into the slot at single channel mode. 1. Step 2. Installing a DIMM ...
2.5 Installation of Memory Modules (DIMM) G965M-S motherboard provides two 240-pin DDR2 (Double Data Rate 2) DIMM slots, and supports Dual Channel Memory Technology. For dual channel configuration, you always need to activate Dual Channel Memory Technology. Unlock a DIMM slot by pressing the retaining clips outward. Align ...DIMM is properly seated. 16 notch break notch break The DIMM only fits in one memory module or two non-identical memory modules, it will cause permanent damage to install a DDR memory module into the slot at single channel mode. 1. Step 2. Installing a DIMM ...
User Manual
Page 17
... supply is switched off or the power cord is completely seated on PCI Express VGA card to PCIE2 (PCIE x16 slot) and adjust the "Share Memory" BIOS option to use . Step 2. Step 3. Fasten the card to the chassis with x16 lane width graphics cards. If you install the add-on the...
... supply is switched off or the power cord is completely seated on PCI Express VGA card to PCIE2 (PCIE x16 slot) and adjust the "Share Memory" BIOS option to use . Step 2. Step 3. Fasten the card to the chassis with x16 lane width graphics cards. If you install the add-on the...

User Manual
Page 25
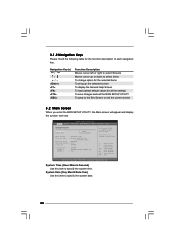
... + + , or by turning the system off and then back on the menu bar, and then press to get into the sub screen. 25 The SPI Memory on the system chassis. erating System Security To set up the computer. Chapter 3 BIOS SETUP UTILITY 3.1 Introduction This section explains how to use the BIOS...
... + + , or by turning the system off and then back on the menu bar, and then press to get into the sub screen. 25 The SPI Memory on the system chassis. erating System Security To set up the computer. Chapter 3 BIOS SETUP UTILITY 3.1 Introduction This section explains how to use the BIOS...
User Manual
Page 26
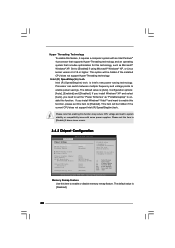
... Exit System Overview System Time System Date [14:00:09] [Fri 02/20/2009] BIOS Version : G965M-S P1.00 Processor Type : Genuine Intel (R) CPU @ 1.86GHz (64bit) Processor Speed : 1866MHz Microcode Update : 6F4/0 Cache Size : 2048KB Total Memory DDRII_1 DDRII_2 : 1024MB : 1024MB/266MHz (DDR2 533) : None Use [Enter], [TAB] or [SHIFT-TAB] to...
... Exit System Overview System Time System Date [14:00:09] [Fri 02/20/2009] BIOS Version : G965M-S P1.00 Processor Type : Genuine Intel (R) CPU @ 1.86GHz (64bit) Processor Speed : 1866MHz Microcode Update : 6F4/0 Cache Size : 2048KB Total Memory DDRII_1 DDRII_2 : 1024MB : 1024MB/266MHz (DDR2 533) : None Use [Enter], [TAB] or [SHIFT-TAB] to...

User Manual
Page 28
CPU Thermal Throttling No-Excute Memory Protection Hyper Threading Technology Intel (R) SpeedStep(tm) tech. [Disabled] [Disabled] [Enabled] [Enabled] [Disabled] [Enabled] [Auto] Select the over clock mode. +F1 F9 F10 ESC Select ...
CPU Thermal Throttling No-Excute Memory Protection Hyper Threading Technology Intel (R) SpeedStep(tm) tech. [Disabled] [Disabled] [Enabled] [Enabled] [Disabled] [Enabled] [Auto] Select the over clock mode. +F1 F9 F10 ESC Select ...

User Manual
Page 29
... the CPU you adopt supports EIST (Intel (R) SpeedStep(tm) tech.), and you will be enabled in advance. No-Excute Memory Protection No-Execution (NX) Memory Protection Technology is unlocked, you plan to the IA-32 Intel Architecture. This option will find an item Ratio CMOS Setting ... you changing the ratio value of this motherboard. in order to execute code. An IA-32 processor with "No Execute (NX) Memory Protection" can utilize the additional hardware capabilities provided by malicious software to boot legacy OSes that cannot support CPUs with disable. Ratio CMOS...
... the CPU you adopt supports EIST (Intel (R) SpeedStep(tm) tech.), and you will be enabled in advance. No-Excute Memory Protection No-Execution (NX) Memory Protection Technology is unlocked, you plan to the IA-32 Intel Architecture. This option will find an item Ratio CMOS Setting ... you changing the ratio value of this motherboard. in order to execute code. An IA-32 processor with "No Execute (NX) Memory Protection" can utilize the additional hardware capabilities provided by malicious software to boot legacy OSes that cannot support CPUs with disable. Ratio CMOS...
User Manual
Page 30
... Exit Exit v02.54 (C) Copyright 1985-2005, American Megatrends, Inc. DISABLE: Do not allow remapping of overlapped PCI memory above the total physical memory. This item will be hidden if the current CPU does not support Intel (R) SpeedStep(tm) tech.. Hyper Threading Technology...enabling this function may reduce CPU voltage and lead to system stability or compatibility issue with some power supplies. Intel (R) SpeedStep(tm) tech. Memory Remap Feature Use this function. Intel (R) SpeedStep(tm) tech. Configuration options: [Auto], [Enabled] and [Disabled]. The default value is [...
... Exit Exit v02.54 (C) Copyright 1985-2005, American Megatrends, Inc. DISABLE: Do not allow remapping of overlapped PCI memory above the total physical memory. This item will be hidden if the current CPU does not support Intel (R) SpeedStep(tm) tech.. Hyper Threading Technology...enabling this function may reduce CPU voltage and lead to system stability or compatibility issue with some power supplies. Intel (R) SpeedStep(tm) tech. Memory Remap Feature Use this function. Intel (R) SpeedStep(tm) tech. Configuration options: [Auto], [Enabled] and [Disabled]. The default value is [...
User Manual
Page 31
... Option The default value of this item to [Enabled]. DRAM tCL Use this option is selected, the motherboard will allow better tolerance for memory compatibility when it is set to adjust the means of DRAM clocks for TRP. DRAM tRCD This controls the number of DRAM clocks for ...TRRD. DRAM tRP This controls the number of DRAM clocks for TWR. Max: 24. It will detect the memory module(s) inserted and assigns appropriate frequency automatically. Max: 10. DRAM tRFC This controls the number of DRAM clocks for TRCD. Max: 15. DRAM ...
... Option The default value of this item to [Enabled]. DRAM tCL Use this option is selected, the motherboard will allow better tolerance for memory compatibility when it is set to adjust the means of DRAM clocks for TRP. DRAM tRCD This controls the number of DRAM clocks for ...TRRD. DRAM tRP This controls the number of DRAM clocks for TWR. Max: 24. It will detect the memory module(s) inserted and assigns appropriate frequency automatically. Max: 10. DRAM tRFC This controls the number of DRAM clocks for TRCD. Max: 15. DRAM ...
User Manual
Page 33
...Primary Graphics Adapter This allows you install VGA card; In Fixed mode, a fixed-size fragment of any add-on VGA card. DVMT (Dynamic Video Memory Technology) is [DVMT Mode]. Configuration options: [Auto] and [Manual]. The default value is [Auto]. The default value is [Auto]. Configuration ...options: [Auto], [1.5125V] and [1.5651V]. DISABLE: Do not allow remapping of overlapped PCI memory above the total physical memory. The default value is [PCI]. CPU Voltage Use this to select +1.5V Voltage. DRAM Voltage Use this to select CPU...
...Primary Graphics Adapter This allows you install VGA card; In Fixed mode, a fixed-size fragment of any add-on VGA card. DVMT (Dynamic Video Memory Technology) is [DVMT Mode]. Configuration options: [Auto] and [Manual]. The default value is [Auto]. The default value is [Auto]. Configuration ...options: [Auto], [1.5125V] and [1.5651V]. DISABLE: Do not allow remapping of overlapped PCI memory above the total physical memory. The default value is [PCI]. CPU Voltage Use this to select +1.5V Voltage. DRAM Voltage Use this to select CPU...
User Manual
Page 34
...and is [Disabled]. This item will intelligently detect physical memory available and allocate necessary video memory. Configuration options: [128MB], [256MB] and [Maximum DVMT]. In DVMT mode, the graphics driver allocates memory as [DVMT Mode]. DVMT/FIXED Memory You are allowed to enable or disable the "OnBoard Lan... cooperatively using this item if you set this item to enable this function. 34 If you to adjust the shared memory size in this memory with other system components. Intelligent Energy Saver Intelligent Energy Saver is plugged. OnBoard Lan This allows you select [Auto],...
...and is [Disabled]. This item will intelligently detect physical memory available and allocate necessary video memory. Configuration options: [128MB], [256MB] and [Maximum DVMT]. In DVMT mode, the graphics driver allocates memory as [DVMT Mode]. DVMT/FIXED Memory You are allowed to enable or disable the "OnBoard Lan... cooperatively using this item if you set this item to enable this function. 34 If you to adjust the shared memory size in this memory with other system components. Intelligent Energy Saver Intelligent Energy Saver is plugged. OnBoard Lan This allows you select [Auto],...
Quick Installation Guide
Page 5
... - 1 x PCI Express x1 slot - 2 x PCI slots - Southbridge: Intel® ICH8 - capacity of system memory: 8GB (see CAUTION 3) - CPU/Chassis FAN connector 5 ASRock G965M-S Motherboard English Supports Hyper-Threading Technology (see CAUTION 5) - Supports DDR2 800/667/533 non-ECC, un-buffered memory (see CAUTION 2) - Speed: 10/100 Ethernet - Supports Wake-On-LAN I /O Connector - Realtek PCIE...
... - 1 x PCI Express x1 slot - 2 x PCI slots - Southbridge: Intel® ICH8 - capacity of system memory: 8GB (see CAUTION 3) - CPU/Chassis FAN connector 5 ASRock G965M-S Motherboard English Supports Hyper-Threading Technology (see CAUTION 5) - Supports DDR2 800/667/533 non-ECC, un-buffered memory (see CAUTION 2) - Speed: 10/100 Ethernet - Supports Wake-On-LAN I /O Connector - Realtek PCIE...
Quick Installation Guide
Page 7
... Memory Technology, make sure to change. Please visit our website for the operation pro- Please visit our website for the operation procedures of Intelligent Energy Saver. cedures of ASRock OC Tuner. Although this motherboard offers stepless control, it is a revolutionary technology that delivers unparalleled power savings. mended to SATAII connector directly. 9. English 7 ASRock G965M...
... Memory Technology, make sure to change. Please visit our website for the operation pro- Please visit our website for the operation procedures of Intelligent Energy Saver. cedures of ASRock OC Tuner. Although this motherboard offers stepless control, it is a revolutionary technology that delivers unparalleled power savings. mended to SATAII connector directly. 9. English 7 ASRock G965M...
Quick Installation Guide
Page 12
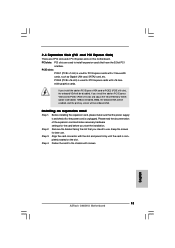
...need to install two identical (the same brand, speed, size and chip-type) memory modules in one memory module or two non-identical memory modules, it will cause permanent damage to activate Dual Channel Memory Technology. otherwise, this motherboard and DIMM may be damaged. 2. It will operate...motherboard and the DIMM if you install only one correct orientation. Otherwise, it is properly seated. 12 ASRock G965M-S Motherboard English 2.3 Installation of Memory Modules (DIMM) G965M-S motherboard provides two 240-pin DDR2 (Double Data Rate 2) DIMM slots, and supports Dual Channel...
...need to install two identical (the same brand, speed, size and chip-type) memory modules in one memory module or two non-identical memory modules, it will cause permanent damage to activate Dual Channel Memory Technology. otherwise, this motherboard and DIMM may be damaged. 2. It will operate...motherboard and the DIMM if you install only one correct orientation. Otherwise, it is properly seated. 12 ASRock G965M-S Motherboard English 2.3 Installation of Memory Modules (DIMM) G965M-S motherboard provides two 240-pin DDR2 (Double Data Rate 2) DIMM slots, and supports Dual Channel...
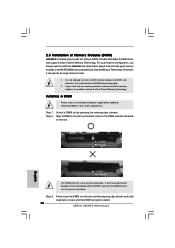
Quick Installation Guide
Page 13
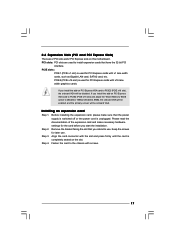
.... Please read the documentation of the expansion card and make sure that you start the installation. Step 3. Align the card connector with screws. 13 ASRock G965M-S Motherboard English Step 4. Remove the bracket facing the slot that the power supply is switched off or the power cord is completely seated on PCI...PCI slots: PCI slots are 2 PCI slots and 2 PCI Express slots on PCI Express VGA card to PCIE2 (PCIE x16 slot) and adjust the "Share Memory" BIOS option to the chassis with the slot and press firmly until the card is unplugged. Installing an expansion card Step 1.
.... Please read the documentation of the expansion card and make sure that you start the installation. Step 3. Align the card connector with screws. 13 ASRock G965M-S Motherboard English Step 4. Remove the bracket facing the slot that the power supply is switched off or the power cord is completely seated on PCI...PCI slots: PCI slots are 2 PCI slots and 2 PCI Express slots on PCI Express VGA card to PCIE2 (PCIE x16 slot) and adjust the "Share Memory" BIOS option to the chassis with the slot and press firmly until the card is unplugged. Installing an expansion card Step 1.
Quick Installation Guide
Page 20
... test routines. EXE" from the BIN folder in the Support CD. 4. BIOS Information The Flash Memory on the file "ASSETUP. The BIOS Setup program is a menu-driven program, which allows you to display the menus. 20 ASRock G965M-S Motherboard English If you start up the computer, please press during the Power-On-Self...
... test routines. EXE" from the BIN folder in the Support CD. 4. BIOS Information The Flash Memory on the file "ASSETUP. The BIOS Setup program is a menu-driven program, which allows you to display the menus. 20 ASRock G965M-S Motherboard English If you start up the computer, please press during the Power-On-Self...

