RAID Installation Guide
Page 2
... data in parallel, interleaved stacks. It provides data protection and increases fault tolerance to configure RAID functions by following the detailed instruction of the "User Manual" in our support CD, then you can improve the access performance, it will double the data transfer rate of a single disk alone while the two...
... data in parallel, interleaved stacks. It provides data protection and increases fault tolerance to configure RAID functions by following the detailed instruction of the "User Manual" in our support CD, then you can improve the access performance, it will double the data transfer rate of a single disk alone while the two...
RAID Installation Guide
Page 14
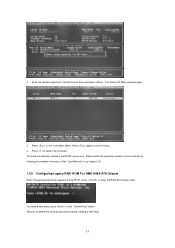
..., press any key (except for ) to input the LD Name. Press to use the full portion of the logical drive for one of the "User Manual" in our support CD.
..., press any key (except for ) to input the LD Name. Press to use the full portion of the logical drive for one of the "User Manual" in our support CD.
RAID Installation Guide
Page 15
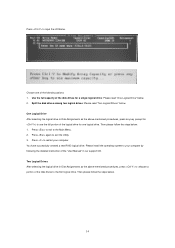
... the existing disk arrays before creating a new array. 15 Please install the operating system to your computer by following the detailed instruction of the "User Manual" in our support CD. 1.4.2 Configuring Legacy RAID ROM For AMD A88X/A78 Chipset When the appropriate prompt appears during POST, press to exit the Utility...
... the existing disk arrays before creating a new array. 15 Please install the operating system to your computer by following the detailed instruction of the "User Manual" in our support CD. 1.4.2 Configuring Legacy RAID ROM For AMD A88X/A78 Chipset When the appropriate prompt appears during POST, press to exit the Utility...
RAID Installation Guide
Page 21
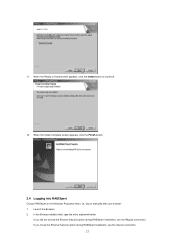
In the Browser address field, type the entry explained below. Launch the Browser. 2. Or, log on manually with your browser: 1. If you chose the External Security option during RAIDXpert installation, use the Secure connection. 21 If you did not choose the External Security option during RAIDXpert installation, use the Regular connection. When the Ready to Install screen appears, click the Install button to continue. 12. 11. When the Install Complete screen appears, click the Finish button. 2.4 Logging into RAIDXpert Choose RAIDXpert in the Windows Programs menu.
In the Browser address field, type the entry explained below. Launch the Browser. 2. Or, log on manually with your browser: 1. If you chose the External Security option during RAIDXpert installation, use the Secure connection. 21 If you did not choose the External Security option during RAIDXpert installation, use the Regular connection. When the Ready to Install screen appears, click the Install button to continue. 12. 11. When the Install Complete screen appears, click the Finish button. 2.4 Logging into RAIDXpert Choose RAIDXpert in the Windows Programs menu.
User Manual
Page 6
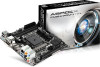
....asp 1.1 Package Contents ASRock FM2A78M-ITX+ Motherboard (Mini-ITX Form Factor) ASRock FM2A78M-ITX+ Quick Installation Guide ASRock FM2A78M-ITX+ Support CD 2 x Serial ATA (SATA) Data Cables (Optional) 1 x I/O Panel Shield ASRock Reminds You... Introduction Thank you for specific information about the model you require technical support related to this documentation, Chapter 1 and 2 contains the introduction of this manual will be subject to...
....asp 1.1 Package Contents ASRock FM2A78M-ITX+ Motherboard (Mini-ITX Form Factor) ASRock FM2A78M-ITX+ Quick Installation Guide ASRock FM2A78M-ITX+ Support CD 2 x Serial ATA (SATA) Data Cables (Optional) 1 x I/O Panel Shield ASRock Reminds You... Introduction Thank you for specific information about the model you require technical support related to this documentation, Chapter 1 and 2 contains the introduction of this manual will be subject to...

User Manual
Page 22
For proper installation, please kindly refer to the instruction manuals of CPU Fan and Heatsink After you install the CPU into this motherboard, it is necessary to install a larger heatsink and cooling fan to dissipate heat. You also need to spray thermal grease between the CPU and the heatsink to the CPU FAN connector (CPU_FAN1, see Page 11, No. 2). Make sure that the CPU and the heatsink are securely fastened and in good contact with each other. 2.2 Installation of the CPU fan and the heatsink. 17 Then connect the CPU fan to improve heat dissipation.
For proper installation, please kindly refer to the instruction manuals of CPU Fan and Heatsink After you install the CPU into this motherboard, it is necessary to install a larger heatsink and cooling fan to dissipate heat. You also need to spray thermal grease between the CPU and the heatsink to the CPU FAN connector (CPU_FAN1, see Page 11, No. 2). Make sure that the CPU and the heatsink are securely fastened and in good contact with each other. 2.2 Installation of the CPU fan and the heatsink. 17 Then connect the CPU fan to improve heat dissipation.
User Manual
Page 28
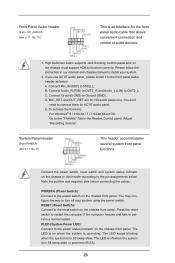
... the power switch, reset switch and system status indicator on the chassis front panel. The LED is off when the system is in our manual and chassis manual to connect them for HD audio panel only. Please follow the instruction in S4 sleep state or powered off your system. 2. Connect Mic_IN (MIC...
... the power switch, reset switch and system status indicator on the chassis front panel. The LED is off when the system is in our manual and chassis manual to connect them for HD audio panel only. Please follow the instruction in S4 sleep state or powered off your system. 2. Connect Mic_IN (MIC...

User Manual
Page 53
.../PCIE Frequency (MHz) This item appears only when you adopt supports this option to adjust EZ overclocking setting. Configuration options: [Auto] and [Manual]. The default value is [Disabled]. Configuration options: [Enabled] and [Disabled]. Spread Spectrum This item should be done at or below the TDP for better system ...
.../PCIE Frequency (MHz) This item appears only when you adopt supports this option to adjust EZ overclocking setting. Configuration options: [Auto] and [Manual]. The default value is [Disabled]. Configuration options: [Enabled] and [Disabled]. Spread Spectrum This item should be done at or below the TDP for better system ...

User Manual
Page 54
... to adjust the value of CPU voltage. Processor Maximum Frequency It will display Processor Maximum Frequency for safety and system stability, it is set to [Manual], you may adjust the value of Processor Frequency and Processor Voltage. CPU Frequency Multiplier For safety and system stability, it is [Auto]. The default value...
... to adjust the value of CPU voltage. Processor Maximum Frequency It will display Processor Maximum Frequency for safety and system stability, it is set to [Manual], you may adjust the value of Processor Frequency and Processor Voltage. CPU Frequency Multiplier For safety and system stability, it is [Auto]. The default value...
Quick Installation Guide
Page 7
... the Support CD. For the BIOS setup, please refer to this manual occur, the updated version will be found in the user manual presented in our support CD for purchasing ASRock FM2A78M-ITX+ motherboard, a reliable motherboard produced under ASRock's consistently stringent quality control. Because the motherboard specifications and the BIOS software might be updated, the content...
... the Support CD. For the BIOS setup, please refer to this manual occur, the updated version will be found in the user manual presented in our support CD for purchasing ASRock FM2A78M-ITX+ motherboard, a reliable motherboard produced under ASRock's consistently stringent quality control. Because the motherboard specifications and the BIOS software might be updated, the content...

Quick Installation Guide
Page 19
Then connect the CPU fan to the instruction manuals of CPU Fan and Heatsink After you install the CPU into this motherboard, it is necessary to install a larger heatsink and cooling fan to improve .... 2). You also need to spray thermal grease between the CPU and the heatsink to dissipate heat. 2.2 Installation of the CPU fan and the heatsink. 19 ASRock FM2A78M-ITX+ Motherboard English
Then connect the CPU fan to the instruction manuals of CPU Fan and Heatsink After you install the CPU into this motherboard, it is necessary to install a larger heatsink and cooling fan to improve .... 2). You also need to spray thermal grease between the CPU and the heatsink to dissipate heat. 2.2 Installation of the CPU fan and the heatsink. 19 ASRock FM2A78M-ITX+ Motherboard English

Quick Installation Guide
Page 25
...Sensing, but the panel wire on the chassis must support HDA to the power status indicator on when the system is in our manual and chassis manual to turn off your system. 2. C. Adjust "Recording Volume". Note the positive and negative pins before connecting the cables. The LED...E. PLED (System Power LED): Connect to function correctly. The LED is on the chassis front panel. The LED is off (S5). 25 ASRock FM2A78M-ITX+ Motherboard MIC_RET and OUT_RET are for AC'97 audio panel. English Connect the power switch, reset switch and system status indicator on the chassis ...
...Sensing, but the panel wire on the chassis must support HDA to the power status indicator on when the system is in our manual and chassis manual to turn off your system. 2. C. Adjust "Recording Volume". Note the positive and negative pins before connecting the cables. The LED...E. PLED (System Power LED): Connect to function correctly. The LED is on the chassis front panel. The LED is off (S5). 25 ASRock FM2A78M-ITX+ Motherboard MIC_RET and OUT_RET are for AC'97 audio panel. English Connect the power switch, reset switch and system status indicator on the chassis ...

Quick Installation Guide
Page 28
...ASRSETUP.EXE" from the BIN folder in the Support CD to enter BIOS Setup utility; The BIOS Setup program is designed to the User Manual (PDF file) contained in your CDROM drive. Software Support CD information This motherboard supports various Microsoft® Windows® operating systems: 8.1 ...which allows you start up the computer, please press or during the Power-On-Self-Test (POST) to display the menus. 28 ASRock FM2A78M-ITX+ Motherboard English It will enhance motherboard features. 3. BIOS Information The Flash Memory on the motherboard stores BIOS Setup Utility. It is...
...ASRSETUP.EXE" from the BIN folder in the Support CD to enter BIOS Setup utility; The BIOS Setup program is designed to the User Manual (PDF file) contained in your CDROM drive. Software Support CD information This motherboard supports various Microsoft® Windows® operating systems: 8.1 ...which allows you start up the computer, please press or during the Power-On-Self-Test (POST) to display the menus. 28 ASRock FM2A78M-ITX+ Motherboard English It will enhance motherboard features. 3. BIOS Information The Flash Memory on the motherboard stores BIOS Setup Utility. It is...

Quick Installation Guide
Page 128
1 FM2A78M-ITX BIOS CPU http://www.asrock.com www.asrock.com/support/index.asp 1.1 華擎 FM2A78M-ITX+ 主板 (Mini-ITX FM2A78M-ITX FM2A78M-ITX Serial ATA(SATA I/O 擋板 ASRock 為了在 Windows® 8 / 8 64-bit / 7 / 7 64-bit BIOS中將Storage Configuration AHCI BIOS User Manual 128 ASRock FM2A78M-ITX+ Motherboard 簡體中文
1 FM2A78M-ITX BIOS CPU http://www.asrock.com www.asrock.com/support/index.asp 1.1 華擎 FM2A78M-ITX+ 主板 (Mini-ITX FM2A78M-ITX FM2A78M-ITX Serial ATA(SATA I/O 擋板 ASRock 為了在 Windows® 8 / 8 64-bit / 7 / 7 64-bit BIOS中將Storage Configuration AHCI BIOS User Manual 128 ASRock FM2A78M-ITX+ Motherboard 簡體中文
