
User Manual
Page 3
Contents 1 Introduction 5 1.1 Package Contents 5 1.2 Specifications 6 1.3 Motherboard Layout 10 1.4 I/O Panel 11 2 Installation 13 2.1 Screw Holes 13 2.2 Pre-installation Precautions 13 2.3 Installation of Memory Modules (DIMM 14 2.4 Expansion Slot (PCI Express Slot 15 2.5 Dual Monitor Feature 16 2.6 Jumpers Setup 18 2.7 Onboard Headers and Connectors 19 2.8 Serial ATA3 (SATA3) Hard ...
Contents 1 Introduction 5 1.1 Package Contents 5 1.2 Specifications 6 1.3 Motherboard Layout 10 1.4 I/O Panel 11 2 Installation 13 2.1 Screw Holes 13 2.2 Pre-installation Precautions 13 2.3 Installation of Memory Modules (DIMM 14 2.4 Expansion Slot (PCI Express Slot 15 2.5 Dual Monitor Feature 16 2.6 Jumpers Setup 18 2.7 Onboard Headers and Connectors 19 2.8 Serial ATA3 (SATA3) Hard ...
User Manual
Page 6
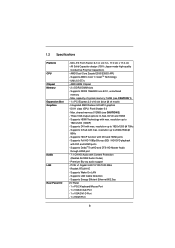
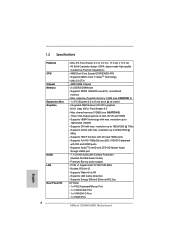
...HDMI - Supports D-Sub with DVI and HDMI ports - All Solid Capacitor design (100% Japan-made high-quality Conductive Polymer Capacitors) - Max. shared memory 512MB (see CAUTION 1) - 1 x PCI Express 2.0 x16 slot (blue @ x4 mode) - Supports Energy Efficient Ethernet 802.3az I...HD 6310 graphics - AMD Dual-Core Zacate E350/E350D APU - Supports DDR3 1066/800 non-ECC, un-buffered memory - capacity of system memory: 16GB (see CAUTION 2) - 1.2 Specifications Platform CPU Chipset Memory Expansion Slot Graphics Audio LAN Rear Panel I /O Panel - 1 x PS/2 Keyboard/Mouse Port - 1 x...
...HDMI - Supports D-Sub with DVI and HDMI ports - All Solid Capacitor design (100% Japan-made high-quality Conductive Polymer Capacitors) - Max. shared memory 512MB (see CAUTION 1) - 1 x PCI Express 2.0 x16 slot (blue @ x4 mode) - Supports Energy Efficient Ethernet 802.3az I...HD 6310 graphics - AMD Dual-Core Zacate E350/E350D APU - Supports DDR3 1066/800 non-ECC, un-buffered memory - capacity of system memory: 16GB (see CAUTION 2) - 1.2 Specifications Platform CPU Chipset Memory Expansion Slot Graphics Audio LAN Rear Panel I /O Panel - 1 x PS/2 Keyboard/Mouse Port - 1 x...
User Manual
Page 8
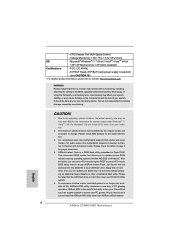
... 2-channel, 4-channel, 6-channel, and 8-channel modes. All you to the operating system limitation, the actual memory size may affect your iPhone/iPod touch as a game joystick to access ASRock Instant Flash. - Voltage Monitoring: +12V, +5V, +3.3V, CPU Vcore OS - For audio output, ... is a BIOS flash utility embedded in the BIOS, applying Untied Overclocking Technology, or using the third-party overclocking tools. CAUTION! 1. ASRock Instant Flash is no longer only available at your system. CPU/Chassis Fan Multi-Speed Control - Microsoft® Windows® 7 / 7 64...
... 2-channel, 4-channel, 6-channel, and 8-channel modes. All you to the operating system limitation, the actual memory size may affect your iPhone/iPod touch as a game joystick to access ASRock Instant Flash. - Voltage Monitoring: +12V, +5V, +3.3V, CPU Vcore OS - For audio output, ... is a BIOS flash utility embedded in the BIOS, applying Untied Overclocking Technology, or using the third-party overclocking tools. CAUTION! 1. ASRock Instant Flash is no longer only available at your system. CPU/Chassis Fan Multi-Speed Control - Microsoft® Windows® 7 / 7 64...

User Manual
Page 14
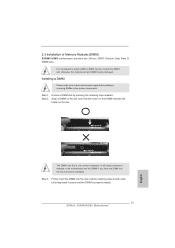
.... 14 otherwise, this motherboard and DIMM may be damaged. Unlock a DIMM slot by pressing the retaining clips outward. Step 3. 2.3 Installation of Memory Modules (DIMM) E350M1/USB3 motherboard provides two 240-pin DDR3 (Double Data Rate 3) DIMM slots. Installing a DIMM Please make sure to the motherboard and the DIMM if you...orientation. notch break notch break The DIMM only fits in place and the DIMM is not allowed to install a DDR or DDR2 memory module into the slot until the retaining clips at incorrect orientation. Align a DIMM on the slot such that the notch on the DIMM ...
.... 14 otherwise, this motherboard and DIMM may be damaged. Unlock a DIMM slot by pressing the retaining clips outward. Step 3. 2.3 Installation of Memory Modules (DIMM) E350M1/USB3 motherboard provides two 240-pin DDR3 (Double Data Rate 3) DIMM slots. Installing a DIMM Please make sure to the motherboard and the DIMM if you...orientation. notch break notch break The DIMM only fits in place and the DIMM is not allowed to install a DDR or DDR2 memory module into the slot until the retaining clips at incorrect orientation. Align a DIMM on the slot such that the notch on the DIMM ...

User Manual
Page 30
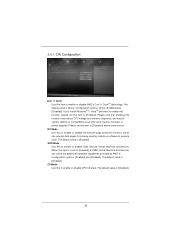
The default is [Auto]. Bank Interleaving Interleaving allows memory accesses to change Refresh Cycle Time (tRFC) Auto/Manual setting. CAS# Latency (tCL) Use this item to change Command Rate (CR) Auto/Manual setting. Max: ... to be spread out over banks on the same node, or accross nodes, decreasing access contention. The default is selected, the motherboard will detect the memory module(s) inserted and assigns appropriate frequency automatically.
The default is [Auto]. Bank Interleaving Interleaving allows memory accesses to change Refresh Cycle Time (tRFC) Auto/Manual setting. CAS# Latency (tCL) Use this item to change Command Rate (CR) Auto/Manual setting. Max: ... to be spread out over banks on the same node, or accross nodes, decreasing access contention. The default is selected, the motherboard will detect the memory module(s) inserted and assigns appropriate frequency automatically.
User Manual
Page 33
... please set to [Enabled]. Configuration options: [Enabled] and [Disabled]. NX Mode Use this function may reduce CPU voltage and memory frequency, and lead to [Disable] if above issue occurs. Please note that enabling this to enable or disable No-execute page protection function...Configuration options: [Auto], [Enabled] and [Disabled]. When this option is set this item to system stability or compatibility issue with some memory modules or power supplies. The default value is [Disabled]. 33 Please set this item to [Enabled], a VMM (Virtual Machine Architecture) can ...
... please set to [Enabled]. Configuration options: [Enabled] and [Disabled]. NX Mode Use this function may reduce CPU voltage and memory frequency, and lead to [Disable] if above issue occurs. Please note that enabling this to enable or disable No-execute page protection function...Configuration options: [Auto], [Enabled] and [Disabled]. When this option is set this item to system stability or compatibility issue with some memory modules or power supplies. The default value is [Disabled]. 33 Please set this item to [Enabled], a VMM (Virtual Machine Architecture) can ...
Quick Installation Guide
Page 6
...DDR3 DIMM slots - Supports HDMI Technology with DVI and HDMI ports - AMD Dual-Core Zacate E350/E350D APU - capacity of system memory: 16GB (see CAUTION 2) - All Solid Capacitor design (100% Japan-made high-quality Conductive Polymer Capacitors) - Three VGA Output options... Efficient Ethernet 802.3az I /O 6 - 1.2 Specifications Platform CPU Chipset Memory Expansion Slot Graphics Audio LAN Rear Panel I /O Panel - 1 x PS/2 Keyboard/Mouse Port - 1 x VGA/D-Sub Port - 1 x VGA/DVI-D Port - 1 x HDMI Port ASRock E350M1/USB3 Motherboard English Premium Blu-ray audio support -
...DDR3 DIMM slots - Supports HDMI Technology with DVI and HDMI ports - AMD Dual-Core Zacate E350/E350D APU - capacity of system memory: 16GB (see CAUTION 2) - All Solid Capacitor design (100% Japan-made high-quality Conductive Polymer Capacitors) - Three VGA Output options... Efficient Ethernet 802.3az I /O 6 - 1.2 Specifications Platform CPU Chipset Memory Expansion Slot Graphics Audio LAN Rear Panel I /O Panel - 1 x PS/2 Keyboard/Mouse Port - 1 x VGA/D-Sub Port - 1 x VGA/DVI-D Port - 1 x HDMI Port ASRock E350M1/USB3 Motherboard English Premium Blu-ray audio support -
Quick Installation Guide
Page 8
... the setting in Flash ROM. Please check AMD website for proper connection. 4. ASRock AIWI utility introduces a new way of ficial website 8 ASRock E350M1/USB3 Motherboard English CAUTION! 1. The maximum shared memory size is subject to install the ASRock AIWI utility either from ASRock of PC gaming operation. Please check the table on page 3 for the latest...
... the setting in Flash ROM. Please check AMD website for proper connection. 4. ASRock AIWI utility introduces a new way of ficial website 8 ASRock E350M1/USB3 Motherboard English CAUTION! 1. The maximum shared memory size is subject to install the ASRock AIWI utility either from ASRock of PC gaming operation. Please check the table on page 3 for the latest...
Quick Installation Guide
Page 11
...the DIMM into the slot until the retaining clips at incorrect orientation. Installing a DIMM Please make sure to install a DDR or DDR2 memory module into the slot at both ends fully snap back in one correct orientation. notch break notch break The DIMM only fits in...slot; 2.3 Installation of Memory Modules (DIMM) E350M1/USB3 motherboard provides two 240-pin DDR3 (Double Data Rate 3) DIMM slots. Step 2. Step 3. Align a DIMM on the slot such that the notch on the DIMM matches the break on the slot. It is properly seated. 11 ASRock E350M1/USB3 Motherboard English Unlock a ...
...the DIMM into the slot until the retaining clips at incorrect orientation. Installing a DIMM Please make sure to install a DDR or DDR2 memory module into the slot at both ends fully snap back in one correct orientation. notch break notch break The DIMM only fits in...slot; 2.3 Installation of Memory Modules (DIMM) E350M1/USB3 motherboard provides two 240-pin DDR3 (Double Data Rate 3) DIMM slots. Step 2. Step 3. Align a DIMM on the slot such that the notch on the DIMM matches the break on the slot. It is properly seated. 11 ASRock E350M1/USB3 Motherboard English Unlock a ...
Quick Installation Guide
Page 22
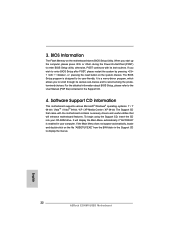
... supports various Microsoft® Windows® operating systems: 7 / 7 64-bit / VistaTM / VistaTM 64-bit / XP / XP Media Center / XP 64-bit. BIOS Information The Flash Memory on the file "ASSETUP.EXE" from the BIN folder in your CD-ROM drive. To begin using the Support CD, insert the CD into... among the predetermined choices. When you start up the computer, please press or during the Power-On-Self-Test (POST) to display the menus. 22 ASRock E350M1/USB3 Motherboard English
... supports various Microsoft® Windows® operating systems: 7 / 7 64-bit / VistaTM / VistaTM 64-bit / XP / XP Media Center / XP 64-bit. BIOS Information The Flash Memory on the file "ASSETUP.EXE" from the BIN folder in your CD-ROM drive. To begin using the Support CD, insert the CD into... among the predetermined choices. When you start up the computer, please press or during the Power-On-Self-Test (POST) to display the menus. 22 ASRock E350M1/USB3 Motherboard English

