User Manual
Page 3
... Specifications 6 1.3 Supported AGP VGA Cards Lists 9 1.4 Motherboard Layout 11 1.5 ASRock I/O PlusTM 12 2 Installation 13 2.1 Screw Holes 13 2.2 Pre-installation Precautions 13 2.3 CPU Installation 14 2.4 Installation of Heatsink and CPU fan 16 2.5 Installation of Memory Modules (DIMM 17 2.6 Expansion Slots (PCI, AMR, and AGI ...Feature 19 2.8 Jumpers Setup 19 2.9 Onboard Headers and Connectors 20 2.10 Serial ATA (SATA) Hard Disks Installation 23 2.11 Driver Installation Guide 23 2.12 Untied Overclocking Technology 23 3 BIOS SETUP UTILITY 24 3.1 Introduction 24 3.1.1 BIOS Menu ...
... Specifications 6 1.3 Supported AGP VGA Cards Lists 9 1.4 Motherboard Layout 11 1.5 ASRock I/O PlusTM 12 2 Installation 13 2.1 Screw Holes 13 2.2 Pre-installation Precautions 13 2.3 CPU Installation 14 2.4 Installation of Heatsink and CPU fan 16 2.5 Installation of Memory Modules (DIMM 17 2.6 Expansion Slots (PCI, AMR, and AGI ...Feature 19 2.8 Jumpers Setup 19 2.9 Onboard Headers and Connectors 20 2.10 Serial ATA (SATA) Hard Disks Installation 23 2.11 Driver Installation Guide 23 2.12 Untied Overclocking Technology 23 3 BIOS SETUP UTILITY 24 3.1 Introduction 24 3.1.1 BIOS Menu ...

User Manual
Page 4
4 Software Support 41 4.1 Install Operating System 41 4.2 Support CD Information 41 4.2.1 Running Support CD 41 4.2.2 Drivers Menu 41• 4.2.3 Utilities Menu 41 4.2.4 "LGA 775 CPU Installation Live Demo" Program ... 41 4.2.5 Contact Information 41 4
4 Software Support 41 4.1 Install Operating System 41 4.2 Support CD Information 41 4.2.1 Running Support CD 41 4.2.2 Drivers Menu 41• 4.2.3 Utilities Menu 41 4.2.4 "LGA 775 CPU Installation Live Demo" Program ... 41 4.2.5 Contact Information 41 4

User Manual
Page 5
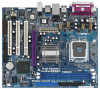
... introduction of the motherboard and step-bystep guide to quality and endurance. ASRock website http://www.asrock.com 1.1 Package Contents ASRock ConRoe865GV Motherboard (Micro ATX Form Factor: 9.6-in x 8.0-in, 24.4 cm x 20.3 cm) ASRock ConRoe865GV Quick Installation Guide ASRock ConRoe865GV Support CD (including LGA 775 CPU Installation Live Demo) One 80-conductor Ultra ATA 66/100 IDE Ribbon Cable One...
... introduction of the motherboard and step-bystep guide to quality and endurance. ASRock website http://www.asrock.com 1.1 Package Contents ASRock ConRoe865GV Motherboard (Micro ATX Form Factor: 9.6-in x 8.0-in, 24.4 cm x 20.3 cm) ASRock ConRoe865GV Quick Installation Guide ASRock ConRoe865GV Support CD (including LGA 775 CPU Installation Live Demo) One 80-conductor Ultra ATA 66/100 IDE Ribbon Cable One...

User Manual
Page 8
... the heatsink when you can only adopt Conroe 800 E4XXX processors. 2. This motherboard supports Untied Overclocking Technology. Although this motherboard, you install the PC system. 8. Frequencies other than the recommended CPU bus frequencies may not work properly under Microsoft® Windows® XP ...SP1 or SP2 / 2000 SP4. The AGI [ASRock Graphics Interface] slot is not recommended to Microsoft® official document at DDR320 if you resume the system, please check if the ...
... the heatsink when you can only adopt Conroe 800 E4XXX processors. 2. This motherboard supports Untied Overclocking Technology. Although this motherboard, you install the PC system. 8. Frequencies other than the recommended CPU bus frequencies may not work properly under Microsoft® Windows® XP ...SP1 or SP2 / 2000 SP4. The AGI [ASRock Graphics Interface] slot is not recommended to Microsoft® official document at DDR320 if you resume the system, please check if the ...

User Manual
Page 13
... 24.4 cm x 20.3 cm) motherboard. Also remember to unplug the power cord before touching any motherboard settings. 1. Whenever you install motherboard components or change any component. 2. Make sure to use a grounded wrist strap or touch a safety grounded object before you ...and/or components. 13 Before you handle components. 3. Do not over-tighten the screws! Chapter 2 Installation ConRoe865GV is detached from the wall socket before installing or removing the motherboard. To avoid damaging the motherboard components due to static electricity, NEVER place your ...
... 24.4 cm x 20.3 cm) motherboard. Also remember to unplug the power cord before touching any motherboard settings. 1. Whenever you install motherboard components or change any component. 2. Make sure to use a grounded wrist strap or touch a safety grounded object before you ...and/or components. 13 Before you handle components. 3. Do not over-tighten the screws! Chapter 2 Installation ConRoe865GV is detached from the wall socket before installing or removing the motherboard. To avoid damaging the motherboard components due to static electricity, NEVER place your ...

User Manual
Page 14
... lever by the edges where are marked with IHS (Integrated Heat Sink) up. Locate Pin1 and the two orientation key notches. Step 1-2. Step 2. 2.3 CPU Installation For the installation of Intel 775-LAND CPU, please follow the steps below. 775-Pin Socket Overview Before you insert the 775-LAND CPU into the socket...
... lever by the edges where are marked with IHS (Integrated Heat Sink) up. Locate Pin1 and the two orientation key notches. Step 1-2. Step 2. 2.3 CPU Installation For the installation of Intel 775-LAND CPU, please follow the steps below. 775-Pin Socket Overview Before you insert the 775-LAND CPU into the socket...

User Manual
Page 16
...contact other . Step 5. Secure excess cable with tie-wrap to ensure cable does not interfere with the motherboard throughholes. For proper installation, please kindly refer to the instruction manuals of the heatsink for 775-LAND CPU. Step 2. Repeat with the CPU fan connector... page 11, No. 5). Connect fan header with remaining fasteners. 2.4 Installation of CPU Fan and Heatsink This motherboard is an example to illustrate the installation of your CPU fan and heatsink. Before you installed the heatsink, you press down on the motherboard. Ensure that supports Intel...
...contact other . Step 5. Secure excess cable with tie-wrap to ensure cable does not interfere with the motherboard throughholes. For proper installation, please kindly refer to the instruction manuals of the heatsink for 775-LAND CPU. Step 2. Repeat with the CPU fan connector... page 11, No. 5). Connect fan header with remaining fasteners. 2.4 Installation of CPU Fan and Heatsink This motherboard is an example to illustrate the installation of your CPU fan and heatsink. Before you installed the heatsink, you press down on the motherboard. Ensure that supports Intel...

User Manual
Page 17
...module or two non-identical memory modules, it will cause permanent damage to the motherboard and the DIMM if you always need to install two identical (the same brand, speed, size and chiptype) memory modules in place and the DIMM is unable to disconnect power ... Technology. For dual channel configuration, you force the DIMM into the slot until the retaining clips at single channel mode. 2.5 Installation of Memory Modules (DIMM) ConRoe865GV motherboard provides two 184-pin DDR (Double Data Rate) DIMM slots, and supports Dual Channel Memory Technology. Otherwise, it is ...
...module or two non-identical memory modules, it will cause permanent damage to the motherboard and the DIMM if you always need to install two identical (the same brand, speed, size and chiptype) memory modules in place and the DIMM is unable to disconnect power ... Technology. For dual channel configuration, you force the DIMM into the slot until the retaining clips at single channel mode. 2.5 Installation of Memory Modules (DIMM) ConRoe865GV motherboard provides two 184-pin DDR (Double Data Rate) DIMM slots, and supports Dual Channel Memory Technology. Otherwise, it is ...

User Manual
Page 18
...slot that the power supply is switched off or the power cord is unplugged. Replace the system cover. 18 To install the system with the PCI card installed in "PCI3" slot, you install the add-on AGP VGA card, the system will no be able to the documents in the Support CD, "... add-on the slot. In that only supports compatible AGP VGA cards. Step 2. Step 6. AMR slot: AMR slot is already installed in a chassis). AGI slot: The AGI [ASRock Graphics Interface] slot is completely seated on AGP VGA card and its driver. Remove the system unit cover (if your motherboard is used ...
...slot that the power supply is switched off or the power cord is unplugged. Replace the system cover. 18 To install the system with the PCI card installed in "PCI3" slot, you install the add-on AGP VGA card, the system will no be able to the documents in the Support CD, "... add-on the slot. In that only supports compatible AGP VGA cards. Step 2. Step 6. AMR slot: AMR slot is already installed in a chassis). AGI slot: The AGI [ASRock Graphics Interface] slot is completely seated on AGP VGA card and its driver. Remove the system unit cover (if your motherboard is used ...

User Manual
Page 22
... (Quiet Fan) support, the 3-Pin CPU fan still can work successfully even without the fan speed control function. Though this connector. Pin 1-3 Connected 3-Pin Fan Installation ATX Power Connector (20-pin ATXPWR1) (see p.11 No. 13) GND +12V CHA_FAN_SPEED Please connect a chassis fan cable to this motherboard, please connect it to...
... (Quiet Fan) support, the 3-Pin CPU fan still can work successfully even without the fan speed control function. Though this connector. Pin 1-3 Connected 3-Pin Fan Installation ATX Power Connector (20-pin ATXPWR1) (see p.11 No. 13) GND +12V CHA_FAN_SPEED Please connect a chassis fan cable to this motherboard, please connect it to...

User Manual
Page 23
...system, please insert the support CD to your chassis. This section will guide you the actual CPU host frequency in the following item. STEP 1: Install the SATA hard disks into the SATA hard disk, you need to check and ensure the configuration of the OnBoard IDE Operate Mode option in... overclocking environment. 23 STEP 4: Connect the other end of BIOS setup to [Auto], which will cause the failure to power up to bottom side to install those required drivers. Then, the drivers compatible to your system. ATX 12V Connector (4-pin ATX12V1) (see p.11 No. 2) Please note that it is ...
...system, please insert the support CD to your chassis. This section will guide you the actual CPU host frequency in the following item. STEP 1: Install the SATA hard disks into the SATA hard disk, you need to check and ensure the configuration of the OnBoard IDE Operate Mode option in... overclocking environment. 23 STEP 4: Connect the other end of BIOS setup to [Auto], which will cause the failure to power up to bottom side to install those required drivers. Then, the drivers compatible to your system. ATX 12V Connector (4-pin ATX12V1) (see p.11 No. 2) Please note that it is ...

User Manual
Page 27
... Technology is "Unlocked", this item will find an item Ratio CMOS Setting appears to execute code. This option will be hidden if the installed CPU does not support Intel (R) Virtualization Technology. The C1 state is set the ratio value between CPU Core Clock and the FSB frequency....This should always be [Auto] for better system stability. Spread Spectrum This item should be enabled in order to the core speed of the installed processor. If you will display and allow you to the IA-32 Intel Architecture. When this motherboard. CPU Thermal Throttling You may select ...
... Technology is "Unlocked", this item will find an item Ratio CMOS Setting appears to execute code. This option will be hidden if the installed CPU does not support Intel (R) Virtualization Technology. The C1 state is set the ratio value between CPU Core Clock and the FSB frequency....This should always be [Auto] for better system stability. Spread Spectrum This item should be enabled in order to the core speed of the installed processor. If you will display and allow you to the IA-32 Intel Architecture. When this motherboard. CPU Thermal Throttling You may select ...

User Manual
Page 28
... higher. You may also select other value as Microsoft® Windows® XP. Configure DRAM Timing by SPD Select [Enabled] will be hidden if the installed CPU does not support Hyper-Threading technology. Configuration options: [Auto], [2.5], [2], and [3]. If you select [Auto], you need to set to [Enabled]. This option will configure...
... higher. You may also select other value as Microsoft® Windows® XP. Configure DRAM Timing by SPD Select [Enabled] will be hidden if the installed CPU does not support Hyper-Threading technology. Configuration options: [Auto], [2.5], [2], and [3]. If you select [Auto], you need to set to [Enabled]. This option will configure...

User Manual
Page 31
... four IDE devices under legacy OS (Windows® ME / 98SE), you may enable either [Pri IDE + SATA] or [SATA + Sec IDE] when the installed SATA device is installed into IDE HDD while SATA devices are used, you to [Pri IDE + SATA], then the secondary IDE will not work . OnBoard IDE Operate Mode... OS into IDE HDD and SATA devices are used with legacy OS. 31 If you do not install any SATA device, please also select [Enhanced Mode] no matter you install legacy OS (Windows® ME / 98SE) into SATA device, please select [Enhanced Mode]. Likewise, if it is set to select [Enhanced ...
... four IDE devices under legacy OS (Windows® ME / 98SE), you may enable either [Pri IDE + SATA] or [SATA + Sec IDE] when the installed SATA device is installed into IDE HDD while SATA devices are used, you to [Pri IDE + SATA], then the secondary IDE will not work . OnBoard IDE Operate Mode... OS into IDE HDD and SATA devices are used with legacy OS. 31 If you do not install any SATA device, please also select [Enhanced Mode] no matter you install legacy OS (Windows® ME / 98SE) into SATA device, please select [Enhanced Mode]. Likewise, if it is set to select [Enhanced ...

User Manual
Page 32
... necessary so that you can be applied to configure the type of the IDE device that you specify. Configuration options: [Not Installed], [Auto], [CD/DVD], and [ARMD]. [Not Installed]: Select [Not Installed] to disable the use a disk utility, such as the example in the following instruction, which can write or read data from...
... necessary so that you can be applied to configure the type of the IDE device that you specify. Configuration options: [Not Installed], [Auto], [CD/DVD], and [ARMD]. [Not Installed]: Select [Not Installed] to disable the use a disk utility, such as the example in the following instruction, which can write or read data from...

User Manual
Page 33
... Advanced PCI / PnP Configuration PCI Latency Timer PCI IDE BusMaster [32] [Enabled] Value in units of this item to keep the default value unless the installed PCI expansion cards' specifications require other settings. S.M.A.R.T.
... Advanced PCI / PnP Configuration PCI Latency Timer PCI IDE BusMaster [32] [Enabled] Value in units of this item to keep the default value unless the installed PCI expansion cards' specifications require other settings. S.M.A.R.T.

User Manual
Page 37
... Use this function only when you to the target CPU temperature that you set the target fan speed. CPU Quiet Fan This item allows you install 4-pin CPU fan. Configuration options: [Fast], [Middle] and [Slow]. 37 The default value is [Disabled]. The default value is [2], which means the error of the...
... Use this function only when you to the target CPU temperature that you set the target fan speed. CPU Quiet Fan This item allows you install 4-pin CPU fan. Configuration options: [Fast], [Middle] and [Slow]. 37 The default value is [Disabled]. The default value is [2], which means the error of the...

User Manual
Page 39
... available devices for the system. BIOS SETUP UTILITY Main Advanced H/W Monitor Boot Security Exit Security Settings Supervisor Password : Not Installed User Password : Not Installed Change Supervisor Password Change User Password Clear User Password Install or Change the password. A device enclosed in parenthesis has been disabled in your system. For the user password, you...
... available devices for the system. BIOS SETUP UTILITY Main Advanced H/W Monitor Boot Security Exit Security Settings Supervisor Password : Not Installed User Password : Not Installed Change Supervisor Password Change User Password Clear User Password Install or Change the password. A device enclosed in parenthesis has been disabled in your system. For the user password, you...
User Manual
Page 41
...ASSETUP.EXE" from the BIN folder in your OS documentation for more about ASRock, welcome to play the file. You may contact your CD-ROM drive. Chapter 4 Software Support 4.1 Install Operating System This motherboard supports various Microsoft® Windows® operating systems:... XP. Refer to be damaged by improper handling, ASRock sincerely presents you a clear installation guide through the following path: ..\ Live Demo \ LGA 775 CPU Installation \ LGA775INST_English.DAT 4.2.5 Contact Information If you need to contact ASRock or want to activate the devices. 4.2.3 Utilities Menu...
...ASSETUP.EXE" from the BIN folder in your OS documentation for more about ASRock, welcome to play the file. You may contact your CD-ROM drive. Chapter 4 Software Support 4.1 Install Operating System This motherboard supports various Microsoft® Windows® operating systems:... XP. Refer to be damaged by improper handling, ASRock sincerely presents you a clear installation guide through the following path: ..\ Live Demo \ LGA 775 CPU Installation \ LGA775INST_English.DAT 4.2.5 Contact Information If you need to contact ASRock or want to activate the devices. 4.2.3 Utilities Menu...

Quick Installation Guide
Page 1
...as a commitment by the purchaser for backup purpose, without written consent of ASRock Inc. All rights reserved. 1 ASRock ConRoe865GV Motherboard English Operation is subject to the following two conditions: (1) this ...device may not cause harmful interference, and (2) this device must accept any interference received, including interference that may appear in any form or by any means, except duplication of documentation by ASRock. Copyright Notice: No part of this installation...
...as a commitment by the purchaser for backup purpose, without written consent of ASRock Inc. All rights reserved. 1 ASRock ConRoe865GV Motherboard English Operation is subject to the following two conditions: (1) this ...device may not cause harmful interference, and (2) this device must accept any interference received, including interference that may appear in any form or by any means, except duplication of documentation by ASRock. Copyright Notice: No part of this installation...


