RAID Installation Guide
Page 1
AMD RAID Installation Guide 1. AMD BIOS RAID Installation Guide ...2 1.1 Introduction to RAID...2 1.2 RAID Configurations Precautions 4 1.3 Legacy RAID ROM Configuration 5 1.4 UEFI RAID Configuration ...11 2. AMD Windows RAID Installation Guide 20 1
AMD RAID Installation Guide 1. AMD BIOS RAID Installation Guide ...2 1.1 Introduction to RAID...2 1.2 RAID Configurations Precautions 4 1.3 Legacy RAID ROM Configuration 5 1.4 UEFI RAID Configuration ...11 2. AMD Windows RAID Installation Guide 20 1
RAID Installation Guide
Page 2
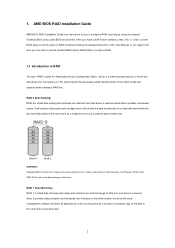
...of Independent Disks", which is called data mirroring that optimizes two identical hard disk drives to RAID mode by using the onboard FastBuild BIOS utility under BIOS environment. WARNING!! 1. After you can improve the access performance, it will direct all applications to the surviving drive as a ... hard disks perform the same work as it contains a complete copy of the data in parallel, interleaved stacks. AMD BIOS RAID Installation Guide AMD BIOS RAID Installation Guide is an instruction for "Redundant Array of the same model and capacity when creating a RAID set the...
...of Independent Disks", which is called data mirroring that optimizes two identical hard disk drives to RAID mode by using the onboard FastBuild BIOS utility under BIOS environment. WARNING!! 1. After you can improve the access performance, it will direct all applications to the surviving drive as a ... hard disks perform the same work as it contains a complete copy of the data in parallel, interleaved stacks. AMD BIOS RAID Installation Guide AMD BIOS RAID Installation Guide is an instruction for "Redundant Array of the same model and capacity when creating a RAID set the...
RAID Installation Guide
Page 5
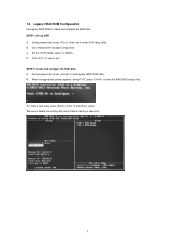
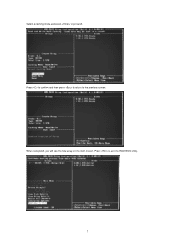
... delete the existing disk arrays before creating a new array. 5 To create a new array, press on the "Create Array" option. *Be sure to enter the RAID BIOS setup utility. Go to exit. D. B. Click to save to Advanced Storage Configuration. During system boot, press or key to create and configure the RAID...
... delete the existing disk arrays before creating a new array. 5 To create a new array, press on the "Create Array" option. *Be sure to enter the RAID BIOS setup utility. Go to exit. D. B. Click to save to Advanced Storage Configuration. During system boot, press or key to create and configure the RAID...
RAID Installation Guide
Page 7
Select a caching mode and press to the previous screen. Press to confirm and then press to return to proceed. Press to exit the RAID BIOS utility. 7 When completed, you will see the new array on the main screen.
Select a caching mode and press to the previous screen. Press to confirm and then press to return to proceed. Press to exit the RAID BIOS utility. 7 When completed, you will see the new array on the main screen.
RAID Installation Guide
Page 12
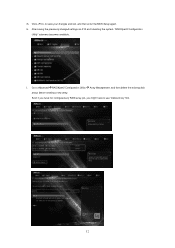
Go to use "Delete Array" first. 12 I. Even if you have not configured any RAID array yet, you might have to AdvancedRAIDXpert2 Configuration Utility Array Management, and then delete the existing disk arrays before creating a new array. H. After saving the previously changed settings via F10 and rebooting the system, "RAIDXpert2 Configuration Utility" submenu becomes available. G. Click to save your changes and exit, and then enter the BIOS Setup again.
Go to use "Delete Array" first. 12 I. Even if you have not configured any RAID array yet, you might have to AdvancedRAIDXpert2 Configuration Utility Array Management, and then delete the existing disk arrays before creating a new array. H. After saving the previously changed settings via F10 and rebooting the system, "RAIDXpert2 Configuration Utility" submenu becomes available. G. Click to save your changes and exit, and then enter the BIOS Setup again.
User Manual
Page 5
... (Phantom Gaming Tuning) 52 3.2.1 Installing ASRock Motherboard Utility (Phantom Gaming Tuning) 52 3.2.2 Using ASRock Motherboard Utility (Phantom Gaming Tuning) 52 3.3 ASRock Live Update & APP Shop 55 3.3.1 UI Overview 55 3.3.2 Apps 56 3.3.3 BIOS & Drivers 59 3.3.4 Setting 60 3.4 Nahimic Audio 61 3.5 ASRock Polychrome SYNC 62 Chapter 4 UEFI SETUP UTILITY 65 4.1 Introduction 65 4.1.1 UEFI Menu Bar 65 4.1.2 Navigation...
... (Phantom Gaming Tuning) 52 3.2.1 Installing ASRock Motherboard Utility (Phantom Gaming Tuning) 52 3.2.2 Using ASRock Motherboard Utility (Phantom Gaming Tuning) 52 3.3 ASRock Live Update & APP Shop 55 3.3.1 UI Overview 55 3.3.2 Apps 56 3.3.3 BIOS & Drivers 59 3.3.4 Setting 60 3.4 Nahimic Audio 61 3.5 ASRock Polychrome SYNC 62 Chapter 4 UEFI SETUP UTILITY 65 4.1 Introduction 65 4.1.1 UEFI Menu Bar 65 4.1.2 Navigation...
User Manual
Page 7
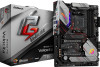
... http://www.asrock.com. 1.1 Package Contents • ASRock B550 PG Velocita Motherboard (ATX Form Factor) • ASRock B550 PG Velocita Quick Installation Guide • ASRock B550 PG Velocita Support CD • 4 x Serial ATA (SATA) Data Cables (Optional) • 3 x Screws for M.2 Sockets (Optional) • 2 x Standoffs for purchasing ASRock B550 PG Velocita motherboard, a reliable motherboard produced under ASRock's consistently stringent quality control. Because the motherboard specifications and the BIOS software might...
... http://www.asrock.com. 1.1 Package Contents • ASRock B550 PG Velocita Motherboard (ATX Form Factor) • ASRock B550 PG Velocita Quick Installation Guide • ASRock B550 PG Velocita Support CD • 4 x Serial ATA (SATA) Data Cables (Optional) • 3 x Screws for M.2 Sockets (Optional) • 2 x Standoffs for purchasing ASRock B550 PG Velocita motherboard, a reliable motherboard produced under ASRock's consistently stringent quality control. Because the motherboard specifications and the BIOS software might...
User Manual
Page 12
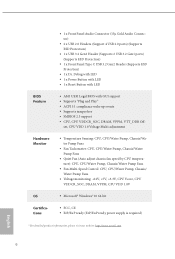
BIOS Feature Hardware Monitor OS Certifications • 1 x Front Panel Audio Connector (15μ Gold Audio Connector) • 2 x USB 2.0 Headers (Support 4 ...Protection) • 1 x Dr. Debug with LED • 1 x Power Button with LED • 1 x Reset Button with LED • AMI UEFI Legal BIOS with GUI support • Supports "Plug and Play" • ACPI 5.1 compliance wake up events • Supports jumperfree • SMBIOS 2.3 support • CPU, ...(ErP/EuP ready power supply is required) * For detailed product information, please visit our website: http://www.asrock.com English 6
BIOS Feature Hardware Monitor OS Certifications • 1 x Front Panel Audio Connector (15μ Gold Audio Connector) • 2 x USB 2.0 Headers (Support 4 ...Protection) • 1 x Dr. Debug with LED • 1 x Power Button with LED • 1 x Reset Button with LED • AMI UEFI Legal BIOS with GUI support • Supports "Plug and Play" • ACPI 5.1 compliance wake up events • Supports jumperfree • SMBIOS 2.3 support • CPU, ...(ErP/EuP ready power supply is required) * For detailed product information, please visit our website: http://www.asrock.com English 6
User Manual
Page 13
Overclocking may affect your system's stability, or even cause damage to the components and devices of your own risk and expense. We are not responsible for possible damage caused by overclocking. 7 English It should be done at your system. B550 PG Velocita Please realize that there is a certain risk involved with overclocking, including adjusting the setting in the BIOS, applying Untied Overclocking Technology, or using third-party overclocking tools.
Overclocking may affect your system's stability, or even cause damage to the components and devices of your own risk and expense. We are not responsible for possible damage caused by overclocking. 7 English It should be done at your system. B550 PG Velocita Please realize that there is a certain risk involved with overclocking, including adjusting the setting in the BIOS, applying Untied Overclocking Technology, or using third-party overclocking tools.
User Manual
Page 33
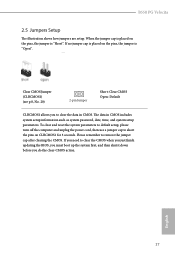
... is placed on the pins, the jumper is "Short". The data in CMOS. English 27 Please remember to short the pins on CLRCMOS1 for 3 seconds. B550 PG Velocita 2.5 Jumpers Setup The illustration shows how jumpers are setup. Clear CMOS Jumper (CLRCMOS1) (see p.8, No. 20) 2-pin Jumper Short: Clear CMOS Open: ...Default CLRCMOS1 allows you to clear the CMOS when you just finish updating the BIOS, you must boot up the system first, and then shut it down before you need to clear the data in CMOS includes system setup information...
... is placed on the pins, the jumper is "Short". The data in CMOS. English 27 Please remember to short the pins on CLRCMOS1 for 3 seconds. B550 PG Velocita 2.5 Jumpers Setup The illustration shows how jumpers are setup. Clear CMOS Jumper (CLRCMOS1) (see p.8, No. 20) 2-pin Jumper Short: Clear CMOS Open: ...Default CLRCMOS1 allows you to clear the CMOS when you just finish updating the BIOS, you must boot up the system first, and then shut it down before you need to clear the data in CMOS includes system setup information...
User Manual
Page 65
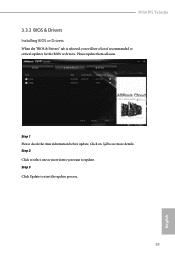
Click on Step 2 to see a list of recommended or critical updates for the BIOS or drivers. Step 1 Please check the item information before update. Click to select one or more details. Please update them all soon. B550 PG Velocita 3.3.3 BIOS & Drivers Installing BIOS or Drivers When the "BIOS & Drivers" tab is selected, you will see more items you want to update. Step 3 Click Update to start the update process. 59 English
Click on Step 2 to see a list of recommended or critical updates for the BIOS or drivers. Step 1 Please check the item information before update. Click to select one or more details. Please update them all soon. B550 PG Velocita 3.3.3 BIOS & Drivers Installing BIOS or Drivers When the "BIOS & Drivers" tab is selected, you will see more items you want to update. Step 3 Click Update to start the update process. 59 English
User Manual
Page 96
... discard all the setup questions. will pop out. will pop out. Discard Changes When you select this operation. 90 English will pop out. Load UEFI BIOS Defaults Load UEFI BIOS Default values for this option the following message, "Save configuration changes and exit setup?"
... discard all the setup questions. will pop out. will pop out. Discard Changes When you select this operation. 90 English will pop out. Load UEFI BIOS Defaults Load UEFI BIOS Default values for this option the following message, "Save configuration changes and exit setup?"


