RAID Installation Guide
Page 1
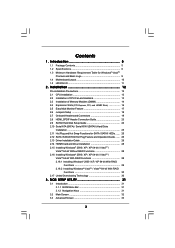
NVIDIA Windows RAID Installation Guide 8 2.1 NVIDIA Windows RAID Installation Guide for Windows 2000 / XP / XP 64-bit Users 8 2.2 NVIDIA Windows RAID Installation Guide for Windows Vista / Vista 64-bit Users 18 1 NVIDIA RAID Installation Guide 1. NVIDIA BIOS RAID Installation Guide 2 1.1 Introduction to RAID 2 1.2 RAID Configurations Precautions 3 1.3 Create Disk Array 4 2.
NVIDIA Windows RAID Installation Guide 8 2.1 NVIDIA Windows RAID Installation Guide for Windows 2000 / XP / XP 64-bit Users 8 2.2 NVIDIA Windows RAID Installation Guide for Windows Vista / Vista 64-bit Users 18 1 NVIDIA RAID Installation Guide 1. NVIDIA BIOS RAID Installation Guide 2 1.1 Introduction to RAID 2 1.2 RAID Configurations Precautions 3 1.3 Create Disk Array 4 2.

RAID Installation Guide
Page 4
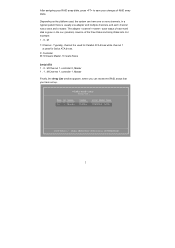
...different sizes, the smaller capacity hard disk will operate under a clean environment. 1.3 Create Disk Array Power on your system. Define a New Array window appears. Please backup your computer, wait until you see the RAID software prompting you create RAID functions. If you want to press . After ...rebooting your data first before you to create RAID 0. By default, RAID Mode is set up your hard disks before the window disappears. 2. The RAID prompt appears as default. After you set to Optimal as a part of your new RAID array. We take 4 ...
...different sizes, the smaller capacity hard disk will operate under a clean environment. 1.3 Create Disk Array Power on your system. Define a New Array window appears. Please backup your computer, wait until you see the RAID software prompting you create RAID functions. If you want to press . After ...rebooting your data first before you to create RAID 0. By default, RAID Mode is set up your hard disks before the window disappears. 2. The RAID prompt appears as default. After you set to Optimal as a part of your new RAID array. We take 4 ...
RAID Installation Guide
Page 7
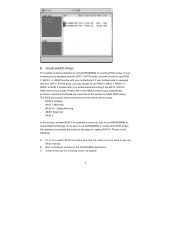
..., press to save your changes of the Free Disks and Array Disks lists. For example: 1 . 0 . M Channel 1, controller 0, Master 1 . 1 . M Channel 1, controller 1, Master Finally, the Array List window appears, where you have one adapter and multiple channels, and each hard disk is used for Serial ATA drives. 0: Controller M: M means Master, S means Slave Serial...
..., press to save your changes of the Free Disks and Array Disks lists. For example: 1 . 0 . M Channel 1, controller 0, Master 1 . 1 . M Channel 1, controller 1, Master Finally, the Array List window appears, where you have one adapter and multiple channels, and each hard disk is used for Serial ATA drives. 0: Controller M: M means Master, S means Slave Serial...

RAID Installation Guide
Page 8
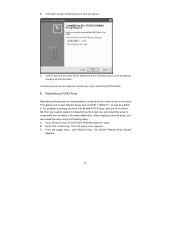
...RAID functions. Please follow the instructions below screen appears. 8 For Windows 2000 / XP / XP 64-bit and Windows Vista / Vista 64-bit, there are different installation procedures. NVIDIA Windows RAID Installation Guide NVIDIA Windows RAID Installation Guide is built in NVIDIA ALL in one driver provided... in our support CD. Please enter NVRAIDMAN by using NVIDIAMAN under Windows environment. 2. Enter NVRAIDMAN RAID driver is an instruction for Windows 2000 / XP / XP 64-bit Users A. Please read this guide carefully and follow the instructions ...
...RAID functions. Please follow the instructions below screen appears. 8 For Windows 2000 / XP / XP 64-bit and Windows Vista / Vista 64-bit, there are different installation procedures. NVIDIA Windows RAID Installation Guide NVIDIA Windows RAID Installation Guide is built in NVIDIA ALL in one driver provided... in our support CD. Please enter NVRAIDMAN by using NVIDIAMAN under Windows environment. 2. Enter NVRAIDMAN RAID driver is an instruction for Windows 2000 / XP / XP 64-bit Users A. Please read this guide carefully and follow the instructions ...
RAID Installation Guide
Page 9
... is equipped with two SATA / SATAII ports, you may be mentioned in this section are similar to the steps of using NVRAIDMAN for example to Windows and launch the NVRAIDMAN application. JBOD: Spanning - Create Array and the following : A. RAID 0+1: Stripe Mirroring - If you want to use RAID 0, RAID 1, RAID 0+1, JBOD, or...
... is equipped with two SATA / SATAII ports, you may be mentioned in this section are similar to the steps of using NVRAIDMAN for example to Windows and launch the NVRAIDMAN application. JBOD: Spanning - Create Array and the following : A. RAID 0+1: Stripe Mirroring - If you want to use RAID 0, RAID 1, RAID 0+1, JBOD, or...
RAID Installation Guide
Page 15
... Array Rebuilding is the process of the drives fail, then you need to replace the failed drive with a new one, and rebuild the array to Windows and run the NVIDIA RAID Management utility. Click Finish and the array will be applied to delete any array created by NVIDIA RAID. From the...
... Array Rebuilding is the process of the drives fail, then you need to replace the failed drive with a new one, and rebuild the array to Windows and run the NVIDIA RAID Management utility. Click Finish and the array will be applied to delete any array created by NVIDIA RAID. From the...

RAID Installation Guide
Page 18
... below screen appears. 18 C. Enter Storage RAID driver is built in NVIDIA ALL in one driver provided in a short period of time. 2.2 NVIDIA Windows RAID Installation Guide for Windows Vista / Vista 64-bit Users A. Please enter Storage by clicking on Start → Programs → NVIDIA Corporation → Storage. (There is synchronizing. The...
... below screen appears. 18 C. Enter Storage RAID driver is built in NVIDIA ALL in one driver provided in a short period of time. 2.2 NVIDIA Windows RAID Installation Guide for Windows Vista / Vista 64-bit Users A. Please enter Storage by clicking on Start → Programs → NVIDIA Corporation → Storage. (There is synchronizing. The...
User Manual
Page 3
...2.9 SATAII Hard Disk Setup Guide 24 2.10 Serial ATA (SATA) / Serial ATAII (SATAII) Hard Disks Installation 25 2.11 Hot Plug and Hot Swap Functions for Windows® VistaTM Premium and Basic Logo 9 1.4 Motherboard Layout 10 1.5 HD 8CH I/O 11 2 . Introduction 5 1.1 Package Contents 5 1.2 Specifications 6 1.3 Minimum ...26 2.13 Driver Installation Guide 28 2.14 HDMR Card and Driver Installation 28 2.15 Installing Windows® 2000 / XP / XP 64-bit / VistaTM / VistaTM 64-bit Without RAID Functions 28 2.16 Installing Windows® 2000 / XP / XP 64-bit / VistaTM / VistaTM 64-bit With ...
...2.9 SATAII Hard Disk Setup Guide 24 2.10 Serial ATA (SATA) / Serial ATAII (SATAII) Hard Disks Installation 25 2.11 Hot Plug and Hot Swap Functions for Windows® VistaTM Premium and Basic Logo 9 1.4 Motherboard Layout 10 1.5 HD 8CH I/O 11 2 . Introduction 5 1.1 Package Contents 5 1.2 Specifications 6 1.3 Minimum ...26 2.13 Driver Installation Guide 28 2.14 HDMR Card and Driver Installation 28 2.15 Installing Windows® 2000 / XP / XP 64-bit / VistaTM / VistaTM 64-bit Without RAID Functions 28 2.16 Installing Windows® 2000 / XP / XP 64-bit / VistaTM / VistaTM 64-bit With ...
User Manual
Page 6
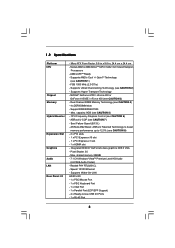
...capacity: 8GB (see CAUTION 7) - Max. Realtek PHY RTL8201CL - Supports Hyper-Transport Technology - Integrated NVIDIA® GeForce6-class graphics DX9.0 VGA - ASRock U-COP (see CAUTION 5) - Speed: 10/100 Ethernet - 1.2 Specifications Platform CPU Chipset Memory Hybrid Booster Expansion Slot Graphics Audio LAN Rear Panel I...4) - 4 x DDRII DIMM slots - Dual Channel DDRII Memory Technology (see CAUTION 3) - Pixel Shader 3.0 - shared memory 256MB - 7.1 CH Windows® VistaTM Premium Level HD Audio (ALC888 Audio Codec) - Micro ATX Form Factor: 9.6-in x 9.6-in, 24.4 cm x 24.4 cm - ...
...capacity: 8GB (see CAUTION 7) - Max. Realtek PHY RTL8201CL - Supports Hyper-Transport Technology - Integrated NVIDIA® GeForce6-class graphics DX9.0 VGA - ASRock U-COP (see CAUTION 5) - Speed: 10/100 Ethernet - 1.2 Specifications Platform CPU Chipset Memory Hybrid Booster Expansion Slot Graphics Audio LAN Rear Panel I...4) - 4 x DDRII DIMM slots - Dual Channel DDRII Memory Technology (see CAUTION 3) - Pixel Shader 3.0 - shared memory 256MB - 7.1 CH Windows® VistaTM Premium Level HD Audio (ALC888 Audio Codec) - Micro ATX Form Factor: 9.6-in x 9.6-in, 24.4 cm x 24.4 cm - ...
User Manual
Page 7
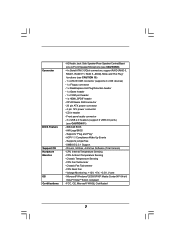
... CAUTION 9) - 4 x Serial ATAII 3.0Gb/s connectors, support RAID (RAID 0, RAID 1, RAID 0+1, RAID 5, JBOD), NCQ, and "Hot Plug" functions (see CAUTION 11) - 4Mb AMI BIOS - Microsoft® Windows® 2000/XP/XP Media Center/XP 64-bit/ VistaTM/VistaTM 64-bit compliant - ACPI 1.1 Compliance Wake Up Events - Supports jumperfree - Drivers, Utilities, AntiVirus Software...
... CAUTION 9) - 4 x Serial ATAII 3.0Gb/s connectors, support RAID (RAID 0, RAID 1, RAID 0+1, RAID 5, JBOD), NCQ, and "Hot Plug" functions (see CAUTION 11) - 4Mb AMI BIOS - Microsoft® Windows® 2000/XP/XP Media Center/XP 64-bit/ VistaTM/VistaTM 64-bit compliant - ACPI 1.1 Compliance Wake Up Events - Supports jumperfree - Drivers, Utilities, AntiVirus Software...
User Manual
Page 8
... CPU bus frequencies may affect your system stability, or even cause damage to your system. However, the difference in device name under Windows® VistaTM / VistaTM 64-bit, the chipset name will automatically shutdown. This motherboard supports Dual Channel Memory Technology. You may be... in the BIOS setup, the memory performance will overclock the chipset/CPU reference clock. This motherboard supports ASRock AM2 Boost overclocking technology. For Windows® XP 64-bit and Windows® VistaTM 64bit with 64-bit CPU, there is a certain risk involved with 97.19 version ...
... CPU bus frequencies may affect your system stability, or even cause damage to your system. However, the difference in device name under Windows® VistaTM / VistaTM 64-bit, the chipset name will automatically shutdown. This motherboard supports Dual Channel Memory Technology. You may be... in the BIOS setup, the memory performance will overclock the chipset/CPU reference clock. This motherboard supports ASRock AM2 Boost overclocking technology. For Windows® XP 64-bit and Windows® VistaTM 64bit with 64-bit CPU, there is a certain risk involved with 97.19 version ...
User Manual
Page 9
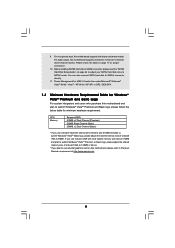
... Disk Setup Guide" on this motherboard supports 2-channel, 4-channel, 6-channel, and 8-channel modes. Power Management for USB 2.0 works fine under Microsoft® Windows® VistaTM 64-bit / VistaTM / XP 64-bit / XP SP1 or SP2 / 2000 SP4. 1.3 Minimum Hardware Requirement Table for proper connection. 10... use onboard VGA with total system memory size 512MB and plan to submit Windows® VistaTM Basic logo, please adjust the shared memory size of onboard VGA to Premium Discrete requirement at http://www.asrock.com 9 For audio output, this motherboard, please refer to 128MB or ...
... Disk Setup Guide" on this motherboard supports 2-channel, 4-channel, 6-channel, and 8-channel modes. Power Management for USB 2.0 works fine under Microsoft® Windows® VistaTM 64-bit / VistaTM / XP 64-bit / XP SP1 or SP2 / 2000 SP4. 1.3 Minimum Hardware Requirement Table for proper connection. 10... use onboard VGA with total system memory size 512MB and plan to submit Windows® VistaTM Basic logo, please adjust the shared memory size of onboard VGA to Premium Discrete requirement at http://www.asrock.com 9 For audio output, this motherboard, please refer to 128MB or ...

User Manual
Page 17
... of the multimonitor according to the VGA/D-Sub port on each monitor. Right-click the display icon in this motherboard. 4. Click "Extend my Windows desktop onto this motherboard. Set the "Screen Resolution" and "Color Quality" as appropriate for the diaplay icon identified by the number 2. Click... Please refer to the VGA/D-Sub connector of the add-on PCI Express VGA card, you select is inserted to this step are under Windows® XP environment. Connect another D-Sub input monitor cable to page 16 for proper expansion card installation procedures for details. 2. Please make...
... of the multimonitor according to the VGA/D-Sub port on each monitor. Right-click the display icon in this motherboard. 4. Click "Extend my Windows desktop onto this motherboard. Set the "Screen Resolution" and "Color Quality" as appropriate for the diaplay icon identified by the number 2. Click... Please refer to the VGA/D-Sub connector of the add-on PCI Express VGA card, you select is inserted to this step are under Windows® XP environment. Connect another D-Sub input monitor cable to page 16 for proper expansion card installation procedures for details. 2. Please make...
User Manual
Page 21
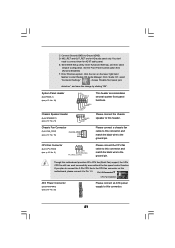
...]. E. Enter Advanced Settings, and then select Chipset Configuration. Set the Front Panel Control option from [Auto] to connect them for HD audio panel only. Enter Windows system. Enter BIOS Setup Utility. Please connect the chassis speaker to this motherboard provides 4-Pin CPU fan (Quiet Fan) support, the 3-Pin CPU fan still...
...]. E. Enter Advanced Settings, and then select Chipset Configuration. Set the Front Panel Control option from [Auto] to connect them for HD audio panel only. Enter Windows system. Enter BIOS Setup Utility. Please connect the chassis speaker to this motherboard provides 4-Pin CPU fan (Quiet Fan) support, the 3-Pin CPU fan still...
User Manual
Page 28
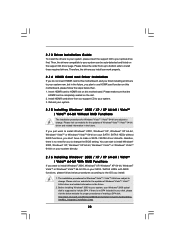
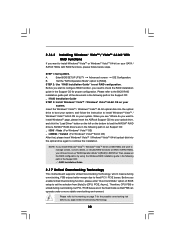
... / VistaTM 64-bit driver and related information in the future. 2. If you just want to install Windows® 2000, Windows® XP, Windows® XP 64-bit, Windows® VistaTM or Windows® VistaTM 64-bit OS on your SATA / SATAII HDDs without RAID functions, you install. 1. ...If there is completely seated on this motherboard, please follow the steps below then. 1. htm#the_integrated_installation_fmay 28 Please follow below website for Windows® VistaTM / VistaTM 64-bit are subject to change. Insert HDMR card to HDMR slot on the slot. 2. Install HDMR card driver...
... / VistaTM 64-bit driver and related information in the future. 2. If you just want to install Windows® 2000, Windows® XP, Windows® XP 64-bit, Windows® VistaTM or Windows® VistaTM 64-bit OS on your SATA / SATAII HDDs without RAID functions, you install. 1. ...If there is completely seated on this motherboard, please follow the steps below then. 1. htm#the_integrated_installation_fmay 28 Please follow below website for Windows® VistaTM / VistaTM 64-bit are subject to change. Insert HDMR card to HDMR slot on the slot. 2. Install HDMR card driver...

User Manual
Page 29
...your system. B. During POST at the beginning of Windows® setup, press F6 to install Windows® 2000, Windows® XP or Windows® XP 64-bit on IDE HDDs and want to install a third-party RAID driver. A. Insert the ASRock Support CD into the floppy diskette. ROM as ... BIOS RAID installation guide in the following path in the Support CD for boot devices selection appears. E. Please refer to install Windows® 2000 / Windows® XP / Windows® XP 64-bit OS on your system. Select the driver to install according to [RAID]. Then, please set RAID ...
...your system. B. During POST at the beginning of Windows® setup, press F6 to install Windows® 2000, Windows® XP or Windows® XP 64-bit on IDE HDDs and want to install a third-party RAID driver. A. Insert the ASRock Support CD into the floppy diskette. ROM as ... BIOS RAID installation guide in the following path in the Support CD for boot devices selection appears. E. Please refer to install Windows® 2000 / Windows® XP / Windows® XP 64-bit OS on your system. Select the driver to install according to [RAID]. Then, please set RAID ...
User Manual
Page 30
... Untied Overclocking Technology. 30 page, please insert the ASRock Support CD into the optical drive again to continue the installation. If you install Windows® VistaTM / Windows® VistaTM 64-bit on IDE HDDs and want to install Windows?" Then, please set up "SATA Operation Mode" ... [Auto] to [CPU, PCIE, Async.]. Before you start to configure RAID function, you need to set the RAID configuration by using the Windows RAID installation guide in the following path in the Support CD: .. \ RAID Installation Guide 2 . 1 7 Untied Overclocking Technology This motherboard supports...
... Untied Overclocking Technology. 30 page, please insert the ASRock Support CD into the optical drive again to continue the installation. If you install Windows® VistaTM / Windows® VistaTM 64-bit on IDE HDDs and want to install Windows?" Then, please set up "SATA Operation Mode" ... [Auto] to [CPU, PCIE, Async.]. Before you start to configure RAID function, you need to set the RAID configuration by using the Windows RAID installation guide in the following path in the Support CD: .. \ RAID Installation Guide 2 . 1 7 Untied Overclocking Technology This motherboard supports...
User Manual
Page 35
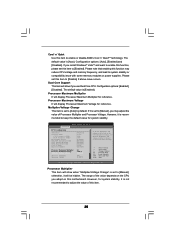
... supplies. If Manual, multiplier and voltage will display Processor Maximum Voltage for reference. Configuration options: [Auto], [Enabled] and [Disabled]. Please set to [Manual], you install Windows® VistaTM and want to enable this function, please set to [Manual]; If it will show if you adopt on User Selection in Setup. +F1...
... supplies. If Manual, multiplier and voltage will display Processor Maximum Voltage for reference. Configuration options: [Auto], [Enabled] and [Disabled]. Please set to [Manual], you install Windows® VistaTM and want to enable this function, please set to [Manual]; If it will show if you adopt on User Selection in Setup. +F1...

User Manual
Page 38
If you plan to use this motherboard to submit Windows® VistaTM logo test, please disable this option. If you select [Auto], the onboard HD Audio will switch the PCI Bus scanning order while searching ...
If you plan to use this motherboard to submit Windows® VistaTM logo test, please disable this option. If you select [Auto], the onboard HD Audio will switch the PCI Bus scanning order while searching ...

User Manual
Page 39
... Support Use this to select DRAM voltage. If [Power On] is [Disabled]. DRAM Voltage Use this item to enable or disable Away Mode support under Windows® XP Media Center OS. If you to set this item to enable or disable Ring-In signals to turn on the system from the...
... Support Use this to select DRAM voltage. If [Power On] is [Disabled]. DRAM Voltage Use this item to enable or disable Away Mode support under Windows® XP Media Center OS. If you to set this item to enable or disable Ring-In signals to turn on the system from the...


