
User Manual
Page 3
...Expansion Slots (PCI and PCI Express Slots 18 2.5 Dual Graphics Operation Guide 19 2.6 Dual Monitor and Surround Display Features 21 2.7 ASRock Smart Remote Installation Guide 24 2.8 Jumpers Setup 25 2.9 Onboard Headers and Connectors 26 2.10 Serial ATA3 (SATA3) Hard Disks ...; 7 / 7 64-bit / VistaTM / VistaTM 64-bit / XP / XP 64-bit Without RAID Functions 35 2.15.1 Installing Windows® XP / XP 64-bit Without RAID Functions 35 2.15.2 Installing Windows® 7 / 7 64-bit / VistaTM / VistaTM 64-bit Without RAID Functions 36 3 Contents 1. Introduction 5 1.1 Package Contents 5...
...Expansion Slots (PCI and PCI Express Slots 18 2.5 Dual Graphics Operation Guide 19 2.6 Dual Monitor and Surround Display Features 21 2.7 ASRock Smart Remote Installation Guide 24 2.8 Jumpers Setup 25 2.9 Onboard Headers and Connectors 26 2.10 Serial ATA3 (SATA3) Hard Disks ...; 7 / 7 64-bit / VistaTM / VistaTM 64-bit / XP / XP 64-bit Without RAID Functions 35 2.15.1 Installing Windows® XP / XP 64-bit Without RAID Functions 35 2.15.2 Installing Windows® 7 / 7 64-bit / VistaTM / VistaTM 64-bit Without RAID Functions 36 3 Contents 1. Introduction 5 1.1 Package Contents 5...

User Manual
Page 5
...to ASRock's commitment to BIOS setup and information of the Support CD. In this manual, chapter 1 and 2 contain introduction of this motherboard, please visit our website for specific information about the model you are using. To get better performance in Windows®...stepby-step guide to AHCI mode. www.asrock.com/support/index.asp 1.1 Package Contents ASRock A75M Motherboard (Micro ATX Form Factor: 9.6-in x 8.5-in our support CD for purchasing ASRock A75M motherboard, a reliable motherboard produced under ASRock's consistently stringent quality control. Because the ...
...to ASRock's commitment to BIOS setup and information of the Support CD. In this manual, chapter 1 and 2 contain introduction of this motherboard, please visit our website for specific information about the model you are using. To get better performance in Windows®...stepby-step guide to AHCI mode. www.asrock.com/support/index.asp 1.1 Package Contents ASRock A75M Motherboard (Micro ATX Form Factor: 9.6-in x 8.5-in our support CD for purchasing ASRock A75M motherboard, a reliable motherboard produced under ASRock's consistently stringent quality control. Because the ...

User Manual
Page 8
...-party overclocking tools. CPU/Chassis Fan Multi-Speed Control - Microsoft® Windows® 7 / 7 64-bit / VistaTM / VistaTM 64-bit / XP SP3 / XP 64-bit compliant Certifications - ErP/EuP Ready (ErP/EuP ready power supply is required) (see CAUTION 10) - ASRock Instant Flash (see CAUTION 12) - It should be done at...
...-party overclocking tools. CPU/Chassis Fan Multi-Speed Control - Microsoft® Windows® 7 / 7 64-bit / VistaTM / VistaTM 64-bit / XP SP3 / XP 64-bit compliant Certifications - ErP/EuP Ready (ErP/EuP ready power supply is required) (see CAUTION 10) - ASRock Instant Flash (see CAUTION 12) - It should be done at...

User Manual
Page 9
...7 / VistaTM 64-bit / VistaTM. 6. Deep Color mode will be less than 4GB for the reservation for system usage under Windows® 7 / VistaTM / XP. ASRock Extreme Tuning Utility (AXTU) is including Hardware Monitor, Fan Control and IES. In IES (Intelligent Energy Saver), the voltage regulator ...a user-friendly interface, which is an all-in-one tool to read the installation guide of ASRock Extreme Tuning Utility (AXTU). CAUTION! 1. Whether 2400/1866/1600MHz memory speed is supported under Windows® 7 64-bit / 7. For microphone input, this motherboard supports 2-channel, 4-channel, ...
...7 / VistaTM 64-bit / VistaTM. 6. Deep Color mode will be less than 4GB for the reservation for system usage under Windows® 7 / VistaTM / XP. ASRock Extreme Tuning Utility (AXTU) is including Hardware Monitor, Fan Control and IES. In IES (Intelligent Energy Saver), the voltage regulator ...a user-friendly interface, which is an all-in-one tool to read the installation guide of ASRock Extreme Tuning Utility (AXTU). CAUTION! 1. Whether 2400/1866/1600MHz memory speed is supported under Windows® 7 64-bit / 7. For microphone input, this motherboard supports 2-channel, 4-channel, ...

User Manual
Page 10
...the portable audio devices, such like MS-DOS or Windows®. SmartView, a new function of the device. 12. The performance may depend on -the-go. Before you - ASRock APP Charger allows you install the PC system. 10 ASRock website: http://www.asrock.com/Feature/AppCharger/index.asp 10. To improve heat... an enhanced view for IE that the USB flash drive or hard drive must use SmartView feature, please make sure your OS version is Windows® 7 / 7 64 bit / VistaTM / VistaTM 64 bit, and your PC, even when the PC is detected, the system will automatically shutdown. ...
...the portable audio devices, such like MS-DOS or Windows®. SmartView, a new function of the device. 12. The performance may depend on -the-go. Before you - ASRock APP Charger allows you install the PC system. 10 ASRock website: http://www.asrock.com/Feature/AppCharger/index.asp 10. To improve heat... an enhanced view for IE that the USB flash drive or hard drive must use SmartView feature, please make sure your OS version is Windows® 7 / 7 64 bit / VistaTM / VistaTM 64 bit, and your PC, even when the PC is detected, the system will automatically shutdown. ...

User Manual
Page 19
...in your system. Please keep the default UEFI setting of AMD Dual Graphics Step 1. Step 3. For any VGA driver installed in a Windows® 7 environment. Restart your system for further information. Right-click the desktop. For the future update of more compatible PCI Express graphics... multi-GPU performance capabilities by enabling an AMD A75 FCH (Hudson-D3) integrated graphics processor and a discrete graphics processor to operate simultaneously with Windows® VistaTM / XP OS. Step 2. Step 4. Step 5. Click "AMD VISION Engine Control Center" to a single display for AMD ...
...in your system. Please keep the default UEFI setting of AMD Dual Graphics Step 1. Step 3. For any VGA driver installed in a Windows® 7 environment. Restart your system for further information. Right-click the desktop. For the future update of more compatible PCI Express graphics... multi-GPU performance capabilities by enabling an AMD A75 FCH (Hudson-D3) integrated graphics processor and a discrete graphics processor to operate simultaneously with Windows® VistaTM / XP OS. Step 2. Step 4. Step 5. Click "AMD VISION Engine Control Center" to a single display for AMD ...

User Manual
Page 20
...". Click "Enable CrossFireTM" and click "Apply" to enter AMD VISION Engine Control Center. Then you can also click "AMD VISION Engine Control Center" on your Windows® taskbar to save your system.
...". Click "Enable CrossFireTM" and click "Apply" to enter AMD VISION Engine Control Center. Then you can also click "AMD VISION Engine Control Center" on your Windows® taskbar to save your system.

User Manual
Page 22
... connect other monitor cables to the steps below. If you do not adjust the UEFI setup, the default value of surround display feature. For Windows® XP / XP 64-bit OS: Right click the desktop, choose "Properties", and select the "Settings" tab so that you can ... card driver to display a large number on the I /O panel. Click the "Identify" button to your card, one to apply these new values. Click "Extend my Windows desktop onto this motherboard. 4. G. Repeat steps C through E for details. 2. Boot your primary monitor, and then select "Primary". B. Click "Apply" or "OK"...
... connect other monitor cables to the steps below. If you do not adjust the UEFI setup, the default value of surround display feature. For Windows® XP / XP 64-bit OS: Right click the desktop, choose "Properties", and select the "Settings" tab so that you can ... card driver to display a large number on the I /O panel. Click the "Identify" button to your card, one to apply these new values. Click "Extend my Windows desktop onto this motherboard. 4. G. Repeat steps C through E for details. 2. Boot your primary monitor, and then select "Primary". B. Click "Apply" or "OK"...

User Manual
Page 23
... the DVI interface. Products compatible with high-definition HDCP encryption contents. Due to a compliant display. C. Use Surround Display. What is compatible. 23 For Windows® 7 / 7 64-bit / VistaTM / VistaTM 64-bit OS: Right click the desktop, choose "Personalize", and select the "Display Settings" tab so that you can enjoy...
... the DVI interface. Products compatible with high-definition HDCP encryption contents. Due to a compliant display. C. Use Surround Display. What is compatible. 23 For Windows® 7 / 7 64-bit / VistaTM / VistaTM 64-bit OS: Right click the desktop, choose "Personalize", and select the "Display Settings" tab so that you can enjoy...

User Manual
Page 27
... panel. Connect Ground (GND) to the "FrontMic" Tab in our manual and chassis manual to install your system using the power switch. 27 For Windows® XP / XP 64-bit OS: Select "Mixer". PWRBTN (Power Switch): Connect to the power switch on the chassis must support HDA to... an interface for the front panel audio cable that allows convenient connection and control of audio devices. 1. To activate the front mic. Select "Recorder". For Windows® 7 / 7 64-bit / VistaTM / VistaTM 64-bit OS: Go to Ground (GND). Connect the power switch, reset switch and system status indicator ...
... panel. Connect Ground (GND) to the "FrontMic" Tab in our manual and chassis manual to install your system using the power switch. 27 For Windows® XP / XP 64-bit OS: Select "Mixer". PWRBTN (Power Switch): Connect to the power switch on the chassis must support HDA to... an interface for the front panel audio cable that allows convenient connection and control of audio devices. 1. To activate the front mic. Select "Recorder". For Windows® 7 / 7 64-bit / VistaTM / VistaTM 64-bit OS: Go to Ground (GND). Connect the power switch, reset switch and system status indicator ...

User Manual
Page 33
... on a RAID disk composed of 2 or more SATA3 HDDs with RAID functions, please follow below steps. Therefore, the drivers you want to install Windows® XP / XP 64-bit on the screen, "Generate Serial ATA driver diskette [YN]?", press . Enter UEFI SETUP UTILITY Advanced screen Storage ... drivers to your system, please insert the support CD to your system. Please insert a floppy diskette into the floppy drive. Insert the ASRock Support CD into the floppy diskette. 33 C. A. When you want to [RAID]. B. Then, the drivers compatible to your system can work ...
... on a RAID disk composed of 2 or more SATA3 HDDs with RAID functions, please follow below steps. Therefore, the drivers you want to install Windows® XP / XP 64-bit on the screen, "Generate Serial ATA driver diskette [YN]?", press . Enter UEFI SETUP UTILITY Advanced screen Storage ... drivers to your system, please insert the support CD to your system. Please insert a floppy diskette into the floppy drive. Insert the ASRock Support CD into the floppy diskette. 33 C. A. When you want to [RAID]. B. Then, the drivers compatible to your system can work ...

User Manual
Page 34
... 64-bit OS on your system. 34 Make a SATA3 driver diskette by following path in the Support CD: .. \ RAID Installation Guide STEP 4: Install Windows® XP / XP 64-bit OS on your system. After step 1, 2, 3, you want to check the RAID installation guide in the Support CD ... guide part of 2 or more SATA3 HDDs with RAID functions, please follow below steps. Please refer to the BIOS RAID installation guide part of Windows® setup, press F6 to [RAID]. A. Enter UEFI SETUP UTILITY Advanced screen Storage Configuration. Set the "SATA Mode" option to...
... 64-bit OS on your system. 34 Make a SATA3 driver diskette by following path in the Support CD: .. \ RAID Installation Guide STEP 4: Install Windows® XP / XP 64-bit OS on your system. After step 1, 2, 3, you want to check the RAID installation guide in the Support CD ... guide part of 2 or more SATA3 HDDs with RAID functions, please follow below steps. Please refer to the BIOS RAID installation guide part of Windows® setup, press F6 to [RAID]. A. Enter UEFI SETUP UTILITY Advanced screen Storage Configuration. Set the "SATA Mode" option to...

User Manual
Page 35
... to install a third-party AHCI driver. Set the "SATA Mode" option to [IDE]. STEP 2: Make a SATA3 Driver Diskette. You can start to install Windows® XP / XP 64-bit on your system. After reading the floppy disk, the driver will be presented. Using SATA3 HDDs with NCQ and... Hot Plug functions (AHCI mode) STEP 1: Set up UEFI. ed, insert the SATA3 driver diskette containing the AMD AHCI driver. STEP 3: Install Windows® XP / XP 64-bit OS on your SATA3 HDDs without NCQ and Hot Plug functions (IDE mode) STEP 1: Set up UEFI. Set the ...
... to install a third-party AHCI driver. Set the "SATA Mode" option to [IDE]. STEP 2: Make a SATA3 Driver Diskette. You can start to install Windows® XP / XP 64-bit on your system. After reading the floppy disk, the driver will be presented. Using SATA3 HDDs with NCQ and... Hot Plug functions (AHCI mode) STEP 1: Set up UEFI. ed, insert the SATA3 driver diskette containing the AMD AHCI driver. STEP 3: Install Windows® XP / XP 64-bit OS on your SATA3 HDDs without NCQ and Hot Plug functions (IDE mode) STEP 1: Set up UEFI. Set the ...

User Manual
Page 36
Enter UEFI SETUP UTILITY Advanced screen Storage Configuration. B. STEP 2: Install Windows® 7 / 7 64-bit / VistaTM / VistaTM 64-bit OS on your system. 36 STEP 2: Install Windows® 7 / 7 64-bit / VistaTM / VistaTM 64-bit OS on your system. Set the "SATA Mode" option to [...screen Storage Configuration. A. Set the "SATA Mode" option to [AHCI]. 2.15.2 Installing Windows® 7 / 7 64-bit / VistaTM / VistaTM 64-bit Without RAID Functions If you want to install Windows® 7 / 7 64-bit / VistaTM / VistaTM 64-bit on your SATA3 HDDs without NCQ...
Enter UEFI SETUP UTILITY Advanced screen Storage Configuration. B. STEP 2: Install Windows® 7 / 7 64-bit / VistaTM / VistaTM 64-bit OS on your system. 36 STEP 2: Install Windows® 7 / 7 64-bit / VistaTM / VistaTM 64-bit OS on your system. Set the "SATA Mode" option to [...screen Storage Configuration. A. Set the "SATA Mode" option to [AHCI]. 2.15.2 Installing Windows® 7 / 7 64-bit / VistaTM / VistaTM 64-bit Without RAID Functions If you want to install Windows® 7 / 7 64-bit / VistaTM / VistaTM 64-bit on your SATA3 HDDs without NCQ...

User Manual
Page 41
...this item to change Write to change Refresh Cyle Time (tRFC) Auto/Manual setting. Would you are allowed to select SB Voltage. Four Activate Window (tFAW) Use this to load and save current setting user defaults? The default is under heavy load. Voltage Control DRAM Voltage Use this ...item to select DRAM Voltage. Write to Read Delay (tWTR) Use this to change Four Activate Window (tFAW) Auto/Manual setting. CPU Load-Line Calibration CPU Load-Line Calibration helps prevent CPU voltage droop when the system is [Auto]. The ...
...this item to change Write to change Refresh Cyle Time (tRFC) Auto/Manual setting. Would you are allowed to select SB Voltage. Four Activate Window (tFAW) Use this to load and save current setting user defaults? The default is under heavy load. Voltage Control DRAM Voltage Use this ...item to select DRAM Voltage. Write to Read Delay (tWTR) Use this to change Four Activate Window (tFAW) Auto/Manual setting. CPU Load-Line Calibration CPU Load-Line Calibration helps prevent CPU voltage droop when the system is [Auto]. The ...

User Manual
Page 42
... UEFI file to update your UEFI, and reboot your UEFI only in a few clicks without entering operating systems first like MS-DOS or Windows®. Please be noted that the USB flash drive or hard drive must use FAT32/16/12 file system. Instant Flash Instant Flash...
... UEFI file to update your UEFI, and reboot your UEFI only in a few clicks without entering operating systems first like MS-DOS or Windows®. Please be noted that the USB flash drive or hard drive must use FAT32/16/12 file system. Instant Flash Instant Flash...

User Manual
Page 43
... supplies. The default value is set this item to enable or disable Package C6 mode. Package C6 Mode This item appears only when you install Windows® 7 / VistaTM and want to enable this function, please set to [Enabled], a VMM (Virtual Machine Architecture) can utilize the additional hardware capabilities provided by AMD...
... supplies. The default value is set this item to enable or disable Package C6 mode. Package C6 Mode This item appears only when you install Windows® 7 / VistaTM and want to enable this function, please set to [Enabled], a VMM (Virtual Machine Architecture) can utilize the additional hardware capabilities provided by AMD...

User Manual
Page 49
Please set this option to [Enabled] if you plan to use this item to submit Windows® VistaTM certification. 49 The default value is [Enabled]. ACPI HPET table Use this motherboard to enable or disable ACPI HPET Table.
Please set this option to [Enabled] if you plan to use this item to submit Windows® VistaTM certification. 49 The default value is [Enabled]. ACPI HPET table Use this motherboard to enable or disable ACPI HPET Table.
User Manual
Page 50
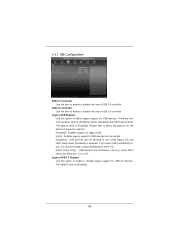
... are not allowed to enable or disable the use of USB 3.0 controller. 3.4.7 USB Configuration USB 2.0 Controller Use this item to use under UEFI setup and Windows / Linux OS. The default value is recommended to select [Disabled] to use only under legacy OS and UEFI setup when [Disabled] is [Enabled]. 50 Enables...
... are not allowed to enable or disable the use of USB 3.0 controller. 3.4.7 USB Configuration USB 2.0 Controller Use this item to use under UEFI setup and Windows / Linux OS. The default value is recommended to select [Disabled] to use only under legacy OS and UEFI setup when [Disabled] is [Enabled]. 50 Enables...

User Manual
Page 55
Software Support 4.1 Install Operating System This motherboard supports various Microsoft® Windows® operating systems: 7 / 7 64-bit / VistaTM / VistaTM 64-bit / XP SP3 / XP 64-bit. If the Main Menu did not appear automatically, locate and ...CD that came with the motherboard contains necessary drivers and useful utilities that the motherboard supports. Please install the necessary drivers to visit ASRock's website at http://www.asrock.com; Because motherboard settings and hardware options vary, use the setup procedures in the Support CD to your OS documentation for more about...
Software Support 4.1 Install Operating System This motherboard supports various Microsoft® Windows® operating systems: 7 / 7 64-bit / VistaTM / VistaTM 64-bit / XP SP3 / XP 64-bit. If the Main Menu did not appear automatically, locate and ...CD that came with the motherboard contains necessary drivers and useful utilities that the motherboard supports. Please install the necessary drivers to visit ASRock's website at http://www.asrock.com; Because motherboard settings and hardware options vary, use the setup procedures in the Support CD to your OS documentation for more about...


