
User Manual
Page 3
... 15 Pre-installation Precautions 15 2.1 CPU Installation 16 2.2 Installation of CPU Fan and Heatsink 16 2.3 Installation of Memory Modules (DIMM 17 2.4 Expansion Slot (PCI Express Slot 18 2.5 Dual Graphics Operation Guide 19 2.6 Dual Monitor and Surround Display Features 21 2.7 ASRock Smart Remote Installation Guide 24 2.8 Jumpers Setup 25 2.9 Onboard Headers and Connectors...
... 15 Pre-installation Precautions 15 2.1 CPU Installation 16 2.2 Installation of CPU Fan and Heatsink 16 2.3 Installation of Memory Modules (DIMM 17 2.4 Expansion Slot (PCI Express Slot 18 2.5 Dual Graphics Operation Guide 19 2.6 Dual Monitor and Surround Display Features 21 2.7 ASRock Smart Remote Installation Guide 24 2.8 Jumpers Setup 25 2.9 Onboard Headers and Connectors...

User Manual
Page 10
...even when the PC is turned off (S5). To improve heat dissipation, remember to spray thermal grease between the CPU and the heatsink when you to quickly charge many Apple devices simultaneously and even supports continuous charging when your computer and up to RAM (S3), ...will automatically shutdown. With APP Charger driver installed, you - 9. If you desire a faster, less restricted way of the device. 12. ASRock APP Charger. LAN Application Prioritization: You can easily recognize which includes below bene ts. Before you keep in Game: After setting online game priority...
...even when the PC is turned off (S5). To improve heat dissipation, remember to spray thermal grease between the CPU and the heatsink when you to quickly charge many Apple devices simultaneously and even supports continuous charging when your computer and up to RAM (S3), ...will automatically shutdown. With APP Charger driver installed, you - 9. If you desire a faster, less restricted way of the device. 12. ASRock APP Charger. LAN Application Prioritization: You can easily recognize which includes below bene ts. Before you keep in Game: After setting online game priority...

User Manual
Page 12
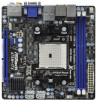
...) 5 COM Port Header (COM1) 18 USB 2.0 Header (USB_67, Blue) 6 Chassis Fan Connector (CHA_FAN1) 19 Consumer Infrared Module Header (CIR1) 7 CPU Heatsink Retention Module 20 Front Panel Audio Header (HD_AUDIO1, White) 8 CPU Socket 21 ATX 12V Power Connector (ATX12V1) 9 System Panel Header (PANEL1, White) 22 ...: CTR BASS Center: REAR SPK Bottom: Optical SPDIF CLRCMOS1 1 1 HDMI_SPDIF1 AUDIO CODEC HD_AUDIO1 1 ATX12V1 USB_89 1 1 CIR1 1 USB_67 32Mb BIOS A75M-ITX PCIE1 AMD A75 FCH (Hudson-D3) Chipset 13 14 17.0cm (6.7-in) 21 20 19 18 17 16 15 1 CPU Fan Connector (CPU_FAN1)...
...) 5 COM Port Header (COM1) 18 USB 2.0 Header (USB_67, Blue) 6 Chassis Fan Connector (CHA_FAN1) 19 Consumer Infrared Module Header (CIR1) 7 CPU Heatsink Retention Module 20 Front Panel Audio Header (HD_AUDIO1, White) 8 CPU Socket 21 ATX 12V Power Connector (ATX12V1) 9 System Panel Header (PANEL1, White) 22 ...: CTR BASS Center: REAR SPK Bottom: Optical SPDIF CLRCMOS1 1 1 HDMI_SPDIF1 AUDIO CODEC HD_AUDIO1 1 ATX12V1 USB_89 1 1 CIR1 1 USB_67 32Mb BIOS A75M-ITX PCIE1 AMD A75 FCH (Hudson-D3) Chipset 13 14 17.0cm (6.7-in) 21 20 19 18 17 16 15 1 CPU Fan Connector (CPU_FAN1)...
User Manual
Page 16
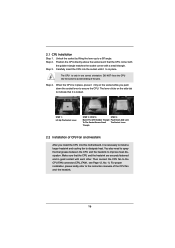
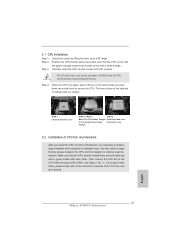
... install the CPU into the socket to the instruction manuals of the pins. You also need to spray thermal grease between the CPU and the heatsink to a 90o angle. Step 3. Carefully insert the CPU into the socket until it is locked. Make sure that the CPU corner with the golden ...triangle matches the socket corner with each other. For proper installation, please kindly refer to avoid bending of the CPU fan and the heatsink. 16 Then connect the CPU fan to secure the CPU. Lever 90° Up STEP 1: Lift Up The Socket Lever CPU Golden Triangle Socket ...
... install the CPU into the socket to the instruction manuals of the pins. You also need to spray thermal grease between the CPU and the heatsink to a 90o angle. Step 3. Carefully insert the CPU into the socket until it is locked. Make sure that the CPU corner with the golden ...triangle matches the socket corner with each other. For proper installation, please kindly refer to avoid bending of the CPU fan and the heatsink. 16 Then connect the CPU fan to secure the CPU. Lever 90° Up STEP 1: Lift Up The Socket Lever CPU Golden Triangle Socket ...

Quick Installation Guide
Page 2
...Header (COM1) 18 USB 2.0 Header (USB_67, Blue) 6 Chassis Fan Connector (CHA_FAN1) 19 Consumer Infrared Module Header (CIR1) 7 CPU Heatsink Retention Module 20 Front Panel Audio Header (HD_AUDIO1, White) 8 CPU Socket 21 ATX 12V Power Connector (ATX12V1) 9 System Panel Header (... 240-pin DDR3 DIMM Slots 12 SATA3 Connector (SATA3_1, White) (Dual Channel: DDR3_A1, DDR3_B1; Blue) 13 SATA3 Connector (SATA3_2, White) English 2 ASRock A75M-ITX Motherboard Motherboard Layout 12 3 17.0cm (6.7-in) 24 CPU_FAN1 CPU_FAN2 AT X P W R 1 DDR3_B1 (64 bit, 240-FpSin Bm8od0u0le) 1 4 ...
...Header (COM1) 18 USB 2.0 Header (USB_67, Blue) 6 Chassis Fan Connector (CHA_FAN1) 19 Consumer Infrared Module Header (CIR1) 7 CPU Heatsink Retention Module 20 Front Panel Audio Header (HD_AUDIO1, White) 8 CPU Socket 21 ATX 12V Power Connector (ATX12V1) 9 System Panel Header (... 240-pin DDR3 DIMM Slots 12 SATA3 Connector (SATA3_1, White) (Dual Channel: DDR3_A1, DDR3_B1; Blue) 13 SATA3 Connector (SATA3_2, White) English 2 ASRock A75M-ITX Motherboard Motherboard Layout 12 3 17.0cm (6.7-in) 24 CPU_FAN1 CPU_FAN2 AT X P W R 1 DDR3_B1 (64 bit, 240-FpSin Bm8od0u0le) 1 4 ...

Quick Installation Guide
Page 10
...or mobile phone to 40% faster than ever. While CPU overheat is IE8. ASRock APP Charger. ASRock On/Off Play Technology allows users to spray thermal grease between the CPU and the heatsink when you - To improve heat dissipation, remember to enjoy the great audio experience... from your Apple devices, such as iPhone/iPod/iPad Touch, ASRock has prepared a wonderful solution for you install the PC system. 10 ASRock A75M-ITX Motherboard English Simply installing ...
...or mobile phone to 40% faster than ever. While CPU overheat is IE8. ASRock APP Charger. ASRock On/Off Play Technology allows users to spray thermal grease between the CPU and the heatsink when you - To improve heat dissipation, remember to enjoy the great audio experience... from your Apple devices, such as iPhone/iPod/iPad Touch, ASRock has prepared a wonderful solution for you install the PC system. 10 ASRock A75M-ITX Motherboard English Simply installing ...
Quick Installation Guide
Page 13
... until it is locked. When the CPU is in one correct orientation. You also need to spray thermal grease between the CPU and the heatsink to a 90 angle. Then connect the CPU fan to dissipate heat. For proper installation, please kindly refer to the instruction manuals of CPU...a small triangle. The CPU fits only in place, press it is necessary to install a larger heatsink and cooling fan to the CPU FAN connector (CPU_FAN1, see Page 2, No. 1). English 13 ASRock A75M-ITX Motherboard Position the CPU directly above the socket such that it firmly on the side tab to...
... until it is locked. When the CPU is in one correct orientation. You also need to spray thermal grease between the CPU and the heatsink to a 90 angle. Then connect the CPU fan to dissipate heat. For proper installation, please kindly refer to the instruction manuals of CPU...a small triangle. The CPU fits only in place, press it is necessary to install a larger heatsink and cooling fan to the CPU FAN connector (CPU_FAN1, see Page 2, No. 1). English 13 ASRock A75M-ITX Motherboard Position the CPU directly above the socket such that it firmly on the side tab to...
