
User Manual
Page 3
... 64-bit / VistaTM / VistaTM 64-bit / XP / XP 64-bit With RAID Functions 38 2.14.1 Installing Windows® XP / XP 64-bit With RAID Functions 38 2.14.2 Installing Windows® 7 / 7 64-bit / VistaTM / VistaTM 64-bit With RAID Functions 39 2.15 Installing Windows® 7 / 7 64-bit / VistaTM / ...VistaTM 64-bit / XP / XP 64-bit Without RAID Functions 40 2.15.1 Installing Windows® XP / XP 64-bit Without RAID Functions 40 2.15.2 Installing Windows® 7 / 7 64-bit...
... 64-bit / VistaTM / VistaTM 64-bit / XP / XP 64-bit With RAID Functions 38 2.14.1 Installing Windows® XP / XP 64-bit With RAID Functions 38 2.14.2 Installing Windows® 7 / 7 64-bit / VistaTM / VistaTM 64-bit With RAID Functions 39 2.15 Installing Windows® 7 / 7 64-bit / VistaTM / ...VistaTM 64-bit / XP / XP 64-bit Without RAID Functions 40 2.15.1 Installing Windows® XP / XP 64-bit Without RAID Functions 40 2.15.2 Installing Windows® 7 / 7 64-bit...

User Manual
Page 7
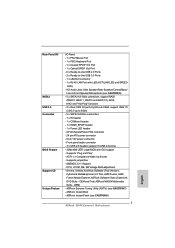
...ASRock MAGIX Multimedia Suite - OEM) 7 CPU/Chassis/Power FAN connector - 24 pin ATX power connector - 8 pin 12V power connector - ACPI 1.1 Compliance Wake Up Events - CPU, VCCM, NB, SB Voltage Multi-adjustment - HD Audio Jack: Side Speaker/Rear Speaker/Central/Bass/ Line in/Front Speaker/Microphone (see CAUTION 6) - 5 x SATA3 6.0 Gb/s connectors, support RAID (RAID 0, RAID 1, RAID... 5, and RAID 10), NCQ, AHCI and "Hot Plug" functions - 2 x Rear USB 3.0 ports by Etron EJ168A...
...ASRock MAGIX Multimedia Suite - OEM) 7 CPU/Chassis/Power FAN connector - 24 pin ATX power connector - 8 pin 12V power connector - ACPI 1.1 Compliance Wake Up Events - CPU, VCCM, NB, SB Voltage Multi-adjustment - HD Audio Jack: Side Speaker/Rear Speaker/Central/Bass/ Line in/Front Speaker/Microphone (see CAUTION 6) - 5 x SATA3 6.0 Gb/s connectors, support RAID (RAID 0, RAID 1, RAID... 5, and RAID 10), NCQ, AHCI and "Hot Plug" functions - 2 x Rear USB 3.0 ports by Etron EJ168A...

User Manual
Page 35
... system is still power-on this motherboard for SATA3 in working condition. 35 However, please note that supports Serial ATA3 (SATA3) hard disks and RAID (RAID 0, RAID 1, RAID 5 and RAID 10) functions. STEP 1: Install the SATA3 hard disks into the SATA3 HDD. This section will guide you to the SATA3 hard disk. If ...the SATA3 HDDs are built as RAID 1 or RAID 5 then it cannot perform Hot Plug if the OS has been installed into the drive bays of the SATA data cable to insert and...
... system is still power-on this motherboard for SATA3 in working condition. 35 However, please note that supports Serial ATA3 (SATA3) hard disks and RAID (RAID 0, RAID 1, RAID 5 and RAID 10) functions. STEP 1: Install the SATA3 hard disks into the SATA3 HDD. This section will guide you to the SATA3 hard disk. If ...the SATA3 HDDs are built as RAID 1 or RAID 5 then it cannot perform Hot Plug if the OS has been installed into the drive bays of the SATA data cable to insert and...

User Manual
Page 36
... HDD 1x4-pin conventional power connector (White) connects to reduce the risk of our motherboard is indicated in RAID / AHCI mode. Below operation procedure is available on our website: www.asrock.com 2. A. 7-pin SATA data cable B. Points of Hot Plug feature carefully. The latest SATA3 driver... is designed only for SATA3 HDD in the product spec on our support website: www.asrock.com 4. Please follow below operation guide of attention, before you process the SATA3 HDD Hot Plug, please check below cable accessories from...
... HDD 1x4-pin conventional power connector (White) connects to reduce the risk of our motherboard is indicated in RAID / AHCI mode. Below operation procedure is available on our website: www.asrock.com 2. A. 7-pin SATA data cable B. Points of Hot Plug feature carefully. The latest SATA3 driver... is designed only for SATA3 HDD in the product spec on our support website: www.asrock.com 4. Please follow below operation guide of attention, before you process the SATA3 HDD Hot Plug, please check below cable accessories from...

User Manual
Page 38
... on the screen, "Generate Serial ATA driver diskette [YN]?", press . During POST at the beginning of 2 or more SATA3 HDDs with RAID functions, please follow the procedures below . Then you see these messages, Please insert a diskette into the floppy diskette. 38 WARNING! Start to...SATA3 drivers into the floppy drive. STEP 2: Make a SATA3 Driver Diskette. (Please use an USB floppy or a floppy disk.) A. Insert the ASRock Support CD into the floppy drive, and press any key. C. B. B. D. STEP 1: Set up , press the key, and then a window for boot ...
... on the screen, "Generate Serial ATA driver diskette [YN]?", press . During POST at the beginning of 2 or more SATA3 HDDs with RAID functions, please follow the procedures below . Then you see these messages, Please insert a diskette into the floppy diskette. 38 WARNING! Start to...SATA3 drivers into the floppy drive. STEP 2: Make a SATA3 Driver Diskette. (Please use an USB floppy or a floppy disk.) A. Insert the ASRock Support CD into the floppy drive, and press any key. C. B. B. D. STEP 1: Set up , press the key, and then a window for boot ...

User Manual
Page 39
...UEFI SETUP UTILITY Advanced screen Storage Configuration. Before you start to configure RAID function, you need to set RAID configuration. tem. 39 STEP 3: Use "RAID Installation Guide" to check the RAID installation guide in the Support CD for proper configuration. B. STEP 4: Install Windows... Windows® 7 / 7 64-bit / VistaTM / VistaTM 64-bit on your sys- STEP 1: Set up UEFI. Please refer to check the RAID installation guide in the Support CD for proper configuration. After step 1, 2, 3, you want to install Windows® XP / XP 64-bit...
...UEFI SETUP UTILITY Advanced screen Storage Configuration. Before you start to configure RAID function, you need to set RAID configuration. tem. 39 STEP 3: Use "RAID Installation Guide" to check the RAID installation guide in the Support CD for proper configuration. B. STEP 4: Install Windows... Windows® 7 / 7 64-bit / VistaTM / VistaTM 64-bit on your sys- STEP 1: Set up UEFI. Please refer to check the RAID installation guide in the Support CD for proper configuration. After step 1, 2, 3, you want to install Windows® XP / XP 64-bit...

User Manual
Page 40
...to install according to install Windows® XP / XP 64-bit on your SATA3 HDDs without RAID functions, please follow the procedures below . Enter UEFI SETUP UTILITY Advanced screen Storage Configuration...2.15 Installing Windows® 7 / 7 64-bit / VistaTM / VistaTM 64-bit / XP / XP 64-bit Without RAID Functions If you want to install Windows® 7 / 7 64-bit / VistaTM / VistaTM 64-bit / XP / XP 64bit ...to the OS you install. 2.15.1 Installing Windows® XP / XP 64-bit Without RAID Functions If you want to the OS you install. Enter UEFI SETUP UTILITY Advanced screen Storage Con...
...to install according to install Windows® XP / XP 64-bit on your SATA3 HDDs without RAID functions, please follow the procedures below . Enter UEFI SETUP UTILITY Advanced screen Storage Configuration...2.15 Installing Windows® 7 / 7 64-bit / VistaTM / VistaTM 64-bit / XP / XP 64-bit Without RAID Functions If you want to install Windows® 7 / 7 64-bit / VistaTM / VistaTM 64-bit / XP / XP 64bit ...to the OS you install. 2.15.1 Installing Windows® XP / XP 64-bit Without RAID Functions If you want to the OS you install. Enter UEFI SETUP UTILITY Advanced screen Storage Con...

User Manual
Page 41
...VistaTM 64-bit OS on your SATA3 HDDs without NCQ and Hot Plug functions (IDE mode) STEP 1: Set up UEFI. tem. Using SATA3 HDDs without RAID functions, please follow below steps. Set the option "SATA Mode" to [AHCI]. 2.15.2 Installing Windows® 7 / 7 64-bit / VistaTM / VistaTM 64-...bit Without RAID Functions If you want to install Windows® 7 / 7 64-bit / VistaTM / VistaTM 64-bit on your sys- Before you apply Untied Overclocking Technology. 41...
...VistaTM 64-bit OS on your SATA3 HDDs without NCQ and Hot Plug functions (IDE mode) STEP 1: Set up UEFI. tem. Using SATA3 HDDs without RAID functions, please follow below steps. Set the option "SATA Mode" to [AHCI]. 2.15.2 Installing Windows® 7 / 7 64-bit / VistaTM / VistaTM 64-...bit Without RAID Functions If you want to install Windows® 7 / 7 64-bit / VistaTM / VistaTM 64-bit on your sys- Before you apply Untied Overclocking Technology. 41...
User Manual
Page 52
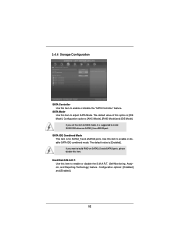
3.4.4 Storage Configuration SATA Controller Use this item to enable or disable SATA IDE combined mode. Configuration options: [AHCI Mode], [RAID Mode] and [IDE Mode]. The default value of this option is [Enabled]. The default value is [IDE Mode]. Use this item. Hard Disk S.M.A.R.T. SATA IDE ...;guration options: [Disabled] and [Enabled]. 52 If you want to enable or disable the S.M.A.R.T. (Self-Monitoring, Analysis, and Reporting Technology) feature. Use this item to RAID mode, it is for SATA3_5 and eSATA3 ports. If you set this item to build...
3.4.4 Storage Configuration SATA Controller Use this item to enable or disable SATA IDE combined mode. Configuration options: [AHCI Mode], [RAID Mode] and [IDE Mode]. The default value of this option is [Enabled]. The default value is [IDE Mode]. Use this item. Hard Disk S.M.A.R.T. SATA IDE ...;guration options: [Disabled] and [Enabled]. 52 If you want to enable or disable the S.M.A.R.T. (Self-Monitoring, Analysis, and Reporting Technology) feature. Use this item to RAID mode, it is for SATA3_5 and eSATA3 ports. If you set this item to build...

User Manual
Page 63
Choose onboard RAID 3TB+ unlocker > UEFI Mode For GPT partition. Press to install the operating system. 1. Press or at system POST. Key in dh [Drv number], for example ...[B5] Lang[eng] 6. Please make sure to be installed on a HDD Larger Than 2TB in dh 4E. 63 Key in drvcfg, for example: key in RAID Mode This motherboard adopts UEFI BIOS that allows Windows® OS to use Windows® VistaTM 64-bit (with SP1 or above) or Windows®...
Choose onboard RAID 3TB+ unlocker > UEFI Mode For GPT partition. Press to install the operating system. 1. Press or at system POST. Key in dh [Drv number], for example ...[B5] Lang[eng] 6. Please make sure to be installed on a HDD Larger Than 2TB in dh 4E. 63 Key in drvcfg, for example: key in RAID Mode This motherboard adopts UEFI BIOS that allows Windows® OS to use Windows® VistaTM 64-bit (with SP1 or above) or Windows®...

User Manual
Page 64
And then key in drvcfg -s 4E B5. 8. 7. Choose Logical Drive Create Menu to enter Raid Utility. Choose Usable Physical Drive List to set up Raid Drive. 9. For example: key in drvcfg -s [Drv number] [Ctrl number] to create a Raid Drive. 10. Choose Logical Drive Main Menu to select Raid HDD. 64
And then key in drvcfg -s 4E B5. 8. 7. Choose Logical Drive Create Menu to enter Raid Utility. Choose Usable Physical Drive List to set up Raid Drive. 9. For example: key in drvcfg -s [Drv number] [Ctrl number] to create a Raid Drive. 10. Choose Logical Drive Main Menu to select Raid HDD. 64

User Manual
Page 65
After set up Raid size, please click Start to enter Boot Manual. Choose UEFI: SCSI CD/DVD Drive. * This option only shows on keyboard to exit Utility. 15. Choose Ld Size setting, and key in the Raid size. 13. During reboot, please press to Create. 14. Press to toggle checkbox. 12. Press Space on Windows® 7 64-bit and VistaTM 64-bit OS. 65 11.
After set up Raid size, please click Start to enter Boot Manual. Choose UEFI: SCSI CD/DVD Drive. * This option only shows on keyboard to exit Utility. 15. Choose Ld Size setting, and key in the Raid size. 13. During reboot, please press to Create. 14. Press to toggle checkbox. 12. Press Space on Windows® 7 64-bit and VistaTM 64-bit OS. 65 11.
Quick Installation Guide
Page 7
...- 1 x Power LED header - CPU, VCCM, NB, SB Voltage Multi-adjustment - ASRock Extreme Tuning Utility (AXTU) (see CAUTION 8) English 7 ASRock 990FX Extreme3 Motherboard Front panel audio connector - 3 x USB 2.0 headers (support 6 USB 2.0 ports...ASRock Instant Flash (see CAUTION 7) - OEM) - Supports jumperfree - CPU/Chassis/Power FAN connector - 24 pin ATX power connector - 8 pin 12V power connector - HD Audio Jack: Side Speaker/Rear Speaker/Central/Bass/ Line in/Front Speaker/Microphone (see CAUTION 6) - 5 x SATA3 6.0 Gb/s connectors, support RAID (RAID 0, RAID 1, RAID 5 and RAID...
...- 1 x Power LED header - CPU, VCCM, NB, SB Voltage Multi-adjustment - ASRock Extreme Tuning Utility (AXTU) (see CAUTION 8) English 7 ASRock 990FX Extreme3 Motherboard Front panel audio connector - 3 x USB 2.0 headers (support 6 USB 2.0 ports...ASRock Instant Flash (see CAUTION 7) - OEM) - Supports jumperfree - CPU/Chassis/Power FAN connector - 24 pin ATX power connector - 8 pin 12V power connector - HD Audio Jack: Side Speaker/Rear Speaker/Central/Bass/ Line in/Front Speaker/Microphone (see CAUTION 6) - 5 x SATA3 6.0 Gb/s connectors, support RAID (RAID 0, RAID 1, RAID 5 and RAID...

Quick Installation Guide
Page 32
...your SATA3 HDDs without NCQ and Hot Plug functions (IDE mode) STEP 1: Set up to bottom side to [IDE]. Using SATA3 HDDs without RAID functions, please follow the order from up UEFI. Then, the drivers compatible to your optical drive first. Please follow below procedures according... RAID functions, please follow below steps. B.Set the option "SATA Mode" to install those required drivers. Therefore, the drivers you install can be auto-detected and listed on the support CD driver page. STEP 2: Install Windows® XP / XP 64-bit OS on your system. 32 ASRock 990FX Extreme3 ...
...your SATA3 HDDs without NCQ and Hot Plug functions (IDE mode) STEP 1: Set up to bottom side to [IDE]. Using SATA3 HDDs without RAID functions, please follow the order from up UEFI. Then, the drivers compatible to your optical drive first. Please follow below procedures according... RAID functions, please follow below steps. B.Set the option "SATA Mode" to install those required drivers. Therefore, the drivers you install can be auto-detected and listed on the support CD driver page. STEP 2: Install Windows® XP / XP 64-bit OS on your system. 32 ASRock 990FX Extreme3 ...

Quick Installation Guide
Page 33
.... A.Enter UEFI SETUP UTILITY Advanced screen Storage Configuration. 2.12.2 Installing Windows® 7 / 7 64-bit / VistaTM / VistaTM 64-bit Without RAID Functions If you apply Untied Overclocking Technology. 33 ASRock 990FX Extreme3 Motherboard English B.Set the option "SATA Mode" to [AHCI]. STEP 2: Install Windows® 7 / 7 64-bit / VistaTM / VistaTM 64-bit OS on...
.... A.Enter UEFI SETUP UTILITY Advanced screen Storage Configuration. 2.12.2 Installing Windows® 7 / 7 64-bit / VistaTM / VistaTM 64-bit Without RAID Functions If you apply Untied Overclocking Technology. 33 ASRock 990FX Extreme3 Motherboard English B.Set the option "SATA Mode" to [AHCI]. STEP 2: Install Windows® 7 / 7 64-bit / VistaTM / VistaTM 64-bit OS on...

Quick Installation Guide
Page 177
...enter Boot Manual. Press or at system POST. Key in dh 4E. 177 ASRock 990FX Extreme3 Motherboard English Please follow below : Drv[4E] Ctrl[B5] Lang[eng] 6. Set RAID Mode in EFI Shell. 5. Choose UEFI : Built - Choose onboard RAID 3TB+ unlocker > UEFI Mode For GPT partition. in UEFI Setup Utility > Advanced...figuration > SATA Mode. 3. Installing OS on a large size HDD (>2TB). Press to be installed on a HDD Larger Than 2TB in RAID Mode This motherboard is adopting UEFI BIOS that allows Windows® OS to save the change and exit. 4. Please make sure to use Windows®...
...enter Boot Manual. Press or at system POST. Key in dh 4E. 177 ASRock 990FX Extreme3 Motherboard English Please follow below : Drv[4E] Ctrl[B5] Lang[eng] 6. Set RAID Mode in EFI Shell. 5. Choose UEFI : Built - Choose onboard RAID 3TB+ unlocker > UEFI Mode For GPT partition. in UEFI Setup Utility > Advanced...figuration > SATA Mode. 3. Installing OS on a large size HDD (>2TB). Press to be installed on a HDD Larger Than 2TB in RAID Mode This motherboard is adopting UEFI BIOS that allows Windows® OS to save the change and exit. 4. Please make sure to use Windows®...

Quick Installation Guide
Page 178
And then key in drvcfg -s 4E B5. 8. Choose Logical Drive Main Menu to select Raid HDD. 178 ASRock 990FX Extreme3 Motherboard English Choose Usable Physical Drive List to set up Raid Drive. 9. 7. Choose Logical Drive Create Menu to enter Raid Utility. For example: key in drvcfg -s [Drv number] [Ctrl number] to create a Raid Drive. 10.
And then key in drvcfg -s 4E B5. 8. Choose Logical Drive Main Menu to select Raid HDD. 178 ASRock 990FX Extreme3 Motherboard English Choose Usable Physical Drive List to set up Raid Drive. 9. 7. Choose Logical Drive Create Menu to enter Raid Utility. For example: key in drvcfg -s [Drv number] [Ctrl number] to create a Raid Drive. 10.

Quick Installation Guide
Page 179
Press Space on Windows® 7 64-bit and VistaTM 64-bit OS. 179 ASRock 990FX Extreme3 Motherboard English Press to toggle checkbox. 12. 11. After set up Raid size, please click Start to enter Boot Manual. Choose UEFI: SCSI CD/DVD Drive. * This option only shows on keyboard to exit Utility. 15. During reboot, please press to Create. 14. Choose Ld Size setting, and key in the Raid size. 13.
Press Space on Windows® 7 64-bit and VistaTM 64-bit OS. 179 ASRock 990FX Extreme3 Motherboard English Press to toggle checkbox. 12. 11. After set up Raid size, please click Start to enter Boot Manual. Choose UEFI: SCSI CD/DVD Drive. * This option only shows on keyboard to exit Utility. 15. During reboot, please press to Create. 14. Choose Ld Size setting, and key in the Raid size. 13.

RAID Installation Guide
Page 1
... 2.6 Secure Connection 14 2.7 Creating a New Logical Drive 15 2.8 Connecting to RAID 2 1.2 RAID Configurations Precautions 3 1.3 Installing Windows® 7 / 7 64-bit / VistaTM / VistaTM 64-bit / XP / XP 64-bit With RAID Funtions ...4 1.3.1 1.3.2 Installing Windows® 7 / 7 64-bit / VistaTM... / VistaTM 64-bit With RAID Funtions 4 Installing Windows® XP / XP 64-bit With RAID Funtions 5 1.4 Create Disk Array 7 2. AMD BIOS RAID Installation Guide 2 1.1 Introduction to ...
... 2.6 Secure Connection 14 2.7 Creating a New Logical Drive 15 2.8 Connecting to RAID 2 1.2 RAID Configurations Precautions 3 1.3 Installing Windows® 7 / 7 64-bit / VistaTM / VistaTM 64-bit / XP / XP 64-bit With RAID Funtions ...4 1.3.1 1.3.2 Installing Windows® 7 / 7 64-bit / VistaTM... / VistaTM 64-bit With RAID Funtions 4 Installing Windows® XP / XP 64-bit With RAID Funtions 5 1.4 Create Disk Array 7 2. AMD BIOS RAID Installation Guide 2 1.1 Introduction to ...

RAID Installation Guide
Page 2
...provide any HDDs of data from one drive to read and write data in the other drive if one logical unit. RAID 1 (Data Mirroring) RAID 1 is called data mirroring that optimizes two identical hard disk drives to a second drive. For optimal performance, please install...data. Hot-Plug any fault tolerance. This organization increases performance by accessing multiple physical drives simultaneously for improved performance 2 RAID 10 (Stripe Mirroring) RAID 0 drives can be mirrored using the onboard FastBuild BIOS utility under BIOS environment. In the event of the same...
...provide any HDDs of data from one drive to read and write data in the other drive if one logical unit. RAID 1 (Data Mirroring) RAID 1 is called data mirroring that optimizes two identical hard disk drives to a second drive. For optimal performance, please install...data. Hot-Plug any fault tolerance. This organization increases performance by accessing multiple physical drives simultaneously for improved performance 2 RAID 10 (Stripe Mirroring) RAID 0 drives can be mirrored using the onboard FastBuild BIOS utility under BIOS environment. In the event of the same...


