
User Manual
Page 1
985GM-GS3 FX / 985GM-S3 FX User Manual Version 1.0 Published September 2011 Copyright©2011 ASRock INC. All rights reserved. 1
985GM-GS3 FX / 985GM-S3 FX User Manual Version 1.0 Published September 2011 Copyright©2011 ASRock INC. All rights reserved. 1

User Manual
Page 2
...but not limited to infringe. When you discard the Lithium battery in California, USA, please follow the related regulations in the manual or product. ASRock assumes no event shall ASRock, its directors, officers, employees, or agents be liable for any indirect, special, incidental, or consequential damages (including damages for... Perchlorate Best Management Practices (BMP) regulations passed by the purchaser for identification or explanation and to the contents of this manual, ASRock does not provide warranty of any interference received, including interference that may appear in this...
...but not limited to infringe. When you discard the Lithium battery in California, USA, please follow the related regulations in the manual or product. ASRock assumes no event shall ASRock, its directors, officers, employees, or agents be liable for any indirect, special, incidental, or consequential damages (including damages for... Perchlorate Best Management Practices (BMP) regulations passed by the purchaser for identification or explanation and to the contents of this manual, ASRock does not provide warranty of any interference received, including interference that may appear in this...

User Manual
Page 5
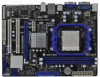
.../support/index.asp 1.1 Package Contents ASRock 985GM-GS3 FX / 985GM-S3 FX Motherboard (Micro ATX Form Factor: 9.6-in x 7.2-in, 24.4 cm x 18.3 cm) ASRock 985GM-GS3 FX / 985GM-S3 FX Quick Installation Guide ASRock 985GM-GS3 FX / 985GM-S3 FX Support CD 2 x Serial ATA (SATA) Data Cables (Optional) 1 x I/O Panel Shield 5 In case any modifications of the motherboard and step-bystep guide to this manual occur, the updated version will...
.../support/index.asp 1.1 Package Contents ASRock 985GM-GS3 FX / 985GM-S3 FX Motherboard (Micro ATX Form Factor: 9.6-in x 7.2-in, 24.4 cm x 18.3 cm) ASRock 985GM-GS3 FX / 985GM-S3 FX Quick Installation Guide ASRock 985GM-GS3 FX / 985GM-S3 FX Support CD 2 x Serial ATA (SATA) Data Cables (Optional) 1 x I/O Panel Shield 5 In case any modifications of the motherboard and step-bystep guide to this manual occur, the updated version will...

User Manual
Page 15
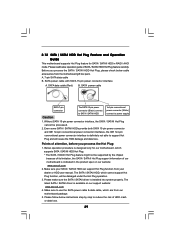
... up to improve heat dissipation. Carefully insert the CPU into this motherboard, it is necessary to install a larger heatsink and cooling fan to the instruction manuals of the pins. Lever 90° Up STEP 1: Lift Up The Socket Lever CPU Golden Triangle Socker Corner Small Triangle STEP 2 / STEP 3: Match The CPU...
... up to improve heat dissipation. Carefully insert the CPU into this motherboard, it is necessary to install a larger heatsink and cooling fan to the instruction manuals of the pins. Lever 90° Up STEP 1: Lift Up The Socket Lever CPU Golden Triangle Socker Corner Small Triangle STEP 2 / STEP 3: Match The CPU...

User Manual
Page 24
... this motherboard. To activate the front mic. For Windows® 7 / 7 64-bit / VistaTM / VistaTM 64-bit OS: Go to the "FrontMic" Tab in our manual and chassis manual to install your system. 2. If you use AC'97 audio panel, please install it to MIC2_L. B. Select "Recorder". Each USB 2.0 header can support two...
... this motherboard. To activate the front mic. For Windows® 7 / 7 64-bit / VistaTM / VistaTM 64-bit OS: Go to the "FrontMic" Tab in our manual and chassis manual to install your system. 2. If you use AC'97 audio panel, please install it to MIC2_L. B. Select "Recorder". Each USB 2.0 header can support two...
User Manual
Page 29
... under the Hot Plug operation. 3. Below operation procedure is designed only for SATA / SATAII HDD in the product spec on our support website: www.asrock.com 4. The SATA / SATAII HDD, which are from our motherboard package. 5. Points of attention, before you process the SATA / SATAII HDD Hot...please check below operation guide of SATA / SATAII HDD Hot Plug feature carefully. Please read below cable accessories from your dealer or HDD user manual. SATA power cable with SATA 15-pin power connector interface A. Make sure to use the SATA power cable & data cable, which cannot ...
... under the Hot Plug operation. 3. Below operation procedure is designed only for SATA / SATAII HDD in the product spec on our support website: www.asrock.com 4. The SATA / SATAII HDD, which are from our motherboard package. 5. Points of attention, before you process the SATA / SATAII HDD Hot...please check below operation guide of SATA / SATAII HDD Hot Plug feature carefully. Please read below cable accessories from your dealer or HDD user manual. SATA power cable with SATA 15-pin power connector interface A. Make sure to use the SATA power cable & data cable, which cannot ...

User Manual
Page 35
Please refer to [Manual]. Therefore, CPU FSB is untied during overclocking, FSB enjoys better margin due to fixed PCI / PCIE buses. Before you enable Untied Overclocking function, please enter "...
Please refer to [Manual]. Therefore, CPU FSB is untied during overclocking, FSB enjoys better margin due to fixed PCI / PCIE buses. Before you enable Untied Overclocking function, please enter "...

User Manual
Page 39
... cause damage to your mGPU and motherboard. Configuration options: [Press Enter], [OFF], [System Performance Increases 40%] and [System Performance Increases 50%]. Configuration options: [Auto] and [Manual]. 3.3 OC Tweaker Screen In the OC Tweaker screen, you can use this option to increase your system performance. It should be [Auto] for better system...
... cause damage to your mGPU and motherboard. Configuration options: [Press Enter], [OFF], [System Performance Increases 40%] and [System Performance Increases 50%]. Configuration options: [Auto] and [Manual]. 3.3 OC Tweaker Screen In the OC Tweaker screen, you can use this option to increase your system performance. It should be [Auto] for better system...

User Manual
Page 40
...Disabled], [Auto], [All Cores] and [Per Core]. AMD Turbo Core Technology This item appears only when the processor you may cause damage to [Manual], you adopt supports this feature. If it is recommended to adjust Advanced Clock Calibration feature. Advanced Clock Calibration This allows you will see the options... Enter] [Press Enter] [Press Enter] [Auto] [200] [100] [Auto] [Enabled] [3] [Disabled] [Auto] [Enabled] [Disabled] x13.5 2700 MHZ x10.0 2000 MHz 1.325 V [Manual] Overclocking may adjust the value of this to [-12%]. It should be done at your CPU and motherboard.
...Disabled], [Auto], [All Cores] and [Per Core]. AMD Turbo Core Technology This item appears only when the processor you may cause damage to [Manual], you adopt supports this feature. If it is recommended to adjust Advanced Clock Calibration feature. Advanced Clock Calibration This allows you will see the options... Enter] [Press Enter] [Press Enter] [Auto] [200] [100] [Auto] [Enabled] [3] [Disabled] [Auto] [Enabled] [Disabled] x13.5 2700 MHZ x10.0 2000 MHz 1.325 V [Manual] Overclocking may adjust the value of this to [-12%]. It should be done at your CPU and motherboard.

User Manual
Page 42
...], [Address bits 6], [Address bits 12], [HASH 1] and [HASH 2]. TRP Use this to adjust TRC values. Min: 1N. TRC Use this to change Command Rate Auto/Manual setting. The default value is [Auto]. TRFC Use this item to adjust TRP values. The default value is [Auto]. Chipset Settings Onboard GPU Clock Override...
...], [Address bits 6], [Address bits 12], [HASH 1] and [HASH 2]. TRP Use this to adjust TRC values. Min: 1N. TRC Use this to change Command Rate Auto/Manual setting. The default value is [Auto]. TRFC Use this item to adjust TRP values. The default value is [Auto]. Chipset Settings Onboard GPU Clock Override...

User Manual
Page 53
... C / 80 F : 4722 RPM : N/A : N/A : 1.216V : 3.248V : 5.136V : 12.091V CPU Fan Setting Chassis Fan 1 Setting Enable/Disable CPU Quiet Fan Function. Configuration options: [Full On] and [Manual Mode]. Chassis Fan 1 Setting This allows you to monitor the status of the hardware on your system, including the parameters of the CPU temperature, motherboard...
... C / 80 F : 4722 RPM : N/A : N/A : 1.216V : 3.248V : 5.136V : 12.091V CPU Fan Setting Chassis Fan 1 Setting Enable/Disable CPU Quiet Fan Function. Configuration options: [Full On] and [Manual Mode]. Chassis Fan 1 Setting This allows you to monitor the status of the hardware on your system, including the parameters of the CPU temperature, motherboard...

Quick Installation Guide
Page 5
... and information of this manual will be available on ASRock website as well. In this motherboard, please visit our website for purchasing ASRock 985GM-GS3 FX / 985GM-S3 FX motherboard, a reliable motherboard produced under ASRock's consistently stringent quality control. 1. ASRock website http://www.asrock.com If you are using. www.asrock.com/support/index.asp 1.1 Package Contents ASRock 985GM-GS3 FX / 985GM-S3 FX Motherboard (Micro ATX Form...
... and information of this manual will be available on ASRock website as well. In this motherboard, please visit our website for purchasing ASRock 985GM-GS3 FX / 985GM-S3 FX motherboard, a reliable motherboard produced under ASRock's consistently stringent quality control. 1. ASRock website http://www.asrock.com If you are using. www.asrock.com/support/index.asp 1.1 Package Contents ASRock 985GM-GS3 FX / 985GM-S3 FX Motherboard (Micro ATX Form...

Quick Installation Guide
Page 8
...on this motherboard, please refer to the components and devices of "User Manual" in the BIOS, applying Untied Overclocking Technology, or using the third-party overclocking tools. ASRock website http://www.asrock.com 4. For Windows® OS with overclocking, including adjusting the ... supply is required) (see CAUTION 17) * For detailed product information, please visit our website: http://www.asrock.com WARNING Please realize that there is a certain risk involved with 64-bit CPU, there is subject to SATAII connector directly. 8 ASRock 985GM-GS3 FX / 985GM-S3 FX Motherboard English
...on this motherboard, please refer to the components and devices of "User Manual" in the BIOS, applying Untied Overclocking Technology, or using the third-party overclocking tools. ASRock website http://www.asrock.com 4. For Windows® OS with overclocking, including adjusting the ... supply is required) (see CAUTION 17) * For detailed product information, please visit our website: http://www.asrock.com WARNING Please realize that there is a certain risk involved with 64-bit CPU, there is subject to SATAII connector directly. 8 ASRock 985GM-GS3 FX / 985GM-S3 FX Motherboard English

Quick Installation Guide
Page 12
2.1 CPU Installation Step 1. Step 4. English 12 ASRock 985GM-GS3 FX / 985GM-S3 FX Motherboard Step 3. Carefully insert the CPU into the socket to the CPU FAN connector (CPU_FAN1, see Page 2, No. 6). Lever 90° Up STEP 1: Lift Up ... also need to spray thermal grease between the CPU and the heatsink to secure the CPU. For proper installation, please kindly refer to the instruction manuals of CPU Fan and Heatsink After you push down the socket lever to improve heat dissipation. Make sure that the CPU and the heatsink are...
2.1 CPU Installation Step 1. Step 4. English 12 ASRock 985GM-GS3 FX / 985GM-S3 FX Motherboard Step 3. Carefully insert the CPU into the socket to the CPU FAN connector (CPU_FAN1, see Page 2, No. 6). Lever 90° Up STEP 1: Lift Up ... also need to spray thermal grease between the CPU and the heatsink to secure the CPU. For proper installation, please kindly refer to the instruction manuals of CPU Fan and Heatsink After you push down the socket lever to improve heat dissipation. Make sure that the CPU and the heatsink are...

Quick Installation Guide
Page 21
... activate the front mic. D. For Windows® 7 / 7 64-bit / VistaTM / VistaTM 64-bit OS: Go to install your system. 2. Please follow the instruction in our manual and chassis manual to the "FrontMic" Tab in the Realtek Control panel. B. E. Adjust "Recording Volume". 21 ASRock 985GM-GS3 FX / 985GM-S3 FX Motherboard English
... activate the front mic. D. For Windows® 7 / 7 64-bit / VistaTM / VistaTM 64-bit OS: Go to install your system. 2. Please follow the instruction in our manual and chassis manual to the "FrontMic" Tab in the Realtek Control panel. B. E. Adjust "Recording Volume". 21 ASRock 985GM-GS3 FX / 985GM-S3 FX Motherboard English

Quick Installation Guide
Page 24
... the possible overclocking risk before you enable Untied Overclocking function, please enter "Overclock Mode" option of BIOS setup to set the selection from [Auto] to [Manual]. Enter BIOS SETUP UTILITY Advanced screen Storage Configuration. Before you apply Untied Overclocking Technology. B. Set the "SATA Operation Mode" option to [AHCI]. Using SATA / SATAII... RAID functions, please follow below steps. Therefore, CPU FSB is untied during overclocking, FSB enjoys better margin due to fixed PCI / PCIE buses. English 24 ASRock 985GM-GS3 FX / 985GM-S3 FX Motherboard
... the possible overclocking risk before you enable Untied Overclocking function, please enter "Overclock Mode" option of BIOS setup to set the selection from [Auto] to [Manual]. Enter BIOS SETUP UTILITY Advanced screen Storage Configuration. Before you apply Untied Overclocking Technology. B. Set the "SATA Operation Mode" option to [AHCI]. Using SATA / SATAII... RAID functions, please follow below steps. Therefore, CPU FSB is untied during overclocking, FSB enjoys better margin due to fixed PCI / PCIE buses. English 24 ASRock 985GM-GS3 FX / 985GM-S3 FX Motherboard

Quick Installation Guide
Page 25
For the detailed information about BIOS Setup, please refer to the User Manual (PDF file) contained in the Support CD to select among the predetermined choices. 3. When you start up the computer, please press during the Power-On-... the Support CD, insert the CD into your computer. The Support CD that came with its various sub-menus and to display the menus. 25 ASRock 985GM-GS3 FX / 985GM-S3 FX Motherboard English The BIOS Setup program is designed to enter BIOS Setup utility; BIOS Information The Flash Memory on the system chassis.
For the detailed information about BIOS Setup, please refer to the User Manual (PDF file) contained in the Support CD to select among the predetermined choices. 3. When you start up the computer, please press during the Power-On-... the Support CD, insert the CD into your computer. The Support CD that came with its various sub-menus and to display the menus. 25 ASRock 985GM-GS3 FX / 985GM-S3 FX Motherboard English The BIOS Setup program is designed to enter BIOS Setup utility; BIOS Information The Flash Memory on the system chassis.
RAID Installation Guide
Page 2
... the other drive if one drive fails. Data is an instruction for you to configure RAID functions by following the detailed instruction of the "User Manual" in RAIDXpert, 2 However, in our support CD or "Quick Installation Guide", then you make a SATA / SATAII driver diskette, press to enter BIOS setup to set...
... the other drive if one drive fails. Data is an instruction for you to configure RAID functions by following the detailed instruction of the "User Manual" in RAIDXpert, 2 However, in our support CD or "Quick Installation Guide", then you make a SATA / SATAII driver diskette, press to enter BIOS setup to set...

RAID Installation Guide
Page 8
Two Logical Drives After selecting the logical drive in our support CD or "Quick Installation Guide". The Define LD Menu displays again. 2. Enter the desired capacity (MB) for the first logical drive and press . Press the up and down arrow keys to the first logical drive. Then please follow the steps below. 1. following the detailed instruction of the "User Manual" in Disk Assignments as the above-mentioned procedures, press to allocate a portion of the disk drives to select an available logical drive number and press . 8
Two Logical Drives After selecting the logical drive in our support CD or "Quick Installation Guide". The Define LD Menu displays again. 2. Enter the desired capacity (MB) for the first logical drive and press . Press the up and down arrow keys to the first logical drive. Then please follow the steps below. 1. following the detailed instruction of the "User Manual" in Disk Assignments as the above-mentioned procedures, press to allocate a portion of the disk drives to select an available logical drive number and press . 8

RAID Installation Guide
Page 9
... install the operating system to your logical drive configuration. 5. Note that the disk drives in Channels 1 and 2 reflect smaller capacities because a portion of the "User Manual" in Channels 3 and 4 are not assigned to the first logical drive. Press again to save your computer by following the detailed instruction of their capacity...
... install the operating system to your logical drive configuration. 5. Note that the disk drives in Channels 1 and 2 reflect smaller capacities because a portion of the "User Manual" in Channels 3 and 4 are not assigned to the first logical drive. Press again to save your computer by following the detailed instruction of their capacity...
