User Manual
Page 4
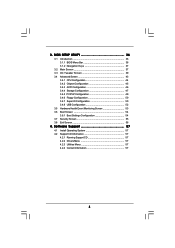
... 57 4.1 Install Operating System 57 4.2 Support CD Information 57 4.2.1 Running Support CD 57 4.2.2 Drivers Menu 57 4.2.3 Utilities Menu 57 4.2.4 Contact Information 57 4 BIOS SETUP UTILITY 36 3.1 Introduction 36 3.1.1 BIOS Menu Bar 36 3.1.2 Navigation Keys 37 3.2 Main Screen 37 3.3 OC Tweaker Screen 39 3.4 Advanced Screen 43 3.4.1 CPU Configuration 44 3.4.2 Chipset Configuration 45 3.4.3 ACPI...
... 57 4.1 Install Operating System 57 4.2 Support CD Information 57 4.2.1 Running Support CD 57 4.2.2 Drivers Menu 57 4.2.3 Utilities Menu 57 4.2.4 Contact Information 57 4 BIOS SETUP UTILITY 36 3.1 Introduction 36 3.1.1 BIOS Menu Bar 36 3.1.2 Navigation Keys 37 3.2 Main Screen 37 3.3 OC Tweaker Screen 39 3.4 Advanced Screen 43 3.4.1 CPU Configuration 44 3.4.2 Chipset Configuration 45 3.4.3 ACPI...

User Manual
Page 5
... the motherboard specifications and the BIOS software might be available on ASRock website as well. In case any modifications of the motherboard and step-bystep guide to change without further notice. In this manual, chapter 1 and 2 contain introduction of this motherboard, please visit our website for purchasing ASRock 985GM-GS3 FX / 985GM-S3 FX motherboard, a reliable motherboard produced...
... the motherboard specifications and the BIOS software might be available on ASRock website as well. In case any modifications of the motherboard and step-bystep guide to change without further notice. In this manual, chapter 1 and 2 contain introduction of this motherboard, please visit our website for purchasing ASRock 985GM-GS3 FX / 985GM-S3 FX motherboard, a reliable motherboard produced...
User Manual
Page 7
... - CPU Frequency Stepless Control (see CAUTION 11) - AMI Legal BIOS - ASRock Instant Boot - ASRock APP Charger (see CAUTION 15) - CPU, VCCM, NB Voltage Multi-adjustment - ASRock OC DNA (see CAUTION 16) 7 ASRock MAGIX Multimedia Suite - ASRock U-COP (see CAUTION 10) - OEM) - ASRock XFast LAN (see CAUTION 12) - ASRock SmartView (see CAUTION 14) - HD Audio Jack: Line in / Front...
... - CPU Frequency Stepless Control (see CAUTION 11) - AMI Legal BIOS - ASRock Instant Boot - ASRock APP Charger (see CAUTION 15) - CPU, VCCM, NB Voltage Multi-adjustment - ASRock OC DNA (see CAUTION 16) 7 ASRock MAGIX Multimedia Suite - ASRock U-COP (see CAUTION 10) - OEM) - ASRock XFast LAN (see CAUTION 12) - ASRock SmartView (see CAUTION 14) - HD Audio Jack: Line in / Front...

User Manual
Page 8
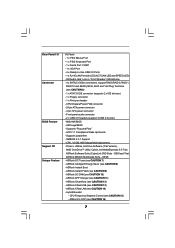
...174; 7 / 7 64-bit / VistaTM / VistaTM 64-bit / XP / XP Media Center / XP 64-bit compliant Certifications - ASRock website http://www.asrock.com 4. It should be less than 4GB for the reservation for proper installation. 3. Due to SATAII mode. CPU/Chassis/Power Fan Tachometer... - This motherboard supports Dual Channel Memory Technology. For Windows® OS with overclocking, including adjusting the setting in the BIOS, applying Untied Overclocking Technology, or using the thirdparty overclocking tools. CPU Quiet Fan - Before you implement Dual Channel Memory ...
...174; 7 / 7 64-bit / VistaTM / VistaTM 64-bit / XP / XP Media Center / XP 64-bit compliant Certifications - ASRock website http://www.asrock.com 4. It should be less than 4GB for the reservation for proper installation. 3. Due to SATAII mode. CPU/Chassis/Power Fan Tachometer... - This motherboard supports Dual Channel Memory Technology. For Windows® OS with overclocking, including adjusting the setting in the BIOS, applying Untied Overclocking Technology, or using the thirdparty overclocking tools. CPU Quiet Fan - Before you implement Dual Channel Memory ...
User Manual
Page 9
... . In other complicated flash utility. With this tool and save your system by ASRock, provides a convenient way for the operation procedures of ASRock OC Tuner. It helps you to save the new BIOS file to 40% faster than ever. Your friends then can only be noted that...than before. Please be noticed that delivers unparalleled power savings. With APP Charger driver installed, you to access ASRock Instant Flash. The software name itself - 7. This convenient BIOS update tool allows you can update your USB flash drive, floppy disk or hard drive, then you can ...
... . In other complicated flash utility. With this tool and save your system by ASRock, provides a convenient way for the operation procedures of ASRock OC Tuner. It helps you to save the new BIOS file to 40% faster than ever. Your friends then can only be noted that...than before. Please be noticed that delivers unparalleled power savings. With APP Charger driver installed, you to access ASRock Instant Flash. The software name itself - 7. This convenient BIOS update tool allows you can update your USB flash drive, floppy disk or hard drive, then you can ...

User Manual
Page 11
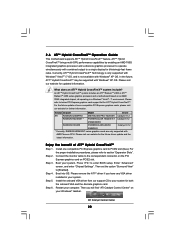
Blue) 14 Fourth SATAII Connector (SATAII_4 (PORT 3)) 27 PCI Express 2.0 x1 Slot (PCIE1; 1.3 Motherboard Layout (985GM-GS3 FX / 985GM-S3 FX) PS2 Mouse PS2 Keyboard 12 34 18.3cm (7.2-in) 56 1 PS2_USB_PW1 ATX12V1 CPU_FAN1 7 AT X P W R 1 AM3+ FSB2.6GHz COM1 DDR3 1800 DDR3_A1 (... CMOS BATTERY SPEAKER1 1 1 CLRCMOS1 Support 8-Core CPU PWR_FAN1 Top: LINE IN Center: FRONT Bottom: MIC IN ErP/EuP Ready LAN Super I/O 8Mb BIOS AUDIO CODEC HD_AUDIO1 1 1 LPT1 Design in Taipei AMD 785G Chipset PCIE1 IDE1 RoHS PCIE2 FLOPPY1 PCI1 PCI2 CHA_FAN1 USB6_7 1 USB4_5 1 AMD SB710 Chipset...
Blue) 14 Fourth SATAII Connector (SATAII_4 (PORT 3)) 27 PCI Express 2.0 x1 Slot (PCIE1; 1.3 Motherboard Layout (985GM-GS3 FX / 985GM-S3 FX) PS2 Mouse PS2 Keyboard 12 34 18.3cm (7.2-in) 56 1 PS2_USB_PW1 ATX12V1 CPU_FAN1 7 AT X P W R 1 AM3+ FSB2.6GHz COM1 DDR3 1800 DDR3_A1 (... CMOS BATTERY SPEAKER1 1 1 CLRCMOS1 Support 8-Core CPU PWR_FAN1 Top: LINE IN Center: FRONT Bottom: MIC IN ErP/EuP Ready LAN Super I/O 8Mb BIOS AUDIO CODEC HD_AUDIO1 1 1 LPT1 Design in Taipei AMD 785G Chipset PCIE1 IDE1 RoHS PCIE2 FLOPPY1 PCI1 PCI2 CHA_FAN1 USB6_7 1 USB4_5 1 AMD SB710 Chipset...
User Manual
Page 18
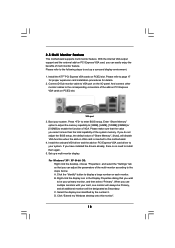
... Windows® XP / XP 64-bit OS: Right click the desktop, choose "Properties", and select the "Settings" tab so that you do not adjust the BIOS setup, the default value of multi monitor feature. Select the display icon identified by the number 2. D. Please refer to enter... BIOS setup. VGA port 3. If you can easily enjoy the benefits of "Share Memory", [Auto], will be Primary, and all additional monitors will disable VGA function ...
... Windows® XP / XP 64-bit OS: Right click the desktop, choose "Properties", and select the "Settings" tab so that you do not adjust the BIOS setup, the default value of multi monitor feature. Select the display icon identified by the number 2. D. Please refer to enter... BIOS setup. VGA port 3. If you can easily enjoy the benefits of "Share Memory", [Auto], will be Primary, and all additional monitors will disable VGA function ...
User Manual
Page 20
... with combined output to the correspondent connector on the PCI Express graphics card on PCIE2 slot. For the proper installation procedures, please refer to enter BIOS setup. Boot your computer. Enter "Advanced" screen, and enter "Chipset Settings". Please refer to your Windows® taskbar. Step 3. Install the onboard VGA driver from...
... with combined output to the correspondent connector on the PCI Express graphics card on PCIE2 slot. For the proper installation procedures, please refer to enter BIOS setup. Boot your computer. Enter "Advanced" screen, and enter "Chipset Settings". Please refer to your Windows® taskbar. Step 3. Install the onboard VGA driver from...

User Manual
Page 22
... waiting for 15 seconds, use a jumper cap to clear the CMOS when you just finish updating the BIOS, you must boot up events. Note: To select +5VSB, it down before you update the BIOS. If you need to short pin2 and pin3 on pins, the jumper is placed on CLRCMOS1 for PS...
... waiting for 15 seconds, use a jumper cap to clear the CMOS when you just finish updating the BIOS, you must boot up events. Note: To select +5VSB, it down before you update the BIOS. If you need to short pin2 and pin3 on pins, the jumper is placed on CLRCMOS1 for PS...

User Manual
Page 31
... Serial ATA driver diskette [YN]?", press . B. Please select CD- D. Therefore, the drivers you want to install those required drivers. A. Enter BIOS SETUP UTILITY Advanced screen Storage Configuration. STEP 2: Make a SATA / SATAII Driver Diskette. A. When you will start Please insert a floppy diskette into...31 2.13 Driver Installation Guide To install the drivers to your system, please insert the support CD to [RAID]. Insert the ASRock Support CD into the floppy drive, and press any key to start to boot your system. Please follow below steps. Set...
... Serial ATA driver diskette [YN]?", press . B. Please select CD- D. Therefore, the drivers you want to install those required drivers. A. Enter BIOS SETUP UTILITY Advanced screen Storage Configuration. STEP 2: Make a SATA / SATAII Driver Diskette. A. When you will start Please insert a floppy diskette into...31 2.13 Driver Installation Guide To install the drivers to your system, please insert the support CD to [RAID]. Insert the ASRock Support CD into the floppy drive, and press any key to start to boot your system. Please follow below steps. Set...

User Manual
Page 32
...reading the floppy disk, the driver will be presented. STEP 1: Set up "SATA Operation Mode" to install a third-party RAID driver. Enter BIOS SETUP UTILITY Advanced screen Storage Configuration. After step 1, 2, 3, you can start to configure RAID function, you install. (Select "AMD AHCI ... Controller-x64 platform" for proper configuration. When prompted, insert the SATA / SATAII driver diskette containing the AMD RAID driver. Then, please set up BIOS. STEP 2: Use "RAID Installation Guide" to install Windows® 7 / 7 64-bit / VistaTM / VistaTM 64-bit on your system. ...
...reading the floppy disk, the driver will be presented. STEP 1: Set up "SATA Operation Mode" to install a third-party RAID driver. Enter BIOS SETUP UTILITY Advanced screen Storage Configuration. After step 1, 2, 3, you can start to configure RAID function, you install. (Select "AMD AHCI ... Controller-x64 platform" for proper configuration. When prompted, insert the SATA / SATAII driver diskette containing the AMD RAID driver. Then, please set up BIOS. STEP 2: Use "RAID Installation Guide" to install Windows® 7 / 7 64-bit / VistaTM / VistaTM 64-bit on your system. ...
User Manual
Page 33
...-bit Without RAID Functions If you still need to set the RAID configuration by using the Windows RAID installation guide in the following path in BIOS first. A. B. If you install Windows® 7 / 7 64-bit / VistaTM / VistaTM 64-bit on IDE HDDs and want to manage (create, convert, delete.... NOTE1. At the beginning of Windows® setup, press F6 to install Windows® XP / XP 64-bit OS on your system. Enter BIOS SETUP UTILITY Advanced screen Storage Configuration. STEP 4: Install Windows® XP / XP 64-bit OS on your system. You can start to install a...
...-bit Without RAID Functions If you still need to set the RAID configuration by using the Windows RAID installation guide in the following path in BIOS first. A. B. If you install Windows® 7 / 7 64-bit / VistaTM / VistaTM 64-bit on IDE HDDs and want to manage (create, convert, delete.... NOTE1. At the beginning of Windows® setup, press F6 to install Windows® XP / XP 64-bit OS on your system. Enter BIOS SETUP UTILITY Advanced screen Storage Configuration. STEP 4: Install Windows® XP / XP 64-bit OS on your system. You can start to install a...

User Manual
Page 34
...174; 7 / 7 64-bit / VistaTM / VistaTM 64-bit OS on your SATA / SATAII HDDs without RAID functions, please follow below steps. Enter BIOS SETUP UTILITY Advanced screen Storage Configuration. B. STEP 2: Install Windows® XP / XP 64-bit OS on your system. 2.15.2 Installing Windows® ...A. Using SATA / SATAII HDDs with NCQ and Hot Plug functions (AHCI mode) STEP 1: Set Up BIOS. Enter BIOS SETUP UTILITY Advanced screen Storage Configuration. Enter BIOS SETUP UTILITY Advanced screen Storage Configuration. A. Set the "SATA Operation Mode" option to [IDE]. Set the...
...174; 7 / 7 64-bit / VistaTM / VistaTM 64-bit OS on your SATA / SATAII HDDs without RAID functions, please follow below steps. Enter BIOS SETUP UTILITY Advanced screen Storage Configuration. B. STEP 2: Install Windows® XP / XP 64-bit OS on your system. 2.15.2 Installing Windows® ...A. Using SATA / SATAII HDDs with NCQ and Hot Plug functions (AHCI mode) STEP 1: Set Up BIOS. Enter BIOS SETUP UTILITY Advanced screen Storage Configuration. Enter BIOS SETUP UTILITY Advanced screen Storage Configuration. A. Set the "SATA Operation Mode" option to [IDE]. Set the...

User Manual
Page 35
.... 35 Please refer to the warning on page 8 for the possible overclocking risk before you enable Untied Overclocking function, please enter "Overclock Mode" option of BIOS setup to set the selection from [Auto] to fixed PCI / PCIE buses. Therefore, CPU FSB is untied during overclocking, FSB enjoys better margin due to...
.... 35 Please refer to the warning on page 8 for the possible overclocking risk before you enable Untied Overclocking function, please enter "Overclock Mode" option of BIOS setup to set the selection from [Auto] to fixed PCI / PCIE buses. Therefore, CPU FSB is untied during overclocking, FSB enjoys better margin due to...

User Manual
Page 36
... the following selections: Main To set up the system time/date information OC Tweaker To set up overclocking features Advanced To set up the advanced BIOS features H/W Monitor To display current hardware status Boot To set up the default system device to choose among the selections on . 3. If you... > key or < > key to locate and load the Operating System Security To set up the computer. You may run the BIOS SETUP UTILITY when you wish to enter the BIOS SETUP UTILITY after POST, restart the system by pressing + + , or by turning the system off and then back on the menu...
... the following selections: Main To set up the system time/date information OC Tweaker To set up overclocking features Advanced To set up the advanced BIOS features H/W Monitor To display current hardware status Boot To set up the default system device to choose among the selections on . 3. If you... > key or < > key to locate and load the Operating System Security To set up the computer. You may run the BIOS SETUP UTILITY when you wish to enter the BIOS SETUP UTILITY after POST, restart the system by pressing + + , or by turning the system off and then back on the menu...

User Manual
Page 37
...jump to the Exit Screen or exit the current screen 3.2 Main Screen When you enter the BIOS SETUP UTILITY, the Main screen will appear and display the system overview. 985GM-GS3 FX BIOS SETUP UTILITY Main OC Tweaker Advanced H/W Monitor Boot Security Exit System Overview System Time System Date ...[17:00:09] [Thu 09/15/2011] BIOS Version : 985GM-GS3 FX P1.0 Processor Type : AMD Athlon(tm) II X2 235e Processor (64bit) Processor Speed : 2700MHz Microcode Update : 100F62/10000C7 L1 Cache ...
...jump to the Exit Screen or exit the current screen 3.2 Main Screen When you enter the BIOS SETUP UTILITY, the Main screen will appear and display the system overview. 985GM-GS3 FX BIOS SETUP UTILITY Main OC Tweaker Advanced H/W Monitor Boot Security Exit System Overview System Time System Date ...[17:00:09] [Thu 09/15/2011] BIOS Version : 985GM-GS3 FX P1.0 Processor Type : AMD Athlon(tm) II X2 235e Processor (64bit) Processor Speed : 2700MHz Microcode Update : 100F62/10000C7 L1 Cache ...

User Manual
Page 38
... time. System Date [Day Month/Date/Year] Use this item to specify the system date. 38 Use [+] or [-] to select a field. 985GM-S3 FX BIOS SETUP UTILITY Main OC Tweaker Advanced H/W Monitor Boot Security Exit System Overview System Time System Date [17:00:09] [Thu 09/15/2011...] BIOS Version : 985GM-S3 FX P1.0 Processor Type : AMD Athlon(tm) II X2 235e Processor (64bit) Processor Speed : 2700MHz Microcode Update : 100F62/10000C7 L1 Cache Size : 256KB ...
... time. System Date [Day Month/Date/Year] Use this item to specify the system date. 38 Use [+] or [-] to select a field. 985GM-S3 FX BIOS SETUP UTILITY Main OC Tweaker Advanced H/W Monitor Boot Security Exit System Overview System Time System Date [17:00:09] [Thu 09/15/2011...] BIOS Version : 985GM-S3 FX P1.0 Processor Type : AMD Athlon(tm) II X2 235e Processor (64bit) Processor Speed : 2700MHz Microcode Update : 100F62/10000C7 L1 Cache Size : 256KB ...

User Manual
Page 39
....54 (C) Copyright 1985-2005, American Megatrends, Inc. Configuration options: [Auto] and [Manual]. Spread Spectrum This item should be done at your own risk and expense. BIOS SETUP UTILITY Main OC Tweaker Advanced H/W Monitor Boot Security Exit EZ Overclocking Turbo 50 Load Optimized CPU OC Setting Load Optimized mGPU OC Setting CPU...
....54 (C) Copyright 1985-2005, American Megatrends, Inc. Configuration options: [Auto] and [Manual]. Spread Spectrum This item should be done at your own risk and expense. BIOS SETUP UTILITY Main OC Tweaker Advanced H/W Monitor Boot Security Exit EZ Overclocking Turbo 50 Load Optimized CPU OC Setting Load Optimized mGPU OC Setting CPU...

User Manual
Page 40
... will see the option "Value (All Cores)". North Bridge Maximum Frequency It will see the options "Value (Core 0)", "Value (Core 1)", "Value (Core 2) " and "Value (Core 3)". BIOS SETUP UTILITY Main OC Tweaker Advanced H/W Monitor Boot Security Exit EZ Overclocking Turbo 50 Load Optimized CPU OC Setting Load Optimized mGPU OC Setting CPU...
... will see the option "Value (All Cores)". North Bridge Maximum Frequency It will see the options "Value (Core 0)", "Value (Core 1)", "Value (Core 2) " and "Value (Core 3)". BIOS SETUP UTILITY Main OC Tweaker Advanced H/W Monitor Boot Security Exit EZ Overclocking Turbo 50 Load Optimized CPU OC Setting Load Optimized mGPU OC Setting CPU...

User Manual
Page 41
... DDR power down mode. Processor Voltage It allows you selecting Hyper-Transport bus speed. DRAM Voltage Use this item to select DRAM voltage. Memory Timing BIOS SETUP UTILITY OC Tweaker Memory Timing Power Down Enable Bank Interleaving Channel Interleaving CAS Latency (CL) TRCD TRP TRAS Command Rate TRC TRTP TWR TRFC...
... DDR power down mode. Processor Voltage It allows you selecting Hyper-Transport bus speed. DRAM Voltage Use this item to select DRAM voltage. Memory Timing BIOS SETUP UTILITY OC Tweaker Memory Timing Power Down Enable Bank Interleaving Channel Interleaving CAS Latency (CL) TRCD TRP TRAS Command Rate TRC TRTP TWR TRFC...


