
RAID Installation Guide
Page 6
Press 2 on the Main Menu screen to select it. Press keys, then the FastBuild Utility Main Menu appears. Press the arrow keys to highlight a logical drive number you selected will next appear. 6 The Define LD Menu for the logical drive number you want to define and press to display the Define LD Menu.
Press 2 on the Main Menu screen to select it. Press keys, then the FastBuild Utility Main Menu appears. Press the arrow keys to highlight a logical drive number you selected will next appear. 6 The Define LD Menu for the logical drive number you want to define and press to display the Define LD Menu.

RAID Installation Guide
Page 7
While you want. Press the arrow key to move to the Main Menu. 2. Assign the appropriate number of the disk drives for a single logical drive: Please read "Two Logical Drives" below : 1. Press Ctrl-Y to Modify Array Capacity ...
While you want. Press the arrow key to move to the Main Menu. 2. Assign the appropriate number of the disk drives for a single logical drive: Please read "Two Logical Drives" below : 1. Press Ctrl-Y to Modify Array Capacity ...

RAID Installation Guide
Page 9
... your logical drive configuration. 5. Press to restart the computer. Press to save your computer by following the detailed instruction of their capacity belongs to the Main Menu. In this example the disk drives in our support CD or "Quick Installation Guide". 9 Note that the disk drives in Channels 1 and 2 reflect smaller...
... your logical drive configuration. 5. Press to restart the computer. Press to save your computer by following the detailed instruction of their capacity belongs to the Main Menu. In this example the disk drives in our support CD or "Quick Installation Guide". 9 Note that the disk drives in Channels 1 and 2 reflect smaller...

User Manual
Page 4
... Support CD 52 4.2.2 Drivers Menu 52 4.2.3 Utilities Menu 52 4.2.4 Contact Information 52 4 BIOS SETUP UTILITY 32 3.1 Introduction 32 3.1.1 BIOS Menu Bar 32 3.1.2 Navigation Keys 33 3.2 Main Screen 33 3.3 OC Tweaker Screen 34 3.4 Advanced Screen 38 3.4.1 CPU Configuration 39 3.4.2 Chipset Configuration 40 3.4.3 ACPI Configuration 41 3.4.4 Storage Configuration 43 3.4.6 PCIPnP Configuration 44 3.4.6 Floppy...
... Support CD 52 4.2.2 Drivers Menu 52 4.2.3 Utilities Menu 52 4.2.4 Contact Information 52 4 BIOS SETUP UTILITY 32 3.1 Introduction 32 3.1.1 BIOS Menu Bar 32 3.1.2 Navigation Keys 33 3.2 Main Screen 33 3.3 OC Tweaker Screen 34 3.4 Advanced Screen 38 3.4.1 CPU Configuration 39 3.4.2 Chipset Configuration 40 3.4.3 ACPI Configuration 41 3.4.4 Storage Configuration 43 3.4.6 PCIPnP Configuration 44 3.4.6 Floppy...

User Manual
Page 23
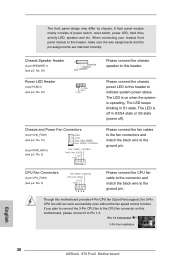
... p.12 No. 3) GND 1 2 3 4 Please connect the CPU fan cable to the connector and match the black wire to indicate system power status. A front panel module mainly consists of power switch, reset switch, power LED, hard drive activity LED, speaker and etc. Though this header. CPU Fan Connectors FAN_SPEED_CONTROL (4-pin CPU_FAN1) CPU_FAN_SPEED...
... p.12 No. 3) GND 1 2 3 4 Please connect the CPU fan cable to the connector and match the black wire to indicate system power status. A front panel module mainly consists of power switch, reset switch, power LED, hard drive activity LED, speaker and etc. Though this header. CPU Fan Connectors FAN_SPEED_CONTROL (4-pin CPU_FAN1) CPU_FAN_SPEED...

User Manual
Page 32
You may also restart by pressing the reset button on the system chassis. Because the BIOS software is constantly being updated, the following selections: Main To set up the system time/date information OC Tweaker To set up overclocking features Advanced To set up the advanced BIOS features H/W Monitor To ...
You may also restart by pressing the reset button on the system chassis. Because the BIOS software is constantly being updated, the following selections: Main To set up the system time/date information OC Tweaker To set up overclocking features Advanced To set up the advanced BIOS features H/W Monitor To ...

User Manual
Page 33
Use [+] or [-] to select a field. BIOS SETUP UTILITY Main OC Tweaker Advanced H/W Monitor System Overview System Time System Date [17:00:09] [Tue 08/28/2012] BIOS Version : 970 Pro2 P1.00 Processor Type : AMD FX(tm)-8150 Eight Core Processor (64bit) Processor Speed : 3600MHz Microcode Update : 600F12/6000623 L1 ...save changes and exit the BIOS SETUP UTILITY To jump to the Exit Screen or exit the current screen 3.2 Main Screen When you enter the BIOS SETUP UTILITY, the Main screen will appear and display the system overview. System Date [Day Month/Date/Year] Use this item to...
Use [+] or [-] to select a field. BIOS SETUP UTILITY Main OC Tweaker Advanced H/W Monitor System Overview System Time System Date [17:00:09] [Tue 08/28/2012] BIOS Version : 970 Pro2 P1.00 Processor Type : AMD FX(tm)-8150 Eight Core Processor (64bit) Processor Speed : 3600MHz Microcode Update : 600F12/6000623 L1 ...save changes and exit the BIOS SETUP UTILITY To jump to the Exit Screen or exit the current screen 3.2 Main Screen When you enter the BIOS SETUP UTILITY, the Main screen will appear and display the system overview. System Date [Day Month/Date/Year] Use this item to...

User Manual
Page 34
... feature. CPU Configuration Overclock Mode Use this to select Overclock Mode. Use this to select enable or disable AMD Turbo Core Technology. BIOS SETUP UTILITY Main OC Tweaker Advanced H/W Monitor Boot Security Exit EZ Overclocking Load Optimized CPU OC Setting CPU Configuration Overclock Mode CPU Frequency (MHz) PCIE Frequency (MHz) Spread...
... feature. CPU Configuration Overclock Mode Use this to select Overclock Mode. Use this to select enable or disable AMD Turbo Core Technology. BIOS SETUP UTILITY Main OC Tweaker Advanced H/W Monitor Boot Security Exit EZ Overclocking Load Optimized CPU OC Setting CPU Configuration Overclock Mode CPU Frequency (MHz) PCIE Frequency (MHz) Spread...

User Manual
Page 35
... Go to adjust the value of this item. HT Bus Speed This feature allows you to adjust the value of this item. BIOS SETUP UTILITY Main OC Tweaker Advanced H/W Monitor Boot Security Exit EZ Overclocking Load Optimized CPU OC Setting CPU Configuration Overclock Mode CPU Frequency (MHz) PCIE Frequency (MHz) Spread...
... Go to adjust the value of this item. HT Bus Speed This feature allows you to adjust the value of this item. BIOS SETUP UTILITY Main OC Tweaker Advanced H/W Monitor Boot Security Exit EZ Overclocking Load Optimized CPU OC Setting CPU Configuration Overclock Mode CPU Frequency (MHz) PCIE Frequency (MHz) Spread...

User Manual
Page 38
... values in Flash ROM. Please be noted that the USB flash drive or hard drive must use FAT32/16/12 file system. BIOS SETUP UTILITY Main OC Tweaker Advanced H/W Monitor Boot Security Exit Advanced Settings Options for the following items: CPU Configuration, Chipset Configuration, ACPI Configuration, Storage Configuration, PCPPnP Configuration, Floppy...
... values in Flash ROM. Please be noted that the USB flash drive or hard drive must use FAT32/16/12 file system. BIOS SETUP UTILITY Main OC Tweaker Advanced H/W Monitor Boot Security Exit Advanced Settings Options for the following items: CPU Configuration, Chipset Configuration, ACPI Configuration, Storage Configuration, PCPPnP Configuration, Floppy...

User Manual
Page 48
... Exit v02.54 (C) Copyright 1985-2003, American Megatrends, Inc. The default is value [Full On]. 48 The default is value [Full On]. BIOS SETUP UTILITY Main OC Tweaker Advanced H/W Monitor Boot Security Exit Hardware Health Event Monitoring CPU Temperature M / B Temperature CPU Fan Speed Chassis Fan Speed Power Fan Speed Vcore + 3.30V...
... Exit v02.54 (C) Copyright 1985-2003, American Megatrends, Inc. The default is value [Full On]. 48 The default is value [Full On]. BIOS SETUP UTILITY Main OC Tweaker Advanced H/W Monitor Boot Security Exit Hardware Health Event Monitoring CPU Temperature M / B Temperature CPU Fan Speed Chassis Fan Speed Power Fan Speed Vcore + 3.30V...

User Manual
Page 49
... after boot-up. 49 Full Screen Logo Use this item to enable or disable OEM Logo. Configuration options: [Enabled] and [Disabled]. CD - BIOS SETUP UTILITY Main OC Tweaker Advanced H/W Monitor Boot Security Exit Boot Settings Boot Settings Configuration Configure Settings during System Boot. 1st Boot Device 2nd Boot Device 3rd Boot...
... after boot-up. 49 Full Screen Logo Use this item to enable or disable OEM Logo. Configuration options: [Enabled] and [Disabled]. CD - BIOS SETUP UTILITY Main OC Tweaker Advanced H/W Monitor Boot Security Exit Boot Settings Boot Settings Configuration Configure Settings during System Boot. 1st Boot Device 2nd Boot Device 3rd Boot...

User Manual
Page 50
3.7 Security Screen In this section, you may set or change the supervisor/user password for the system. For the user password, you may also clear it. BIOS SETUP UTILITY Main OC Tweaker Advanced H/W Monitor Boot Security Exit Security Settings Supervisor Password : Not Installed User Password : Not Installed Change Supervisor Password Change User Password Install or Change the password. Select Screen Select Item Enter Change F1 General Help F9 Load Defaults F10 Save and Exit ESC Exit v02.54 (C) Copyright 1985-2005, American Megatrends, Inc. 50
3.7 Security Screen In this section, you may set or change the supervisor/user password for the system. For the user password, you may also clear it. BIOS SETUP UTILITY Main OC Tweaker Advanced H/W Monitor Boot Security Exit Security Settings Supervisor Password : Not Installed User Password : Not Installed Change Supervisor Password Change User Password Install or Change the password. Select Screen Select Item Enter Change F1 General Help F9 Load Defaults F10 Save and Exit ESC Exit v02.54 (C) Copyright 1985-2005, American Megatrends, Inc. 50

User Manual
Page 51
... configuration changes and exit setup?" Load Performance Setup Default This performance setup default may not be used for this operation. 3.8 Exit Screen BIOS SETUP UTILITY Main OC Tweaker Advanced H/W Monitor Boot Security Exit Exit Options Save Changes and Exit Discard Changes and Exit Discard Changes Load BIOS Defaults Load Performance Setup...
... configuration changes and exit setup?" Load Performance Setup Default This performance setup default may not be used for this operation. 3.8 Exit Screen BIOS SETUP UTILITY Main OC Tweaker Advanced H/W Monitor Boot Security Exit Exit Options Save Changes and Exit Discard Changes and Exit Discard Changes Load BIOS Defaults Load Performance Setup...
User Manual
Page 52
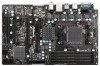
...utilities that the motherboard supports. Because motherboard settings and hardware options vary, use the setup procedures in this chapter for more about ASRock, welcome to activate the devices. 4.2.3 Utilities Menu The Utilities Menu shows the applications software that enhance the motherboard features. 4.2.1 Running... the menus. 4.2.2 Drivers Menu The Drivers Menu shows the available devices drivers if the system detects the installed devices. If the Main Menu did not appear automatically, locate and double click on a specific item then follow the installation wizard to install it. 4.2.4 ...
...utilities that the motherboard supports. Because motherboard settings and hardware options vary, use the setup procedures in this chapter for more about ASRock, welcome to activate the devices. 4.2.3 Utilities Menu The Utilities Menu shows the applications software that enhance the motherboard features. 4.2.1 Running... the menus. 4.2.2 Drivers Menu The Drivers Menu shows the available devices drivers if the system detects the installed devices. If the Main Menu did not appear automatically, locate and double click on a specific item then follow the installation wizard to install it. 4.2.4 ...
Quick Installation Guide
Page 20
...) support, the 3-Pin CPU fan still can work successfully even without the fan speed control function. Pin 1-3 Connected 3-Pin Fan Installation English 20 ASRock 970 Pro2 Motherboard A front panel module mainly consists of power switch, reset switch, power LED, hard drive activity LED, speaker and etc. CPU Fan Connectors FAN_SPEED_CONTROL (4-pin CPU_FAN1) CPU_FAN_SPEED +12V...
...) support, the 3-Pin CPU fan still can work successfully even without the fan speed control function. Pin 1-3 Connected 3-Pin Fan Installation English 20 ASRock 970 Pro2 Motherboard A front panel module mainly consists of power switch, reset switch, power LED, hard drive activity LED, speaker and etc. CPU Fan Connectors FAN_SPEED_CONTROL (4-pin CPU_FAN1) CPU_FAN_SPEED +12V...

Quick Installation Guide
Page 24
.../ 7 64-bit / VistaTM / VistaTM 64-bit / XP / XP Media Center / XP 64-bit. If the Main Menu does not appear automatically, locate and double-click on the motherboard stores BIOS Setup Utility. The Support CD that will display the... Main Menu automatically if "AUTORUN" is a menu-driven program, which allows you start up the computer, please press... utilities that came with its various sub-menus and to display the menus. 24 ASRock 970 Pro2 Motherboard English
.../ 7 64-bit / VistaTM / VistaTM 64-bit / XP / XP Media Center / XP 64-bit. If the Main Menu does not appear automatically, locate and double-click on the motherboard stores BIOS Setup Utility. The Support CD that will display the... Main Menu automatically if "AUTORUN" is a menu-driven program, which allows you start up the computer, please press... utilities that came with its various sub-menus and to display the menus. 24 ASRock 970 Pro2 Motherboard English