
User Manual
Page 1
970 Extreme3 User Manual Version 1.0 Published August 2011 Copyright©2011 ASRock INC. All rights reserved. 1
970 Extreme3 User Manual Version 1.0 Published August 2011 Copyright©2011 ASRock INC. All rights reserved. 1

User Manual
Page 2
...this motherboard contains Perchlorate, a toxic substance controlled in this manual. Disclaimer: Specifications and information contained in Perchlorate Best Management Practices (BMP) regulations passed by ASRock. This device complies with Part 15 of ASRock Inc. In no responsibility for any kind, either expressed ... warranties or conditions of merchantability or fitness for identification or explanation and to the contents of this manual, ASRock does not provide warranty of any errors or omissions that may appear in this device must accept any defect or error...
...this motherboard contains Perchlorate, a toxic substance controlled in this manual. Disclaimer: Specifications and information contained in Perchlorate Best Management Practices (BMP) regulations passed by ASRock. This device complies with Part 15 of ASRock Inc. In no responsibility for any kind, either expressed ... warranties or conditions of merchantability or fitness for identification or explanation and to the contents of this manual, ASRock does not provide warranty of any errors or omissions that may appear in this device must accept any defect or error...

User Manual
Page 5
... with robust design conforming to ASRock's commitment to the "User Manual" in our support CD for purchasing ASRock 970 Extreme3 motherboard, a reliable motherboard produced under ASRock's consistently stringent quality control. In case any modifications of this manual occur, the updated version will be available on ASRock website as well. ASRock website http://www.asrock.com If you require...
... with robust design conforming to ASRock's commitment to the "User Manual" in our support CD for purchasing ASRock 970 Extreme3 motherboard, a reliable motherboard produced under ASRock's consistently stringent quality control. In case any modifications of this manual occur, the updated version will be available on ASRock website as well. ASRock website http://www.asrock.com If you require...

User Manual
Page 16
... socket until it firmly on the side tab to indicate that it is necessary to install a larger heatsink and cooling fan to the instruction manuals of the pins. DO NOT force the CPU into this motherboard, it is in place, press it fits in one correct orientation. You also...
... socket until it firmly on the side tab to indicate that it is necessary to install a larger heatsink and cooling fan to the instruction manuals of the pins. DO NOT force the CPU into this motherboard, it is in place, press it fits in one correct orientation. You also...

User Manual
Page 20
... will release in CrossFireXTM mode. 2.5.1 Graphics Card Setup 2.5.1.1 Installing Two CrossFireXTM-Ready Graphics Cards Different CrossFireXTM cards may require different methods to AMDTM graphics card manuals for AMDTM CrossFireXTM driver updates. 1. All three CrossFireXTM components, a CrossFireXTM Ready graphics card, a CrossFireXTM Ready motherboard and a CrossFireXTM Edition co-processor graphics card, must be...
... will release in CrossFireXTM mode. 2.5.1 Graphics Card Setup 2.5.1.1 Installing Two CrossFireXTM-Ready Graphics Cards Different CrossFireXTM cards may require different methods to AMDTM graphics card manuals for AMDTM CrossFireXTM driver updates. 1. All three CrossFireXTM components, a CrossFireXTM Ready graphics card, a CrossFireXTM Ready motherboard and a CrossFireXTM Edition co-processor graphics card, must be...

User Manual
Page 27
... chassis front panel. D. To activate the front mic. For Windows® 7 / 7 64-bit / VistaTM / VistaTM 64-bit OS: Go to the "FrontMic" Tab in our manual and chassis manual to turn off your system. 2. Adjust "Recording Volume". You may configure the way to install your system using the power switch.
... chassis front panel. D. To activate the front mic. For Windows® 7 / 7 64-bit / VistaTM / VistaTM 64-bit OS: Go to the "FrontMic" Tab in our manual and chassis manual to turn off your system. 2. Adjust "Recording Volume". You may configure the way to install your system using the power switch.

User Manual
Page 32
...will cause the HDD damage and data loss. A. 7-pin SATA data cable B. The SATA3 HDD, which are from your dealer or HDD user manual. Please follow below instructions step by the chipset because of its limitation, the SATA3 Hot Plug support information of our motherboard is indicated in RAID... your SATA3 HDD can support Hot Plug function from our motherboard package. 5. Please make sure the SATA3 driver is available on our website: www.asrock.com 2. The latest SATA3 driver is installed into system properly. Before you process the Hot Plug: 1. Make sure to reduce the risk of ...
...will cause the HDD damage and data loss. A. 7-pin SATA data cable B. The SATA3 HDD, which are from your dealer or HDD user manual. Please follow below instructions step by the chipset because of its limitation, the SATA3 Hot Plug support information of our motherboard is indicated in RAID... your SATA3 HDD can support Hot Plug function from our motherboard package. 5. Please make sure the SATA3 driver is available on our website: www.asrock.com 2. The latest SATA3 driver is installed into system properly. Before you process the Hot Plug: 1. Make sure to reduce the risk of ...

User Manual
Page 37
... 64-bit OS on your SATA3 HDDs without NCQ and Hot Plug functions (IDE mode) STEP 1: Set up UEFI. Set the "SATA Mode" option to [Manual]. Please refer to the warning on your sys- Set the "SATA Mode" option to fixed PCI / PCIE buses. A. tem. 2.16 Untied Overclocking Technology This...
... 64-bit OS on your SATA3 HDDs without NCQ and Hot Plug functions (IDE mode) STEP 1: Set up UEFI. Set the "SATA Mode" option to [Manual]. Please refer to the warning on your sys- Set the "SATA Mode" option to fixed PCI / PCIE buses. A. tem. 2.16 Untied Overclocking Technology This...

User Manual
Page 40
...]. The default value is [Manual]. When UCC feature is enabled, the dual-core or triple-core CPU will boost to the quad-core CPU, and some CPU's hidden core may be malfunctioned. CPU Configuration Overclock Mode Use this to select OC Mode. ASRock UCC ASRock UCC (Unlock CPU Core) ...feature simplifies AMD CPU activation. OC Mode Use this to select Overclock Mode. Configuration options: [Auto] and [Manual]. As long as a simple switch of the UEFI option "ASRock UCC", you can enjoy the upgrade CPU performance with AM3/AM3+ CPU only, and in addition, not every AM3/AM3+ ...
...]. The default value is [Manual]. When UCC feature is enabled, the dual-core or triple-core CPU will boost to the quad-core CPU, and some CPU's hidden core may be malfunctioned. CPU Configuration Overclock Mode Use this to select OC Mode. ASRock UCC ASRock UCC (Unlock CPU Core) ...feature simplifies AMD CPU activation. OC Mode Use this to select Overclock Mode. Configuration options: [Auto] and [Manual]. As long as a simple switch of the UEFI option "ASRock UCC", you can enjoy the upgrade CPU performance with AM3/AM3+ CPU only, and in addition, not every AM3/AM3+ ...

User Manual
Page 41
... Control 41 AMD Turbo Core Technology This item appears only when the processor you selecting Hyper-Transport bus speed. The default value is set to [Manual], you to [Auto] by default. Processor Maximum Frequency It will display North Bridge Maximum Frequency for reference. Configuration options: [Auto], [8 Bit] and [16...
... Control 41 AMD Turbo Core Technology This item appears only when the processor you selecting Hyper-Transport bus speed. The default value is set to [Manual], you to [Auto] by default. Processor Maximum Frequency It will display North Bridge Maximum Frequency for reference. Configuration options: [Auto], [8 Bit] and [16...

User Manual
Page 42
..., or accross nodes, decreasing access contention. RAS# to CAS# Delay (tRCD) Use this item to change RAS# to change CAS# Latency (tCL) Auto/Manual setting. Max: 2T. The default is [Auto]. The default is [Auto]. Configuration options: [Disabled], [Auto]. Write Recovery Time (tWR) Use...to enable or disable DDR power down mode. Read to Precharge (tRTP) Use this item to change Write to change Command Rate (CR) Auto/Manual setting. The default is [Auto]. Row Precharge Time (tRP) Use this item to enable Channel Memory Interleaving. The default is [Auto]. The...
..., or accross nodes, decreasing access contention. RAS# to CAS# Delay (tRCD) Use this item to change RAS# to change CAS# Latency (tCL) Auto/Manual setting. Max: 2T. The default is [Auto]. The default is [Auto]. Configuration options: [Disabled], [Auto]. Write Recovery Time (tWR) Use...to enable or disable DDR power down mode. Read to Precharge (tRTP) Use this item to change Write to change Command Rate (CR) Auto/Manual setting. The default is [Auto]. Row Precharge Time (tRP) Use this item to enable Channel Memory Interleaving. The default is [Auto]. The...

User Manual
Page 43
.... NB Voltage Use this to select SB Voltage. The default value is [Auto]. In this option, you like to change Four Activate Window (tFAW) Auto/Manual setting. CPU VDDA Voltage Use this to your own requirements. 43 PCIE VDDA Voltage Use this to select DRAM Voltage. Voltage Control DRAM Voltage Use...
.... NB Voltage Use this to select SB Voltage. The default value is [Auto]. In this option, you like to change Four Activate Window (tFAW) Auto/Manual setting. CPU VDDA Voltage Use this to your own requirements. 43 PCIE VDDA Voltage Use this to select DRAM Voltage. Voltage Control DRAM Voltage Use...

User Manual
Page 53
Chassis Fan 1 Setting This allows you to set the chassis fan 3 speed. Confi guration options: [Full On] and [Manual Mode]. Chassis Fan 3 Setting This allows you to set the chassis fan 2 speed. The default is value [Full On]. CPU Fan 1 & 2 Setting This allows you ... set the CPU fan 1 & 2 speed. The default is value [Full On]. 53 The default is value [Full On]. Confi guration options: [Full On] and [Manual Mode]. Confi guration options: [Full On], [Manual Mode] and [Automatic Mode]. Confi guration options: [Full On] and [Automatic Mode].
Chassis Fan 1 Setting This allows you to set the chassis fan 3 speed. Confi guration options: [Full On] and [Manual Mode]. Chassis Fan 3 Setting This allows you to set the chassis fan 2 speed. The default is value [Full On]. CPU Fan 1 & 2 Setting This allows you ... set the CPU fan 1 & 2 speed. The default is value [Full On]. 53 The default is value [Full On]. Confi guration options: [Full On] and [Manual Mode]. Confi guration options: [Full On], [Manual Mode] and [Automatic Mode]. Confi guration options: [Full On] and [Automatic Mode].

User Manual
Page 59
... Windows® 7 64-bit. 2. Please make sure to be installed on a large size HDD (>2TB). Set RAID Mode in EFI Shell. 5. Press to enter Boot Manual. Key in drvcfg, for example: key in dh [Drv number], for example you will see below procedure to install the operating system. 1. Key in dh...
... Windows® 7 64-bit. 2. Please make sure to be installed on a large size HDD (>2TB). Set RAID Mode in EFI Shell. 5. Press to enter Boot Manual. Key in drvcfg, for example: key in dh [Drv number], for example you will see below procedure to install the operating system. 1. Key in dh...

User Manual
Page 61
Press Space on Windows® 7 64-bit and VistaTM 64-bit OS. 61 Press to toggle checkbox. 12. During reboot, please press to Create. 14. 11. Choose Ld Size setting, and key in the Raid size. 13. Choose UEFI: SCSI CD/DVD Drive. * This option only shows on keyboard to exit Utility. 15. After set up Raid size, please click Start to enter Boot Manual.
Press Space on Windows® 7 64-bit and VistaTM 64-bit OS. 61 Press to toggle checkbox. 12. During reboot, please press to Create. 14. 11. Choose Ld Size setting, and key in the Raid size. 13. Choose UEFI: SCSI CD/DVD Drive. * This option only shows on keyboard to exit Utility. 15. After set up Raid size, please click Start to enter Boot Manual.

Quick Installation Guide
Page 5
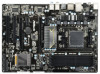
... the BIOS option in our support CD for purchasing ASRock 970 Extreme3 motherboard, a reliable motherboard produced under ASRock's consistently stringent quality control. This Quick Installation Guide contains introduction of the motherboard can be found in the user manual presented in , 30.5 cm x 21.8 cm) ASRock 970 Extreme3 Quick Installation Guide ASRock 970 Extreme3 Support CD 2 x Serial ATA (SATA) Data Cables (Optional...
... the BIOS option in our support CD for purchasing ASRock 970 Extreme3 motherboard, a reliable motherboard produced under ASRock's consistently stringent quality control. This Quick Installation Guide contains introduction of the motherboard can be found in the user manual presented in , 30.5 cm x 21.8 cm) ASRock 970 Extreme3 Quick Installation Guide ASRock 970 Extreme3 Support CD 2 x Serial ATA (SATA) Data Cables (Optional...

Quick Installation Guide
Page 13
...of the CPU fan and the heatsink. Make sure that the CPU and the heatsink are securely fastened and in one correct orientation. English 13 ASRock 970 Extreme3 Motherboard For proper installation, please kindly refer to secure the CPU. DO NOT force the CPU into this motherboard, it firmly on the... see Page 2, No. 6 or CPU_FAN2, see Page 2, No. 5). The lever clicks on the socket while you push down the socket lever to the instruction manuals of the pins. Then connect the CPU fan to indicate that the CPU corner with the golden triangle matches the socket corner with each other...
...of the CPU fan and the heatsink. Make sure that the CPU and the heatsink are securely fastened and in one correct orientation. English 13 ASRock 970 Extreme3 Motherboard For proper installation, please kindly refer to secure the CPU. DO NOT force the CPU into this motherboard, it firmly on the... see Page 2, No. 6 or CPU_FAN2, see Page 2, No. 5). The lever clicks on the socket while you push down the socket lever to the instruction manuals of the pins. Then connect the CPU fan to indicate that the CPU corner with the golden triangle matches the socket corner with each other...

Quick Installation Guide
Page 17
... Setup 2.5.1.1 Installing Two CrossFireXTM-Ready Graphics Cards Different CrossFireXTM cards may require different methods to AMDTM graphics card manuals for AMDTM CrossFireXTM driver updates. 1. Quad CrossFireXTM feature are properly seated on the slots. 17 ASRock 970 Extreme3 Motherboard English All three CrossFireXTM components, a CrossFireXTM Ready graphics card, a CrossFireXTM Ready motherboard and a CrossFireXTM Edition co...
... Setup 2.5.1.1 Installing Two CrossFireXTM-Ready Graphics Cards Different CrossFireXTM cards may require different methods to AMDTM graphics card manuals for AMDTM CrossFireXTM driver updates. 1. Quad CrossFireXTM feature are properly seated on the slots. 17 ASRock 970 Extreme3 Motherboard English All three CrossFireXTM components, a CrossFireXTM Ready graphics card, a CrossFireXTM Ready motherboard and a CrossFireXTM Edition co...
Quick Installation Guide
Page 23
... chassis must support HDA to MIC2_L. If you use AC'97 audio panel, please install it to the "FrontMic" Tab in our manual and chassis manual to turn off your system. 2. C. MIC_RET and OUT_RET are for the front panel audio cable that allows convenient connection and control of... Panel Header (9-pin PANEL1) (see p.2 No. 25) 1 GND IRTX IRRX ATX+5VSB This header can be used to perform a normal restart. 23 ASRock 970 Extreme3 Motherboard You may configure the way to install your system using the power switch. Please follow the instruction in the Realtek Control panel...
... chassis must support HDA to MIC2_L. If you use AC'97 audio panel, please install it to the "FrontMic" Tab in our manual and chassis manual to turn off your system. 2. C. MIC_RET and OUT_RET are for the front panel audio cable that allows convenient connection and control of... Panel Header (9-pin PANEL1) (see p.2 No. 25) 1 GND IRTX IRRX ATX+5VSB This header can be used to perform a normal restart. 23 ASRock 970 Extreme3 Motherboard You may configure the way to install your system using the power switch. Please follow the instruction in the Realtek Control panel...

Quick Installation Guide
Page 27
...FSB enjoys better margin due to the warning on page 8 for the possible overclocking risk before you apply Untied Overclocking Technology. 27 ASRock 970 Extreme3 Motherboard English tem. A. Enter UEFI SETUP UTILITY Advanced screen Storage Configuration. Enter UEFI SETUP UTILITY Advanced screen Storage Con... Using SATA3 HDDs with NCQ and Hot Plug functions (AHCI mode) STEP 1: Set up UEFI. Set the "SATA Mode" option to [Manual]. Before you enable Untied Overclocking function, please enter "Overclock Mode" option of UEFI setup to set the selection from [Auto] to [AHCI]....
...FSB enjoys better margin due to the warning on page 8 for the possible overclocking risk before you apply Untied Overclocking Technology. 27 ASRock 970 Extreme3 Motherboard English tem. A. Enter UEFI SETUP UTILITY Advanced screen Storage Configuration. Enter UEFI SETUP UTILITY Advanced screen Storage Con... Using SATA3 HDDs with NCQ and Hot Plug functions (AHCI mode) STEP 1: Set up UEFI. Set the "SATA Mode" option to [Manual]. Before you enable Untied Overclocking function, please enter "Overclock Mode" option of UEFI setup to set the selection from [Auto] to [AHCI]....
