RAID Installation Guide
Page 2
... access and storage since the disk array management software will direct all applications to configure RAID functions by following the detailed instruction of the "User Manual" in our support CD or "Quick Installation Guide", then you to the surviving drive as a single drive but at a sustained data transfer rate. Hot-Plug...
... access and storage since the disk array management software will direct all applications to configure RAID functions by following the detailed instruction of the "User Manual" in our support CD or "Quick Installation Guide", then you to the surviving drive as a single drive but at a sustained data transfer rate. Hot-Plug...
RAID Installation Guide
Page 8
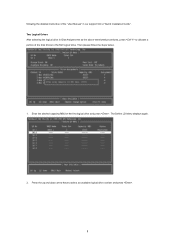
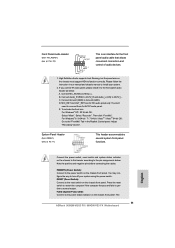
Press the up and down arrow keys to select an available logical drive number and press . 8 The Define LD Menu displays again. 2. Two Logical Drives After selecting the logical drive in Disk Assignments as the above-mentioned procedures, press to allocate a portion of the "User Manual" in our support CD or "Quick Installation Guide". Then please follow the steps below. 1. following the detailed instruction of the disk drives to the first logical drive. Enter the desired capacity (MB) for the first logical drive and press .
Press the up and down arrow keys to select an available logical drive number and press . 8 The Define LD Menu displays again. 2. Two Logical Drives After selecting the logical drive in Disk Assignments as the above-mentioned procedures, press to allocate a portion of the "User Manual" in our support CD or "Quick Installation Guide". Then please follow the steps below. 1. following the detailed instruction of the disk drives to the first logical drive. Enter the desired capacity (MB) for the first logical drive and press .

RAID Installation Guide
Page 9
... RAID level and options for the second logical drive. Note that the disk drives in Channels 1 and 2 reflect smaller capacities because a portion of the "User Manual" in Channels 3 and 4 are not assigned to the Main Menu.
... RAID level and options for the second logical drive. Note that the disk drives in Channels 1 and 2 reflect smaller capacities because a portion of the "User Manual" in Channels 3 and 4 are not assigned to the Main Menu.

RAID Installation Guide
Page 13
... Host PC's IP address 127.0.0.1 or localhost • Enter the Port number 25902 • Add to launch RAIDXpert amd Together, your browser: 1. Or, log on manually with your entry looks like this: http://127.0.0.1:25902/ati or http://localhost:25902/ati 2.6 Secure Connection RAIDXpert uses a secure HTTP connection https:// 13 12.
... Host PC's IP address 127.0.0.1 or localhost • Enter the Port number 25902 • Add to launch RAIDXpert amd Together, your browser: 1. Or, log on manually with your entry looks like this: http://127.0.0.1:25902/ati or http://localhost:25902/ati 2.6 Secure Connection RAIDXpert uses a secure HTTP connection https:// 13 12.
User Manual
Page 1
All rights reserved. 1 960GM-VGS3 FX 960GM-VS3 FX User Manual Version 1.0 Published November 2012 Copyright©2012 ASRock INC.
All rights reserved. 1 960GM-VGS3 FX 960GM-VS3 FX User Manual Version 1.0 Published November 2012 Copyright©2012 ASRock INC.
User Manual
Page 2
Products and corporate names appearing in this manual. ASRock assumes no event shall ASRock, its directors, officers, employees, or agents be registered trademarks or copyrights of their respective companies, and are furnished for a particular purpose. ... (1) this device may not cause harmful interference, and (2) this device must accept any interference received, including interference that may appear in this manual, ASRock does not provide warranty of any kind, either expressed or implied, including but not limited to the implied warranties or conditions of such damages arising...
Products and corporate names appearing in this manual. ASRock assumes no event shall ASRock, its directors, officers, employees, or agents be registered trademarks or copyrights of their respective companies, and are furnished for a particular purpose. ... (1) this device may not cause harmful interference, and (2) this device must accept any interference received, including interference that may appear in this manual, ASRock does not provide warranty of any kind, either expressed or implied, including but not limited to the implied warranties or conditions of such damages arising...
User Manual
Page 5
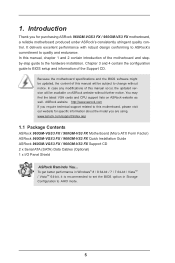
... ASRock 960GM-VGS3 FX / 960GM-VS3 FX Motherboard (Micro ATX Form Factor) ASRock 960GM-VGS3 FX / 960GM-VS3 FX Quick Installation Guide ASRock 960GM-VGS3 FX / 960GM-VS3 FX Support CD 2 x Serial ATA (SATA) Data Cables (Optional) 1 x I/O Panel Shield ASRock Reminds You... ASRock website http://www.asrock.com If you are using. It delivers excellent performance with robust design conforming to ASRock's commitment to AHCI mode. 5 In case any modifications of this manual...
... ASRock 960GM-VGS3 FX / 960GM-VS3 FX Motherboard (Micro ATX Form Factor) ASRock 960GM-VGS3 FX / 960GM-VS3 FX Quick Installation Guide ASRock 960GM-VGS3 FX / 960GM-VS3 FX Support CD 2 x Serial ATA (SATA) Data Cables (Optional) 1 x I/O Panel Shield ASRock Reminds You... ASRock website http://www.asrock.com If you are using. It delivers excellent performance with robust design conforming to ASRock's commitment to AHCI mode. 5 In case any modifications of this manual...

User Manual
Page 16
... are securely fastened and in place, press it firmly on the side tab to secure the CPU. Then connect the CPU fan to the instruction manuals of the pins. DO NOT force the CPU into the socket until it is locked. Step 4. The CPU fits only in place. The lever clicks...
... are securely fastened and in place, press it firmly on the side tab to secure the CPU. Then connect the CPU fan to the instruction manuals of the pins. DO NOT force the CPU into the socket until it is locked. Step 4. The CPU fits only in place. The lever clicks...

User Manual
Page 23
... for HD audio panel only. For Windows® 8 / 8 64-bit / 7 / 7 64-bit / VistaTM / VistaTM 64-bit OS: Go to the "FrontMic" Tab in our manual and chassis manual to the pin assignments below : A. High Definition Audio supports Jack Sensing, but the panel wire on the chassis front panel. Front Panel Audio Header...
... for HD audio panel only. For Windows® 8 / 8 64-bit / 7 / 7 64-bit / VistaTM / VistaTM 64-bit OS: Go to the "FrontMic" Tab in our manual and chassis manual to the pin assignments below : A. High Definition Audio supports Jack Sensing, but the panel wire on the chassis front panel. Front Panel Audio Header...
User Manual
Page 27
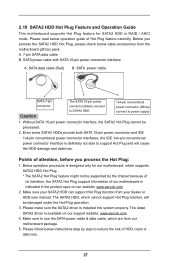
...driver is definitely not able to support Hot Plug and will be damaged under the Hot Plug operation. 3. Make sure your dealer or HDD user manual. Make sure to use the SATA power cable & data cable, which cannot support Hot Plug function, will cause the HDD damage and data ...power connector and IDE 1x4-pin conventional power connector interfaces, the IDE 1x4-pin conventional power connector interface is available on our website: www.asrock.com 2. Below operation procedure is installed into system properly. Please make sure the SATA2 driver is designed only for SATA2 HDD in the ...
...driver is definitely not able to support Hot Plug and will be damaged under the Hot Plug operation. 3. Make sure your dealer or HDD user manual. Make sure to use the SATA power cable & data cable, which cannot support Hot Plug function, will cause the HDD damage and data ...power connector and IDE 1x4-pin conventional power connector interfaces, the IDE 1x4-pin conventional power connector interface is available on our website: www.asrock.com 2. Below operation procedure is installed into system properly. Please make sure the SATA2 driver is designed only for SATA2 HDD in the ...

User Manual
Page 32
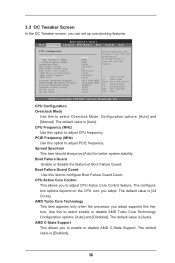
...-bit Without RAID Functions If you enable Untied Overclocking function, please enter "Overclock Mode" option of BIOS setup to set the selection from [Auto] to [Manual]. Enter BIOS SETUP UTILITY Advanced screen Storage Configuration. Enter BIOS SETUP UTILITY Advanced screen Storage Configuration. STEP 2: Install Windows® 8 / 8 64-bit / 7 / 7 64-bit / VistaTM...
...-bit Without RAID Functions If you enable Untied Overclocking function, please enter "Overclock Mode" option of BIOS setup to set the selection from [Auto] to [Manual]. Enter BIOS SETUP UTILITY Advanced screen Storage Configuration. Enter BIOS SETUP UTILITY Advanced screen Storage Configuration. STEP 2: Install Windows® 8 / 8 64-bit / 7 / 7 64-bit / VistaTM...
User Manual
Page 36
... value is [Auto]. Configuration options: [Auto] and [Disabled]. AMD C-State Support This allows you adopt supports this to adjust PCIE frequency. Configuration options: [Auto] and [Manual]. Boot Failure Guard Count Use this option to select enable or disable AMD Turbo Core Technology. The default value is [All Cores]. The configuration options...
... value is [Auto]. Configuration options: [Auto] and [Disabled]. AMD C-State Support This allows you adopt supports this to adjust PCIE frequency. Configuration options: [Auto] and [Manual]. Boot Failure Guard Count Use this option to select enable or disable AMD Turbo Core Technology. The default value is [All Cores]. The configuration options...

User Manual
Page 37
...Maximum Voltage Multiplier/Voltage Change [Auto] [200] [100] [Auto] [Enabled] [3] [All Cores] [Auto] [Enabled] [Auto] x31.5 6300 MHZ x31.0 6200 MHz 1.5500 V [Manual] Overclocking may adjust the value of this item. NB Frequency Multiplier For safety and system stability, it is set to keep the default value for... safety and system stability, it is [Auto]. 37 The default value is not recommended to [Manual], you to adjust the value of CPU NB voltage. Select Screen Select Item Enter Go to your own risk and expense. However, for ...
...Maximum Voltage Multiplier/Voltage Change [Auto] [200] [100] [Auto] [Enabled] [3] [All Cores] [Auto] [Enabled] [Auto] x31.5 6300 MHZ x31.0 6200 MHz 1.5500 V [Manual] Overclocking may adjust the value of this item. NB Frequency Multiplier For safety and system stability, it is set to keep the default value for... safety and system stability, it is [Auto]. 37 The default value is not recommended to [Manual], you to adjust the value of CPU NB voltage. Select Screen Select Item Enter Go to your own risk and expense. However, for ...

User Manual
Page 38
.... Configuration options: [Disabled], [Auto]. The default is [Auto]. TRCD Use this item to change TRCD Auto/Manual setting. The default is [Auto]. TRAS Use this item to enable or disable DDR power down mode. You can be spread out over banks on ... Option General Help Load Defaults Save and Exit Exit v02.54 (C) Copyright 1985-2003, American Megatrends, Inc. TRP Use this item to change TRAS Auto/Manual setting. Memory Configuration Memory Clock This item can set by the code using [Auto]. Channel Interleaving It allows you to be set one of the...
.... Configuration options: [Disabled], [Auto]. The default is [Auto]. TRCD Use this item to change TRCD Auto/Manual setting. The default is [Auto]. TRAS Use this item to enable or disable DDR power down mode. You can be spread out over banks on ... Option General Help Load Defaults Save and Exit Exit v02.54 (C) Copyright 1985-2003, American Megatrends, Inc. TRP Use this item to change TRAS Auto/Manual setting. Memory Configuration Memory Clock This item can set by the code using [Auto]. Channel Interleaving It allows you to be set one of the...

User Manual
Page 39
...to load and save current setting user defaults? The default is [Auto]. TWTR Use this item to change TWR Auto/Manual setting. TRRD Use this item to change TRC Auto/Manual setting. The default is [Auto]. The default is [Auto]. The default is [Auto]. The default is [Auto...]. TRTP Use this item to change TWTR Auto/Manual setting. Onboard GPU Clock This option only appears when you to enable or disable the Onboard GPU Clock Override feature. TRC Use this item ...
...to load and save current setting user defaults? The default is [Auto]. TWTR Use this item to change TWR Auto/Manual setting. TRRD Use this item to change TRC Auto/Manual setting. The default is [Auto]. The default is [Auto]. The default is [Auto]. The default is [Auto...]. TRTP Use this item to change TWTR Auto/Manual setting. Onboard GPU Clock This option only appears when you to enable or disable the Onboard GPU Clock Override feature. TRC Use this item ...

User Manual
Page 49
... on your system, including the parameters of previous chassis intrusion status. 49 Confi guration options: [Full On] and [Automatic Mode]. Confi guration options: [Full On], [Manual Mode] and [Automatic Mode]. The default is value [Full On]. The default is value [Full On]. Chassis Fan 1 Setting This allows you to set the...
... on your system, including the parameters of previous chassis intrusion status. 49 Confi guration options: [Full On] and [Automatic Mode]. Confi guration options: [Full On], [Manual Mode] and [Automatic Mode]. The default is value [Full On]. The default is value [Full On]. Chassis Fan 1 Setting This allows you to set the...
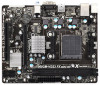
Quick Installation Guide
Page 4
... robust design conforming to ASRock's commitment to the "User Manual" in our support CD for details. 4 ASRock 960GM-VGS3 FX / 960GM-VS3 FX Motherboard English 1. More detailed information of the motherboard and step-bystep installation guide. www.asrock.com/support/index.asp 1.1 Package Contents ASRock 960GM-VGS3 FX / 960GM-VS3 FX Motherboard (Micro ATX Form Factor) ASRock 960GM-VGS3 FX / 960GM-VS3 FX Quick Installation Guide ASRock 960GM-VGS3 FX / 960GM-VS3 FX Support CD 2 x Serial ATA...
... robust design conforming to ASRock's commitment to the "User Manual" in our support CD for details. 4 ASRock 960GM-VGS3 FX / 960GM-VS3 FX Motherboard English 1. More detailed information of the motherboard and step-bystep installation guide. www.asrock.com/support/index.asp 1.1 Package Contents ASRock 960GM-VGS3 FX / 960GM-VS3 FX Motherboard (Micro ATX Form Factor) ASRock 960GM-VGS3 FX / 960GM-VS3 FX Quick Installation Guide ASRock 960GM-VGS3 FX / 960GM-VS3 FX Support CD 2 x Serial ATA...
Quick Installation Guide
Page 11
.... D. You don't need to OUT2_L. Connect Mic_IN (MIC) to perform a normal restart. C. E. Adjust "Recording Volume". The 11 ASRock 960GM-VGS3 FX / 960GM-VS3 FX Motherboard Please follow the instruction in the Realtek Control panel. RESET (Reset Switch): Connect to the reset switch on the chassis must support HDA...174; 8 / 8 64-bit / 7 / 7 64-bit / VistaTM / VistaTM 64-bit OS: Go to the "FrontMic" Tab in our manual and chassis manual to Ground (GND). Note the positive and negative pins before connecting the cables. Press the reset switch to restart the computer if the computer...
.... D. You don't need to OUT2_L. Connect Mic_IN (MIC) to perform a normal restart. C. E. Adjust "Recording Volume". The 11 ASRock 960GM-VGS3 FX / 960GM-VS3 FX Motherboard Please follow the instruction in the Realtek Control panel. RESET (Reset Switch): Connect to the reset switch on the chassis must support HDA...174; 8 / 8 64-bit / 7 / 7 64-bit / VistaTM / VistaTM 64-bit OS: Go to the "FrontMic" Tab in our manual and chassis manual to Ground (GND). Note the positive and negative pins before connecting the cables. Press the reset switch to restart the computer if the computer...
Quick Installation Guide
Page 14
... that came with its various sub-menus and to be user-friendly. 2. When you wish to display the menus. 14 ASRock 960GM-VGS3 FX / 960GM-VS3 FX Motherboard English If you start up the computer, please press or during the Power-On-Self-Test (POST) to the User Manual (PDF file) contained in the Support CD. 3.
... that came with its various sub-menus and to be user-friendly. 2. When you wish to display the menus. 14 ASRock 960GM-VGS3 FX / 960GM-VS3 FX Motherboard English If you start up the computer, please press or during the Power-On-Self-Test (POST) to the User Manual (PDF file) contained in the Support CD. 3.
