User Manual
Page 4
... 37 3.1 Introduction 37 3.1.1 BIOS Menu Bar 37 3.1.2 Navigation Keys 38 3.2 Main Screen 38 3.3 OC Tweaker Screen 39 3.4 Advanced Screen 43 3.4.1 CPU Configuration 44 3.4.2 Chipset Configuration 45 3.4.3 ACPI Configuration 46 3.4.4 ...
... 37 3.1 Introduction 37 3.1.1 BIOS Menu Bar 37 3.1.2 Navigation Keys 38 3.2 Main Screen 38 3.3 OC Tweaker Screen 39 3.4 Advanced Screen 43 3.4.1 CPU Configuration 44 3.4.2 Chipset Configuration 45 3.4.3 ACPI Configuration 46 3.4.4 ...

User Manual
Page 5
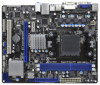
... robust design conforming to ASRock's commitment to BIOS setup and information of the Support CD. www.asrock.com/support/index.asp 1.1 Package Contents ASRock 960GM/U3S3 FX Motherboard (Micro ATX Form Factor: 9.6-in x 7.8-in, 24.4 cm x 19.8 cm) ASRock 960GM/U3S3 FX Quick Installation Guide ASRock 960GM/U3S3 FX Support CD 2 x Serial ATA (SATA) Data Cables (Optional) 1 x I/O Panel Shield 5 ASRock website http://www.asrock.com If you...
... robust design conforming to ASRock's commitment to BIOS setup and information of the Support CD. www.asrock.com/support/index.asp 1.1 Package Contents ASRock 960GM/U3S3 FX Motherboard (Micro ATX Form Factor: 9.6-in x 7.8-in, 24.4 cm x 19.8 cm) ASRock 960GM/U3S3 FX Quick Installation Guide ASRock 960GM/U3S3 FX Support CD 2 x Serial ATA (SATA) Data Cables (Optional) 1 x I/O Panel Shield 5 ASRock website http://www.asrock.com If you...

User Manual
Page 7
... 2.0 headers (support 4 USB 2.0 ports) - 8Mb AMI BIOS - ASRock MAGIX Multimedia Suite - HD Audio Jack: Line in header - CPU/Chassis/Power FAN connector - 24 pin ATX power connector - 4 pin 12V power connector - AMI Legal BIOS - Supports "Plug and Play" - CD in / Front Speaker... - Supports jumperfree - Supports PXE I /O SATA3 USB3 Connector BIOS Feature Support CD - SMBIOS 2.3.1 Support - Drivers, Utilities, AntiVirus Software (Trial Version), AMD OverDriveTM Utility, CyberLink MediaEspresso 6.5 Trial, ASRock Software Suite (CyberLink DVD Suite - ACPI 1.1 Compliance Wake Up...
... 2.0 headers (support 4 USB 2.0 ports) - 8Mb AMI BIOS - ASRock MAGIX Multimedia Suite - HD Audio Jack: Line in header - CPU/Chassis/Power FAN connector - 24 pin ATX power connector - 4 pin 12V power connector - AMI Legal BIOS - Supports "Plug and Play" - CD in / Front Speaker... - Supports jumperfree - Supports PXE I /O SATA3 USB3 Connector BIOS Feature Support CD - SMBIOS 2.3.1 Support - Drivers, Utilities, AntiVirus Software (Trial Version), AMD OverDriveTM Utility, CyberLink MediaEspresso 6.5 Trial, ASRock Software Suite (CyberLink DVD Suite - ACPI 1.1 Compliance Wake Up...
User Manual
Page 8
... Temperature Sensing Monitor - ASRock Instant Flash (see CAUTION 14) - ASRock SmartView (see CAUTION 17) - ASRock U-COP (see CAUTION 12) - CPU/Chassis/Power Fan Tachometer - CPU/Chassis Fan Multi-Speed Control - ErP/EuP Ready (ErP/EuP ready power supply is a certain risk involved with overclocking, including adjusting the setting in the BIOS, applying Untied Overclocking...
... Temperature Sensing Monitor - ASRock Instant Flash (see CAUTION 14) - ASRock SmartView (see CAUTION 17) - ASRock U-COP (see CAUTION 12) - CPU/Chassis/Power Fan Tachometer - CPU/Chassis Fan Multi-Speed Control - ErP/EuP Ready (ErP/EuP ready power supply is a certain risk involved with overclocking, including adjusting the setting in the BIOS, applying Untied Overclocking...

User Manual
Page 9
... also connect SATA hard disk to get the best system performance under Windows® 7 / VistaTM / XP. ASRock website: http://www.asrock.com 9 ASRock website http://www.asrock.com 4. Please visit our website for the operation procedures of memory modules on page 27 to adjust your hardware devices... You can reduce the number of ASRock OC Tuner. To use Intelligent Energy Saver function, please enable Cool 'n' Quiet option in the BIOS setup in advance. Please check AMD website for the compatible memory modules. ASRock website: http://www.asrock.com 8. The maximum shared memory size...
... also connect SATA hard disk to get the best system performance under Windows® 7 / VistaTM / XP. ASRock website: http://www.asrock.com 9 ASRock website http://www.asrock.com 4. Please visit our website for the operation procedures of memory modules on page 27 to adjust your hardware devices... You can reduce the number of ASRock OC Tuner. To use Intelligent Energy Saver function, please enable Cool 'n' Quiet option in the BIOS setup in advance. Please check AMD website for the compatible memory modules. ASRock website: http://www.asrock.com 8. The maximum shared memory size...
User Manual
Page 10
... friends then can boost USB storage device performance. Simply installing the APP Charger driver, it is a BIOS flash utility embedded in touch with others. ASRock website: http://www.asrock.com/Feature/SmartView/index.asp 13. The performance may depend on the property of internet browser, is ...the operating system and simplifies the complicated recording process of overclocking settings. Please be noticed that helps you to save the new BIOS file to access ASRock Instant Flash. 9. The software name itself - With this tool and save your USB flash drive, floppy disk or hard...
... friends then can boost USB storage device performance. Simply installing the APP Charger driver, it is a BIOS flash utility embedded in touch with others. ASRock website: http://www.asrock.com/Feature/SmartView/index.asp 13. The performance may depend on the property of internet browser, is ...the operating system and simplifies the complicated recording process of overclocking settings. Please be noticed that helps you to save the new BIOS file to access ASRock Instant Flash. 9. The software name itself - With this tool and save your USB flash drive, floppy disk or hard...

User Manual
Page 12
...: MIC IN LAN USB 3.0 PCIE1 AMD 760G Chipset PWR_FAN1 SATA3_1 SATA3_2 SATAII_4 (PORT 3) AUDIO CODEC Super I/O COM1 1 RoHS HD_AUDIO1 1 CD1 1 LPT1 SATA3 6Gb/s PCIE2 960GM/U3S3 FX CMOS BATTERY 8Mb BIOS PCI1 CLRCMOS1 1 IR1 1 USB6_7 1 1 CIR1 USB8_9 1 AMD SB710 Chipset SATAII_3 (PORT 2) CHA_FAN1 PANEL 1 PLED PWRBTN 1 HDLED RESET SATAII_1 (PORT 0) SPEAKER1 1 SATAII_2 (PORT 1) 27...
...: MIC IN LAN USB 3.0 PCIE1 AMD 760G Chipset PWR_FAN1 SATA3_1 SATA3_2 SATAII_4 (PORT 3) AUDIO CODEC Super I/O COM1 1 RoHS HD_AUDIO1 1 CD1 1 LPT1 SATA3 6Gb/s PCIE2 960GM/U3S3 FX CMOS BATTERY 8Mb BIOS PCI1 CLRCMOS1 1 IR1 1 USB6_7 1 1 CIR1 USB8_9 1 AMD SB710 Chipset SATAII_3 (PORT 2) CHA_FAN1 PANEL 1 PLED PWRBTN 1 HDLED RESET SATAII_1 (PORT 0) SPEAKER1 1 SATAII_2 (PORT 1) 27...

User Manual
Page 19
... the memory capability to [32MB], [64MB], [128MB] [256MB] or [512MB] to save your system. Please make sure that you do not adjust the BIOS setup, the default value of "Share Memory", [Auto], will be designated as appropriate for the diaplay icon identified by the number one monitor will always... be your monitors that you can adjust the parameters of display icons determines how you use . If you wish to enter BIOS setup. Right-click the display icon in the Display Properties dialog that the value you would like to the steps below . E. F. Set the "...
... the memory capability to [32MB], [64MB], [128MB] [256MB] or [512MB] to save your system. Please make sure that you do not adjust the BIOS setup, the default value of "Share Memory", [Auto], will be designated as appropriate for the diaplay icon identified by the number one monitor will always... be your monitors that you can adjust the parameters of display icons determines how you use . If you wish to enter BIOS setup. Right-click the display icon in the Display Properties dialog that the value you would like to the steps below . E. F. Set the "...

User Manual
Page 22
... waiting for 15 seconds, use a jumper cap to clear the CMOS when you just finish updating the BIOS, you must boot up the system first, and then shut it down before you update the BIOS. If you need to short pin2 and pin3 on pins, the jumper is "Short". 2.7 Jumpers Setup The...
... waiting for 15 seconds, use a jumper cap to clear the CMOS when you just finish updating the BIOS, you must boot up the system first, and then shut it down before you update the BIOS. If you need to short pin2 and pin3 on pins, the jumper is "Short". 2.7 Jumpers Setup The...

User Manual
Page 32
... SATA / SATA2 HDDs with RAID functions, please follow the order from up to bottom side to install those required drivers. B. Insert the ASRock Support CD into your optical drive to boot your optical drive first. Please select CD- D. B. During POST at the beginning of 2... Diskette. (Please use a USB floppy or floppy disk.) A. The system will see the message on a RAID disk composed of system boot-up BIOS. E. Set the "SATA Operation Mode" option to [RAID] for boot devices selection appears. C. Please follow below procedures according to the OS you...
... SATA / SATA2 HDDs with RAID functions, please follow the order from up to bottom side to install those required drivers. B. Insert the ASRock Support CD into your optical drive to boot your optical drive first. Please select CD- D. B. During POST at the beginning of 2... Diskette. (Please use a USB floppy or floppy disk.) A. The system will see the message on a RAID disk composed of system boot-up BIOS. E. Set the "SATA Operation Mode" option to [RAID] for boot devices selection appears. C. Please follow below procedures according to the OS you...
User Manual
Page 33
.../ VistaTM / VistaTM 64-bit OS on your system. 33 B. After reading the floppy disk, the driver will be presented. Then, please set up BIOS. STEP 2: Use "RAID Installation Guide" to set RAID configuration. Before you start to configure RAID function, you need to check the RAID installation guide...SATA / SATA2 driver diskette containing the AMD RAID driver. Select the driver to install according to [RAID] first. A. Please refer to the BIOS RAID installation guide part of 2 or more SATA / SATA2 HDDs with RAID functions, please follow below steps. If you start to install ...
.../ VistaTM / VistaTM 64-bit OS on your system. 33 B. After reading the floppy disk, the driver will be presented. Then, please set up BIOS. STEP 2: Use "RAID Installation Guide" to set RAID configuration. Before you start to configure RAID function, you need to check the RAID installation guide...SATA / SATA2 driver diskette containing the AMD RAID driver. Select the driver to install according to [RAID] first. A. Please refer to the BIOS RAID installation guide part of 2 or more SATA / SATA2 HDDs with RAID functions, please follow below steps. If you start to install ...
User Manual
Page 34
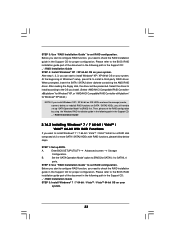
... SATA2 / SATA3 HDDs without RAID functions, please follow below procedures according to install Windows® XP / XP 64-bit on your system. A. Enter BIOS SETUP UTILITY Advanced screen Storage Configuration. At the beginning of Windows® setup, press F6 to [IDE] in the Support CD: .. \ RAID Installation...up "SATA Operation Mode" to SATAII_4 ports. NOTE1. Using SATA / SATA2/ SATA3 HDDs with NCQ and Hot Plug functions (AHCI mode) STEP 1: Set Up BIOS. If you install Windows® 7 / 7 64-bit / VistaTM / VistaTM 64-bit on IDE HDDs and want to manage (create, convert, delete, or...
... SATA2 / SATA3 HDDs without RAID functions, please follow below procedures according to install Windows® XP / XP 64-bit on your system. A. Enter BIOS SETUP UTILITY Advanced screen Storage Configuration. At the beginning of Windows® setup, press F6 to [IDE] in the Support CD: .. \ RAID Installation...up "SATA Operation Mode" to SATAII_4 ports. NOTE1. Using SATA / SATA2/ SATA3 HDDs with NCQ and Hot Plug functions (AHCI mode) STEP 1: Set Up BIOS. If you install Windows® 7 / 7 64-bit / VistaTM / VistaTM 64-bit on IDE HDDs and want to manage (create, convert, delete, or...

User Manual
Page 35
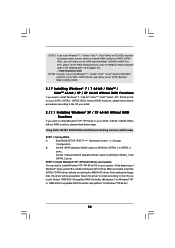
... OS on your system. Using SATA / SATA2 / SATA3 HDDs without NCQ and Hot Plug functions (IDE mode) STEP 1: Set up BIOS. Enter BIOS SETUP UTILITY Advanced screen Storage Configuration. Set the "SATA Operation Mode" option to [AHCI] for SATAII_1 to [IDE] for SATA3_1 and ...IDE] for SATA3_1 and SATA3_2 ports. A. Using SATA / SATA2 / SATA3 HDDs without NCQ and Hot Plug functions (IDE mode) STEP 1: Set up BIOS. Enter BIOS SETUP UTILITY Advanced screen Storage Configuration. B. STEP 2: Install Windows® 7 / 7 64-bit / VistaTM / VistaTM 64-bit OS on your system....
... OS on your system. Using SATA / SATA2 / SATA3 HDDs without NCQ and Hot Plug functions (IDE mode) STEP 1: Set up BIOS. Enter BIOS SETUP UTILITY Advanced screen Storage Configuration. Set the "SATA Operation Mode" option to [AHCI] for SATAII_1 to [IDE] for SATA3_1 and ...IDE] for SATA3_1 and SATA3_2 ports. A. Using SATA / SATA2 / SATA3 HDDs without NCQ and Hot Plug functions (IDE mode) STEP 1: Set up BIOS. Enter BIOS SETUP UTILITY Advanced screen Storage Configuration. B. STEP 2: Install Windows® 7 / 7 64-bit / VistaTM / VistaTM 64-bit OS on your system....

User Manual
Page 36
... better margin due to the warning on page 8 for the possible overclocking risk before you enable Untied Overclocking function, please enter "Overclock Mode" option of BIOS setup to set the selection from [Auto] to [Manual].
... better margin due to the warning on page 8 for the possible overclocking risk before you enable Untied Overclocking function, please enter "Overclock Mode" option of BIOS setup to set the selection from [Auto] to [Manual].

User Manual
Page 37
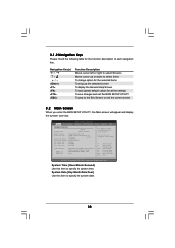
...the following selections: Main To set up the system time/date information OC Tweaker To set up overclocking features Advanced To set up the advanced BIOS features H/W Monitor To display current hardware status Boot To set up the default system device to locate and load the Operating System Security To ...set up the computer. Please press or during the Power-On-Self-Test (POST) to configure your screen. 3.1.1 BIOS Menu Bar The top of the screen has a menu bar with its test routines. You may not exactly match what you wish to get into...
...the following selections: Main To set up the system time/date information OC Tweaker To set up overclocking features Advanced To set up the advanced BIOS features H/W Monitor To display current hardware status Boot To set up the default system device to locate and load the Operating System Security To ...set up the computer. Please press or during the Power-On-Self-Test (POST) to configure your screen. 3.1.1 BIOS Menu Bar The top of the screen has a menu bar with its test routines. You may not exactly match what you wish to get into...
User Manual
Page 38
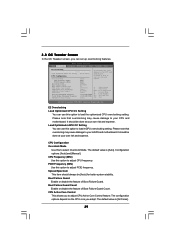
...OC Tweaker Advanced H/W Monitor Boot Security Exit System Overview System Time System Date [17:00:09] [Tue 12/13/2011] BIOS Version : 960GM/U3S3 FX P1.0 Processor Type : AMD FX(tm)-8150 Eight-Core Processor (64bit) Processor Speed : 3600MHz Microcode Update : 600F12/6000623 L1 Cache Size : 640KB L2 ... Use [Enter], [TAB] or [SHIFT-TAB] to the Exit Screen or exit the current screen 3.2 Main Screen When you enter the BIOS SETUP UTILITY, the Main screen will appear and display the system overview. 3.1.2 Navigation Keys Please check the following table for all the settings...
...OC Tweaker Advanced H/W Monitor Boot Security Exit System Overview System Time System Date [17:00:09] [Tue 12/13/2011] BIOS Version : 960GM/U3S3 FX P1.0 Processor Type : AMD FX(tm)-8150 Eight-Core Processor (64bit) Processor Speed : 3600MHz Microcode Update : 600F12/6000623 L1 Cache Size : 640KB L2 ... Use [Enter], [TAB] or [SHIFT-TAB] to the Exit Screen or exit the current screen 3.2 Main Screen When you enter the BIOS SETUP UTILITY, the Main screen will appear and display the system overview. 3.1.2 Navigation Keys Please check the following table for all the settings...
User Manual
Page 39
... Count. Boot Failure Guard Count Enable or disable the feature of Boot Failure Guard. Load Optimized mGPU OC Setting You can set up overclocking features. BIOS SETUP UTILITY Main OC Tweaker Advanced H/W Monitor Boot Security Exit EZ Overclocking Load Optimized CPU OC Setting Load Optimized mGPU OC Setting CPU Configuration Overclock...
... Count. Boot Failure Guard Count Enable or disable the feature of Boot Failure Guard. Load Optimized mGPU OC Setting You can set up overclocking features. BIOS SETUP UTILITY Main OC Tweaker Advanced H/W Monitor Boot Security Exit EZ Overclocking Load Optimized CPU OC Setting Load Optimized mGPU OC Setting CPU Configuration Overclock...
User Manual
Page 40
... is capable of this item. If it is [Enabled]. Select Screen Select Item Enter Go to keep the default value for reference. However, for reference. BIOS SETUP UTILITY Main OC Tweaker Advanced H/W Monitor Boot Security Exit EZ Overclocking Load Optimized CPU OC Setting Load Optimized mGPU OC Setting CPU Configuration Overclock...
... is capable of this item. If it is [Enabled]. Select Screen Select Item Enter Go to keep the default value for reference. However, for reference. BIOS SETUP UTILITY Main OC Tweaker Advanced H/W Monitor Boot Security Exit EZ Overclocking Load Optimized CPU OC Setting Load Optimized mGPU OC Setting CPU Configuration Overclock...
User Manual
Page 41
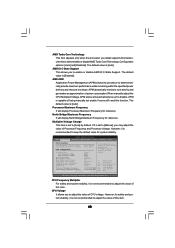
... Hyper-Transport bus speed. Channel Interleaving It allows you to adjust the value of this item. Configuraion options: [Auto], [8 Bit] and [16 Bit]. Memory Timing BIOS SETUP UTILITY OC Tweaker Memory Timing Power Down Enable Bank Interleaving Channel Interleaving CAS Latency (CL) 11 TRCD 11 TRP 11 TRAS 28 Command Rate...
... Hyper-Transport bus speed. Channel Interleaving It allows you to adjust the value of this item. Configuraion options: [Auto], [8 Bit] and [16 Bit]. Memory Timing BIOS SETUP UTILITY OC Tweaker Memory Timing Power Down Enable Bank Interleaving Channel Interleaving CAS Latency (CL) 11 TRCD 11 TRP 11 TRAS 28 Command Rate...
User Manual
Page 43
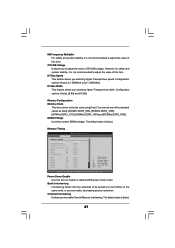
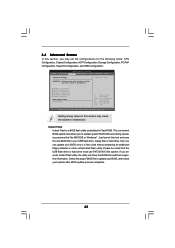
... Configuration, and USB Configuration. 3.4 Advanced Screen In this section, you execute Instant Flash utility, the utility will show the BIOS files and their respective information. Setting wrong values in below sections may set the configurations for CPU WARNING : Setting wrong values... Chipset Configuration ACPI Configuration Storage Configuration PCIPnP Configuration SuperIO Configuration USB Configuration BIOS Update Utility Instant Flash Select Screen Select Item Enter Go to update your BIOS, and reboot your BIOS only in Flash ROM. Please be noted that the USB flash drive...
... Configuration, and USB Configuration. 3.4 Advanced Screen In this section, you execute Instant Flash utility, the utility will show the BIOS files and their respective information. Setting wrong values in below sections may set the configurations for CPU WARNING : Setting wrong values... Chipset Configuration ACPI Configuration Storage Configuration PCIPnP Configuration SuperIO Configuration USB Configuration BIOS Update Utility Instant Flash Select Screen Select Item Enter Go to update your BIOS, and reboot your BIOS only in Flash ROM. Please be noted that the USB flash drive...


