
RAID Installation Guide
Page 2
... functions by following the detailed instruction of the same model and capacity when creating a RAID set the option to read and write data in our support CD or "Quick Installation Guide", you to a second drive. RAID 1 (Data Mirroring) RAID 1 is called data mirroring that optimizes two identical hard disk drives to RAID...
... functions by following the detailed instruction of the same model and capacity when creating a RAID set the option to read and write data in our support CD or "Quick Installation Guide", you to a second drive. RAID 1 (Data Mirroring) RAID 1 is called data mirroring that optimizes two identical hard disk drives to RAID...

RAID Installation Guide
Page 5
... will see the message on your SATA / SATAII HDDs with RAID functions, please follow below procedures according to your system, your system. (There are two ASRock Support CD in your disk, please visit the below steps. Generate RAID Driver diskette for Windows2000/XP 3. B. Set the "SATA Operation Mode" option to include SP4. D.... install Windows® 2000 / Windows® XP / Windows® XP 64-bit on the screen, "Generate Serial ATA driver diskette [YN]?", press . Insert the ASRock Support CD into the floppy drive. Generate AHCI Driver diskette for Windows2000/XP 2.
... will see the message on your SATA / SATAII HDDs with RAID functions, please follow below procedures according to your system, your system. (There are two ASRock Support CD in your disk, please visit the below steps. Generate RAID Driver diskette for Windows2000/XP 3. B. Set the "SATA Operation Mode" option to include SP4. D.... install Windows® 2000 / Windows® XP / Windows® XP 64-bit on the screen, "Generate Serial ATA driver diskette [YN]?", press . Insert the ASRock Support CD into the floppy drive. Generate AHCI Driver diskette for Windows2000/XP 2.

RAID Installation Guide
Page 6
... as below: A. Please specify the first RAID driver and then specify again for Windows® 2000 / XP / XP 64-bit in the Support CD for proper configuration. Select the drivers to the BIOS RAID installation guide part of the document in the following path in the...- E. STEP 3: Use "RAID Installation Guide" to install a third-party RAID driver. At the beginning of the document in the following path in the Support CD: .. \ RAID Installation Guide 6 Then, please set the RAID configuration by using the Windows RAID installation guide part of Windows® setup, press F6 ...
... as below: A. Please specify the first RAID driver and then specify again for Windows® 2000 / XP / XP 64-bit in the Support CD for proper configuration. Select the drivers to the BIOS RAID installation guide part of the document in the following path in the...- E. STEP 3: Use "RAID Installation Guide" to install a third-party RAID driver. At the beginning of the document in the following path in the Support CD: .. \ RAID Installation Guide 6 Then, please set the RAID configuration by using the Windows RAID installation guide part of Windows® setup, press F6 ...
RAID Installation Guide
Page 7
Enter BIOS SETUP UTILITY Advanced screen IDE Configuration. page, please insert the ASRock Support CD into your system. If you install Windows® VistaTM / Windows® VistaTM 64-bit on IDE HDDs and want to manage (create, convert, delete, or...] in the motherboard gift box pack, please choose the one for proper configuration. NVIDIA® RAID drivers are in the following path in our Support CD: (There are two ASRock Support CD in BIOS first. Before you start to configure RAID function, you want to [RAID]. STEP 2: Use "RAID Installation Guide" to continue the ...
Enter BIOS SETUP UTILITY Advanced screen IDE Configuration. page, please insert the ASRock Support CD into your system. If you install Windows® VistaTM / Windows® VistaTM 64-bit on IDE HDDs and want to manage (create, convert, delete, or...] in the motherboard gift box pack, please choose the one for proper configuration. NVIDIA® RAID drivers are in the following path in our Support CD: (There are two ASRock Support CD in BIOS first. Before you start to configure RAID function, you want to [RAID]. STEP 2: Use "RAID Installation Guide" to continue the ...
RAID Installation Guide
Page 11
... by clicking on Start → Programs → NVIDIA Corporation → Mediashield → Mediashield. (There is built in NVIDIA ALL in one driver provided in our support CD. Enter NVRAIDMAN RAID driver is also a "Mediashield" shortcut on the desktop.) Then, the below according to configure and manage RAID functions. NVIDIA Windows RAID Installation...
... by clicking on Start → Programs → NVIDIA Corporation → Mediashield → Mediashield. (There is built in NVIDIA ALL in one driver provided in our support CD. Enter NVRAIDMAN RAID driver is also a "Mediashield" shortcut on the desktop.) Then, the below according to configure and manage RAID functions. NVIDIA Windows RAID Installation...
RAID Installation Guide
Page 21
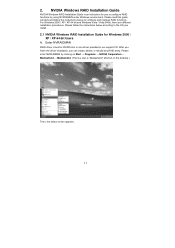
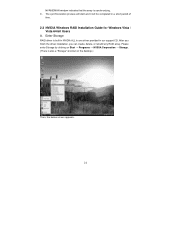
... time. 2.2 NVIDIA Windows RAID Installation Guide for Windows Vista / Vista 64-bit Users A. The synchronization process will start and it will be completed in our support CD. After you finish the driver installation, you can create, delete, or rebuild any RAID array. C.
... time. 2.2 NVIDIA Windows RAID Installation Guide for Windows Vista / Vista 64-bit Users A. The synchronization process will start and it will be completed in our support CD. After you finish the driver installation, you can create, delete, or rebuild any RAID array. C.

User Manual
Page 4
... Configuration 46 3.3.8 USB Configuration 47 3.4 Hardware Health Event Monitoring Screen 48 3.5 Boot Screen 49 3.5.1 Boot Settings Configuration 49 3.6 Security Screen 50 3.7 Exit Screen 51 4 . 3 . Software Support 52 4.1 Install Operating System 52 4.2 Support CD Information 52 4.2.1 Running Support CD 52 4.2.2 Drivers Menu 52 4.2.3 Utilities Menu 52 4.2.4 Contact Information 52 4
... Configuration 46 3.3.8 USB Configuration 47 3.4 Hardware Health Event Monitoring Screen 48 3.5 Boot Screen 49 3.5.1 Boot Settings Configuration 49 3.6 Security Screen 50 3.7 Exit Screen 51 4 . 3 . Software Support 52 4.1 Install Operating System 52 4.2 Support CD Information 52 4.2.1 Running Support CD 52 4.2.2 Drivers Menu 52 4.2.3 Utilities Menu 52 4.2.4 Contact Information 52 4

User Manual
Page 5
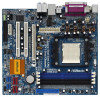
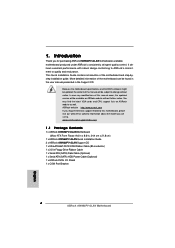
... to change without further notice. Chapter 3 and 4 contain the configuration guide to quality and endurance. www.asrock.com/support/index.asp 1.1 Package Contents 1 x ASRock 939N68PV-GLAN Motherboard (Micro ATX Form Factor: 9.6-in x 8.6-in, 24.4 cm x 21.8 cm) 1 x ASRock 939N68PV-GLAN Quick Installation Guide 2 x ASRock 939N68PV-GLAN Support CD 1 x Ultra ATA 66/100/133 IDE Ribbon Cable (80-conductor) 1 x 3.5-in Floppy Drive Ribbon Cable...
... to change without further notice. Chapter 3 and 4 contain the configuration guide to quality and endurance. www.asrock.com/support/index.asp 1.1 Package Contents 1 x ASRock 939N68PV-GLAN Motherboard (Micro ATX Form Factor: 9.6-in x 8.6-in, 24.4 cm x 21.8 cm) 1 x ASRock 939N68PV-GLAN Quick Installation Guide 2 x ASRock 939N68PV-GLAN Support CD 1 x Ultra ATA 66/100/133 IDE Ribbon Cable (80-conductor) 1 x 3.5-in Floppy Drive Ribbon Cable...
User Manual
Page 7
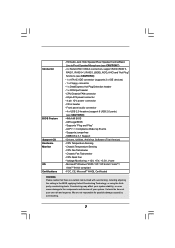
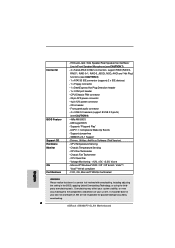
...Utilities, AntiVirus Software (Trial Version) - Chassis Fan Tachometer - Voltage Monitoring: +12V, +5V, +3.3V, Vcore - AMI Legal BIOS - SMBIOS 2.3.1 Support - CPU Quiet Fan - Microsoft® Windows® 2000 / XP / XP 64-bit / VistaTM / VistaTM 64-bit compliant - Chassis Temperature ...CPU/Chassis FAN connector - 24 pin ATX power connector - 4 pin 12V power connector - Connector BIOS Feature Support CD Hardware Monitor OS Certifications - CD in the BIOS, applying Untied Overclocking Technology, or using the thirdparty overclocking tools. We are not responsible for...
...Utilities, AntiVirus Software (Trial Version) - Chassis Fan Tachometer - Voltage Monitoring: +12V, +5V, +3.3V, Vcore - AMI Legal BIOS - SMBIOS 2.3.1 Support - CPU Quiet Fan - Microsoft® Windows® 2000 / XP / XP 64-bit / VistaTM / VistaTM 64-bit compliant - Chassis Temperature ...CPU/Chassis FAN connector - 24 pin ATX power connector - 4 pin 12V power connector - Connector BIOS Feature Support CD Hardware Monitor OS Certifications - CD in the BIOS, applying Untied Overclocking Technology, or using the thirdparty overclocking tools. We are not responsible for...

User Manual
Page 17
.... Then you can start to this motherboard. If you haven't installed onboard VGA driver yet, please install onboard VGA driver from our support CD to your system already, you can freely enjoy the benefits of dual monitor feature without installing any add-on the I /O panel of...motherboard. To enable dual monitor feature, please follow below steps: 1. With the internal dual VGA output support (DVI-D and D-Sub), you have installed onboard VGA driver from our support CD to support dual VGA output so that DVI-D and D-sub can easily enjoy the benefits of dual monitor function ...
.... Then you can start to this motherboard. If you haven't installed onboard VGA driver yet, please install onboard VGA driver from our support CD to your system already, you can freely enjoy the benefits of dual monitor feature without installing any add-on the I /O panel of...motherboard. To enable dual monitor feature, please follow below steps: 1. With the internal dual VGA output support (DVI-D and D-Sub), you have installed onboard VGA driver from our support CD to support dual VGA output so that DVI-D and D-sub can easily enjoy the benefits of dual monitor function ...
User Manual
Page 20
DVI to HDMI adapter is installed, the OS default will not function. After HDMI audio driver is not bundled with this motherboard can support DVI/HDCP and HDMI format signal. For Windows® VistaTM / VistaTM 64-bit OS Step 1: Set up BIOS. Click "Hardware and Sound", and click "Sound". ..." to HDMI interface. A. A. B. B. You may use the DVI to HDMI adapter to convert the DVI-D port to [Auto]. Install "Onboard HDMI HD Audio Driver" from ASRock Support CD to your system manually. C. A.
DVI to HDMI adapter is installed, the OS default will not function. After HDMI audio driver is not bundled with this motherboard can support DVI/HDCP and HDMI format signal. For Windows® VistaTM / VistaTM 64-bit OS Step 1: Set up BIOS. Click "Hardware and Sound", and click "Sound". ..." to HDMI interface. A. A. B. B. You may use the DVI to HDMI adapter to convert the DVI-D port to [Auto]. Install "Onboard HDMI HD Audio Driver" from ASRock Support CD to your system manually. C. A.
User Manual
Page 30
...174; XP / Windows® XP 64-bit on your system. (There are two ASRock Support CD in your optical drive first. Using SATA / SATAII HDDs with NCQ and Hot Plug functions STEP 1: Set ...Up BIOS. A. Insert the ASRock Support CD into your optical drive to boot your SATA / SATAII HDDs without RAID functions, please follow the...side to [AHCI]. A. 2.13 Driver Installation Guide To install the drivers to your system, please insert the support CD to your disk, please visit the below website for Windows® 2000 / XP / XP 64-bit.)...
...174; XP / Windows® XP 64-bit on your system. (There are two ASRock Support CD in your optical drive first. Using SATA / SATAII HDDs with NCQ and Hot Plug functions STEP 1: Set ...Up BIOS. A. Insert the ASRock Support CD into your optical drive to boot your SATA / SATAII HDDs without RAID functions, please follow the...side to [AHCI]. A. 2.13 Driver Installation Guide To install the drivers to your system, please insert the support CD to your disk, please visit the below website for Windows® 2000 / XP / XP 64-bit.)...

User Manual
Page 32
...IDE Configuration. Insert the Windows® VistaTM / Windows® VistaTM 64-bit optical disk into your system. page, please insert the ASRock Support CD into the optical drive to boot your system, and follow the instruction to install Windows® VistaTM / Windows® VistaTM 64-bit..., please follow below procedures according to the OS you install. 32 NVIDIA® AHCI drivers are in the following path in our Support CD: (There are two ASRock Support CD in the motherboard gift box pack, please choose the one for Windows® VistaTM / VistaTM 64-bit.) .. \ I386 \ ...
...IDE Configuration. Insert the Windows® VistaTM / Windows® VistaTM 64-bit optical disk into your system. page, please insert the ASRock Support CD into the optical drive to boot your system, and follow the instruction to install Windows® VistaTM / Windows® VistaTM 64-bit..., please follow below procedures according to the OS you install. 32 NVIDIA® AHCI drivers are in the following path in our Support CD: (There are two ASRock Support CD in the motherboard gift box pack, please choose the one for Windows® VistaTM / VistaTM 64-bit.) .. \ I386 \ ...
User Manual
Page 33
... Installing Windows® 2000 / XP / XP 64-bit With RAID Functions If you still need to check the RAID installation guide in the Support CD for proper procedures of Windows® setup, press F6 to [RAID]. STEP 2: Make a SATA / SATAII driver diskette. Please refer to the ...want to manage (create, convert, delete, or rebuild) RAID functions on page 30. Then, please set the RAID configuration by following path in the Support CD: .. \ RAID Installation Guide 33 STEP 3: Use "RAID Installation Guide" to set up "SATA Operation Mode" to [RAID] in BIOS first....
... Installing Windows® 2000 / XP / XP 64-bit With RAID Functions If you still need to check the RAID installation guide in the Support CD for proper procedures of Windows® setup, press F6 to [RAID]. STEP 2: Make a SATA / SATAII driver diskette. Please refer to the ...want to manage (create, convert, delete, or rebuild) RAID functions on page 30. Then, please set the RAID configuration by following path in the Support CD: .. \ RAID Installation Guide 33 STEP 3: Use "RAID Installation Guide" to set up "SATA Operation Mode" to [RAID] in BIOS first....
User Manual
Page 34
...RAID drivers are in the following path in the Support CD: .. \ RAID Installation Guide 2 . 1 6 Untied Overclocking Technology This motherboard supports Untied Overclocking Technology, which means during overclocking, but PCI / PCIE buses are two ASRock Support CD in the Support CD: .. \ RAID Installation Guide STEP 3: Install Windows...a more stable overclocking environment. Please refer to the warning on page 7 for proper configuration. page, please insert the ASRock Support CD into your system. If you install Windows® VistaTM / Windows® VistaTM 64-bit on IDE HDDs and want ...
...RAID drivers are in the following path in the Support CD: .. \ RAID Installation Guide 2 . 1 6 Untied Overclocking Technology This motherboard supports Untied Overclocking Technology, which means during overclocking, but PCI / PCIE buses are two ASRock Support CD in the Support CD: .. \ RAID Installation Guide STEP 3: Install Windows...a more stable overclocking environment. Please refer to the warning on page 7 for proper configuration. page, please insert the ASRock Support CD into your system. If you install Windows® VistaTM / Windows® VistaTM 64-bit on IDE HDDs and want ...
User Manual
Page 52
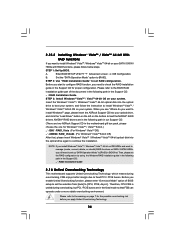
..., use the setup procedures in the Support CD to know more information. 4.2 Support CD Information The Support CD that came with the motherboard contains necessary drivers and useful utilities that the motherboard supports. Please install the necessary drivers to visit ASRock's website at http://www.asrock.com; Software Support 4.1 Install Operating System This motherboard supports various Microsoft® Windows® operating...
..., use the setup procedures in the Support CD to know more information. 4.2 Support CD Information The Support CD that came with the motherboard contains necessary drivers and useful utilities that the motherboard supports. Please install the necessary drivers to visit ASRock's website at http://www.asrock.com; Software Support 4.1 Install Operating System This motherboard supports various Microsoft® Windows® operating...
Quick Installation Guide
Page 4
www.asrock.com/support/index.asp 1.1 Package Contents 1 x ASRock 939N68PV-GLAN Motherboard (Micro ATX Form Factor: 9.6-in x 8.6-in, 24.4 cm x 21.8 cm) 1 x ASRock 939N68PV-GLAN Quick Installation Guide 2 x ASRock 939N68PV-GLAN Support CD 1 x Ultra ATA 66/100/133 IDE Ribbon Cable (80-conductor) 1 x 3.5-in the Support CD. You may find the latest VGA cards and CPU support lists on ASRock website without notice. 1. This Quick Installation Guide contains...
www.asrock.com/support/index.asp 1.1 Package Contents 1 x ASRock 939N68PV-GLAN Motherboard (Micro ATX Form Factor: 9.6-in x 8.6-in, 24.4 cm x 21.8 cm) 1 x ASRock 939N68PV-GLAN Quick Installation Guide 2 x ASRock 939N68PV-GLAN Support CD 1 x Ultra ATA 66/100/133 IDE Ribbon Cable (80-conductor) 1 x 3.5-in the Support CD. You may find the latest VGA cards and CPU support lists on ASRock website without notice. 1. This Quick Installation Guide contains...
Quick Installation Guide
Page 6
... setting in the BIOS, applying Untied Overclocking Technology, or using the thirdparty overclocking tools. Supports jumperfree - We are not responsible for possible damage caused by overclocking. 6 ASRock 939N68PV-GLAN Motherboard Voltage Monitoring: +12V, +5V, +3.3V, Vcore - ACPI 1.1 Compliance Wake.... It should be done at your system. CPU Fan Tachometer - CPU Quiet Fan - SMBIOS 2.3.1 Support - CPU Temperature Sensing - Connector BIOS Feature Support CD Hardware Monitor OS Certifications - CPU/Chassis FAN connector - 24 pin ATX power connector - 4 pin 12V...
... setting in the BIOS, applying Untied Overclocking Technology, or using the thirdparty overclocking tools. Supports jumperfree - We are not responsible for possible damage caused by overclocking. 6 ASRock 939N68PV-GLAN Motherboard Voltage Monitoring: +12V, +5V, +3.3V, Vcore - ACPI 1.1 Compliance Wake.... It should be done at your system. CPU Fan Tachometer - CPU Quiet Fan - SMBIOS 2.3.1 Support - CPU Temperature Sensing - Connector BIOS Feature Support CD Hardware Monitor OS Certifications - CPU/Chassis FAN connector - 24 pin ATX power connector - 4 pin 12V...

Quick Installation Guide
Page 14
...VGA driver yet, please install onboard VGA driver from our support CD to your system and restart your system already, you have installed onboard VGA driver from our support CD to the VGA/DVI-D port on VGA card to support dual VGA output so that DVI-D and D-sub can ... you can drive same or different display contents. This motherboard also provides independent display controllers for DVI-D and D-Sub to this motherboard. 14 ASRock 939N68PV-GLAN Motherboard English To enable dual monitor feature, please follow below steps: 1. VGA/DVI-D port VGA/D-Sub port 2. Connect the D-Sub monitor ...
...VGA driver yet, please install onboard VGA driver from our support CD to your system and restart your system already, you have installed onboard VGA driver from our support CD to the VGA/DVI-D port on VGA card to support dual VGA output so that DVI-D and D-sub can ... you can drive same or different display contents. This motherboard also provides independent display controllers for DVI-D and D-Sub to this motherboard. 14 ASRock 939N68PV-GLAN Motherboard English To enable dual monitor feature, please follow below steps: 1. VGA/DVI-D port VGA/D-Sub port 2. Connect the D-Sub monitor ...

Quick Installation Guide
Page 17
...support DVI/HDCP and HDMI format signal. Click "Hardware and Sound", and click "Sound". Step 3: Reboot your system. After you reboot the system, the HDMI audio function is not bundled with this motherboard, please refer to set up BIOS. Set the option "OnBoard HDMI HD Audio" to [Auto]. D. English 17 ASRock 939N68PV-GLAN... HDMI audio. Change the default setting "Speaker" to your system. B. Install "Onboard HDMI HD Audio Driver" from ASRock Support CD to HDMI interface. After HDMI audio driver is available. For Windows® VistaTM / VistaTM 64-bit OS Step 1:...
...support DVI/HDCP and HDMI format signal. Click "Hardware and Sound", and click "Sound". Step 3: Reboot your system. After you reboot the system, the HDMI audio function is not bundled with this motherboard, please refer to set up BIOS. Set the option "OnBoard HDMI HD Audio" to [Auto]. D. English 17 ASRock 939N68PV-GLAN... HDMI audio. Change the default setting "Speaker" to your system. B. Install "Onboard HDMI HD Audio Driver" from ASRock Support CD to HDMI interface. After HDMI audio driver is available. For Windows® VistaTM / VistaTM 64-bit OS Step 1:...


