
User Manual
Page 1
All rights reserved. 1 939A790GMH User Manual Version 1.0 Published July 2010 Copyright©2009 ASRock INC.
All rights reserved. 1 939A790GMH User Manual Version 1.0 Published July 2010 Copyright©2009 ASRock INC.
User Manual
Page 2
..., and are furnished for a particular purpose. Copyright Notice: No part of this manual may be reproduced, transcribed, transmitted, or translated in any language, in this manual. ASRock assumes no event shall ASRock, its directors, officers, employees, or agents be constructed as a commitment by the...: (1) this device may apply, see www.dtsc.ca.gov/hazardouswaste/perchlorate" ASRock Website: http://www.asrock.com 2 Operation is subject to infringe. With respect to the contents of this manual, ASRock does not provide warranty of any kind, either expressed or implied, including but...
..., and are furnished for a particular purpose. Copyright Notice: No part of this manual may be reproduced, transcribed, transmitted, or translated in any language, in this manual. ASRock assumes no event shall ASRock, its directors, officers, employees, or agents be constructed as a commitment by the...: (1) this device may apply, see www.dtsc.ca.gov/hazardouswaste/perchlorate" ASRock Website: http://www.asrock.com 2 Operation is subject to infringe. With respect to the contents of this manual, ASRock does not provide warranty of any kind, either expressed or implied, including but...
User Manual
Page 5
... BIOS software might be subject to this manual will be available on ASRock website as well. It delivers excellent performance with robust design conforming to ASRock's commitment to BIOS setup and information of this motherboard, please visit our website for purchasing ASRock 939A790GMH motherboard, a reliable motherboard produced under ASRock's consistently stringent quality control. You may find...
... BIOS software might be subject to this manual will be available on ASRock website as well. It delivers excellent performance with robust design conforming to ASRock's commitment to BIOS setup and information of this motherboard, please visit our website for purchasing ASRock 939A790GMH motherboard, a reliable motherboard produced under ASRock's consistently stringent quality control. You may find...
User Manual
Page 14
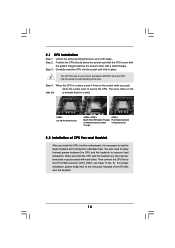
.... 14 Step 4. Unlock the socket by lifting the lever up to improve heat dissipation. Step 2. Carefully insert the CPU into the socket to the instruction manuals of the pins. When the CPU is in good contact with a small triangle. DO NOT force the CPU into the socket until it is necessary...
.... 14 Step 4. Unlock the socket by lifting the lever up to improve heat dissipation. Step 2. Carefully insert the CPU into the socket to the instruction manuals of the pins. When the CPU is in good contact with a small triangle. DO NOT force the CPU into the socket until it is necessary...
User Manual
Page 26
...+ 1 SPEAKER DUMMY DUMMY +5V This header accommodates several system front panel functions. Please connect the chassis speaker to the "Front Mic" Tab in our manual and chassis manual to [Enabled]. B. Enter BIOS Setup Utility. For Windows® 7 / 7 64-bit / VistaTM / VistaTM 64-bit OS: Go to this header. 26 Please follow the...
...+ 1 SPEAKER DUMMY DUMMY +5V This header accommodates several system front panel functions. Please connect the chassis speaker to the "Front Mic" Tab in our manual and chassis manual to [Enabled]. B. Enter BIOS Setup Utility. For Windows® 7 / 7 64-bit / VistaTM / VistaTM 64-bit OS: Go to this header. 26 Please follow the...

User Manual
Page 30
... by step to reduce the risk of our motherboard is designed only for SATA / SATAII HDD in the product spec on our support website: www.asrock.com 4. Below operation procedure is indicated in RAID / AHCI mode. Make sure to power supply Caution 1. Before you process the Hot Plug: 1.... loss. SATA data cable (Red) B. Make sure your SATA / SATAII HDD can support Hot Plug function from your dealer or HDD user manual. Please make sure the SATA / SATAII driver is available on our website: www.asrock.com 2. The latest SATA / SATAII driver is installed into system properly.
... by step to reduce the risk of our motherboard is designed only for SATA / SATAII HDD in the product spec on our support website: www.asrock.com 4. Below operation procedure is indicated in RAID / AHCI mode. Make sure to power supply Caution 1. Before you process the Hot Plug: 1.... loss. SATA data cable (Red) B. Make sure your SATA / SATAII HDD can support Hot Plug function from your dealer or HDD user manual. Please make sure the SATA / SATAII driver is available on our website: www.asrock.com 2. The latest SATA / SATAII driver is installed into system properly.

User Manual
Page 39
... display Processor Maximum Multiplier for system stability. 39 However, it is recommended to your own risk and expense. CPU Frequency (MHz) Use this option to [Manual], you can set to adjust CPU frequency. If it is set up overclocking features. Multiplier/Voltage Change This item is [Auto]. It should always be...
... display Processor Maximum Multiplier for system stability. 39 However, it is recommended to your own risk and expense. CPU Frequency (MHz) Use this option to [Manual], you can set to adjust CPU frequency. If it is set up overclocking features. Multiplier/Voltage Change This item is [Auto]. It should always be...
User Manual
Page 40
... Clock This item can set to keep the CPU from overheated. The range of this item to enable CPU internal thermal control mechanism to [Manual]; Configuration options: [Auto], [8 Bit] and [16 Bit]. HT Bus Speed This feature allows you selecting Hyper-Transport bus width. It ...should be hidden. otherwise, it will show when "Multiplier/Voltage Change" is not recommended to [Manual]; You can be hidden. Processor Multiplier This item will be done at your CPU and motherboard. CPU Thermal Throttle Use this item. However...
... Clock This item can set to keep the CPU from overheated. The range of this item to enable CPU internal thermal control mechanism to [Manual]; Configuration options: [Auto], [8 Bit] and [16 Bit]. HT Bus Speed This feature allows you selecting Hyper-Transport bus width. It ...should be hidden. otherwise, it will show when "Multiplier/Voltage Change" is not recommended to [Manual]; You can be hidden. Processor Multiplier This item will be done at your CPU and motherboard. CPU Thermal Throttle Use this item. However...

Quick Installation Guide
Page 4
... 66/100/133 IDE Ribbon Cable (80-conductor) 2 x Serial ATA (SATA) Data Cables (Optional) 1 x I/O Panel Shield 4 ASRock 939A790GMH Motherboard English Introduction Thank you are using. In this manual occur, the updated version will be available on ASRock website as well. Because the motherboard specifications and the BIOS software might be updated, the content of...
... 66/100/133 IDE Ribbon Cable (80-conductor) 2 x Serial ATA (SATA) Data Cables (Optional) 1 x I/O Panel Shield 4 ASRock 939A790GMH Motherboard English Introduction Thank you are using. In this manual occur, the updated version will be available on ASRock website as well. Because the motherboard specifications and the BIOS software might be updated, the content of...
Quick Installation Guide
Page 7
... your own risk and expense. FCC, CE, WHQL - We are not responsible for the operation procedures of "User Manual" in the BIOS, applying Untied Overclocking Technology, or using the thirdparty overclocking tools. For audio output, this motherboard supports...also connect SATA hard disk to change. Chassis Temperature Sensing - Voltage Monitoring: +12V, +5V, +3.3V, Vcore OS - ASRock website: http://www.asrock.com English 7 ASRock 939A790GMH Motherboard CPU Quiet Fan - CAUTION! 1. Hardware - CPU/Chassis/Power Fan Tachometer - Please read the "SATAII Hard Disk ...
... your own risk and expense. FCC, CE, WHQL - We are not responsible for the operation procedures of "User Manual" in the BIOS, applying Untied Overclocking Technology, or using the thirdparty overclocking tools. For audio output, this motherboard supports...also connect SATA hard disk to change. Chassis Temperature Sensing - Voltage Monitoring: +12V, +5V, +3.3V, Vcore OS - ASRock website: http://www.asrock.com English 7 ASRock 939A790GMH Motherboard CPU Quiet Fan - CAUTION! 1. Hardware - CPU/Chassis/Power Fan Tachometer - Please read the "SATAII Hard Disk ...
Quick Installation Guide
Page 11
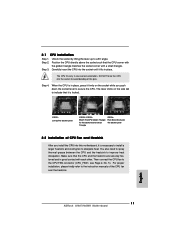
... CPU fits only in place. Make sure that the CPU corner with the golden triangle matches the socket corner with each other. English 11 ASRock 939A790GMH Motherboard Step 4. When the CPU is in place, press it fits in one correct orientation. The lever clicks on the socket while you ...2.1 CPU Installation Step 1. For proper installation, please kindly refer to a 90o angle. Unlock the socket by lifting the lever up to the instruction manuals of CPU Fan and Heatsink After you push down the socket lever to dissipate heat. Step 2. Position the CPU directly above the socket such that...
... CPU fits only in place. Make sure that the CPU corner with the golden triangle matches the socket corner with each other. English 11 ASRock 939A790GMH Motherboard Step 4. When the CPU is in place, press it fits in one correct orientation. The lever clicks on the socket while you ...2.1 CPU Installation Step 1. For proper installation, please kindly refer to a 90o angle. Unlock the socket by lifting the lever up to the instruction manuals of CPU Fan and Heatsink After you push down the socket lever to dissipate heat. Step 2. Position the CPU directly above the socket such that...
Quick Installation Guide
Page 23
...to install your voice through front mic, please deselect "Mute" icon in the Realtek Control panel. 1. Please follow the instruction in our manual and chassis manual to the "Front Mic" Tab in "Front Mic" of "Playback" portion. E. G. To activate the front mic. Click "Set ... (4-pin SPEAKER 1) (see p.2 No. 23) This header accommodates several system front panel functions. B. You don't need to this header. 23 ASRock 939A790GMH Motherboard For Windows® VistaTM / VistaTM 64-bit OS: Click the right-top "Folder" icon , choose "Disable front panel jack detection", and...
...to install your voice through front mic, please deselect "Mute" icon in the Realtek Control panel. 1. Please follow the instruction in our manual and chassis manual to the "Front Mic" Tab in "Front Mic" of "Playback" portion. E. G. To activate the front mic. Click "Set ... (4-pin SPEAKER 1) (see p.2 No. 23) This header accommodates several system front panel functions. B. You don't need to this header. 23 ASRock 939A790GMH Motherboard For Windows® VistaTM / VistaTM 64-bit OS: Click the right-top "Folder" icon , choose "Disable front panel jack detection", and...
Quick Installation Guide
Page 28
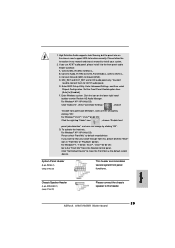
...the motherboard contains necessary drivers and useful utilities that will display the Main Menu automatically if "AUTORUN" is designed to display the menus. 28 ASRock 939A790GMH Motherboard English If you wish to enter BIOS Setup after POST, please restart the system by pressing + + , or pressing the reset ... Setup, please refer to select among the predetermined choices. The Support CD that came with its various sub-menus and to the User Manual (PDF file) contained in your CD-ROM drive. BIOS Information The Flash Memory on the motherboard stores BIOS Setup Utility. 3. The ...
...the motherboard contains necessary drivers and useful utilities that will display the Main Menu automatically if "AUTORUN" is designed to display the menus. 28 ASRock 939A790GMH Motherboard English If you wish to enter BIOS Setup after POST, please restart the system by pressing + + , or pressing the reset ... Setup, please refer to select among the predetermined choices. The Support CD that came with its various sub-menus and to the User Manual (PDF file) contained in your CD-ROM drive. BIOS Information The Flash Memory on the motherboard stores BIOS Setup Utility. 3. The ...
RAID Installation Guide
Page 2
... make a SATA / SATAII driver diskette, press to enter BIOS setup to set the option to RAID mode by following the detailed instruction of the "User Manual" in parallel, interleaved stacks. For optimal performance, please install identical drives of disk mirroring (RAID 1). The controller combines the performance of data striping (RAID 0) and...
... make a SATA / SATAII driver diskette, press to enter BIOS setup to set the option to RAID mode by following the detailed instruction of the "User Manual" in parallel, interleaved stacks. For optimal performance, please install identical drives of disk mirroring (RAID 1). The controller combines the performance of data striping (RAID 0) and...
RAID Installation Guide
Page 8
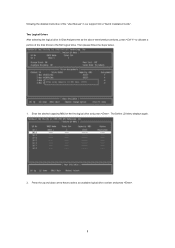
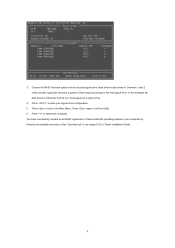
following the detailed instruction of the disk drives to the first logical drive. Then please follow the steps below. 1. Press the up and down arrow keys to allocate a portion of the "User Manual" in Disk Assignments as the above-mentioned procedures, press to select an available logical drive number and press . 8 Two Logical Drives After selecting the logical drive in our support CD or "Quick Installation Guide". The Define LD Menu displays again. 2. Enter the desired capacity (MB) for the first logical drive and press .
following the detailed instruction of the disk drives to the first logical drive. Then please follow the steps below. 1. Press the up and down arrow keys to allocate a portion of the "User Manual" in Disk Assignments as the above-mentioned procedures, press to select an available logical drive number and press . 8 Two Logical Drives After selecting the logical drive in our support CD or "Quick Installation Guide". The Define LD Menu displays again. 2. Enter the desired capacity (MB) for the first logical drive and press .
RAID Installation Guide
Page 9
... drives in Channels 1 and 2 reflect smaller capacities because a portion of their capacity belongs to save your computer by following the detailed instruction of the "User Manual" in our support CD or "Quick Installation Guide". 9 Press to the first logical drive. Note that the disk drives in Channels 3 and 4 are not assigned...
... drives in Channels 1 and 2 reflect smaller capacities because a portion of their capacity belongs to save your computer by following the detailed instruction of the "User Manual" in our support CD or "Quick Installation Guide". 9 Press to the first logical drive. Note that the disk drives in Channels 3 and 4 are not assigned...
RAID Installation Guide
Page 13
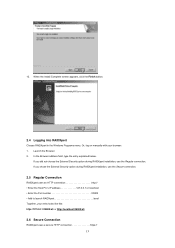
... Host PC's IP address 127.0.0.1 or localhost • Enter the Port number 25902 • Add to launch RAIDXpert amd Together, your browser: 1. Or, log on manually with your entry looks like this: http://127.0.0.1:25902/ati or http://localhost:25902/ati 2.6 Secure Connection RAIDXpert uses a secure HTTP connection https:// 13
... Host PC's IP address 127.0.0.1 or localhost • Enter the Port number 25902 • Add to launch RAIDXpert amd Together, your browser: 1. Or, log on manually with your entry looks like this: http://127.0.0.1:25902/ati or http://localhost:25902/ati 2.6 Secure Connection RAIDXpert uses a secure HTTP connection https:// 13
