
User Manual
Page 3
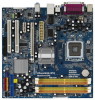
...Expansion Slots (PCI and PCI Express Slots 18 2.7 DVI Graphics-SI Card Installation Guide 19 2.8 Jumpers Setup 21 2.9 Onboard Headers and Connectors 23 2.10 SATAII Hard Disk Setup Guide 27 2.11 Serial ATA (SATA) / Serial ATAII (SATAII) Hard Disks Installation 28 2.12 Driver Installation Guide 28 2.13 Untied Overclocking Technology 28 3 BIOS SETUP UTILITY 29 3.1 Introduction 29 3.1.1 BIOS Menu Bar 29 3.1.2 Navigation Keys 30 3.2 Main Screen 30 3.3 Advanced Screen 30 3.3.1 CPU Configuration 31 3.3.2 Chipset Configuration 33 3.3.3 ACPI Configuration 35 3.3.4 IDE Configuration 36...
...Expansion Slots (PCI and PCI Express Slots 18 2.7 DVI Graphics-SI Card Installation Guide 19 2.8 Jumpers Setup 21 2.9 Onboard Headers and Connectors 23 2.10 SATAII Hard Disk Setup Guide 27 2.11 Serial ATA (SATA) / Serial ATAII (SATAII) Hard Disks Installation 28 2.12 Driver Installation Guide 28 2.13 Untied Overclocking Technology 28 3 BIOS SETUP UTILITY 29 3.1 Introduction 29 3.1.1 BIOS Menu Bar 29 3.1.2 Navigation Keys 30 3.2 Main Screen 30 3.3 Advanced Screen 30 3.3.1 CPU Configuration 31 3.3.2 Chipset Configuration 33 3.3.3 ACPI Configuration 35 3.3.4 IDE Configuration 36...

User Manual
Page 9
... of wireless network connectivity. Please visit our website for Windows® VistaTM Premium 2007 logo. 9 ASRock website http://www.asrock.com 1 . 3 Minimum Hardware Requirement Table for minimum hardware requirements. WiFi/E header supports WiFi+AP function with WDDM Driver * If you plan to use wireless local area network (WLAN) adapter. 12. Power Management for USB 2.0 works fine under BIOS. * If you to submit Windows® VistaTM...
... of wireless network connectivity. Please visit our website for Windows® VistaTM Premium 2007 logo. 9 ASRock website http://www.asrock.com 1 . 3 Minimum Hardware Requirement Table for minimum hardware requirements. WiFi/E header supports WiFi+AP function with WDDM Driver * If you plan to use wireless local area network (WLAN) adapter. 12. Power Management for USB 2.0 works fine under BIOS. * If you to submit Windows® VistaTM...

User Manual
Page 27
... internal storage devices. Then, the drivers compatible to the SATA / SATAII hard disk. STEP 2: Connect the SATA power cable to your chassis. Therefore, CPU FSB is untied during overclocking, FSB enjoys better margin due to the motherboard's SATAII connector. STEP 4: Connect the other end of your system can be auto-detected and listed on this motherboard for the possible overclocking risk before you enable Untied Overclocking function, please enter "Overclock Mode" option of the SATA data cable to fixed PCI / PCIE buses...
... internal storage devices. Then, the drivers compatible to the SATA / SATAII hard disk. STEP 2: Connect the SATA power cable to your chassis. Therefore, CPU FSB is untied during overclocking, FSB enjoys better margin due to the motherboard's SATAII connector. STEP 4: Connect the other end of your system can be auto-detected and listed on this motherboard for the possible overclocking risk before you enable Untied Overclocking function, please enter "Overclock Mode" option of the SATA data cable to fixed PCI / PCIE buses...

User Manual
Page 30
... Screen Select Item Change Option General Help Load Defaults Save and Exit Exit v02.54 (C) Copyright 1985-2005, American Megatrends, Inc. PCIE Frequency (MHz) Use this section may cause system to malfunction. BIOS SETUP UTILITY Main Advanced H/W Monitor Boot Security Exit Advanced Settings WARNING : Setting wrong values in this option to select Overclock Mode. Configuration options: [Auto] and [Manual]. Spread Spectrum This item should always be [Auto] for better system stability. 30 Boot Failure Guard Enable or disable...
... Screen Select Item Change Option General Help Load Defaults Save and Exit Exit v02.54 (C) Copyright 1985-2005, American Megatrends, Inc. PCIE Frequency (MHz) Use this section may cause system to malfunction. BIOS SETUP UTILITY Main Advanced H/W Monitor Boot Security Exit Advanced Settings WARNING : Setting wrong values in this option to select Overclock Mode. Configuration options: [Auto] and [Manual]. Spread Spectrum This item should always be [Auto] for better system stability. 30 Boot Failure Guard Enable or disable...

User Manual
Page 31
... the chipset. NT4.0) cannot handle the function with "No Execute (NX) Memory Protection" can switch between multiple frequency and voltage points to execute code. An IA-32 processor with disable. This option will be hidden if the installed CPU does not support Hyper-Threading technology. The C1 state is Intel's new power saving technology. Intel (R) Virtualization tech. This option will be hidden if the installed CPU does not support Intel (R) Virtualization Technology...
... the chipset. NT4.0) cannot handle the function with "No Execute (NX) Memory Protection" can switch between multiple frequency and voltage points to execute code. An IA-32 processor with disable. This option will be hidden if the installed CPU does not support Hyper-Threading technology. The C1 state is Intel's new power saving technology. Intel (R) Virtualization tech. This option will be hidden if the installed CPU does not support Intel (R) Virtualization Technology...

User Manual
Page 32
... default value is [Auto]. You may reduce CPU voltage and lead to set this item to [Enabled]. If you need to system stability or compatibility issue with some power supplies. Please set to CAS# Delay This controls the latency between the DRAM active command and the read / write command. Please note that enabling this item to [Disable] if above issue occurs. 3.3.2 Chipset Configuration BIOS SETUP UTILITY Advanced Chipset Configuration Memory Remap Feature [Disabled] DRAM Frequency [Auto...
... default value is [Auto]. You may reduce CPU voltage and lead to set this item to [Enabled]. If you need to system stability or compatibility issue with some power supplies. Please set to CAS# Delay This controls the latency between the DRAM active command and the read / write command. Please note that enabling this item to [Disable] if above issue occurs. 3.3.2 Chipset Configuration BIOS SETUP UTILITY Advanced Chipset Configuration Memory Remap Feature [Disabled] DRAM Frequency [Auto...

User Manual
Page 33
... Mode]. OnBoard HD Audio Select [Auto], [Enabled] or [Disabled] for the motherboard through efficient memory utilization. DVMT (Dynamic Video Memory Technology) is an architecture that offers breakthrough performance for the onboard HD Audio feature. In DVMT mode, the graphics driver allocates memory as needed for the onboard HD Audio Front Panel. The option [Maximum DVMT] only appears when you install VGA card; Internal Graphics Mode Select If you set DVMT Mode Select as the boot graphic adapter priority. the onboard VGA will be used under Windows...
... Mode]. OnBoard HD Audio Select [Auto], [Enabled] or [Disabled] for the motherboard through efficient memory utilization. DVMT (Dynamic Video Memory Technology) is an architecture that offers breakthrough performance for the onboard HD Audio feature. In DVMT mode, the graphics driver allocates memory as needed for the onboard HD Audio Front Panel. The option [Maximum DVMT] only appears when you install VGA card; Internal Graphics Mode Select If you set DVMT Mode Select as the boot graphic adapter priority. the onboard VGA will be used under Windows...

User Manual
Page 35
... Windows® VistaTM certification. 3.3.4IDE Configuration BIOS SETUP UTILITY Advanced IDE Configuration ATA/IDE Configuration SATAII 1 SATAII 2 SATAII 3 SATAII 4 IDE1 Master IDE2 Slave [Enhanced] [Hard Disk] [Not Detected] [Not Detected] [Not Detected] [Not Detected] [Not Detected] Set [Compatible] when Legacy OS (MS-DOS, Win NT) is set this option to [Enabled] if you to choose [SATA 1, SATA 2, SATA 3, SATA 4], [SATA 1, SATA 3, IDE 1], or [IDE 1, SATA 2, SATA 4] when the installed device is used. +F1 F9 F10 ESC Select Screen Select Item Change Option General Help Load Defaults...
... Windows® VistaTM certification. 3.3.4IDE Configuration BIOS SETUP UTILITY Advanced IDE Configuration ATA/IDE Configuration SATAII 1 SATAII 2 SATAII 3 SATAII 4 IDE1 Master IDE2 Slave [Enhanced] [Hard Disk] [Not Detected] [Not Detected] [Not Detected] [Not Detected] [Not Detected] Set [Compatible] when Legacy OS (MS-DOS, Win NT) is set this option to [Enabled] if you to choose [SATA 1, SATA 2, SATA 3, SATA 4], [SATA 1, SATA 3, IDE 1], or [IDE 1, SATA 2, SATA 4] when the installed device is used. +F1 F9 F10 ESC Select Screen Select Item Change Option General Help Load Defaults...

User Manual
Page 37
... Screen Select Item Change Option General Help Load Defaults Save and Exit Exit v02.54 (C) Copyright 1985-2005, American Megatrends, Inc. Configuration options: [Disabled], [Auto], [Enabled]. 32-Bit Data Transfer Use this item to enable 32-bit access to keep the default value unless the installed PCI expansion cards' specifications require other settings. PCI Latency Timer The default value is recommended to maximize the IDE hard disk data transfer rate. 3.3.5PCIPnP Configuration BIOS SETUP UTILITY Advanced Advanced PCI / PnP Settings PCI Latency Timer PCI IDE...
... Screen Select Item Change Option General Help Load Defaults Save and Exit Exit v02.54 (C) Copyright 1985-2005, American Megatrends, Inc. Configuration options: [Disabled], [Auto], [Enabled]. 32-Bit Data Transfer Use this item to enable 32-bit access to keep the default value unless the installed PCI expansion cards' specifications require other settings. PCI Latency Timer The default value is recommended to maximize the IDE hard disk data transfer rate. 3.3.5PCIPnP Configuration BIOS SETUP UTILITY Advanced Advanced PCI / PnP Settings PCI Latency Timer PCI IDE...

User Manual
Page 38
OnBoard Floppy Controller Use this item on this motherboard, please keep this item to set the address for the onboard serial port or disable it . BIOS SETUP UTILITY Advanced Floppy Configuration Floppy A [1.44 MB 312"] Select the type of your floppy drive. If you may configure the type of floppy drive connected to the system. +F1 F9 F10 ESC Select Screen Select Item Change Option General Help Load Defaults Save and Exit Exit v02.54 (C) Copyright 1985-2005, American Megatrends...
OnBoard Floppy Controller Use this item on this motherboard, please keep this item to set the address for the onboard serial port or disable it . BIOS SETUP UTILITY Advanced Floppy Configuration Floppy A [1.44 MB 312"] Select the type of your floppy drive. If you may configure the type of floppy drive connected to the system. +F1 F9 F10 ESC Select Screen Select Item Change Option General Help Load Defaults Save and Exit Exit v02.54 (C) Copyright 1985-2005, American Megatrends...

User Manual
Page 40
... are connected. [Disabled] - 3.3.8USB Configuration BIOS SETUP UTILITY Advanced USB Configuration USB Controller USB 2.0 Support Legacy USB Support [Enabled] [Enabled] [BIOS Setup Only] To enable or disable the onboard USB controllers. +F1 F9 F10 ESC Select Screen Select Item Change Option General Help Load Defaults Save and Exit Exit v02.54 (C) Copyright 1985-2005, American Megatrends, Inc. Legacy USB Support Use this item to enter OS. [BIOS Setup Only] - Enables legacy support if USB devices are four configuration options: [Enabled], [Auto], [Disabled] and [BIOS Setup Only...
... are connected. [Disabled] - 3.3.8USB Configuration BIOS SETUP UTILITY Advanced USB Configuration USB Controller USB 2.0 Support Legacy USB Support [Enabled] [Enabled] [BIOS Setup Only] To enable or disable the onboard USB controllers. +F1 F9 F10 ESC Select Screen Select Item Change Option General Help Load Defaults Save and Exit Exit v02.54 (C) Copyright 1985-2005, American Megatrends, Inc. Legacy USB Support Use this item to enter OS. [BIOS Setup Only] - Enables legacy support if USB devices are four configuration options: [Enabled], [Auto], [Disabled] and [BIOS Setup Only...

User Manual
Page 43
... Onboard LAN feature. 3.5.1 Boot Settings Configuration BIOS SETUP UTILITY Boot Boot Settings Configuration Boot From Onboard LAN Bootup Num-Lock [Disabled] [On] To enable or disable the boot from onboard LAN feature. +F1 F9 F10 ESC Select Screen Select Item Change Option General Help Load Defaults Save and Exit Exit v02.54 (C) Copyright 1985-2005, American Megatrends, Inc. Boot From Onboard LAN Use this section, you may set to [On], it . Boot Up Num-Lock If this item is set or change the supervisor/user password...
... Onboard LAN feature. 3.5.1 Boot Settings Configuration BIOS SETUP UTILITY Boot Boot Settings Configuration Boot From Onboard LAN Bootup Num-Lock [Disabled] [On] To enable or disable the boot from onboard LAN feature. +F1 F9 F10 ESC Select Screen Select Item Change Option General Help Load Defaults Save and Exit Exit v02.54 (C) Copyright 1985-2005, American Megatrends, Inc. Boot From Onboard LAN Use this section, you may set to [On], it . Boot Up Num-Lock If this item is set or change the supervisor/user password...

User Manual
Page 45
... the devices. 4.2.3 Utilities Menu The Utilities Menu shows the applications software that enhance the motherboard features. 4.2.1 Running The Support CD To begin using the support CD, insert the CD into your dealer for general reference only. Please install the necessary drivers to your computer. Because motherboard settings and hardware options vary, use the setup procedures in your OS documentation for more about ASRock, welcome to display the menus. 4.2.2 Drivers Menu The Drivers Menu...
... the devices. 4.2.3 Utilities Menu The Utilities Menu shows the applications software that enhance the motherboard features. 4.2.1 Running The Support CD To begin using the support CD, insert the CD into your dealer for general reference only. Please install the necessary drivers to your computer. Because motherboard settings and hardware options vary, use the setup procedures in your OS documentation for more about ASRock, welcome to display the menus. 4.2.2 Drivers Menu The Drivers Menu...
Quick Installation Guide
Page 4
... in Floppy Drive One Serial ATA (SATA) Data Cable (Optional) One Serial ATA (SATA) HDD Power Cable (Optional) One ASRock 6CH I/O Panel Shield One DVI Graphics-SI Card 4 ASRock 4Core1600-DVI Motherboard English ASRock website http://www.asrock.com If you are using. In case any modifications of the motherboard can be available on ASRock website as well. Introduction Thank you for specific information about the model you require technical support related to quality and endurance. Because the motherboard specifications and the BIOS software...
... in Floppy Drive One Serial ATA (SATA) Data Cable (Optional) One Serial ATA (SATA) HDD Power Cable (Optional) One ASRock 6CH I/O Panel Shield One DVI Graphics-SI Card 4 ASRock 4Core1600-DVI Motherboard English ASRock website http://www.asrock.com If you are using. In case any modifications of the motherboard can be available on ASRock website as well. Introduction Thank you for specific information about the model you require technical support related to quality and endurance. Because the motherboard specifications and the BIOS software...

Quick Installation Guide
Page 8
... -use onboard VGA to submit Windows® VistaTM logo, please keep the default setting of wireless network connectivity. Power Management for the availability of ASRock WiFi-802.11g or WiFi-802.11n module. Please visit our website for USB 2.0 works fine under BIOS. * If you to qualify for Windows® VistaTM Premium 2007 and Basic Logo For system integrators and users who purchase this motherboard, please...
... -use onboard VGA to submit Windows® VistaTM logo, please keep the default setting of wireless network connectivity. Power Management for the availability of ASRock WiFi-802.11g or WiFi-802.11n module. Please visit our website for USB 2.0 works fine under BIOS. * If you to qualify for Windows® VistaTM Premium 2007 and Basic Logo For system integrators and users who purchase this motherboard, please...

Quick Installation Guide
Page 15
... proper installation of our DVI Graphics-SI card, this motherboard. Connect the DVI-D monitor to the DVI-D output connector of DVI Graphics-SI card which is inserted to the expansion card installation procedures on this motherboard provides users with dual VGA output support: DVI-D and D-Sub. You can easily enjoy the benefits of DVI Graphics-SI card 15 ASRock 4Core1600-DVI Motherboard Please refer to PCIE1 (PCIE x16 slot). 2.5 DVI Graphics-SI Card Installation Guide With the onboard VGA/D-Sub output and the external installation of DVI Graphics-SI card. Step...
... proper installation of our DVI Graphics-SI card, this motherboard. Connect the DVI-D monitor to the DVI-D output connector of DVI Graphics-SI card which is inserted to the expansion card installation procedures on this motherboard provides users with dual VGA output support: DVI-D and D-Sub. You can easily enjoy the benefits of DVI Graphics-SI card 15 ASRock 4Core1600-DVI Motherboard Please refer to PCIE1 (PCIE x16 slot). 2.5 DVI Graphics-SI Card Installation Guide With the onboard VGA/D-Sub output and the external installation of DVI Graphics-SI card. Step...
Quick Installation Guide
Page 16
Then you can freely enjoy the benefits of this motherboard. English 16 ASRock 4Core1600-DVI Motherboard Connect the D-Sub monitor to the VGA/D-Sub port on the I/O panel of DVI-D output function with this motherboard. If you have installed Intel® VGA driver from our support CD to your system and restart your system already, you haven't installed Intel® VGA driver yet, please install Intel® VGA driver from our support CD to use DVI-D output function with this motherboard after your system boots. If you can start to your computer. Step 4. Step 3.
Then you can freely enjoy the benefits of this motherboard. English 16 ASRock 4Core1600-DVI Motherboard Connect the D-Sub monitor to the VGA/D-Sub port on the I/O panel of DVI-D output function with this motherboard. If you have installed Intel® VGA driver from our support CD to your system and restart your system already, you haven't installed Intel® VGA driver yet, please install Intel® VGA driver from our support CD to use DVI-D output function with this motherboard after your system boots. If you can start to your computer. Step 4. Step 3.

Quick Installation Guide
Page 20
... [Enabled]. Set the Front Panel Control option from [Auto] to OUT2_L. System Panel Header (9-pin PANEL1) (see p.2 No. 2) 4 3 2 1 Please connect the chassis speaker to this connector and match the black wire to function correctly. Connect Mic_IN (MIC) to install your system. 2. Click the icon on the chassis must support HDA to the ground pin. 20 ASRock 4Core1600-DVI Motherboard Enter Windows system. F. Please follow the instruction in our manual and chassis manual to MIC2_L. For Windows® VistaTM / VistaTM 64-bit...
... [Enabled]. Set the Front Panel Control option from [Auto] to OUT2_L. System Panel Header (9-pin PANEL1) (see p.2 No. 2) 4 3 2 1 Please connect the chassis speaker to this connector and match the black wire to function correctly. Connect Mic_IN (MIC) to install your system. 2. Click the icon on the chassis must support HDA to the ground pin. 20 ASRock 4Core1600-DVI Motherboard Enter Windows system. F. Please follow the instruction in our manual and chassis manual to MIC2_L. For Windows® VistaTM / VistaTM 64-bit...

Quick Installation Guide
Page 23
...SATA power cable to your system can be auto-detected and listed on the support CD driver page. Please follow the order from [Auto] to install the SATA / SATAII hard disks. Therefore, the drivers you to [Manual]. Before you apply Untied Overclocking Technology. 23 ASRock 4Core1600-DVI Motherboard English This section will guide you install can work properly. 2 . 1 1 Untied Overclocking Technology This motherboard supports Untied Overclocking Technology, which means during overclocking, but PCI / PCIE buses are in the fixed mode so that supports Serial ATA (SATA) / Serial...
...SATA power cable to your system can be auto-detected and listed on the support CD driver page. Please follow the order from [Auto] to install the SATA / SATAII hard disks. Therefore, the drivers you to [Manual]. Before you apply Untied Overclocking Technology. 23 ASRock 4Core1600-DVI Motherboard English This section will guide you install can work properly. 2 . 1 1 Untied Overclocking Technology This motherboard supports Untied Overclocking Technology, which means during overclocking, but PCI / PCIE buses are in the fixed mode so that supports Serial ATA (SATA) / Serial...

Quick Installation Guide
Page 24
... you start up the computer, please press during the Power-On-Self-Test (POST) to enter BIOS Setup after POST, please restart the system by pressing + + , or pressing the reset button on the system chassis. It will enhance motherboard features. When you wish to enter BIOS Setup utility; Software Support CD information This motherboard supports various Microsoft® Windows® operating systems: 2000 / XP / XP 64-bit / VistaTM / VistaTM 64-bit. For...
... you start up the computer, please press during the Power-On-Self-Test (POST) to enter BIOS Setup after POST, please restart the system by pressing + + , or pressing the reset button on the system chassis. It will enhance motherboard features. When you wish to enter BIOS Setup utility; Software Support CD information This motherboard supports various Microsoft® Windows® operating systems: 2000 / XP / XP 64-bit / VistaTM / VistaTM 64-bit. For...


