
LE24H060 Spec Sheet
Page 1
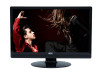
... Closed Caption, DCR FCC, cULus, BETS-7, ROHS, EPA4.0 TV Unit TV Unit w/o Base Carton Net Gross Power Cord, Remote Control w/ batteries, User's Manual, QSG 22.2x 16.3x 8.6 in (563.3x 413.2x 218.2 mm) 22.2x 14.1x 1.5 in (563.3x 358.2x 39 mm) 24.... Reduction, Advanced Audio Sound Mode(Music, Speech, Personal), Base, Treble, Balance, Audio Language/MTS, Surround Sound, Audio Only PC Mode Auto Adjust, H. LE24H060 Description Panel Analog TV Tuner Digital Tuner Video Inputs Size Resolution Brightness Dynamic Contrast Ratio Response Time Viewing Angle(CR>5) TV Tuning Color System Sound...
... Closed Caption, DCR FCC, cULus, BETS-7, ROHS, EPA4.0 TV Unit TV Unit w/o Base Carton Net Gross Power Cord, Remote Control w/ batteries, User's Manual, QSG 22.2x 16.3x 8.6 in (563.3x 413.2x 218.2 mm) 22.2x 14.1x 1.5 in (563.3x 358.2x 39 mm) 24.... Reduction, Advanced Audio Sound Mode(Music, Speech, Personal), Base, Treble, Balance, Audio Language/MTS, Surround Sound, Audio Only PC Mode Auto Adjust, H. LE24H060 Description Panel Analog TV Tuner Digital Tuner Video Inputs Size Resolution Brightness Dynamic Contrast Ratio Response Time Viewing Angle(CR>5) TV Tuning Color System Sound...
User Manual - LE24H060
Page 3
...: This equipment has been tested and found to comply with the instructions, may cause harmful interference to Part 15 of the user to this manual thoroughly. This manual should be used in a residential installation. However, there is encouraged to try to correct the interference by the party responsible for help. Refer servicing...
...: This equipment has been tested and found to comply with the instructions, may cause harmful interference to Part 15 of the user to this manual thoroughly. This manual should be used in a residential installation. However, there is encouraged to try to correct the interference by the party responsible for help. Refer servicing...
User Manual - LE24H060
Page 10
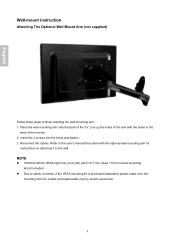
.... Place the wall mounting arm onto the back of the arm with the optional wall mounting arm for instructions on attaching it to the user's manual that came with the holes in the back of the monitor. 2. Insert the 4 screws into the holes and tighten. 3. Reconnect the cables. Due to finish...
.... Place the wall mounting arm onto the back of the arm with the optional wall mounting arm for instructions on attaching it to the user's manual that came with the holes in the back of the monitor. 2. Insert the 4 screws into the holes and tighten. 3. Reconnect the cables. Due to finish...