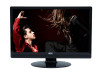

LE24H060 Spec Sheet
Page 1
... USB Mode(Image Display) Slideshow/Pause, Exit Full-Screen, Next/Previous Photo, Zoom In, Rotate Right, Rotate Left, Browse Photos, Slide Setting Sleep Timer Off, 5,10,15,30,45,60,90,120,180,240 Min Others Wall Mountable(100mmx100mm)*, Multi-function Remote, V- LE24H060 Description Panel Analog TV Tuner Digital Tuner Video Inputs Size Resolution Brightness Dynamic Contrast Ratio Response Time Viewing Angle(CR>5) TV Tuning Color System Sound System Closed Caption V-Chip Parental Control TV Tuning Composite + L/R Audio S-Video + L/R Audio...
... USB Mode(Image Display) Slideshow/Pause, Exit Full-Screen, Next/Previous Photo, Zoom In, Rotate Right, Rotate Left, Browse Photos, Slide Setting Sleep Timer Off, 5,10,15,30,45,60,90,120,180,240 Min Others Wall Mountable(100mmx100mm)*, Multi-function Remote, V- LE24H060 Description Panel Analog TV Tuner Digital Tuner Video Inputs Size Resolution Brightness Dynamic Contrast Ratio Response Time Viewing Angle(CR>5) TV Tuning Color System Sound System Closed Caption V-Chip Parental Control TV Tuning Composite + L/R Audio S-Video + L/R Audio...
User Manual - LE24H060
Page 1
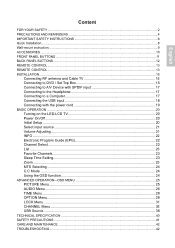
... Quick Installation...8 Wall-mount instruction...9 ACCESSORIES ...10 FRONT PANEL BUTTONS ...11 BACK PANEL BUTTONS...12 REMOTE CONTROL ...13 REMOTE CONTROL ...13 INSTALLATION ...15 Connecting RF antenna and Cable TV 15 Connecting to DVD / Set Top Box 15 Connecting to A/V Device with SPDIF input 17 Connecting to the Headphone 17 Connecting to a Computer 17 Connecting the USB input 18 Connecting with the power cord 19 BASIC OPERATION ...20 Turning on the LED-LCD TV 20 Power On/Off ...20 Initial Setup...20 Select input source ...21 Volume Adjusting ...21 INFO ...22 Electronic Program Guide...
... Quick Installation...8 Wall-mount instruction...9 ACCESSORIES ...10 FRONT PANEL BUTTONS ...11 BACK PANEL BUTTONS...12 REMOTE CONTROL ...13 REMOTE CONTROL ...13 INSTALLATION ...15 Connecting RF antenna and Cable TV 15 Connecting to DVD / Set Top Box 15 Connecting to A/V Device with SPDIF input 17 Connecting to the Headphone 17 Connecting to a Computer 17 Connecting the USB input 18 Connecting with the power cord 19 BASIC OPERATION ...20 Turning on the LED-LCD TV 20 Power On/Off ...20 Initial Setup...20 Select input source ...21 Volume Adjusting ...21 INFO ...22 Electronic Program Guide...
User Manual - LE24H060
Page 3
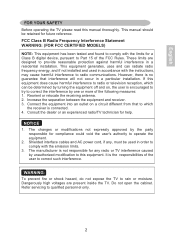
... in a particular installation. Refer servicing to rain or moisture. English FOR YOUR SAFETY Before operating the TV please read this equipment. If this equipment does cause harmful interference to this manual thoroughly. Shielded interface cables and AC power cord, if any radio or TV interference caused by unauthorized modification to radio or television reception, which the receiver is connected. 4. WARNING...
... in a particular installation. Refer servicing to rain or moisture. English FOR YOUR SAFETY Before operating the TV please read this equipment. If this equipment does cause harmful interference to this manual thoroughly. Shielded interface cables and AC power cord, if any radio or TV interference caused by unauthorized modification to radio or television reception, which the receiver is connected. 4. WARNING...
User Manual - LE24H060
Page 7
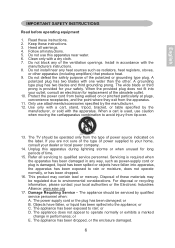
.... The power supply cord or the plug has been damaged; or B. The appliance has been exposed to operate normally or exhibits a marked change in any heat sources such as power-supply cord or plug is used, use this apparatus during lightning storms or when unused for your safety. The appliance has been dropped, or the enclosure damaged. 6 Keep these instructions. 2. Follow all servicing to your...
.... The power supply cord or the plug has been damaged; or B. The appliance has been exposed to operate normally or exhibits a marked change in any heat sources such as power-supply cord or plug is used, use this apparatus during lightning storms or when unused for your safety. The appliance has been dropped, or the enclosure damaged. 6 Keep these instructions. 2. Follow all servicing to your...
User Manual - LE24H060
Page 8
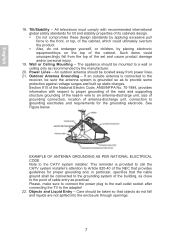
...power lines. 21. Power Lines - Outdoor Antenna Grounding - The appliance should be mounted to provide some protection against voltage surges and built up static charges. If an outside antenna is connected to the receiver, be connected to the grounding system of the set... and cause product damage and/or personal injury. 19. See Figure below. EXAMPLE OF ANTENNA GROUNDING AS PER NATIONAL ELECTRICAL CODE Note to the CATV system installer: This reminder is grounded so as to a wall or ceiling only as close...
...power lines. 21. Power Lines - Outdoor Antenna Grounding - The appliance should be mounted to provide some protection against voltage surges and built up static charges. If an outside antenna is connected to the receiver, be connected to the grounding system of the set... and cause product damage and/or personal injury. 19. See Figure below. EXAMPLE OF ANTENNA GROUNDING AS PER NATIONAL ELECTRICAL CODE Note to the CATV system installer: This reminder is grounded so as to a wall or ceiling only as close...
User Manual - LE24H060
Page 10
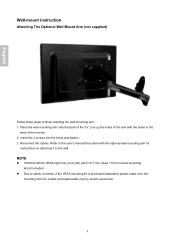
... to the wall. English Wall-mount instruction Attaching The Optional Wall Mount Arm (not supplied) Follow these steps to safety concerns, if the VESA mounting kit is purchased separately please make sure the mounting kit is UL-Listed, and replaceable only by service personnel. 9 Line up the holes of the arm with the optional wall mounting arm for instructions on attaching it to the user's manual that came...
... to the wall. English Wall-mount instruction Attaching The Optional Wall Mount Arm (not supplied) Follow these steps to safety concerns, if the VESA mounting kit is purchased separately please make sure the mounting kit is UL-Listed, and replaceable only by service personnel. 9 Line up the holes of the arm with the optional wall mounting arm for instructions on attaching it to the user's manual that came...
User Manual - LE24H060
Page 11
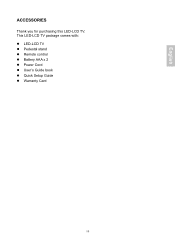
English ACCESSORIES Thank you for purchasing this LED-LCD TV. This LED-LCD TV package comes with: LED-LCD TV Pedestal stand Remote control Battery AAA x 2 Power Cord User's Guide book Quick Setup Guide Warranty Card 10
English ACCESSORIES Thank you for purchasing this LED-LCD TV. This LED-LCD TV package comes with: LED-LCD TV Pedestal stand Remote control Battery AAA x 2 Power Cord User's Guide book Quick Setup Guide Warranty Card 10
User Manual - LE24H060
Page 15
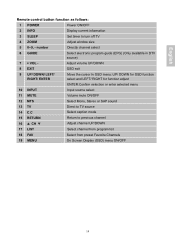
... menu 10 INPUT Input source select 11 MUTE Volume mute ON/OFF 12 MTS Select Mono, Stereo or SAP sound 13 TV Direct to TV source 14 C.C Select caption mode 15 RETURN Return to turn off TV 4 ZOOM Adjust window size 5 0~9, - number Directly channel select 6 GUIDE Select electronic program guide (EPG) (Only available in DTV source) 7 + VOL - English Remote control button function as follows: 1 POWER Power ON/OFF 2 INFO Display current information 3 SLEEP Set timer to previous channel...
... menu 10 INPUT Input source select 11 MUTE Volume mute ON/OFF 12 MTS Select Mono, Stereo or SAP sound 13 TV Direct to TV source 14 C.C Select caption mode 15 RETURN Return to turn off TV 4 ZOOM Adjust window size 5 0~9, - number Directly channel select 6 GUIDE Select electronic program guide (EPG) (Only available in DTV source) 7 + VOL - English Remote control button function as follows: 1 POWER Power ON/OFF 2 INFO Display current information 3 SLEEP Set timer to previous channel...
User Manual - LE24H060
Page 16
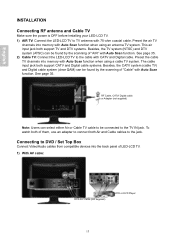
.... Connecting to DVD / Set Top Box Connect Video/Audio cables from compatible devices into memory with 75-ohm coaxial cable. See page 35. 2) Cable TV: Connect the LED-LCD TV to the cable with Auto Scan function when using an antenna TV system. RF Cable, CATV/ Digital cable or Adapter (not supplied) Note: Users can be found by the scanning of "AIR" with Auto Scan function. This air input jack both of LED-LCD TV. 1) With AV cable: RCA A/V Cable (not supplied) VCD or DVD Player...
.... Connecting to DVD / Set Top Box Connect Video/Audio cables from compatible devices into memory with 75-ohm coaxial cable. See page 35. 2) Cable TV: Connect the LED-LCD TV to the cable with Auto Scan function when using an antenna TV system. RF Cable, CATV/ Digital cable or Adapter (not supplied) Note: Users can be found by the scanning of "AIR" with Auto Scan function. This air input jack both of LED-LCD TV. 1) With AV cable: RCA A/V Cable (not supplied) VCD or DVD Player...
User Manual - LE24H060
Page 19
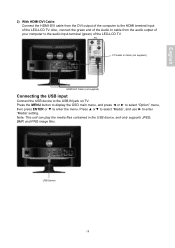
... LED-LCD TV. Press the MENU button to display the OSD main menu, and press ◄ or ► to select "Option" menu, then press ENTER or ▼ to the audio input terminal (green) of the computer to enter "Media" setting. USB Device 18 Also, connect the green end of the Audio In cable from the DVI output of the LED-LCD TV. PC PC Audio In Cable (not supplied) HDMI-DVI Cable (not supplied) Connecting the USB input Connect the USB...
... LED-LCD TV. Press the MENU button to display the OSD main menu, and press ◄ or ► to select "Option" menu, then press ENTER or ▼ to the audio input terminal (green) of the computer to enter "Media" setting. USB Device 18 Also, connect the green end of the Audio In cable from the DVI output of the LED-LCD TV. PC PC Audio In Cable (not supplied) HDMI-DVI Cable (not supplied) Connecting the USB input Connect the USB...
User Manual - LE24H060
Page 21
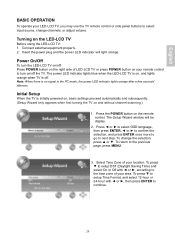
... the LED-LCD TV Before using the LED-LCD TV: 1. To change channels, or adjust volume. The power LED indicator lights blue when the LED-LCD TV is off the TV. Press the POWER button on , and lights orange when TV is on the remote control. Select Time Zone of LED-LCD TV or press POWER button on your remote control to turn on/off . Initial Setup When the TV is no signal in the PC mode, the power LED indicator lights orange...
... the LED-LCD TV Before using the LED-LCD TV: 1. To change channels, or adjust volume. The power LED indicator lights blue when the LED-LCD TV is off the TV. Press the POWER button on , and lights orange when TV is on the remote control. Select Time Zone of LED-LCD TV or press POWER button on your remote control to turn on/off . Initial Setup When the TV is no signal in the PC mode, the power LED indicator lights orange...

User Manual - LE24H060
Page 22
... you want to adjust volume. directly. 21 Select input source To select the required input source: Press the INPUT button on the remote control, Use ▲▼ to continue. 5. Select TV Source from Air or Cable, then press ENTER to select the required input source between TV, AV, S-Video, YPbPr, HDMI1, HDMI2, PC and USB. English 4. The Initial Setup will be completed after Cannel scanning is finished. Volume Adjusting Press + VOL...
... you want to adjust volume. directly. 21 Select input source To select the required input source: Press the INPUT button on the remote control, Use ▲▼ to continue. 5. Select TV Source from Air or Cable, then press ENTER to select the required input source between TV, AV, S-Video, YPbPr, HDMI1, HDMI2, PC and USB. English 4. The Initial Setup will be completed after Cannel scanning is finished. Volume Adjusting Press + VOL...

User Manual - LE24H060
Page 23
... the LED-LCD TV: Press INFO, and the current state will be displayed on the screen. (It shows all or some of the information about Input, Channel, Resolution, Audio Type, etc., depending on what input source it is in.) * The picture here shows an example of the GUIDE screen in a DTV source. Electronic Program Guide (EPG) Press the GUIDE button on the remote control and the program information for 3 seconds to change automatically...
... the LED-LCD TV: Press INFO, and the current state will be displayed on the screen. (It shows all or some of the information about Input, Channel, Resolution, Audio Type, etc., depending on what input source it is in.) * The picture here shows an example of the GUIDE screen in a DTV source. Electronic Program Guide (EPG) Press the GUIDE button on the remote control and the program information for 3 seconds to change automatically...
User Manual - LE24H060
Page 24
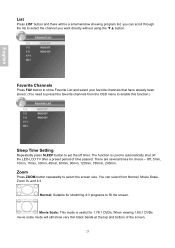
... LIST button and there will still show Favorite List and select your favorite channels that have already been stored. (You need to preset the favorite channels from Normal, Movie Scale, Zoom In, and 4:3. There are several times for stretching 4:3 programs to set the off the LED-LCD TV after a preset period of the screen. 23 Movie Scale: This mode is used to select the screen size...
... LIST button and there will still show Favorite List and select your favorite channels that have already been stored. (You need to preset the favorite channels from Normal, Movie Scale, Zoom In, and 4:3. There are several times for stretching 4:3 programs to set the off the LED-LCD TV after a preset period of the screen. 23 Movie Scale: This mode is used to select the screen size...

User Manual - LE24H060
Page 25
... caption mode. Using the OSD function You can use the OSD menus and options to display OSD menu. C.C Mode Press C.C button to exit from the OSD menu. 24 English Zoom In: Suitable for viewing wide-screen 2.35:1 anamorphic DVDs in full screen. 4:3: Suitable for viewing conventional 4:3 programs in their normal format. MTS Selecting Press MTS button to choose the available sound output that is as following: Press MENU to adjust various settings...
... caption mode. Using the OSD function You can use the OSD menus and options to display OSD menu. C.C Mode Press C.C button to exit from the OSD menu. 24 English Zoom In: Suitable for viewing wide-screen 2.35:1 anamorphic DVDs in full screen. 4:3: Suitable for viewing conventional 4:3 programs in their normal format. MTS Selecting Press MTS button to choose the available sound output that is as following: Press MENU to adjust various settings...

User Manual - LE24H060
Page 30
..., S-Video, YPbPr, HDMI1, HDMI2, PC and USB sources. Transparency: To change the transparency of OSD window. (0%, 25%, 50%, 75%, 100%) OSD Time Out: To setup the display time of OSD. (5, 15, 30, 45, and 60 seconds) Closed Caption: To set up caption modes for digital TV channels. (Service1~6, or Off) Option: Press ◄► to adjust detailed settings. 29 Menu Language: To select an OSD language from Default or...
..., S-Video, YPbPr, HDMI1, HDMI2, PC and USB sources. Transparency: To change the transparency of OSD window. (0%, 25%, 50%, 75%, 100%) OSD Time Out: To setup the display time of OSD. (5, 15, 30, 45, and 60 seconds) Closed Caption: To set up caption modes for digital TV channels. (Service1~6, or Off) Option: Press ◄► to adjust detailed settings. 29 Menu Language: To select an OSD language from Default or...

User Manual - LE24H060
Page 36
Auto Scan: To auto scan the TV or DTV channels. Press MENU again at any time to start auto scanning TV channels. TV Source: To select Cable or Air as the TV source. English CHANNEL Menu -To set up for TV Note: The Channel Menu is in DTV. Note: The condition of DTV Signal will not appear. When in AV, S-Video, YPbPr, HDMI1, HDMI2, PC and USB source, the CHANNEL Menu will only be displayed when source is only active in TV Source option, and press ► to interrupt scanning. 35 Select Air or Cable in TV source.
Auto Scan: To auto scan the TV or DTV channels. Press MENU again at any time to start auto scanning TV channels. TV Source: To select Cable or Air as the TV source. English CHANNEL Menu -To set up for TV Note: The Channel Menu is in DTV. Note: The condition of DTV Signal will not appear. When in AV, S-Video, YPbPr, HDMI1, HDMI2, PC and USB source, the CHANNEL Menu will only be displayed when source is only active in TV Source option, and press ► to interrupt scanning. 35 Select Air or Cable in TV source.
User Manual - LE24H060
Page 41
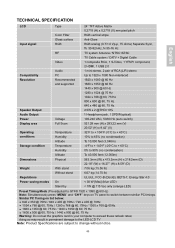
... computer to exceed these refresh rates; Similar PC Timing on TV panel to switch between similar PC timings. English TECHNICAL SPECIFICATION LCD Input signal Compatibility Resolution Type Color Filter Glass surface RGB RF Video Audio PC Recommended and supported Speaker Output Audio Output Power Display area Voltage Full Scan Operating conditions Storage condition Dimensions Temperature Humidity Altitude Temperature Humidity Altitude Physical Weight Regulations Power saving modes With stand Without stand On Stand by 24" TFT Active Matrix 0.2715 (H) x 0.2715 (V) mm...
... computer to exceed these refresh rates; Similar PC Timing on TV panel to switch between similar PC timings. English TECHNICAL SPECIFICATION LCD Input signal Compatibility Resolution Type Color Filter Glass surface RGB RF Video Audio PC Recommended and supported Speaker Output Audio Output Power Display area Voltage Full Scan Operating conditions Storage condition Dimensions Temperature Humidity Altitude Temperature Humidity Altitude Physical Weight Regulations Power saving modes With stand Without stand On Stand by 24" TFT Active Matrix 0.2715 (H) x 0.2715 (V) mm...

User Manual - LE24H060
Page 42
..., dry cloth. Do not place heavy objects on the rear end of the power supply in a clean, dry environment. Have it contains no user-serviceable parts. Always unplug the LED-LCD TV before installation and keep this guide handy. Keep the LED-LCD TV away from magnetic objects, motors, TV sets, and transformer. Stop using the LED-LCD TV if the cabinet is disconnected . Unplug the...
..., dry cloth. Do not place heavy objects on the rear end of the power supply in a clean, dry environment. Have it contains no user-serviceable parts. Always unplug the LED-LCD TV before installation and keep this guide handy. Keep the LED-LCD TV away from magnetic objects, motors, TV sets, and transformer. Stop using the LED-LCD TV if the cabinet is disconnected . Unplug the...
User Manual - LE24H060
Page 43
... to another video source or use another electrical device into the power outlet to the video output port on top of video source (DVD, VCR...). If not, tightly secure it . Wrong or abnormal colors If any colors (red, green, blue) are installed. Keep your LED-LCD TV away from magnets, motors, transformers, speakers, and TV sets. Always call your LED-LCD TV yourself. Plug another TVs to fix it . Put your service center or...
... to another video source or use another electrical device into the power outlet to the video output port on top of video source (DVD, VCR...). If not, tightly secure it . Wrong or abnormal colors If any colors (red, green, blue) are installed. Keep your LED-LCD TV away from magnets, motors, transformers, speakers, and TV sets. Always call your LED-LCD TV yourself. Plug another TVs to fix it . Put your service center or...

