

Operating Instructions
Page 2
... the cord from the rear and the top of important operating and maintenance (servicing) instructions in the Operating Instructions, and as the safety suggestions below. Unplug the AC power cord from a cold spot to power sources specified in the literature accompanying the appliance. When the cord is intended to alert the user to the presence of Graphical Symbols: The lightning flash with polarized AC power plugs...
... the cord from the rear and the top of important operating and maintenance (servicing) instructions in the Operating Instructions, and as the safety suggestions below. Unplug the AC power cord from a cold spot to power sources specified in the literature accompanying the appliance. When the cord is intended to alert the user to the presence of Graphical Symbols: The lightning flash with polarized AC power plugs...
Operating Instructions
Page 3
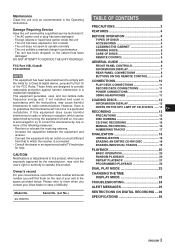
... product, which are designed to Part 15 of the FCC Rules. Owner's record For your convenience, record the model number and serial number (you contact your set) in a residential installation. XC-RW700 Serial No. (Lot No.) TABLE OF CONTENTS PRECAUTIONS 2 FEATURES 4 BEFORE OPERATION 4 TYPES OF DISCS 4 ACCESSORIES 4 CLEANING THE CABINET 5 STORING DISCS 5 CARE OF DISCS 5 REMOTE CONTROL 5 GENERAL GUIDE 6 FRONT PANEL CONTROLS 6 INFORMATION DISPLAY 7 REAR PANEL CONNECTIONS 8 BUTTONS ON THE REMOTE CONTROL 9 CONNECTIONS 10 PLAY DECK CONNECTIONS 11 RECORD DECK CONNECTIONS 11 POWER...
... product, which are designed to Part 15 of the FCC Rules. Owner's record For your convenience, record the model number and serial number (you contact your set) in a residential installation. XC-RW700 Serial No. (Lot No.) TABLE OF CONTENTS PRECAUTIONS 2 FEATURES 4 BEFORE OPERATION 4 TYPES OF DISCS 4 ACCESSORIES 4 CLEANING THE CABINET 5 STORING DISCS 5 CARE OF DISCS 5 REMOTE CONTROL 5 GENERAL GUIDE 6 FRONT PANEL CONTROLS 6 INFORMATION DISPLAY 7 REAR PANEL CONNECTIONS 8 BUTTONS ON THE REMOTE CONTROL 9 CONNECTIONS 10 PLAY DECK CONNECTIONS 11 RECORD DECK CONNECTIONS 11 POWER...
Operating Instructions
Page 4
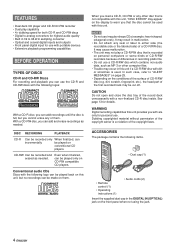
... following items. • Dust cap (1) • Remote control (1) • Operating instructions (1) • Audio cords (2) Insert the supplied dust cap in 32 to 96 kHz sampling converter • Optical and coaxial digital inputs and outputs • Front panel digital input for use irregular shape CDs (example: heart-shaped, octagonal ones). Conventional audio CDs Discs with a non-finalized CD-R disc inside. dirt, scratch, fingerprint, etc.), the head part of the first recorded track may...
... following items. • Dust cap (1) • Remote control (1) • Operating instructions (1) • Audio cords (2) Insert the supplied dust cap in 32 to 96 kHz sampling converter • Optical and coaxial digital inputs and outputs • Front panel digital input for use irregular shape CDs (example: heart-shaped, octagonal ones). Conventional audio CDs Discs with a non-finalized CD-R disc inside. dirt, scratch, fingerprint, etc.), the head part of the first recorded track may...
Operating Instructions
Page 5
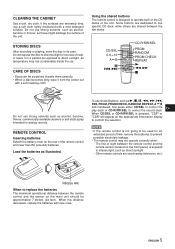
... to intense light, such as temperature may not operate correctly when: - Some buttons are dedicated to replace the batteries The maximum operational distance between the two decks. Do not expose the disc to direct sunlight, as direct sunlight - NOTE • If the remote control is designed to operate both of the CD decks of time, remove the batteries to be scratched. Using the shared buttons The remote control is not...
... to intense light, such as temperature may not operate correctly when: - Some buttons are dedicated to replace the batteries The maximum operational distance between the two decks. Do not expose the disc to direct sunlight, as direct sunlight - NOTE • If the remote control is designed to operate both of the CD decks of time, remove the batteries to be scratched. Using the shared buttons The remote control is not...

Operating Instructions
Page 6
... the power. 2 PHONES Connect headphones with a standard stereo type plug. 3 PHONE LEVEL Turn to adjust the headphones volume level. 4 DIGITAL IN (OPTICAL) Use to connect a portable digital audio player to this unit. [ DISPLAY Press to cycle through the time display options for the record deck. - Press to move to the previous track. & aPAUSE Press to pause or restart the disc. * INPUT Press to select the input source for digital recording. 5 Play deck Use to play CD, CD-R or CD-RW discs...
... the power. 2 PHONES Connect headphones with a standard stereo type plug. 3 PHONE LEVEL Turn to adjust the headphones volume level. 4 DIGITAL IN (OPTICAL) Use to connect a portable digital audio player to this unit. [ DISPLAY Press to cycle through the time display options for the record deck. - Press to move to the previous track. & aPAUSE Press to pause or restart the disc. * INPUT Press to select the input source for digital recording. 5 Play deck Use to play CD, CD-R or CD-RW discs...
Operating Instructions
Page 7
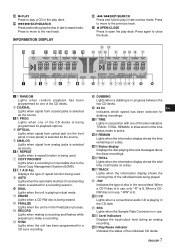
... disc playing time and messages about the discs recordings. )) TOTAL Lights when the information display shows the total time of all tracks on the front panel or rear panel) is selected as source. 66 REPEAT Lights when a repeat function is being used. 7 COPY PROHIBIT Lights when a recording is not possible due to the Serial Copy Management System (SCMS). 88 1 A-B ALL Displays the type of repeat function being used. 9 AUTO Lights...
... disc playing time and messages about the discs recordings. )) TOTAL Lights when the information display shows the total time of all tracks on the front panel or rear panel) is selected as source. 66 REPEAT Lights when a repeat function is being used. 7 COPY PROHIBIT Lights when a recording is not possible due to the Serial Copy Management System (SCMS). 88 1 A-B ALL Displays the type of repeat function being used. 9 AUTO Lights...
Operating Instructions
Page 9
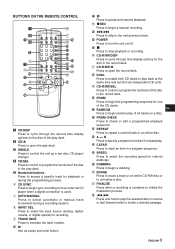
... various time display options for the disc in the play deck. 2 CD/z Press to open the play deck. 3 SINGLE Press to control the unit as a two-disc CD player/ changer. 4 CD/SEL Press to control or program the functions of the disc in the play deck. 5 Numbered buttons Press to access a specific track for playback or during the programming process. 6 CD SYNC Press to begin sync recording from an external CD player when a digital connection is...
... various time display options for the disc in the play deck. 2 CD/z Press to open the play deck. 3 SINGLE Press to control the unit as a two-disc CD player/ changer. 4 CD/SEL Press to control or program the functions of the disc in the play deck. 5 Numbered buttons Press to access a specific track for playback or during the programming process. 6 CD SYNC Press to begin sync recording from an external CD player when a digital connection is...
Operating Instructions
Page 10
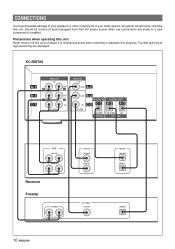
... CD input coaxial optical rec/out play/in progress. CONNECTIONS To prevent possible damage to your speakers or other components in your audio system, all system components, including this unit or subject it to mechanical shock when recording or playback is installed. Precautions when operating this unit Never move or tilt this unit, should be damaged. The disc spinning at high speed may be turned...
... CD input coaxial optical rec/out play/in progress. CONNECTIONS To prevent possible damage to your speakers or other components in your audio system, all system components, including this unit or subject it to mechanical shock when recording or playback is installed. Precautions when operating this unit Never move or tilt this unit, should be damaged. The disc spinning at high speed may be turned...

Operating Instructions
Page 11
... receiver, preamp or surround processor. USING HEADPHONES Connect headphones with a stereo standard plug (Ø 6.3 mm) to the TAPE rec/ out on your receiver or processor for digital signal use audio cords that are fixed, and the volume should be fed to save the plastic dust caps that cover the optical jacks, and replace them when a jack is in the dual playback mode (see page 23), only the output of the play...
... receiver, preamp or surround processor. USING HEADPHONES Connect headphones with a stereo standard plug (Ø 6.3 mm) to the TAPE rec/ out on your receiver or processor for digital signal use audio cords that are fixed, and the volume should be fed to save the plastic dust caps that cover the optical jacks, and replace them when a jack is in the dual playback mode (see page 23), only the output of the play...
Operating Instructions
Page 12
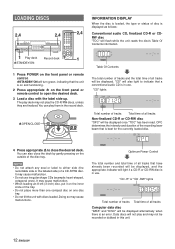
... indicate that is an error. "CD -R" or "CD -RW" lights Total number of tracks Total time of all tracks will be recorded or dubbed in the record deck. RW disc "TOC" will flash while the unit reads the disc's Table Of Contents information. 1 Play deck Record deck 1 6STANDBY/ON 1 Press POWER on the front panel or remote control. 6STANDBY/ON will turn green, indicating that...
... indicate that is an error. "CD -R" or "CD -RW" lights Total number of tracks Total time of all tracks will be recorded or dubbed in the record deck. RW disc "TOC" will flash while the unit reads the disc's Table Of Contents information. 1 Play deck Record deck 1 6STANDBY/ON 1 Press POWER on the front panel or remote control. 6STANDBY/ON will turn green, indicating that...

Operating Instructions
Page 13
... and Dolby Digital Surround sounds. If there is loaded, and OPC can run when loading a finalized CD-R disc or a prerecorded music CD. Compressed audio, and video or graphics data This unit is displayed after recording. In this unit either. NOTES ON THE OPC LIMIT OF CD-R DISCS When a non-finalized CD-R is recorded. Do not open and close the disc tray unnecessarily OPC runs every time a non-finalized CD-R disc...
... and Dolby Digital Surround sounds. If there is loaded, and OPC can run when loading a finalized CD-R disc or a prerecorded music CD. Compressed audio, and video or graphics data This unit is displayed after recording. In this unit either. NOTES ON THE OPC LIMIT OF CD-R DISCS When a non-finalized CD-R is recorded. Do not open and close the disc tray unnecessarily OPC runs every time a non-finalized CD-R disc...
Operating Instructions
Page 14
... speed changes as the actual running time of all tracks 14 ENGLISH Alternatively, press c on the remote control. Alternatively, press s on the remote control. See page 18 for details. • Dub containing programmed playback may only be made by selecting the appropriate input on your receiver, preamp or processor. • Do not use high volume levels when listening to be adjusted during digital...
... speed changes as the actual running time of all tracks 14 ENGLISH Alternatively, press c on the remote control. Alternatively, press s on the remote control. See page 18 for details. • Dub containing programmed playback may only be made by selecting the appropriate input on your receiver, preamp or processor. • Do not use high volume levels when listening to be adjusted during digital...

Operating Instructions
Page 15
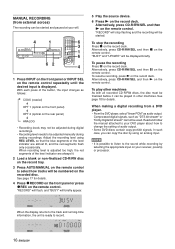
... the sound while recording by selecting the appropriate input on the remote control repeatedly until the desired input is no incoming signal for details. To record the entire disc or tape, select "ALL". To stop the recording manually Press s on the remote control. NOTE You cannot start or resume recording from a halfway point. • When in CD sync record-standby mode and switch the source device from...
... the sound while recording by selecting the appropriate input on the remote control repeatedly until the desired input is no incoming signal for details. To record the entire disc or tape, select "ALL". To stop the recording manually Press s on the remote control. NOTE You cannot start or resume recording from a halfway point. • When in CD sync record-standby mode and switch the source device from...
Operating Instructions
Page 16
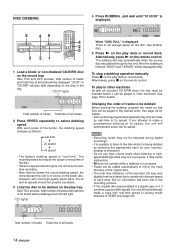
... used. When the display returns to the track and running-time information, the unit is displayed. "BUSY" and "UPDATE" will be started . NOTE • It is adjusted too high, the red segments of the level indicator are always lit. 2 Load a blank or non-finalized CD-R/RW disc on the record tray. 3 Press AUTO/MANUAL on your DVD player about how to change the setting of the button, the input changes...
... used. When the display returns to the track and running-time information, the unit is displayed. "BUSY" and "UPDATE" will be started . NOTE • It is adjusted too high, the red segments of the level indicator are always lit. 2 Load a blank or non-finalized CD-R/RW disc on the record tray. 3 Press AUTO/MANUAL on your DVD player about how to change the setting of the button, the input changes...
Operating Instructions
Page 20
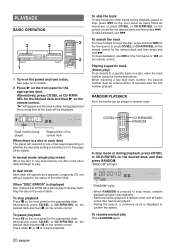
... a disc, enter the track number using the numbered buttons. See page 23 for the desired deck and then c on the remote control. "RANDOM" lights • When RANDOM is pressed in the play ) To go directly to confirm the search. Alternatively, press CD/SEL or CD-R/RW/ SEL for details. To skip backward, use r on the front panel or f on the remote control. Playing a specific track (Direct play deck. In dual mode...
... a disc, enter the track number using the numbered buttons. See page 23 for the desired deck and then c on the remote control. "RANDOM" lights • When RANDOM is pressed in the play ) To go directly to confirm the search. Alternatively, press CD/SEL or CD-R/RW/ SEL for details. To skip backward, use r on the front panel or f on the remote control. Playing a specific track (Direct play deck. In dual mode...

Operating Instructions
Page 22
As each track is playing. Whenever a disc is removed or the unit is turned off . "PROG" ights 3 Press the numbered button to add a new track. Programed track number Program number 2 Press a numbered button to program a track. The selected track will flash three times, alternating between two displays. To clear the program Press PRGM while the program is entered, the display will be added using r and t to locate the track, and the PRGM...
As each track is playing. Whenever a disc is removed or the unit is turned off . "PROG" ights 3 Press the numbered button to add a new track. Programed track number Program number 2 Press a numbered button to program a track. The selected track will flash three times, alternating between two displays. To clear the program Press PRGM while the program is entered, the display will be added using r and t to locate the track, and the PRGM...
Operating Instructions
Page 23
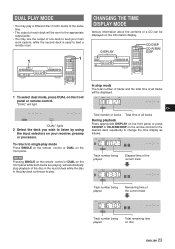
... number of tracks Total time of a CD can be displayed. "DUAL" will be displayed on the information display. "DUAL" lights 2 Select the deck you wish to listen by using the input selectors on your main room system, while the second deck is used to the appropriate output jacks. • You may use the output of the current track Track number being played Total remaining time on the front panel or remote control...
... number of tracks Total time of a CD can be displayed. "DUAL" will be displayed on the information display. "DUAL" lights 2 Select the deck you wish to listen by using the input selectors on your main room system, while the second deck is used to the appropriate output jacks. • You may use the output of the current track Track number being played Total remaining time on the front panel or remote control...
Operating Instructions
Page 24
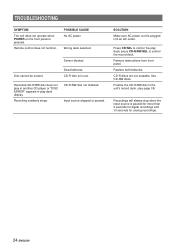
.... Input source stopped or paused. Remove obstructions from front panel. Finalize the CD-R/RW disc in use. SOLUTION Make sure AC power cord is pressed. Sensor blocked Disc cannot be erased. CD-R/RW disc not finalized. Replace both batteries. CD-R discs are not erasable. press CD-R/RW/SEL to control the play deck display. Recorded CD-R/RW disc does not play in another CD player or "DISC ERROR" appears in play deck; Press CD/SEL to control the record deck. Use CD-RW discs. TROUBLESHOOTING...
.... Input source stopped or paused. Remove obstructions from front panel. Finalize the CD-R/RW disc in use. SOLUTION Make sure AC power cord is pressed. Sensor blocked Disc cannot be erased. CD-R/RW disc not finalized. Replace both batteries. CD-R discs are not erasable. press CD-R/RW/SEL to control the play deck display. Recorded CD-R/RW disc does not play in another CD player or "DISC ERROR" appears in play deck; Press CD/SEL to control the record deck. Use CD-RW discs. TROUBLESHOOTING...

Operating Instructions
Page 25
.... disc. disc. replace the disc. Trying to see that the disc is in the Finalize the disc. Only audio CD discs will play disc. ALERT MESSAGES ERROR MESSAGE CHECK DISC DATA DISC DISC ERROR DISC FULL ERROR FAILED FULL NO AUDIO EXPLANATION AND PROBABLE CAUSE SOLUTION A record-related button has been pressed Unfinalize the disc to add tracks to a CD-RW when a finalized disc is properly loaded. Open the tray and check to program 21st track. Audio disc. A record...
.... disc. disc. replace the disc. Trying to see that the disc is in the Finalize the disc. Only audio CD discs will play disc. ALERT MESSAGES ERROR MESSAGE CHECK DISC DATA DISC DISC ERROR DISC FULL ERROR FAILED FULL NO AUDIO EXPLANATION AND PROBABLE CAUSE SOLUTION A record-related button has been pressed Unfinalize the disc to add tracks to a CD-RW when a finalized disc is properly loaded. Open the tray and check to program 21st track. Audio disc. A record...

Operating Instructions
Page 26
Recording from digital sources with copy prohibition code Copyrighted CDs or copyright protected digital sources Digital input OK (First generation copy) Digital input NO (Second generation copy) Copying a disc recorded from discs, radio or external tapes for digital audio Frequency response 2 Hz to 20 kHz Playback signal-to-noise ratio 105 dB Playback total harmonic distortion 0.005% / -88 dB Digital input sampling frequency range Digital input format Recording format 32 to...
Recording from digital sources with copy prohibition code Copyrighted CDs or copyright protected digital sources Digital input OK (First generation copy) Digital input NO (Second generation copy) Copying a disc recorded from discs, radio or external tapes for digital audio Frequency response 2 Hz to 20 kHz Playback signal-to-noise ratio 105 dB Playback total harmonic distortion 0.005% / -88 dB Digital input sampling frequency range Digital input format Recording format 32 to...


