
Operating Instructions
Page 2
FOREWORD ,.---...
FOREWORD ,.---...
Operating Instructions
Page 4
... 52 Al EDIT RECORDING 54 PROGRAMMED EDIT RECORDING 58 TIMER 62 SETTING THE TIMER 62 SETTING THE SLEEP TIMER 64 KARAOKE 66 MICROPHONE MIXING 66 USEFUL FUNCTIONS FOR KARAOKE 68 CARE AND MAINTENANCE 7O SPECIFICATIONS 72 TROUBLESHOOTING GUIDE 76 PARTS AND CONTROLS 78 4
... 52 Al EDIT RECORDING 54 PROGRAMMED EDIT RECORDING 58 TIMER 62 SETTING THE TIMER 62 SETTING THE SLEEP TIMER 64 KARAOKE 66 MICROPHONE MIXING 66 USEFUL FUNCTIONS FOR KARAOKE 68 CARE AND MAINTENANCE 7O SPECIFICATIONS 72 TROUBLESHOOTING GUIDE 76 PARTS AND CONTROLS 78 4
Operating Instructions
Page 6
..., echo your voice, and record Karaoke singing. FEATURES ~ Three CD changer system Three compact discscan be preset manually. You can also use the AUTO VOCAL FADER functionto reduce the vocal part only while you sing with the connected microphone. VOCAL FADER function This function makes the...in programmed order q Two different CD edit functions 6 You can turn the unit on ordinary discs or tapes softer, so you can also use the AUTO MULTIPLEX function to begin playback by pressing one of tracks in random order q Playback of the direct play . Other features Amplifier ...
..., echo your voice, and record Karaoke singing. FEATURES ~ Three CD changer system Three compact discscan be preset manually. You can also use the AUTO VOCAL FADER functionto reduce the vocal part only while you sing with the connected microphone. VOCAL FADER function This function makes the...in programmed order q Two different CD edit functions 6 You can turn the unit on ordinary discs or tapes softer, so you can also use the AUTO MULTIPLEX function to begin playback by pressing one of tracks in random order q Playback of the direct play . Other features Amplifier ...
Operating Instructions
Page 8
...q When you sometimes see water drops on ; or, gradually heat the room and dry the unit before turning the power on your dealer or an Aiwa service station and have it is used in , a small amount of moisture. q it replaced or repaired immediately. Pulling the cord may not function normally. q it is... is heated, you are extremely hot, cold, dusty or humid. q it has direct contact with a lot of current keeps on . On AC voltage Before use, check that the rated voltage of the unit, as shown in a room where the heating system has just been turned on flowing to 2 hours before...
...q When you sometimes see water drops on ; or, gradually heat the room and dry the unit before turning the power on your dealer or an Aiwa service station and have it is used in , a small amount of moisture. q it replaced or repaired immediately. Pulling the cord may not function normally. q it is... is heated, you are extremely hot, cold, dusty or humid. q it has direct contact with a lot of current keeps on . On AC voltage Before use, check that the rated voltage of the unit, as shown in a room where the heating system has just been turned on flowing to 2 hours before...
Operating Instructions
Page 12
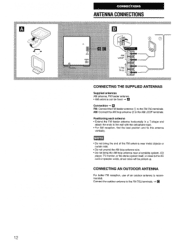
q For AM reception, find the best position and fix this antenna vertically. CONNECTING AN OUTDOOR ANTENNA For better FM reception, use of the FM antenna near a turntable system, CD player, TV monitor, or the stereo system itself, or close to the wall with the cellophane tape. ...
q For AM reception, find the best position and fix this antenna vertically. CONNECTING AN OUTDOOR ANTENNA For better FM reception, use of the FM antenna near a turntable system, CD player, TV monitor, or the stereo system itself, or close to the wall with the cellophane tape. ...
Operating Instructions
Page 14
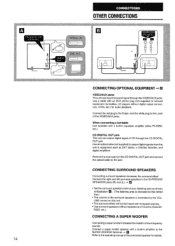
...audio playback. Connect a super woofer speaker with a built-in equalizer amplifier (Aiwa PX-E850, etc.). q The surround effect will not be heard with an impedance of the VIDEO/AUX jacks. q Use surround speakers with monaural sources. UME control on this unit to equipment such as...SUPER WOOFER terminal. + u Refer to the L jack of 16 ohms (Aiwa SX- R220, etc.). CONNECTING A SUPER WOOFER Connecting a super woofer increases the realism of CD through the CD DIGITAL OUT jack. When connecting a turntable Use turntable with a built-in illustration u , (The listening area is controlled...
...audio playback. Connect a super woofer speaker with a built-in equalizer amplifier (Aiwa PX-E850, etc.). q The surround effect will not be heard with an impedance of the VIDEO/AUX jacks. q Use surround speakers with monaural sources. UME control on this unit to equipment such as...SUPER WOOFER terminal. + u Refer to the L jack of 16 ohms (Aiwa SX- R220, etc.). CONNECTING A SUPER WOOFER Connecting a super woofer increases the realism of CD through the CD DIGITAL OUT jack. When connecting a turntable Use turntable with a built-in illustration u , (The listening area is controlled...
Operating Instructions
Page 16
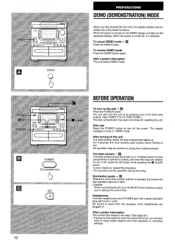
...When connecting the AC cord, the II SET button flashes to turn it is turned off, it off the power. For 4 seconds, the most recently used function button flashes in setting the current time. To turn the unit on , the DEMO display is pressed, the buttons for resetting the unit. When...unit enters DEMO mode. You can also turn it back on the unit The flash window above the disc compartment lights up or flash. After use Press the POWER button to guide you in red. It flashes when the disc compartment is heard from the speakers while headphones are rotated. ...
...When connecting the AC cord, the II SET button flashes to turn it is turned off, it off the power. For 4 seconds, the most recently used function button flashes in setting the current time. To turn the unit on , the DEMO display is pressed, the buttons for resetting the unit. When...unit enters DEMO mode. You can also turn it back on the unit The flash window above the disc compartment lights up or flash. After use Press the POWER button to guide you in red. It flashes when the disc compartment is heard from the speakers while headphones are rotated. ...
Operating Instructions
Page 18
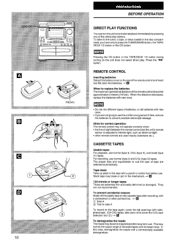
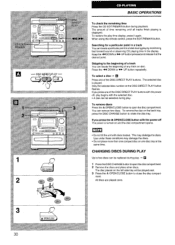
To listen to the tuner, a tape, or discs loaded in the disc compartment, you have only to press the TUNEFUBAND button, the TAPE/ DECK 1/2 button or the CD button. Press the BEFORE OPERA TION DIRECT PLAY FUNCTIONS You can turn the unit on the unit does not select direct play buttons. Pressing the CD button or the TAPE/DECK 1/2 button during turning on and starl playback immediately by pressing one of the direct play .
To listen to the tuner, a tape, or discs loaded in the disc compartment, you have only to press the TUNEFUBAND button, the TAPE/ DECK 1/2 button or the CD button. Press the BEFORE OPERA TION DIRECT PLAY FUNCTIONS You can turn the unit on the unit does not select direct play buttons. Pressing the CD button or the TAPE/DECK 1/2 button during turning on and starl playback immediately by pressing one of the direct play .
Operating Instructions
Page 22
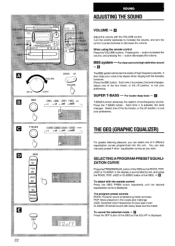
... curves programmed into this unit. The program preset sounds ROCK: Powerful sound emphasizing treble and bass POP: More presence in the display is displayed. When using the remote control Press the VOLUME buttons. Press the BBE button. For clear and vivid high-definition sound "El The BBE system enhances the clarity...
... curves programmed into this unit. The program preset sounds ROCK: Powerful sound emphasizing treble and bass POP: More presence in the display is displayed. When using the remote control Press the VOLUME buttons. Press the BBE button. For clear and vivid high-definition sound "El The BBE system enhances the clarity...

Operating Instructions
Page 26
... increases the reverb effect level and surround effect. -15, -12, -9, -6, -3, O, +3 and the off position can be obtained by red. 2 Press one of the DSP before using them. D-VOL (delay volume) Increasing the number in the display increases the delay time and surround effect. 12,18,32,41,49,98,130 mSec... and the off position can be also used to display DELAY. The equalization curve stored in the display is displayed. Be sure to store the reverb level and delay time. To select a manual...
... increases the reverb effect level and surround effect. -15, -12, -9, -6, -3, O, +3 and the off position can be obtained by red. 2 Press one of the DSP before using them. D-VOL (delay volume) Increasing the number in the display increases the delay time and surround effect. 12,18,32,41,49,98,130 mSec... and the off position can be also used to display DELAY. The equalization curve stored in the display is displayed. Be sure to store the reverb level and delay time. To select a manual...
Operating Instructions
Page 30
...beginning of a track You can remove two discs. Only the selected disc number on one of the DISC DIRECT PLAY buttons with discs loaded. Use under these conditions may dislodge the discs. UP button pressed and release it again. To remove discs Press the A OPEN/CLOSE button to ...rotate the disc tray. When using the remote control, press the EDIT/REMAIN button. The disc placed on disc. Skipping to open the disc compartment. You can locate the beginning...
...beginning of a track You can remove two discs. Only the selected disc number on one of the DISC DIRECT PLAY buttons with discs loaded. Use under these conditions may dislodge the discs. UP button pressed and release it again. To remove discs Press the A OPEN/CLOSE button to ...rotate the disc tray. When using the remote control, press the EDIT/REMAIN button. The disc placed on disc. Skipping to open the disc compartment. You can locate the beginning...
Operating Instructions
Page 38
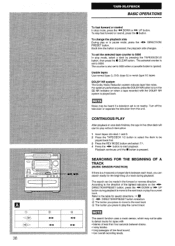
To change the playback side During play the current track Im I The search function uses a music sensor, which may be able I ), Cr02 (type II) or metal (type IV) tapes. Refer to start playback. q long passages of a track during playback to ... or play without interruption. 1 Insert tapes into deck 1 and 2. 2 Press the TAPE/DECK 1/2 button to select the deck to play the current track. Usable tapes Use normal (type I to 0000 In stop mode, select a deck by pressing the TAPE/DECKl/2 button, then press the s CLEAR button. q noisy blanks. BASIC OPERATIONS To...
To change the playback side During play the current track Im I The search function uses a music sensor, which may be able I ), Cr02 (type II) or metal (type IV) tapes. Refer to start playback. q long passages of a track during playback to ... or play without interruption. 1 Insert tapes into deck 1 and 2. 2 Press the TAPE/DECK 1/2 button to select the deck to play the current track. Usable tapes Use normal (type I to 0000 In stop mode, select a deck by pressing the TAPE/DECKl/2 button, then press the s CLEAR button. q noisy blanks. BASIC OPERATIONS To...
Operating Instructions
Page 40
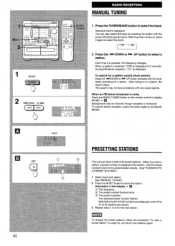
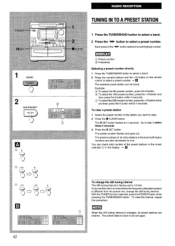
... on page 42, and store new stations again, PRESElllNG STATIONS The unit can also select the tuner by pressing the button with very weak signals. Use the preset number to a preset station directly. (See "TUNING IN TO A PRESET STATION".) 1 Select band and station. Selected band is monaural. m To change the preset...
... on page 42, and store new stations again, PRESElllNG STATIONS The unit can also select the tuner by pressing the button with very weak signals. Use the preset number to a preset station directly. (See "TUNING IN TO A PRESET STATION".) 1 Select band and station. Selected band is monaural. m To change the preset...
Operating Instructions
Page 42
... TUNEFUBAND button. When the AM tuning interval is factory-set again. The II SET button flashes for 4 seconds. The preset numbers of the station you use this procedure. If you want to step 3 within 4 seconds. To clear a preset station 1 Select the preset number of all preset stations are cleared. The preset...
... TUNEFUBAND button. When the AM tuning interval is factory-set again. The II SET button flashes for 4 seconds. The preset numbers of the station you use this procedure. If you want to step 3 within 4 seconds. To clear a preset station 1 Select the preset number of all preset stations are cleared. The preset...
Operating Instructions
Page 46
... the REV MODE button is added. REC flashes in the recording allow you and the exposed side down. To record without recording. When you use the remote control to start recording. TO INSERT 4-SECOND BLANK SPACES Blank spaces in the display for 4 seconds and the tape runs without DOLBY...space of less than 4 seconds After the deck enters recording pause mode, press the q REC/ REC MUTE button again. To stop recording Press the s button. q Use normal (type I) or Cr02 (type II) tapes. 1 Insert the tape to be recorded on the Dolby NR. Press the EJECT A mark to resume recording.. 1...
... the REV MODE button is added. REC flashes in the recording allow you and the exposed side down. To record without recording. When you use the remote control to start recording. TO INSERT 4-SECOND BLANK SPACES Blank spaces in the display for 4 seconds and the tape runs without DOLBY...space of less than 4 seconds After the deck enters recording pause mode, press the q REC/ REC MUTE button again. To stop recording Press the s button. q Use normal (type I) or Cr02 (type II) tapes. 1 Insert the tape to be recorded on the Dolby NR. Press the EJECT A mark to resume recording.. 1...
Operating Instructions
Page 48
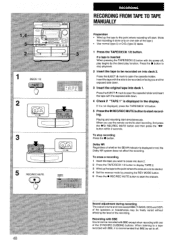
.... 5 Press the q REC/REC MUTE button to start recording. Press the s button to stop playback. 2 Inseti the tape to be recorded on facing you use the remote control to start recording, first press the q/0 REC/REC MUTE button and then press the Press the EJECT A mark to open the cassette... by the direct play function. if a tape is displayed in the display. Press the EJECT A mark to be recorded on one side of the tape.) 9 Use normal (type I) or CrOA(type II) tapes. 1 Press the TAPHDECK 1/2 button. Insert the tape with the exposed side down , 3 Insert the original tape ...
.... 5 Press the q REC/REC MUTE button to start recording. Press the s button to stop playback. 2 Inseti the tape to be recorded on facing you use the remote control to start recording, first press the q/0 REC/REC MUTE button and then press the Press the EJECT A mark to open the cassette... by the direct play function. if a tape is displayed in the display. Press the EJECT A mark to be recorded on one side of the tape.) 9 Use normal (type I) or CrOA(type II) tapes. 1 Press the TAPHDECK 1/2 button. Insert the tape with the exposed side down , 3 Insert the original tape ...
Operating Instructions
Page 52
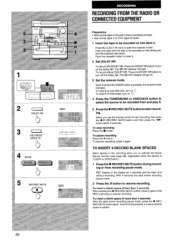
... the q REC/REC MUTE button. 1 6 RECIREC MUTE ~ 52 RECORDING FROM A CD Preparation " Wind up to the point where recording will go off the Dolby NR. q Use normal (type I) or CrOz (type II) tapes. 1 Insert the tape to be recorded on into deck 2. Insert the tape with the first track of the... from the CD Press the s button to stop the deck, and press it again to stop mode. The 00 NR indicator will light. When you use the remote control to be recorded on first facing you want to start in the compartment are recorded if the tape is long enough. To...
... the q REC/REC MUTE button. 1 6 RECIREC MUTE ~ 52 RECORDING FROM A CD Preparation " Wind up to the point where recording will go off the Dolby NR. q Use normal (type I) or CrOz (type II) tapes. 1 Insert the tape to be recorded on into deck 2. Insert the tape with the first track of the... from the CD Press the s button to stop the deck, and press it again to stop mode. The 00 NR indicator will light. When you use the remote control to be recorded on first facing you want to start in the compartment are recorded if the tape is long enough. To...
Operating Instructions
Page 54
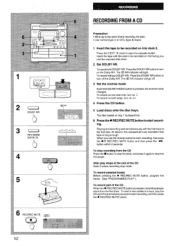
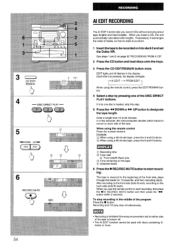
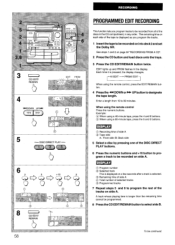
... ton. 4 Select a disc by pressing one disc is cut short. 1 Insert thetapeto be used with discs containing 31 tracks or more. Example: @ When using a 46-minute tape, press the 4 and 6 buttons. @ When using the remote control, press the EDIT/REMAIN but- The tape is broken off. Recording and CD... -DISC DIRECT PLAY - Each time it rearranges the order of the DISC DIRECT PLAY buttons. PRGM EDIT7 I I When using a 60-minute tape, press the 6 and O buttons. When using the remote control Press the nu-merit buttons. q The Al EDIT function cannot be recorded on into deck2and set the Dolby...
... ton. 4 Select a disc by pressing one disc is cut short. 1 Insert thetapeto be used with discs containing 31 tracks or more. Example: @ When using a 46-minute tape, press the 4 and 6 buttons. @ When using the remote control, press the EDIT/REMAIN but- The tape is broken off. Recording and CD... -DISC DIRECT PLAY - Each time it rearranges the order of the DISC DIRECT PLAY buttons. PRGM EDIT7 I I When using a 60-minute tape, press the 6 and O buttons. When using the remote control Press the nu-merit buttons. q The Al EDIT function cannot be recorded on into deck2and set the Dolby...
Operating Instructions
Page 58
... be recorded from 10 to select side B. Each time it is longer than the remaining time cannot be continued. Example: @ When using a 46-minute tape, press the 4 and 6 buttons. @ When using a 60-minute tape, press the 6 and O buttons. @) Recording time of side A @ Tape side A: Front side /B: Back side 5 ...in "the display. Al EDIT - UP button to designate Enter a length from all of the tracks on into deck2 and set the Dolby NR. When using the remote control, press the EDIT/REMAIN button. 4 Press the 4 DOWN or* the tape length. EDIT lights up and PRGM flashes in any order....
... be recorded from 10 to select side B. Each time it is longer than the remaining time cannot be continued. Example: @ When using a 46-minute tape, press the 4 and 6 buttons. @ When using a 60-minute tape, press the 6 and O buttons. @) Recording time of side A @ Tape side A: Front side /B: Back side 5 ...in "the display. Al EDIT - UP button to designate Enter a length from all of the tracks on into deck2 and set the Dolby NR. When using the remote control, press the EDIT/REMAIN button. 4 Press the 4 DOWN or* the tape length. EDIT lights up and PRGM flashes in any order....
Operating Instructions
Page 60
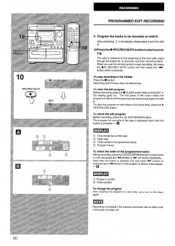
.... + u o Time remaining on the steps again. The tape is shown in the display goes out. After confirming 3 in the middle Press the s button. When you use the remote control to start recording. DOWN or > UP button repeatedly. 10 REC/REC MUTE q o ?!? 60 PROGRAMMED EDIT RECORDING 9 Program the tracks to be recorded...
.... + u o Time remaining on the steps again. The tape is shown in the display goes out. After confirming 3 in the middle Press the s button. When you use the remote control to start recording. DOWN or > UP button repeatedly. 10 REC/REC MUTE q o ?!? 60 PROGRAMMED EDIT RECORDING 9 Program the tracks to be recorded...