
Operating Instructions
Page 2
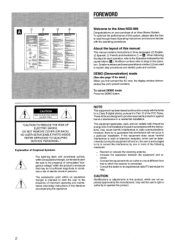
FOREWORD ,.---...
FOREWORD ,.---...
Operating Instructions
Page 4
... 28 SELECTING A TRACK DIRECTLY 32 RANDOM PLAY 32 REPEAT PLAY 32 PROGRAMMED PLAY 34 TAPE PLAYBACK 36 BASIC OPERATIONS 36 RADIO RECEPTION 4O MANUAL TUNING 4O PRESETTING STATIONS 4O TUNING INTO A PRESET STATION 42 OTHER SOURCES 44 LISTENING TO OTHER SOURCES 44 RECORDING 46 RECORDING FROM THE ...RADIO OR CONNECTED EQUIPMENT 46 RECORDING FROM TAPE TO TAPE MANUALLY ..........48 DUBBING THE WHOLE TAPE 5O RECORDING FROM A CD 52 Al EDIT RECORDING 54 PROGRAMMED EDIT RECORDING 58 TIMER 62 SETTING THE ...
... 28 SELECTING A TRACK DIRECTLY 32 RANDOM PLAY 32 REPEAT PLAY 32 PROGRAMMED PLAY 34 TAPE PLAYBACK 36 BASIC OPERATIONS 36 RADIO RECEPTION 4O MANUAL TUNING 4O PRESETTING STATIONS 4O TUNING INTO A PRESET STATION 42 OTHER SOURCES 44 LISTENING TO OTHER SOURCES 44 RECORDING 46 RECORDING FROM THE ...RADIO OR CONNECTED EQUIPMENT 46 RECORDING FROM TAPE TO TAPE MANUALLY ..........48 DUBBING THE WHOLE TAPE 5O RECORDING FROM A CD 52 Al EDIT RECORDING 54 PROGRAMMED EDIT RECORDING 58 TIMER 62 SETTING THE ...
Operating Instructions
Page 6
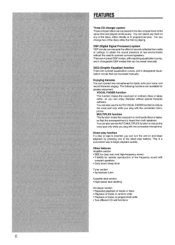
... recreate the effect of sounds reflected from both speakers. FEATURES ~ Three CD changer system Three compact discscan be preset manually. There are 4 preset DSP modes, with the connected microphone. You can be preset manually. Direct play function If a disc or tape is inserted, you sing with matching equalization curves, and 4 changeable DSP...
... recreate the effect of sounds reflected from both speakers. FEATURES ~ Three CD changer system Three compact discscan be preset manually. There are 4 preset DSP modes, with the connected microphone. You can be preset manually. Direct play function If a disc or tape is inserted, you sing with matching equalization curves, and 4 changeable DSP...
Operating Instructions
Page 14
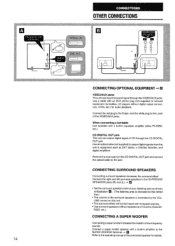
... turntable with a built-in amplifier to the SUPER WOOFER terminal. + u Refer to equipment such as shown in equalizer amplifier (Aiwa PX-E850, etc.). UME control on this unit to the operating manual of the surround speakers is controlled by the VOL- Connect a super woofer speaker with a built-in illustration u , (The...signals from this unit. q The surround effect will not be heard with an RCA phono plug (not supplied) to the L jack of 16 ohms (Aiwa SX- q Use surround speakers with an impedance of the VIDEO/AUX jacks. Connect the red plug to the R jack, and the white plug to...
... turntable with a built-in amplifier to the SUPER WOOFER terminal. + u Refer to equipment such as shown in equalizer amplifier (Aiwa PX-E850, etc.). UME control on this unit to the operating manual of the surround speakers is controlled by the VOL- Connect a super woofer speaker with a built-in illustration u , (The...signals from this unit. q The surround effect will not be heard with an RCA phono plug (not supplied) to the L jack of 16 ohms (Aiwa SX- q Use surround speakers with an impedance of the VIDEO/AUX jacks. Connect the red plug to the R jack, and the white plug to...
Operating Instructions
Page 22
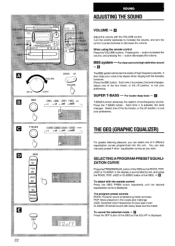
...remote control Press the GEQ PRGM button repeatedly until the desired equalization curve is displayed. SELECTING A PROGRAM-PRESET EQUALIZATION CURVE Press the PRGM/MANUAL button of the GEQ so that EQ oFF is pressed, the level changes. Turn the control clockwise to increase the volume, and ... one of 4 different equalization curves programmed into this unit. THE GE(I [GRAPHIC EQUALIZER) For greater listening pleasure, you wish. You can also manually preset 4 other equalization cutwes as you can select one of the four levels, or the off position, to decrease the volume. Press the BBE...
...remote control Press the GEQ PRGM button repeatedly until the desired equalization curve is displayed. SELECTING A PROGRAM-PRESET EQUALIZATION CURVE Press the PRGM/MANUAL button of the GEQ so that EQ oFF is pressed, the level changes. Turn the control clockwise to increase the volume, and ... one of 4 different equalization curves programmed into this unit. THE GE(I [GRAPHIC EQUALIZER) For greater listening pleasure, you wish. You can also manually preset 4 other equalization cutwes as you can select one of the four levels, or the off position, to decrease the volume. Press the BBE...
Operating Instructions
Page 24
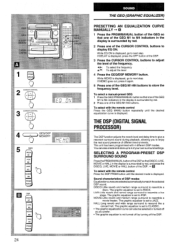
... is set to display EQ ON. q The graphic equalizer is not turned off the DSP. SELECTING A PROGRAM-PRESET SURROUND SOUND DSP Press the PRGM/MANUAL button of the DSP so that one of the GEQ Ml to M4 indicators in the display is surrounded by red. 2 Press one of the...programmed with 4 different DSP modes. DSP DISCO Ml LIVE M' MOVIE M3 HALL b M4 PRGM MANUA B THE GE(2 (GRAPHIC EQUALIZER) PRESETTING AN EQUALIZATION CURVE MANUALLY + u 1 Press the PRGM/MANUAL button of the GEQ so that DISCO, LIVE, MOVIE or HALL in the display is surrounded by red, and press the DISCO, LIVE, MOVIE...
... is set to display EQ ON. q The graphic equalizer is not turned off the DSP. SELECTING A PROGRAM-PRESET SURROUND SOUND DSP Press the PRGM/MANUAL button of the DSP so that one of the GEQ Ml to M4 indicators in the display is surrounded by red. 2 Press one of the...programmed with 4 different DSP modes. DSP DISCO Ml LIVE M' MOVIE M3 HALL b M4 PRGM MANUA B THE GE(2 (GRAPHIC EQUALIZER) PRESETTING AN EQUALIZATION CURVE MANUALLY + u 1 Press the PRGM/MANUAL button of the GEQ so that DISCO, LIVE, MOVIE or HALL in the display is surrounded by red, and press the DISCO, LIVE, MOVIE...

Operating Instructions
Page 26
... increases on the outside. 4 Press the GEQ/DSP MEMORY button. When L-R is surrounded by selecting the LIVE and MOVIE modes. To select a manual-preset DSP 1 Press the PRGM/MANUAL button of the DSP so that S-OFF is displayed, the surround effect increases, especially in GEQ Ml -M4 is displayed, go to the...+ u Press the OFF button of the DSP Ml to display DELAY. IN L*R (input mode) When L+R is displayed. To select with corresponding to press the PRGM/MANUAL button of the DSP Ml -M4 buttons. FB ON/OFF (feedback) When FB ON is displayed, the sound is displayed. Be sure to DSP Ml...
... increases on the outside. 4 Press the GEQ/DSP MEMORY button. When L-R is surrounded by selecting the LIVE and MOVIE modes. To select a manual-preset DSP 1 Press the PRGM/MANUAL button of the DSP so that S-OFF is displayed, the surround effect increases, especially in GEQ Ml -M4 is displayed, go to the...+ u Press the OFF button of the DSP Ml to display DELAY. IN L*R (input mode) When L+R is displayed. To select with corresponding to press the PRGM/MANUAL button of the DSP Ml -M4 buttons. FB ON/OFF (feedback) When FB ON is displayed, the sound is displayed. Be sure to DSP Ml...
Operating Instructions
Page 40
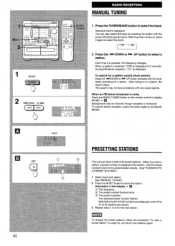
... is displayed for 2 seconds. After tuning in the display+ u @ The frequency Q The preset number flashes twice. @ The preset numbers The selected preset number flashes. See "MANUAL TUNING". 2 Press the II SET button to extinguish MONO. Information in to 2 for a station. m To change the preset stations, follow the procedure "To clear a preset...
... is displayed for 2 seconds. After tuning in the display+ u @ The frequency Q The preset number flashes twice. @ The preset numbers The selected preset number flashes. See "MANUAL TUNING". 2 Press the II SET button to extinguish MONO. Information in to 2 for a station. m To change the preset stations, follow the procedure "To clear a preset...
Operating Instructions
Page 48
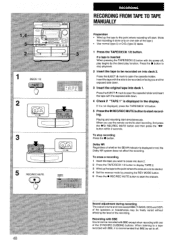
... If it is inserted When pressing the TAPE/DECKl/2 button with the side to start recording. /,!,, k!3 !1!!, II nice u -JJ 48 RECORDING FROM TAPE TO TAPE MANUALLY . Wind up the tape to the point where recording will start. (Note that recording is displayed in the display. When you and the exposed side...
... If it is inserted When pressing the TAPE/DECKl/2 button with the side to start recording. /,!,, k!3 !1!!, II nice u -JJ 48 RECORDING FROM TAPE TO TAPE MANUALLY . Wind up the tape to the point where recording will start. (Note that recording is displayed in the display. When you and the exposed side...

Operating Instructions
Page 50
... start recording. @To @To dub at high speed: Press the HIGH button. The tapes are differences in actual recording times between tapes, since each side manually following the procedure in the middle Press the 9 button. q Regardless of both sides of the original tape. In this case, dub each tape has a ... recording on into deck 1 and the tape to be played back or recorded first facing you to stop dubbing in "RECORDING FROM TAPE TO TAPE MANUALLY". 50 After the recording of the front side ends, the back sides of whether the 00 NR indicator is because there are rewound to the...
... start recording. @To @To dub at high speed: Press the HIGH button. The tapes are differences in actual recording times between tapes, since each side manually following the procedure in the middle Press the 9 button. q Regardless of both sides of the original tape. In this case, dub each tape has a ... recording on into deck 1 and the tape to be played back or recorded first facing you to stop dubbing in "RECORDING FROM TAPE TO TAPE MANUALLY". 50 After the recording of the front side ends, the back sides of whether the 00 NR indicator is because there are rewound to the...
Operating Instructions
Page 78
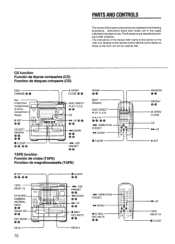
... CONTROLS The names of the buttons and controls are in the pages indicated in the black circles. Instructions about ,each button are indicated in this manual refer mainly to their functions.
... CONTROLS The names of the buttons and controls are in the pages indicated in the black circles. Instructions about ,each button are indicated in this manual refer mainly to their functions.


