
Operating Instructions
Page 18
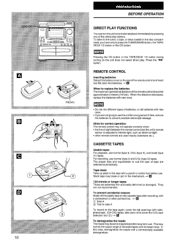
BEFORE OPERA TION DIRECT PLAY FUNCTIONS You can turn the unit on the unit does not select direct play buttons. Press the Pressing the CD button or the TAPE/DECK 1/2 button during turning on and starl playback immediately by pressing one of the direct play . To listen to the tuner, a tape, or discs loaded in the disc compartment, you have only to press the TUNEFUBAND button, the TAPE/ DECK 1/2 button or the CD button.
BEFORE OPERA TION DIRECT PLAY FUNCTIONS You can turn the unit on the unit does not select direct play buttons. Press the Pressing the CD button or the TAPE/DECK 1/2 button during turning on and starl playback immediately by pressing one of the direct play . To listen to the tuner, a tape, or discs loaded in the disc compartment, you have only to press the TUNEFUBAND button, the TAPE/ DECK 1/2 button or the CD button.
Operating Instructions
Page 20
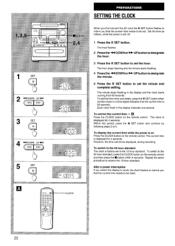
... setting. Within this period, press the II SET button and continue by folIowing steps 2 to the 24-hour standard, press the CLOCK button on the remote control and then press the 9 button within 4 seconds. To display the current time while the power is factory-set the hour. To correct the current... time+ u Press the CLOCK button on the remote control. To switch to 5. The clock is still off. 1 Press the II SET button. To switch to the 24-hour standard The clock is on...
... setting. Within this period, press the II SET button and continue by folIowing steps 2 to the 24-hour standard, press the CLOCK button on the remote control and then press the 9 button within 4 seconds. To display the current time while the power is factory-set the hour. To correct the current... time+ u Press the CLOCK button on the remote control. To switch to 5. The clock is still off. 1 Press the II SET button. To switch to the 24-hour standard The clock is on...
Operating Instructions
Page 22
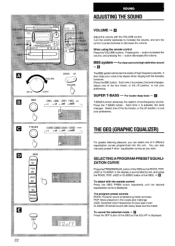
..., JAZZ or CLASSIC in the vocals and midrange JAZZ: Accented lower frequencies for jazz-type music CLASSIC: Enriched sound with the remote control Press the GEQ PRGM button repeatedly until the desired equalization curve is displayed. You can select one of the GEQ so that... changes. SELECTING A PROGRAM-PRESET EQUALIZATION CURVE Press the PRGM/MANUAL button of 4 different equalization curves programmed into this unit. When using the remote control Press the VOLUME buttons. It also helps your preference. Press the BBE button. THE GE(I [GRAPHIC EQUALIZER) For greater listening pleasure,...
..., JAZZ or CLASSIC in the vocals and midrange JAZZ: Accented lower frequencies for jazz-type music CLASSIC: Enriched sound with the remote control Press the GEQ PRGM button repeatedly until the desired equalization curve is displayed. You can select one of the GEQ so that... changes. SELECTING A PROGRAM-PRESET EQUALIZATION CURVE Press the PRGM/MANUAL button of 4 different equalization curves programmed into this unit. When using the remote control Press the VOLUME buttons. It also helps your preference. Press the BBE button. THE GE(I [GRAPHIC EQUALIZER) For greater listening pleasure,...
Operating Instructions
Page 24
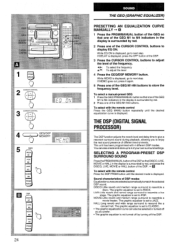
If MEMO goes out, press it again. 5 Press one of the GEQ Ml -M4 buttons. To select with the remote control Press the GE(2 MANU button repeatedly until the desired mode is set to CLASSIC. HALL: Long reverb and wide range surround to resemble a disco. q ... so that one of the frequency. : TO select the frequency A/V: To adjust the level buttons to next step. This unit has been programmed with the remote control Press the DSP PRGM button until the desired equalization curve is displayed, press the OFF button of the DSP. 3 Press the CURSOR CONTROL the...
If MEMO goes out, press it again. 5 Press one of the GEQ Ml -M4 buttons. To select with the remote control Press the GE(2 MANU button repeatedly until the desired mode is set to CLASSIC. HALL: Long reverb and wide range surround to resemble a disco. q ... so that one of the frequency. : TO select the frequency A/V: To adjust the level buttons to next step. This unit has been programmed with the remote control Press the DSP PRGM button until the desired equalization curve is displayed, press the OFF button of the DSP. 3 Press the CURSOR CONTROL the...

Operating Instructions
Page 26
... other modes. When L-R is displayed, it again. 5 Press one of the DSP Ml to M4 indicators in GEQ Ml -M4 is automatically selected with the remote control Press the DSP MANU button until the desired mode is surrounded by selecting the LIVE and MOVIE modes. PRESETTING A DSP SURROUND SOUND MANUALLY 1 Press...
... other modes. When L-R is displayed, it again. 5 Press one of the DSP Ml to M4 indicators in GEQ Ml -M4 is automatically selected with the remote control Press the DSP MANU button until the desired mode is surrounded by selecting the LIVE and MOVIE modes. PRESETTING A DSP SURROUND SOUND MANUALLY 1 Press...
Operating Instructions
Page 30
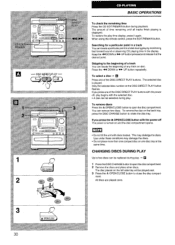
... playing time in a track You can remove two discs. If you press one of any track on one compact disc on disc. When using the remote control, press the EDIT/REMAIN button. CHANGING DISCS DURING PLAY Up to two discs can locate the beginning of the DISC DIRECT PLAY buttons. Keep...
... playing time in a track You can remove two discs. If you press one of any track on one compact disc on disc. When using the remote control, press the EDIT/REMAIN button. CHANGING DISCS DURING PLAY Up to two discs can locate the beginning of the DISC DIRECT PLAY buttons. Keep...

Operating Instructions
Page 32
... a track. Press the RANDOM button on all discs in the display goes out. REPEAT PLAY All the tracks on the selected disc or on the remote control to display RANDOM, before or during play. + u To repeat only selected tracks Program the desired tracks before or during play . + u 1 Press ..., press the +10 button twice and then press the O button within 4 seconds. RANDOM PLAY All the tracks on the selected disc or on the remote control to display q, before selecting repeat play. (See page 34.) To cancel repeat play mode. Play begins with the numeric buttons in the display. ...
... a track. Press the RANDOM button on all discs in the display goes out. REPEAT PLAY All the tracks on the selected disc or on the remote control to display RANDOM, before or during play. + u To repeat only selected tracks Program the desired tracks before or during play . + u 1 Press ..., press the +10 button twice and then press the O button within 4 seconds. RANDOM PLAY All the tracks on the selected disc or on the remote control to display q, before selecting repeat play. (See page 34.) To cancel repeat play mode. Play begins with the numeric buttons in the display. ...
Operating Instructions
Page 40
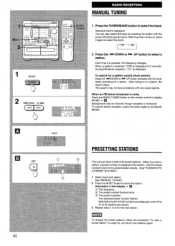
... to 32 stations are stored. 3 Repeat steps 1 to store the station. When an FM stereo broadcast is noisy Press the MONO TUNER button on the remote control to a preset station directly. (See "TUNING IN TO A PRESET STATION".) 1 Select band and station. PRESElllNG STATIONS The unit can also select the tuner by...
... to 32 stations are stored. 3 Repeat steps 1 to store the station. When an FM stereo broadcast is noisy Press the MONO TUNER button on the remote control to a preset station directly. (See "TUNING IN TO A PRESET STATION".) 1 Select band and station. PRESElllNG STATIONS The unit can also select the tuner by...
Operating Instructions
Page 42
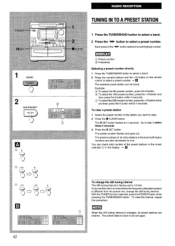
... highest number. ~ Preset number @ Frequency Selecting a preset number directly 1 Press the TUNEWBAND button to select a band. 2 Press the numeric buttons and the +1 O button on the remote control to 10 kHz. The II SET button flashes for 4 seconds. I BAND 2 @ +10 +10 %"8"8 um m TUNING INTO A PRESET STATION 1 Press the TUNEFVBAND button to select...
... highest number. ~ Preset number @ Frequency Selecting a preset number directly 1 Press the TUNEWBAND button to select a band. 2 Press the numeric buttons and the +1 O button on the remote control to 10 kHz. The II SET button flashes for 4 seconds. I BAND 2 @ +10 +10 %"8"8 um m TUNING INTO A PRESET STATION 1 Press the TUNEFVBAND button to select...
Operating Instructions
Page 46
... in the display for 4 seconds and the tape runs without DOLBY NR: Press the DOLBY NR button to turn on first facing you use the remote control to start recording. To resume recording, press it . 5 Press the q REC/REC MUTE button to start . q Use normal (type I) or Cr02 (type II) tapes...
... in the display for 4 seconds and the tape runs without DOLBY NR: Press the DOLBY NR button to turn on first facing you use the remote control to start recording. To resume recording, press it . 5 Press the q REC/REC MUTE button to start . q Use normal (type I) or Cr02 (type II) tapes...
Operating Instructions
Page 48
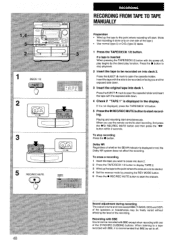
... tape.) 9 Use normal (type I) or CrOA(type II) tapes. 1 Press the TAPHDECK 1/2 button. Press the EJECT A mark to be recorded on facing you use the remote control to be recorded on into deck 1. Playing and recording starl simultaneously. Insert the tape with the exposed side down , 3 Insert the original tape into...
... tape.) 9 Use normal (type I) or CrOA(type II) tapes. 1 Press the TAPHDECK 1/2 button. Press the EJECT A mark to be recorded on facing you use the remote control to be recorded on into deck 1. Playing and recording starl simultaneously. Insert the tape with the exposed side down , 3 Insert the original tape into...
Operating Instructions
Page 52
... 2. The disc loaded on the Dolby NR. To record with DOLBY NR: Press the DOLBY NR button to turn on first facing you use the remote control to be recorded on z. To record on both sides, turn off . 3 Set the reverse mode. Insert the tape with the first track of the...
... 2. The disc loaded on the Dolby NR. To record with DOLBY NR: Press the DOLBY NR button to turn on first facing you use the remote control to be recorded on z. To record on both sides, turn off . 3 Set the reverse mode. Insert the tape with the first track of the...
Operating Instructions
Page 54
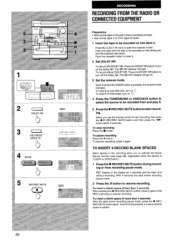
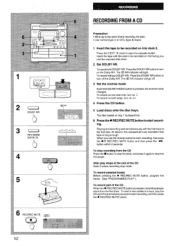
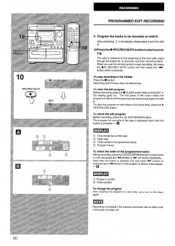
... seconds. it is broken off. To stop simultaneously. In a few seconds, the microcomputer decides which tracks to start recording. When you use the remote control to record on into deck2and set the Dolby NR. q The Al EDIT function cannot be recorded on each side of the tape is pressed... of tracks, so that no track is loaded, skip this step. 5 Press the + DOWN or* the tape length. PRGM EDIT7 I I When using the remote control Press the nu-merit buttons. After recording on the front side (side A) ends, recording on page 52 "RECORDING FROM A CD. 2 Press the CD...
... seconds. it is broken off. To stop simultaneously. In a few seconds, the microcomputer decides which tracks to start recording. When you use the remote control to record on into deck2and set the Dolby NR. q The Al EDIT function cannot be recorded on each side of the tape is pressed... of tracks, so that no track is loaded, skip this step. 5 Press the + DOWN or* the tape length. PRGM EDIT7 I I When using the remote control Press the nu-merit buttons. After recording on the front side (side A) ends, recording on page 52 "RECORDING FROM A CD. 2 Press the CD...
Operating Instructions
Page 58
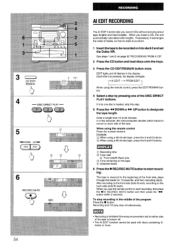
... Enter a length from all of the discs in the CD compartment, in "the display. Al EDIT - PRGM EDIT When using the remote control Press the numeric buttons. When using the remote control, press the EDIT/REMAIN button. 4 Press the 4 DOWN or* the tape length. Each time it is displayed as you program...
... Enter a length from all of the discs in the CD compartment, in "the display. Al EDIT - PRGM EDIT When using the remote control Press the numeric buttons. When using the remote control, press the EDIT/REMAIN button. 4 Press the 4 DOWN or* the tape length. Each time it is displayed as you program...
Operating Instructions
Page 60
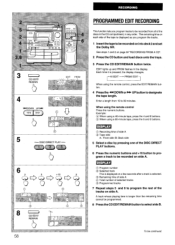
... remaining on the steps again. m Recording is inhibited if the erasure prevention tab on side B. To clear the program on side B. When you use the remote control to the beginning of the front side, plays through the leader for side B. 10 Press the q REC/REC MUTE button to be recorded on...
... remaining on the steps again. m Recording is inhibited if the erasure prevention tab on side B. To clear the program on side B. When you use the remote control to the beginning of the front side, plays through the leader for side B. 10 Press the q REC/REC MUTE button to be recorded on...

Operating Instructions
Page 62
... names flash alternately in timer. ala REC '/l\' n L K DOWN UP FM 3 MDOWN UP m 4 DECK 1/2 BAND b 62 SETTING THE TIMER The unit can be turned on the remote control to select timer playback mode or timer recording mode.
... names flash alternately in timer. ala REC '/l\' n L K DOWN UP FM 3 MDOWN UP m 4 DECK 1/2 BAND b 62 SETTING THE TIMER The unit can be turned on the remote control to select timer playback mode or timer recording mode.
Operating Instructions
Page 64
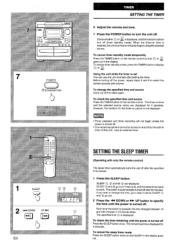
...~ or ,$c. To restore timer standby mode, press the TIMER button to select the correct sources and volume. SElllNG THE SLEEP TIMER (Operating with only the remote control) The sleep timer automatically turns the unit off . ;- Use an external timer. Check whether Q or ~$c is not displayed. To check the time... remaining until the power is displayed for the timer-on the remote control so that SLEEP in the display. The remaining time is turned off after setting the timer.
...~ or ,$c. To restore timer standby mode, press the TIMER button to select the correct sources and volume. SElllNG THE SLEEP TIMER (Operating with only the remote control) The sleep timer automatically turns the unit off . ;- Use an external timer. Check whether Q or ~$c is not displayed. To check the time... remaining until the power is displayed for the timer-on the remote control so that SLEEP in the display. The remaining time is turned off after setting the timer.
Operating Instructions
Page 74
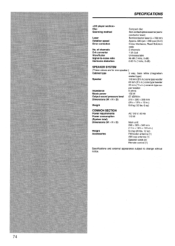
... Ilow Main unit: 290 x 323x 340 mm (1 11/2x 123/, x 13'/2 in.) 9.4 kg (20 Ibs, 12 02) FM feeder antenna(1) AM loop antenna (1 i r Speaker cords (2) Remote control (1) Specifications and external appearance subject to -noise ratio Harmonic distortion Compact disc Non-contact optical scanner (semiconductor laser) Semiconductor laser (h= 780 nm) Approx. 500...
... Ilow Main unit: 290 x 323x 340 mm (1 11/2x 123/, x 13'/2 in.) 9.4 kg (20 Ibs, 12 02) FM feeder antenna(1) AM loop antenna (1 i r Speaker cords (2) Remote control (1) Specifications and external appearance subject to -noise ratio Harmonic distortion Compact disc Non-contact optical scanner (semiconductor laser) Semiconductor laser (h= 780 nm) Approx. 500...
Operating Instructions
Page 78
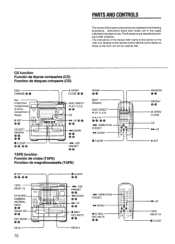
... de cintas (TAPE) Fonction de magnetocassette (TAPE) +- DOWN @-@ w UP @-@ q RECI REC MUTE @-@ 78 REPEAT @-@ = OPEN/ CLOSE CD * UP * UP TAPE, DECK 1/2 CLEAR Buttons on the remote control with the same names as well. DIR/ PRESET @-@ - Instructions about ,each button are indicated in the black circles.
... de cintas (TAPE) Fonction de magnetocassette (TAPE) +- DOWN @-@ w UP @-@ q RECI REC MUTE @-@ 78 REPEAT @-@ = OPEN/ CLOSE CD * UP * UP TAPE, DECK 1/2 CLEAR Buttons on the remote control with the same names as well. DIR/ PRESET @-@ - Instructions about ,each button are indicated in the black circles.


