
Operating Instructions
Page 3
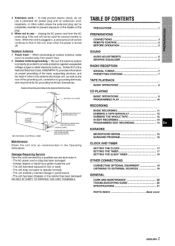
... of the grounding unit, connection to the unit, even when the power is turned off Outdoor Antenna 1 Power lines - TABLE OF CONTENTS Precautions l PREPARATIONS CONNECTIONS . ..m 3 REMOTE CONTROL 5 BEFORE OPERATION 5 SOUND AUDIO ADJUSTMENTS m 6 GRAPHIC EQUALIZER 6 RADIO RECEPTION MANUAL TUNING 7 PRESETTING STATIONS 7 TAPE PLAYBACK BASIC OPERATIONS m 8 CD PLAYING BASIC OPERATIONS 9 PROGRAMMED PLAY 10...
... of the grounding unit, connection to the unit, even when the power is turned off Outdoor Antenna 1 Power lines - TABLE OF CONTENTS Precautions l PREPARATIONS CONNECTIONS . ..m 3 REMOTE CONTROL 5 BEFORE OPERATION 5 SOUND AUDIO ADJUSTMENTS m 6 GRAPHIC EQUALIZER 6 RADIO RECEPTION MANUAL TUNING 7 PRESETTING STATIONS 7 TAPE PLAYBACK BASIC OPERATIONS m 8 CD PLAYING BASIC OPERATIONS 9 PROGRAMMED PLAY 10...
Operating Instructions
Page 4
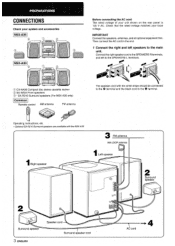
... the AC cord in the end. 1 Connect the right and Ieft,.speakers to the SPEAKERS L terminals. @ CX-NA30 Compact disc stereo cassette reciver @ SX-NA34 Front speakers @ * SX-R21 O Surround speakers (For NSX-A35 only) Remote control :~ . Check that the rated voltage matches your unit shown on the rear panel is 120 V AC...
... the AC cord in the end. 1 Connect the right and Ieft,.speakers to the SPEAKERS L terminals. @ CX-NA30 Compact disc stereo cassette reciver @ SX-NA34 Front speakers @ * SX-R21 O Surround speakers (For NSX-A35 only) Remote control :~ . Check that the rated voltage matches your unit shown on the rear panel is 120 V AC...
Operating Instructions
Page 6
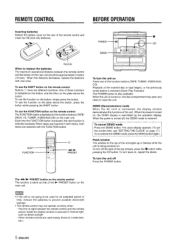
... the battery cover on the rear of the > PRESET button on the main unit. SHIFT - FUNCTION - (i) PRESET u The + P/> PRESEr button on the remote control The function is same as direct sunlight - Playback of the function buttons (TAPE, TUNER, VIDEO/AUX, CD). When the power is overridden by the... on . Each time the FUNCTION button is pressed, the next function is also available. To cancel DEMO mode Press the DEMO button. Other remote controls are selected with new ones, To use the function orl the button, simply press the button. DEMO (Demonstration) mode When the AC ...
... the battery cover on the rear of the > PRESET button on the main unit. SHIFT - FUNCTION - (i) PRESET u The + P/> PRESEr button on the remote control The function is same as direct sunlight - Playback of the function buttons (TAPE, TUNER, VIDEO/AUX, CD). When the power is overridden by the... on . Each time the FUNCTION button is pressed, the next function is also available. To cancel DEMO mode Press the DEMO button. Other remote controls are selected with new ones, To use the function orl the button, simply press the button. DEMO (Demonstration) mode When the AC ...
Operating Instructions
Page 7
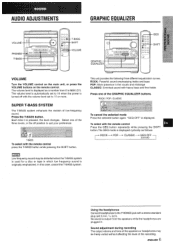
... mode is displayed cyclically as a number from the speakers while the headphones are plugged in the vocals and midrange CLASSIC: Enriched sound with the remote control Press the GEQ button repeatedly while pressing the SHIFT button. CLASSIC- 1 GEC?OFF (cancel) u Low frequency sound may be distorted when... the volume level set to 16 when the power is displayed. "GEQ OFF is turned off position to the PHONES jack with the remote control press the T-BASS button while pressing the SHIFT button. Using the headphones Connect headphones to suit your preference. The volume level is...
... mode is displayed cyclically as a number from the speakers while the headphones are plugged in the vocals and midrange CLASSIC: Enriched sound with the remote control Press the GEQ button repeatedly while pressing the SHIFT button. CLASSIC- 1 GEC?OFF (cancel) u Low frequency sound may be distorted when... the volume level set to 16 when the power is displayed. "GEQ OFF is turned off position to the PHONES jack with the remote control press the T-BASS button while pressing the SHIFT button. Using the headphones Connect headphones to suit your preference. The volume level is...
Operating Instructions
Page 8
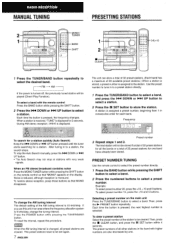
...SET button within 4 seconds. When an FM stereo broadcast contains noise Press the MONO TUNER button while pressing the SHIFT button orl the remote control so that MONO disappears. After tuning in an area where the frequency allocation system is selected. P 'ess the POWER button while... pressing the TUNER/BAND blltton. PRESET NUMBER TUNING Use the remote control to select the preset number directly. . 1 Press the BAND button while pressing the SHIFT button to select a band. 2 Press the...
...SET button within 4 seconds. When an FM stereo broadcast contains noise Press the MONO TUNER button while pressing the SHIFT button orl the remote control so that MONO disappears. After tuning in an area where the frequency allocation system is selected. P 'ess the POWER button while... pressing the TUNER/BAND blltton. PRESET NUMBER TUNING Use the remote control to select the preset number directly. . 1 Press the BAND button while pressing the SHIFT button to select a band. 2 Press the...
Operating Instructions
Page 10
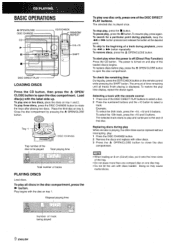
...discs, press the A OPEN/CLOSE button. The selected track starts to rotate the trays after placing two discs. q Do not "tilt the unit with the remote control 1 Press one disc is playing, the other discs. 3 Press the 4 OPEN/CLOSE button to select a track. The power is off (Direct Play...and 5 buttons. Place the third disc on and play , 1 Press the DISC CHANGE button. 2 Remove the discs and replace with the disc on the remote control while pressing the SHIFT botton. To start play , press the s button. The amount of the loaded disc(s) begins. Number of tracks PLAYING DISCS ...
...discs, press the A OPEN/CLOSE button. The selected track starts to rotate the trays after placing two discs. q Do not "tilt the unit with the remote control 1 Press one disc is playing, the other discs. 3 Press the 4 OPEN/CLOSE button to select a track. The power is off (Direct Play...and 5 buttons. Place the third disc on and play , 1 Press the DISC CHANGE button. 2 Remove the discs and replace with the disc on the remote control while pressing the SHIFT botton. To start play , press the s button. The amount of the loaded disc(s) begins. Number of tracks PLAYING DISCS ...
Operating Instructions
Page 11
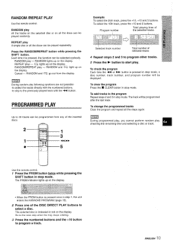
... +10 and 5 buttons. The track will be programmed from the display. RANDOM and ~ go out from any of the inserted discs, 2 1 3 .1 ++-, s 5 u Use the remote control. 1 Press the PRGM button twice while pressing the SHIFT button in red on the display. To change the programmed tracks Clear the program and... the numbered buttons. -to skip to start play , checking the remaining time and selecting a disc or track. RANDOM /REPEAT PLAY Use the remote control, RANDOM play All the tracks on the selected disc or on all the discs can be played repeatedly. REPEAT play A single disc or ...
... +10 and 5 buttons. The track will be programmed from the display. RANDOM and ~ go out from any of the inserted discs, 2 1 3 .1 ++-, s 5 u Use the remote control. 1 Press the PRGM button twice while pressing the SHIFT button in red on the display. To change the programmed tracks Clear the program and... the numbered buttons. -to skip to start play , checking the remaining time and selecting a disc or track. RANDOM /REPEAT PLAY Use the remote control, RANDOM play All the tracks on the selected disc or on all the discs can be played repeatedly. REPEAT play A single disc or ...
Operating Instructions
Page 14
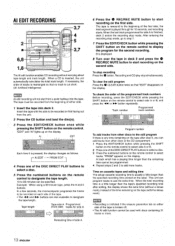
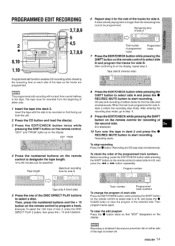
... tape. ENGLISH If necessary, the order of the programmed track numbers Before recording, press the EDIT/CHECK while pressing the SHIFT button on the remote control to designate the tape length. The tape must be recorded from the unit. 2 Press the CD button and.load the disc(s). ' ...display the program for 10 seconds, and recording starts. , I Program number To add tracks from a pojnt halfway into deck 2. Time on the remote control to use the extra time. After entering the recording stop mode. When a CD is usually a little longer than the specified recording time printed...
... tape. ENGLISH If necessary, the order of the programmed track numbers Before recording, press the EDIT/CHECK while pressing the SHIFT button on the remote control to designate the tape length. The tape must be recorded from the unit. 2 Press the CD button and.load the disc(s). ' ...display the program for 10 seconds, and recording starts. , I Program number To add tracks from a pojnt halfway into deck 2. Time on the remote control to use the extra time. After entering the recording stop mode. When a CD is usually a little longer than the specified recording time printed...
Operating Instructions
Page 15
... time of side A 4 Total number of programmed tracks Programmed tracks 7 Press the EDIT/CHECK button while pressing the SHIFT button on the remote control to select side A or B, and press the W CLEAR button to clear the program of edited tracks for the first side start ...on the display. ENGLISH 1 't PROGRAMMED EDIT RECORDING 3,7,8,9 5 4,5 3,7,8,9 u Programmed edit function enables CD recording while checking the remaining time on the remote control to designate the tape length. 10 to 99 minutes can be specified. When the last truck programmed for side B. "EDIT and "PRGM" ...
... time of side A 4 Total number of programmed tracks Programmed tracks 7 Press the EDIT/CHECK button while pressing the SHIFT button on the remote control to select side A or B, and press the W CLEAR button to clear the program of edited tracks for the first side start ...on the display. ENGLISH 1 't PROGRAMMED EDIT RECORDING 3,7,8,9 5 4,5 3,7,8,9 u Programmed edit function enables CD recording while checking the remaining time on the remote control to designate the tape length. 10 to 99 minutes can be specified. When the last truck programmed for side B. "EDIT and "PRGM" ...
Operating Instructions
Page 17
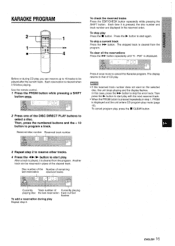
Then, press the numbered buttons and the + 10 button to select a disc. KARAOKE PROGRAM 2 1 1 - Use the remote control. 1 Press the PRGM button while pressing a SHIFT button ~. 2 Press one of CD play. Then press the b button to cancel the Karaoke program. q When the ...
Then, press the numbered buttons and the + 10 button to select a disc. KARAOKE PROGRAM 2 1 1 - Use the remote control. 1 Press the PRGM button while pressing a SHIFT button ~. 2 Press one of CD play. Then press the b button to cancel the Karaoke program. q When the ...
Operating Instructions
Page 18
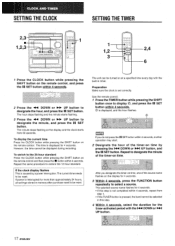
...hour standard. Howew:!r, the time cannot be reset. Repeat to the 24-hour standard Press ille CLOCK button while pressing the SHIFT button on the remote control and then press the s button within 4 seconds. .2 Press the - To s'witch to designate the minute of the source name flashes on... the minute, and press the II SET button. SETTING THE CLOCK SETTING THE TIMER 1 1 Press the CLOCK button while pressing the SHIFT button on the remote control, and ~ress the 11 SET button within 4 seconds. DOWN or * UP button to select a source. The time is not completed within 4 ...
...hour standard. Howew:!r, the time cannot be reset. Repeat to the 24-hour standard Press ille CLOCK button while pressing the SHIFT button on the remote control and then press the s button within 4 seconds. .2 Press the - To s'witch to designate the minute of the source name flashes on... the minute, and press the II SET button. SETTING THE CLOCK SETTING THE TIMER 1 1 Press the CLOCK button while pressing the SHIFT button on the remote control, and ~ress the 11 SET button within 4 seconds. DOWN or * UP button to select a source. The time is not completed within 4 ...
Operating Instructions
Page 68
... (United States and Puerto Rico) Printed in alphabetical order. Las partes se indican en orden alfabetico. The parts are indicated on the main unit or remote control are listed in Malaysia AIWA CO.,LTD. PARTS INDEX Instructions about each part on the right side. Les parties sent indiquees clans I'ordre alphabetique.
... (United States and Puerto Rico) Printed in alphabetical order. Las partes se indican en orden alfabetico. The parts are indicated on the main unit or remote control are listed in Malaysia AIWA CO.,LTD. PARTS INDEX Instructions about each part on the right side. Les parties sent indiquees clans I'ordre alphabetique.


