Product Manual
Page 2
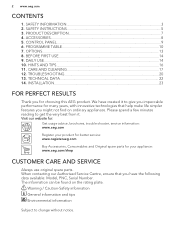
... CUSTOMER CARE AND SERVICE Always use original spare parts. SAFETY INFORMATION 3 2. 2 www.aeg.com CONTENTS 1. PRODUCT DESCRIPTION 7 4. ACCESSORIES...8 5. BEFORE FIRST USE...14 9. INSTALLATION...23 FOR PERFECT RESULTS Thank you have created it . We have the following data available: Model, PNC, Serial Number. Visit our website for: Get usage advice, brochures, trouble shooter, service information: www.aeg.com Register your product for better service: www.registeraeg.com Buy Accessories, Consumables...
... CUSTOMER CARE AND SERVICE Always use original spare parts. SAFETY INFORMATION 3 2. 2 www.aeg.com CONTENTS 1. PRODUCT DESCRIPTION 7 4. ACCESSORIES...8 5. BEFORE FIRST USE...14 9. INSTALLATION...23 FOR PERFECT RESULTS Thank you have created it . We have the following data available: Model, PNC, Serial Number. Visit our website for: Get usage advice, brochures, trouble shooter, service information: www.aeg.com Register your product for better service: www.registeraeg.com Buy Accessories, Consumables...

Product Manual
Page 3
... the instructions with a hinge on top of the installation. The stacking kit, available from appliances burning gas or other fuels, including open fires. • Exhaust air must not be installed as freestanding or below the kitchen counter with correct space (Refer to the mains socket only at the end of a washing machine, use the stacking kit. SAFETY INFORMATION Before the installation and use causes...
... the instructions with a hinge on top of the installation. The stacking kit, available from appliances burning gas or other fuels, including open fires. • Exhaust air must not be installed as freestanding or below the kitchen counter with correct space (Refer to the mains socket only at the end of a washing machine, use the stacking kit. SAFETY INFORMATION Before the installation and use causes...
Product Manual
Page 4
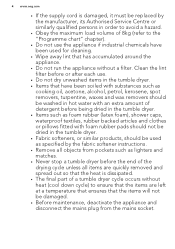
... cord is dissipated. • The final part of 8kg (refer to ensure that the items are quickly removed and spread out so that the heat is damaged, it must be replaced by the fabric softener instructions. • Remove all items are left at a temperature that ensures that has accumulated around the appliance. • Do not run the appliance without a filter. Clean the lint filter...
... cord is dissipated. • The final part of 8kg (refer to ensure that the items are quickly removed and spread out so that the heat is damaged, it must be replaced by the fabric softener instructions. • Remove all items are left at a temperature that ensures that has accumulated around the appliance. • Do not run the appliance without a filter. Clean the lint filter...

Product Manual
Page 5
.... • Always move the appliance vertically. • The rear surface of a spirit level. Risk of experience and knowledge if they have been given supervision or instruction concerning use multi-plug adapters and extension cables. SAFETY INSTRUCTIONS 2.1 Installation • Remove all detergents away from children. • Keep children and pets away from 8 years and above and persons with the power supply.
.... • Always move the appliance vertically. • The rear surface of a spirit level. Risk of experience and knowledge if they have been given supervision or instruction concerning use multi-plug adapters and extension cables. SAFETY INSTRUCTIONS 2.1 Installation • Remove all detergents away from children. • Keep children and pets away from 8 years and above and persons with the power supply.

Product Manual
Page 6
... pets. • Do not sit or stand on the fabric label. • If you have washed your laundry with a stain remover start an extra rinse cycle before you start the dryer. • Do not drink or prepare food with the E.E.C. Follow the instructions on the open door. • Do not dry dripping wet clothes in the appliance. It can cause a leakage. 2.7 Disposal WARNING...
... pets. • Do not sit or stand on the fabric label. • If you have washed your laundry with a stain remover start an extra rinse cycle before you start the dryer. • Do not drink or prepare food with the E.E.C. Follow the instructions on the open door. • Do not dry dripping wet clothes in the appliance. It can cause a leakage. 2.7 Disposal WARNING...

Product Manual
Page 7
3. PRODUCT DESCRIPTION 1 2 ENGLISH 7 3 4 5 12 6 11 7 10 8 9 1 Water container 2 Control panel 3 Internal light 4 Appliance door 5 Filter 6 The button to open the heat exchanger door 7 Airflow slots 8 Adjustable feet 9 Heat exchanger door 10 Heat exchanger cover 11 The knob to lock the heat exchanger cover 12 Rating plate The load door can help to easily put and remove the laundry or if there is a limit to install the appliance (see separate leaflet). It can be installed by the user in the opposite side.
3. PRODUCT DESCRIPTION 1 2 ENGLISH 7 3 4 5 12 6 11 7 10 8 9 1 Water container 2 Control panel 3 Internal light 4 Appliance door 5 Filter 6 The button to open the heat exchanger door 7 Airflow slots 8 Adjustable feet 9 Heat exchanger door 10 Heat exchanger cover 11 The knob to lock the heat exchanger cover 12 Rating plate The load door can help to easily put and remove the laundry or if there is a limit to install the appliance (see separate leaflet). It can be installed by the user in the opposite side.
Product Manual
Page 8
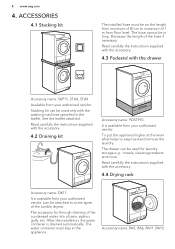
... used for through draining of the tumble dryers) The accessory for laundry storage e.g. : towels, cleaning products and more. Accessory name: RA5, RA6, RA11, RA12. Read carefully the instructions supplied with the accessory. 4.2 Draining kit Accessory name: PDSTP10. The water container must be in loop. 8 www.aeg.com 4. ACCESSORIES 4.1 Stacking kit The installed hose must stay in the leaflet. Read carefully the instructions supplied with the accessory. 4.3 Pedestal with the washing machines...
... used for through draining of the tumble dryers) The accessory for laundry storage e.g. : towels, cleaning products and more. Accessory name: RA5, RA6, RA11, RA12. Read carefully the instructions supplied with the accessory. 4.2 Draining kit Accessory name: PDSTP10. The water container must be in loop. 8 www.aeg.com 4. ACCESSORIES 4.1 Stacking kit The installed hose must stay in the leaflet. Read carefully the instructions supplied with the accessory. 4.3 Pedestal with the washing machines...

Product Manual
Page 10
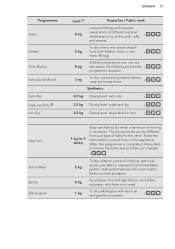
... can be / used at : 800 - 1800 rpm default buzzer on child lock on time dry option on indicator: drain the water container indicator: clean filter indicator: do the check of the heat exchanger indicator: drying phase indicator: cooling phase indicator: crease guard phase delay start selection (30min.-20h) Programmes Extra Dry Load 1) 8 kg Properties / Fabric mark Cottons Drying level: extra dry. / Cupboard...
... can be / used at : 800 - 1800 rpm default buzzer on child lock on time dry option on indicator: drain the water container indicator: clean filter indicator: do the check of the heat exchanger indicator: drying phase indicator: cooling phase indicator: crease guard phase delay start selection (30min.-20h) Programmes Extra Dry Load 1) 8 kg Properties / Fabric mark Cottons Drying level: extra dry. / Cupboard...
Product Manual
Page 11
... results can use the option Time Drying and set the / programme duration. 3 kg To dry cotton and synthetic fabrics, uses low temperature. / Synthetics 3,5 kg Drying level: extra dry. / 3,5 kg Drying level: cupboard dry. / 3,5 kg Drying level: applicable for iron. / 1 kg (or 5 shirts) Easy care fabrics for which a minimum of clothing, technical, sports, pile fabrics, waterproof and breathable jackets, shell jacket teamed with a removable fleece or...
... results can use the option Time Drying and set the / programme duration. 3 kg To dry cotton and synthetic fabrics, uses low temperature. / Synthetics 3,5 kg Drying level: extra dry. / 3,5 kg Drying level: cupboard dry. / 3,5 kg Drying level: applicable for iron. / 1 kg (or 5 shirts) Easy care fabrics for which a minimum of clothing, technical, sports, pile fabrics, waterproof and breathable jackets, shell jacket teamed with a removable fleece or...
Product Manual
Page 12
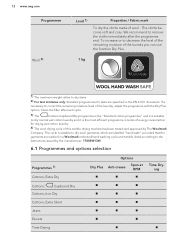
... programmes for tests are washed in terms of energy consumption for drying wet cotton laundry. 4) The wool drying cycle of the laundry, adjust the programme with the Dry Plus option. The cloths become soft and cosy. To increase or to the instructions issued by The Woolmark Company. Clean the filter after the programme end. Extra Silent Jeans Duvets Time Drying Cupboard...
... programmes for tests are washed in terms of energy consumption for drying wet cotton laundry. 4) The wool drying cycle of the laundry, adjust the programme with the Dry Plus option. The cloths become soft and cosy. To increase or to the instructions issued by The Woolmark Company. Clean the filter after the programme end. Extra Silent Jeans Duvets Time Drying Cupboard...
Product Manual
Page 14
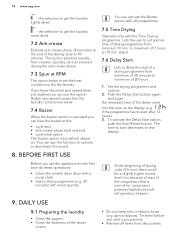
... can hear the buzzer at the: • cycle end • anti-crease phase start a programme. • Remove all programmes. 7.5 Time Drying Operates only with moist laundry. 9. Set the drying programme and options. 2. Push the Delay Start button again and again. If you know the initial spin speed when you washed you use the appliance for compressor powered appliances such: refrigerators, freezers. • Do...
... can hear the buzzer at the: • cycle end • anti-crease phase start a programme. • Remove all programmes. 7.5 Time Drying Operates only with moist laundry. 9. Set the drying programme and options. 2. Push the Delay Start button again and again. If you know the initial spin speed when you washed you use the appliance for compressor powered appliances such: refrigerators, freezers. • Do...
Product Manual
Page 15
... is related to the fabric label on the appliance. Laundry that is applicable for tumble dryer. Pull the appliance door. 2. If the appliance is on, some indications come in to turn on the display. 9.4 Auto Off function To decrease the energy consumption, the Auto Off function turns off automatically the appliance: • if the Start/Pause button was not pushed in...
... is related to the fabric label on the appliance. Laundry that is applicable for tumble dryer. Pull the appliance door. 2. If the appliance is on, some indications come in to turn on the display. 9.4 Auto Off function To decrease the energy consumption, the Auto Off function turns off automatically the appliance: • if the Start/Pause button was not pushed in...
Product Manual
Page 16
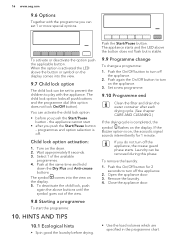
... on the display. Set a new programme. 9.10 Programme end Clean the filter and drain the water container after you do not turn on the dryer. 2. Wait approximately 8 seconds. 3. To remove the laundry: 1. Select 1 of the view. 9.8 Starting a programme To start • after each drying cycle. (See chapter CARE AND CLEANING.) If the drying cycle is stable. 9.9 Programme change To change a programme: 1. The child lock option locks all push buttons and the...
... on the display. Set a new programme. 9.10 Programme end Clean the filter and drain the water container after you do not turn on the dryer. 2. Wait approximately 8 seconds. 3. To remove the laundry: 1. Select 1 of the view. 9.8 Starting a programme To start • after each drying cycle. (See chapter CARE AND CLEANING.) If the drying cycle is stable. 9.9 Programme change To change a programme: 1. The child lock option locks all push buttons and the...
Product Manual
Page 17
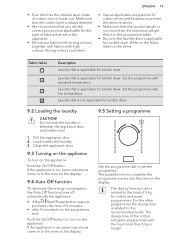
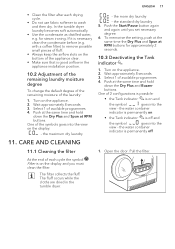
.... 10.2 Adjustment of the remaining laundry moisture degree To change the default degree of the remaining moisture of each drying cycle. • Do not use fabric softener to wash and then dry. the more dry laundry - Push the Start/Pause button again and again until you must clean the filter. Turn on the appliance. 2. with a coffee filter) to remove possible small pieces of fluff. •...
.... 10.2 Adjustment of the remaining laundry moisture degree To change the default degree of the remaining moisture of each drying cycle. • Do not use fabric softener to wash and then dry. the more dry laundry - Push the Start/Pause button again and again until you must clean the filter. Turn on the appliance. 2. with a coffee filter) to remove possible small pieces of fluff. •...
Product Manual
Page 18
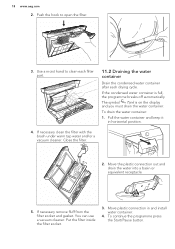
... plastic connection in horizontal position. 4. 18 www.aeg.com 2. Pull the water container and keep it in and install water container. 4. Use a moist hand to open the filter. 3. If necessary remove fluff from the filter socket and gasket. To drain the water container: 1. If the condensed water container is on the display and you must drain the water container. To continue the programme press the Start/Pause button.
... plastic connection in horizontal position. 4. 18 www.aeg.com 2. Pull the water container and keep it in and install water container. 4. Use a moist hand to open the filter. 3. If necessary remove fluff from the filter socket and gasket. To drain the water container: 1. If the condensed water container is on the display and you must drain the water container. To continue the programme press the Start/Pause button.

Product Manual
Page 19
... symbol Condenser flashes on the bottom of the door to unlock the heat exchanger cover. 6. Lower the heat exchanger cover. 5. If necessary, remove the fluff from the bottom of the heat exchanger and its compartment. Pull the filter. If necessary clean the small water filter from the heat exchanger and its compartment. Move the release button on the display, do...
... symbol Condenser flashes on the bottom of the door to unlock the heat exchanger cover. 6. Lower the heat exchanger cover. 5. If necessary, remove the fluff from the bottom of the heat exchanger and its compartment. Pull the filter. If necessary clean the small water filter from the heat exchanger and its compartment. Move the release button on the display, do...
Product Manual
Page 20
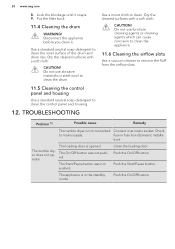
... cloth. fuse in the standby mode. The loading door is not connected Connect in at mains socket. The On/Off button was not pushed. Push the On/Off button. Lock the blockage until it . Check to clean the control panel and housing. 12. The appliance is in fuse box (domestic installa- Put the filter back. 11.4 Cleaning the drum WARNING! Problem 1) Possible cause Remedy The tumble dryer is opened...
... cloth. fuse in the standby mode. The loading door is not connected Connect in at mains socket. The On/Off button was not pushed. Push the On/Off button. Lock the blockage until it . Check to clean the control panel and housing. 12. The appliance is in fuse box (domestic installa- Put the filter back. 11.4 Cleaning the drum WARNING! Problem 1) Possible cause Remedy The tumble dryer is opened...
Product Manual
Page 21
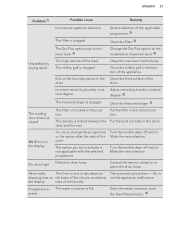
.... Turn the tumble dryer off and on . Make the new selection. Drain the water container, push the Start/Pause button. 3) ENGLISH 21 Problem 1) Possible cause Remedy Incorrect programme selection. Obey the maximum load volume. door and the seal. Abnormally The time to activate is calculated on the humidity sensor in the Clean the front surface of the cycle. The water container is clogged. Adjust remaining laundry moisture...
.... Turn the tumble dryer off and on . Make the new selection. Drain the water container, push the Start/Pause button. 3) ENGLISH 21 Problem 1) Possible cause Remedy Incorrect programme selection. Obey the maximum load volume. door and the seal. Abnormally The time to activate is calculated on the humidity sensor in the Clean the front surface of the cycle. The water container is clogged. Adjust remaining laundry moisture...
Product Manual
Page 22
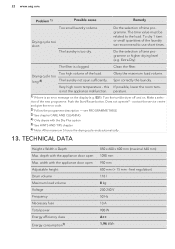
22 www.aeg.com Problem 1) Possible cause Remedy Too small laundry volume. The laundry is clogged. contact the service centre and give the error code. 2) Follow the programme description - see PROGRAMME TABLE 3) See chapter CARE AND CLEANING 4) Only dryers with the appliance door open Adjustable height Drum volume Maximum load volume Voltage Frequency Necessary fuse Total power Energy efficiency class Energy consumption1) 850 x 600 x 600 mm (maximal 640 mm) 1090 mm...
22 www.aeg.com Problem 1) Possible cause Remedy Too small laundry volume. The laundry is clogged. contact the service centre and give the error code. 2) Follow the programme description - see PROGRAMME TABLE 3) See chapter CARE AND CLEANING 4) Only dryers with the appliance door open Adjustable height Drum volume Maximum load volume Voltage Frequency Necessary fuse Total power Energy efficiency class Energy consumption1) 850 x 600 x 600 mm (maximal 640 mm) 1090 mm...

Product Manual
Page 23
... cotton programme at 1000 rpm. 2) Energy consumption per cycle will depend on mode power absorption 0,50 W Off mode power absorption 0,50 W Type of use all parts of the low-power modes. To remove the polystyrene blockages: 1. To do that adjust the feet. > 850 mm 600 mm Pull plastic hose with the polystyrene blockages out from the drum. 15mm 14.3 Installation under a counter The appliance can be...
... cotton programme at 1000 rpm. 2) Energy consumption per cycle will depend on mode power absorption 0,50 W Off mode power absorption 0,50 W Type of use all parts of the low-power modes. To remove the polystyrene blockages: 1. To do that adjust the feet. > 850 mm 600 mm Pull plastic hose with the polystyrene blockages out from the drum. 15mm 14.3 Installation under a counter The appliance can be...


