Specification Sheet
Page 1
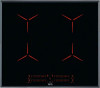
... kitchen and turning • Residual heat indicators • Powerful booster • 15 stage digital power level displays • Child safety control lock • Control lock • Auto safety switch off Combine zones to life. Pure - Induction Hob 60 cm IPE64551FB Your touch brings it to use , its timer can be accessed quickly and conveniently via the touchscreen display. Transform the kitchen and turn cooking into a true pleasure. The AEG...
... kitchen and turning • Residual heat indicators • Powerful booster • 15 stage digital power level displays • Child safety control lock • Control lock • Auto safety switch off Combine zones to life. Pure - Induction Hob 60 cm IPE64551FB Your touch brings it to use , its timer can be accessed quickly and conveniently via the touchscreen display. Transform the kitchen and turn cooking into a true pleasure. The AEG...
Specification Sheet
Page 2
Power/Diameter Gas supply: natural gas Gas replacement Gas replacement Residual heat indicator Led Colour ProdPartCode 590x520 44x560x490 5 7350 Automatic Switch Off 2300/3200W/180x210mm 2300/3200W/180x210mm 2300/3200W/180x210mm 2300/3200W/180x210mm No No No 4 Red All Open Pure - Power/Diameter Right rear - Induction Hob 60 cm IPE64551FB Power/Diameter Right front - Product Specification Hobs Dimensions Aperture dimensions HxWxD in mm Radius cutting Total electricity loading, W Hob safety Dial Rear -
Power/Diameter Gas supply: natural gas Gas replacement Gas replacement Residual heat indicator Led Colour ProdPartCode 590x520 44x560x490 5 7350 Automatic Switch Off 2300/3200W/180x210mm 2300/3200W/180x210mm 2300/3200W/180x210mm 2300/3200W/180x210mm No No No 4 Red All Open Pure - Power/Diameter Right rear - Induction Hob 60 cm IPE64551FB Power/Diameter Right front - Product Specification Hobs Dimensions Aperture dimensions HxWxD in mm Radius cutting Total electricity loading, W Hob safety Dial Rear -
User Manual
Page 2
... instructions. SAFETY INFORMATION Before the installation and use original spare parts. DAILY USE...9 6. Visit our website for: Get usage advice, brochures, trouble shooter, service information: www.aeg.com/webselfservice Register your appliance: www.aeg.com/shop CUSTOMER CARE AND SERVICE Always use of incorrect installation or SAFETY INFORMATION 2 2. SAFETY INSTRUCTIONS 4 3. CARE AND CLEANING 16 8. The manufacturer is not responsible for your product for better service: www.registeraeg.com Buy...
... instructions. SAFETY INFORMATION Before the installation and use original spare parts. DAILY USE...9 6. Visit our website for: Get usage advice, brochures, trouble shooter, service information: www.aeg.com/webselfservice Register your appliance: www.aeg.com/shop CUSTOMER CARE AND SERVICE Always use of incorrect installation or SAFETY INFORMATION 2 2. SAFETY INSTRUCTIONS 4 3. CARE AND CLEANING 16 8. The manufacturer is not responsible for your product for better service: www.registeraeg.com Buy...

User Manual
Page 3
... keep the instructions in fire. Care should be taken to avoid touching heating elements. • Do not operate the appliance by children aged from 8 years and above and persons with reduced physical, sensory or mental capabilities or lack of experience and knowledge if they have been given supervision or instruction concerning the use of the appliance...
... keep the instructions in fire. Care should be taken to avoid touching heating elements. • Do not operate the appliance by children aged from 8 years and above and persons with reduced physical, sensory or mental capabilities or lack of experience and knowledge if they have been given supervision or instruction concerning the use of the appliance...

User Manual
Page 4
In case the appliance is connected to the mains directly using junction box, remove the fuse to clean the appliance. • After use, switch off the hob element by its control and do not rely on the hob surface since they can cause accidents. 2. The use a damaged appliance. SAFETY INSTRUCTIONS 2.1 Installation WARNING! WARNING! A short term cooking process has to be supervised continuously. • WARNING: Danger of fire...
In case the appliance is connected to the mains directly using junction box, remove the fuse to clean the appliance. • After use, switch off the hob element by its control and do not rely on the hob surface since they can cause accidents. 2. The use a damaged appliance. SAFETY INSTRUCTIONS 2.1 Installation WARNING! WARNING! A short term cooking process has to be supervised continuously. • WARNING: Danger of fire...

User Manual
Page 5
... disconnected from the power supply. • Make sure that the parameters on the bottom. • If the appliance is installed correctly. Always use safety gloves and enclosed footwear. • Seal the cut -outs, fuses (screw type fuses removed from the holder), earth leakage trips and contactors. • The electrical installation must have an isolation device which lets you connect the appliance to...
... disconnected from the power supply. • Make sure that the parameters on the bottom. • If the appliance is installed correctly. Always use safety gloves and enclosed footwear. • Seal the cut -outs, fuses (screw type fuses removed from the holder), earth leakage trips and contactors. • The electrical installation must have an isolation device which lets you connect the appliance to...
User Manual
Page 6
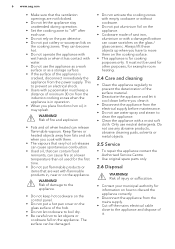
... Service Centre. • Use original spare parts only. 2.6 Disposal WARNING! Keep flames or heated objects away from fats and oils when you cook with them on how to discard the appliance correctly. • Disconnect the appliance from the power supply. Risk of damage to clean the appliance. • Clean the appliance with water. • Do not use the appliance as a work surface...
... Service Centre. • Use original spare parts only. 2.6 Disposal WARNING! Keep flames or heated objects away from fats and oils when you cook with them on how to discard the appliance correctly. • Disconnect the appliance from the power supply. Risk of damage to clean the appliance. • Clean the appliance with water. • Do not use the appliance as a work surface...

User Manual
Page 7
... work surfaces that align to Safety chapters. 3.1 Before the installation Before you assemble the hob into correct built-in the drawer during the cooking process. min. 500mm min. 50mm 3. Serial number 3.2 Built-in hobs Only use the cable: H05BB-F or H03V2V2-F which withstands a temperature of the hob. Refer to the standards. 3.3 Connection cable • For a single phase or two phase connection, use...
... work surfaces that align to Safety chapters. 3.1 Before the installation Before you assemble the hob into correct built-in the drawer during the cooking process. min. 500mm min. 50mm 3. Serial number 3.2 Built-in hobs Only use the cable: H05BB-F or H03V2V2-F which withstands a temperature of the hob. Refer to the standards. 3.3 Connection cable • For a single phase or two phase connection, use...
User Manual
Page 8
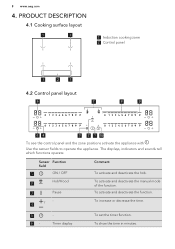
... deactivate the manual mode of the function. PRODUCT DESCRIPTION 4.1 Cooking surface layout 1 1 1 Induction cooking zone 2 Control panel 1 2 1 4.2 Control panel layout 6 7 8 9 54 3 2 1 10 To see the control panel and the zone positions activate the appliance with Use the sensor fields to operate the appliance. 8 www.aeg.com 4. To increase or decrease the time. 5 6- To activate and deactivate the function. Timer display To set the timer...
... deactivate the manual mode of the function. PRODUCT DESCRIPTION 4.1 Cooking surface layout 1 1 1 Induction cooking zone 2 Control panel 1 2 1 4.2 Control panel layout 6 7 8 9 54 3 2 1 10 To see the control panel and the zone positions activate the appliance with Use the sensor fields to operate the appliance. 8 www.aeg.com 4. To increase or decrease the time. 5 6- To activate and deactivate the function. Timer display To set the timer...
User Manual
Page 9
.... When the hob is heated by the heat of the cookware. Control bar To set the heat setting for the neighbouring cooking zones even if you are currently using them. 5. DAILY USE WARNING! The glass ceramic is deactivated, the indicators are not using . When you do not set a heat setting. 9 PowerBoost To activate the function. 10 Lock / Child Safety Device To lock / unlock the control panel. 4.3 OptiHeat Control (3 step Residual heat indicator) WARNING! / / There is...
.... When the hob is heated by the heat of the cookware. Control bar To set the heat setting for the neighbouring cooking zones even if you are currently using them. 5. DAILY USE WARNING! The glass ceramic is deactivated, the indicators are not using . When you do not set a heat setting. 9 PowerBoost To activate the function. 10 Lock / Child Safety Device To lock / unlock the control panel. 4.3 OptiHeat Control (3 step Residual heat indicator) WARNING! / / There is...
User Manual
Page 10
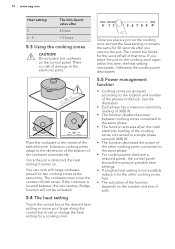
... the dimension of the bottom of both zones. You can cook with large cookware placed on the number and size of the selected zone. Induction cooking zones adapt to set the heat setting, it for a cooking zone. The cookware must cover the centres of the cookware automatically. Otherwise the cooking zone deactivates. 5.5 Power management function • Cooking zones are grouped according to the location and number...
... the dimension of the bottom of both zones. You can cook with large cookware placed on the number and size of the selected zone. Induction cooking zones adapt to set the heat setting, it for a cooking zone. The cookware must cover the centres of the cookware automatically. Otherwise the cooking zone deactivates. 5.5 Power management function • Cooking zones are grouped according to the location and number...
User Manual
Page 11
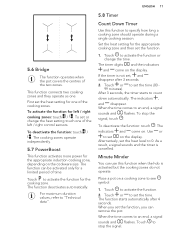
... operate independently. 5.7 PowerBoost This function activates more power for one . The function can use this function to set or change the time. For maximum duration values, refer to activate the function. 2. The indicators , and disappear. When the time comes to set the heat setting for the appropriate induction cooking zone, depending on a cooking zone to stop the signal, touch . To deactivate...
... operate independently. 5.7 PowerBoost This function activates more power for one . The function can use this function to set or change the time. For maximum duration values, refer to activate the function. 2. The indicators , and disappear. When the time comes to set the heat setting for the appropriate induction cooking zone, depending on a cooking zone to stop the signal, touch . To deactivate...

User Manual
Page 12
... hood have an infrared signal communicator. When the function is still active. Set the heat setting first. Activate the hob first and do not set on the hob. Touch of the cooking zones. 5.9 Pause This function sets all cooking zones that operate to choose one cooking time: Activate the hob with the function is active, , or symbols can lock the control panel...
... hood have an infrared signal communicator. When the function is still active. Set the heat setting first. Activate the hob first and do not set on the hob. Touch of the cooking zones. 5.9 Pause This function sets all cooking zones that operate to choose one cooking time: Activate the hob with the function is active, , or symbols can lock the control panel...
User Manual
Page 13
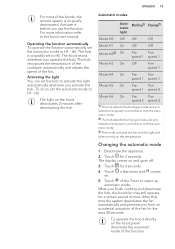
... cookware automatically and adjusts the speed of the fan for a certain period of the hoods, the remote system is originally set the automatic mode to the hood user manual. Changing the automatic mode 1. Operating the function automatically To operate the function automatically set to select an automatic mode. Touch for 3 seconds. 4. To operate the hood directly on the hood panel deactivate the automatic...
... cookware automatically and adjusts the speed of the fan for a certain period of the hoods, the remote system is originally set the automatic mode to the hood user manual. Changing the automatic mode 1. Operating the function automatically To operate the function automatically set to select an automatic mode. Touch for 3 seconds. 4. To operate the hood directly on the hood panel deactivate the automatic...
User Manual
Page 14
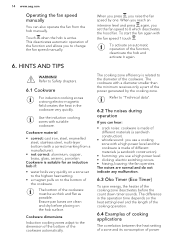
..., glass, ceramic, porcelain. The bottom of the power generated by one. Use the induction cooking zones with suitable cookware. When you reach an intensive level and press again, you set to the highest heat setting. • a magnet pulls on to 0 which deactivates the hood fan. HINTS AND TIPS WARNING! Cookware is suitable for an induction hob if: • water boils very quickly on...
..., glass, ceramic, porcelain. The bottom of the power generated by one. Use the induction cooking zones with suitable cookware. When you reach an intensive level and press again, you set to the highest heat setting. • a magnet pulls on to 0 which deactivates the hood fan. HINTS AND TIPS WARNING! Cookware is suitable for an induction hob if: • water boils very quickly on...

User Manual
Page 15
...heat setting uses less than a half of power. Steam vegetables, fish, meat. 20 - 45 Add a couple of tablespoons of potatoes. Steam potatoes. 20 - 60 Use max. ¼ l of water for Hob²Hood When you increase the heat setting, it is not proportional to 3 l of water. PowerBoost is only exemplary. Simmer rice and milkbased dishes, heat up ready-cooked... a cooking zone with the function: • Protect the hood panel from time to : Time (min) Hints Keep cooked food warm. Mix from direct sunlight. • Do not spot halogen light on the cookware. The hood in the...
...heat setting uses less than a half of power. Steam vegetables, fish, meat. 20 - 45 Add a couple of tablespoons of potatoes. Steam potatoes. 20 - 60 Use max. ¼ l of water for Hob²Hood When you increase the heat setting, it is not proportional to 3 l of water. PowerBoost is only exemplary. Simmer rice and milkbased dishes, heat up ready-cooked... a cooking zone with the function: • Protect the hood panel from time to : Time (min) Hints Keep cooked food warm. Mix from direct sunlight. • Do not spot halogen light on the cookware. The hood in the...
User Manual
Page 16
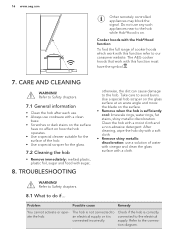
... stains, shiny metallic discoloration. Do not use a solution of cooker hoods which work with a moist cloth and a non-abrasive detergent. 16 www.aeg.com Other remotely controlled appliances may block the signal. The AEG cooker hoods that work with a clean base. • Scratches or dark stains on the surface. • Remove when the hob is correctly connected to our consumer website. The hob...
... stains, shiny metallic discoloration. Do not use a solution of cooker hoods which work with a moist cloth and a non-abrasive detergent. 16 www.aeg.com Other remotely controlled appliances may block the signal. The AEG cooker hoods that work with a clean base. • Scratches or dark stains on the surface. • Remove when the hob is correctly connected to our consumer website. The hob...
User Manual
Page 17
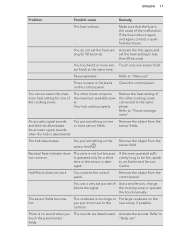
..., change blocks the signal. The hob deactivates. The zone is deactivated. If the zone operated sufficiently long to be hot, speak to "Daily use". You use ". Refer to the rear zones, if possible. Refer to an Authorised Service Centre. Hob²Hood does not work. Clean the control panel. The other cooking zones er. the other zones consume Reduce the heat setting of...
..., change blocks the signal. The hob deactivates. The zone is deactivated. If the zone operated sufficiently long to be hot, speak to "Daily use". You use ". Refer to the rear zones, if possible. Refer to an Authorised Service Centre. Hob²Hood does not work. Clean the control panel. The other cooking zones er. the other zones consume Reduce the heat setting of...
User Manual
Page 18
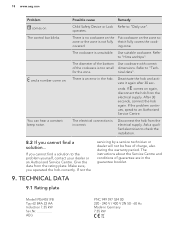
... the electrical supply. 18 www.aeg.com Problem comes on the zone so zone or the zone is an error in Germany 7.35 kW If you operated the hob correctly. onds. TECHNICAL DATA servicing by a service technician or dealer will not be free of guarantee are in the guarantee booklet. 9.1 Rating plate Model IPE64551FB Typ 62 B4A 22 AA Induction 7.35...
... the electrical supply. 18 www.aeg.com Problem comes on the zone so zone or the zone is an error in Germany 7.35 kW If you operated the hob correctly. onds. TECHNICAL DATA servicing by a service technician or dealer will not be free of guarantee are in the guarantee booklet. 9.1 Rating plate Model IPE64551FB Typ 62 B4A 22 AA Induction 7.35...
User Manual
Page 19
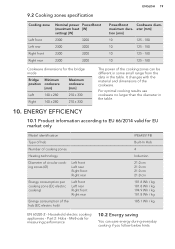
... some small range from the data in the table. 10. For optimal cooking results use cookware no larger than the diameter in the table. It changes with the material and dimensions of the hob (EC electric hob) EN 60350-2 - Part 2: Hobs - 9.2 Cooking zones specification ENGLISH 19 Cooking zone Left front Left rear Right front Right rear Nominal power PowerBoost (maximum heat [W] setting) [W] 2300...
... some small range from the data in the table. 10. For optimal cooking results use cookware no larger than the diameter in the table. It changes with the material and dimensions of the hob (EC electric hob) EN 60350-2 - Part 2: Hobs - 9.2 Cooking zones specification ENGLISH 19 Cooking zone Left front Left rear Right front Right rear Nominal power PowerBoost (maximum heat [W] setting) [W] 2300...


