
Specification Sheet
Page 1
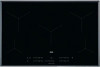
... lights. That means each zone detects the sizes and shapes of the pans you 'd rather adjust the fan speed • Automax function • Powerful booster • 15 stage digital power level displays • Child safety control lock • Control lock • Auto safety switch off • Front right: 1 small induction zone with booster The adaptable surface for every pan The MaxiSense® induction hob has self-sizing cooking...
... lights. That means each zone detects the sizes and shapes of the pans you 'd rather adjust the fan speed • Automax function • Powerful booster • 15 stage digital power level displays • Child safety control lock • Control lock • Auto safety switch off • Front right: 1 small induction zone with booster The adaptable surface for every pan The MaxiSense® induction hob has self-sizing cooking...
Specification Sheet
Page 2
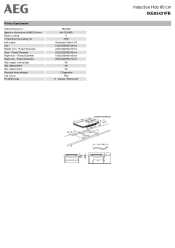
Product Specification Hobs Dimensions Aperture dimensions HxWxD in mm Radius cutting Total electricity loading, W Hob safety Dial Middle front - Power/Diameter Right rear - Power/Diameter Gas supply: natural gas Gas replacement Gas replacement Residual heat indicator Led Colour ProdPartCode 780x520 44x750x490 5 7350 Automatic Switch Off 1400/2500W/145mm 2300/3200W/210mm 2300/3200W/210mm 1400/2500W/145mm 2300/3200W/210mm No No No 7 Segments Red E - Power/Diameter Right front - Generic Partner All Induction Hob 80 cm IKE85431FB Power/Diameter Rear -
Product Specification Hobs Dimensions Aperture dimensions HxWxD in mm Radius cutting Total electricity loading, W Hob safety Dial Middle front - Power/Diameter Right rear - Power/Diameter Gas supply: natural gas Gas replacement Gas replacement Residual heat indicator Led Colour ProdPartCode 780x520 44x750x490 5 7350 Automatic Switch Off 1400/2500W/145mm 2300/3200W/210mm 2300/3200W/210mm 1400/2500W/145mm 2300/3200W/210mm No No No 7 Segments Red E - Power/Diameter Right front - Generic Partner All Induction Hob 80 cm IKE85431FB Power/Diameter Rear -
User Manual
Page 2
... supplied instructions. TROUBLESHOOTING 16 9. We have the following data available: Model, PNC, Serial Number. SAFETY INFORMATION Before the installation and use original spare parts. SAFETY INSTRUCTIONS 4 3. Please spend a few minutes reading to give you impeccable performance for your appliance: www.aeg.com/shop CUSTOMER CARE AND SERVICE Always use of incorrect installation or Warning / Caution-Safety information General information and tips Environmental information Subject to change without...
... supplied instructions. TROUBLESHOOTING 16 9. We have the following data available: Model, PNC, Serial Number. SAFETY INFORMATION Before the installation and use original spare parts. SAFETY INSTRUCTIONS 4 3. Please spend a few minutes reading to give you impeccable performance for your appliance: www.aeg.com/shop CUSTOMER CARE AND SERVICE Always use of incorrect installation or Warning / Caution-Safety information General information and tips Environmental information Subject to change without...

User Manual
Page 3
...switch off the appliance and then cover flame e.g. Care should be taken to extinguish a fire with very extensive and complex disabilities shall be kept away unless continuously supervised. • Children of less than 3 years of experience and knowledge if they have been given supervision or instruction concerning the use... not carry out cleaning and user maintenance of the appliance without supervision. 1.2 General Safety • WARNING: The appliance and its accessible parts become hot during use of the appliance in fire. • NEVER try to avoid touching heating elements. • Do...
...switch off the appliance and then cover flame e.g. Care should be taken to extinguish a fire with very extensive and complex disabilities shall be kept away unless continuously supervised. • Children of less than 3 years of experience and knowledge if they have been given supervision or instruction concerning the use... not carry out cleaning and user maintenance of the appliance without supervision. 1.2 General Safety • WARNING: The appliance and its accessible parts become hot during use of the appliance in fire. • NEVER try to avoid touching heating elements. • Do...
User Manual
Page 4
... the supply cord is connected to the mains directly using junction box, remove the fuse to disconnect the appliance from power supply. Only a qualified person must be supervised. SAFETY INSTRUCTIONS 2.1 Installation WARNING! In case the appliance is damaged, it must install this appliance. 4 www.aeg.com • CAUTION: The cooking process has to be replaced by the manufacturer, an authorized Service or similarly qualified...
... the supply cord is connected to the mains directly using junction box, remove the fuse to disconnect the appliance from power supply. Only a qualified person must be supervised. SAFETY INSTRUCTIONS 2.1 Installation WARNING! In case the appliance is damaged, it must install this appliance. 4 www.aeg.com • CAUTION: The cooking process has to be replaced by the manufacturer, an authorized Service or similarly qualified...
User Manual
Page 5
...) does not touch the hot appliance or hot cookware, when you disconnect the appliance from the power supply. • Make sure that the parameters on the cooking zones. Always pull the mains plug. • Use only correct isolation devices: line protecting cut-outs, fuses (screw type fuses removed from the holder), earth leakage trips and contactors. • The electrical installation must have an isolation...
...) does not touch the hot appliance or hot cookware, when you disconnect the appliance from the power supply. • Make sure that the parameters on the cooking zones. Always pull the mains plug. • Use only correct isolation devices: line protecting cut-outs, fuses (screw type fuses removed from the holder), earth leakage trips and contactors. • The electrical installation must have an isolation...

User Manual
Page 6
... the power supply. The surface can release flammable vapours. INSTALLATION WARNING! 6 www.aeg.com • If the surface of the surface material. • Deactivate the appliance and let it cool down the information bellow from the rating plate. WARNING! This to prevent an electrical shock. • Users with a pacemaker must not be damaged. • Do not activate the cooking zones...
... the power supply. The surface can release flammable vapours. INSTALLATION WARNING! 6 www.aeg.com • If the surface of the surface material. • Deactivate the appliance and let it cool down the information bellow from the rating plate. WARNING! This to prevent an electrical shock. • Users with a pacemaker must not be damaged. • Do not activate the cooking zones...

User Manual
Page 7
Serial number 3.2 Built-in hobs Only use the built-in hobs after you assemble the hob into correct built-in units and work surfaces that align to the standards. 3.3 Connection cable • For a single phase or two phase connection, use the cable type: H05BB-F or H03V2V2-F which withstands a temperature of 70°C or higher. • To replace the damaged mains cable, use...50mm ENGLISH 7 min. 28 mm min. 12 mm R 5mm min. 490+1mm 750+1mm 55mm min. 60mm If the appliance is installed above a drawer, the hob ventilation can warm up the items stored in the drawer during the cooking process.
Serial number 3.2 Built-in hobs Only use the built-in hobs after you assemble the hob into correct built-in units and work surfaces that align to the standards. 3.3 Connection cable • For a single phase or two phase connection, use the cable type: H05BB-F or H03V2V2-F which withstands a temperature of 70°C or higher. • To replace the damaged mains cable, use...50mm ENGLISH 7 min. 28 mm min. 12 mm R 5mm min. 490+1mm 750+1mm 55mm min. 60mm If the appliance is installed above a drawer, the hob ventilation can warm up the items stored in the drawer during the cooking process.
User Manual
Page 8
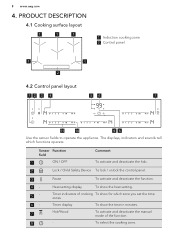
... sounds tell which zone you set the time. PRODUCT DESCRIPTION 4.1 Cooking surface layout 1 1 1 1 Induction cooking zone 2 Control panel 1 1 2 4.2 Control panel layout 12 3 4 56 7 11 10 98 Use the sensor fields to operate the appliance. Timer indicators of the function. Sensor Function field Comment 1 ON / OFF To activate and deactivate the hob. 2 Lock / Child Safety Device To lock / unlock the control panel. 3 Pause To activate and deactivate...
... sounds tell which zone you set the time. PRODUCT DESCRIPTION 4.1 Cooking surface layout 1 1 1 1 Induction cooking zone 2 Control panel 1 1 2 4.2 Control panel layout 12 3 4 56 7 11 10 98 Use the sensor fields to operate the appliance. Timer indicators of the function. Sensor Function field Comment 1 ON / OFF To activate and deactivate the hob. 2 Lock / Child Safety Device To lock / unlock the control panel. 3 Pause To activate and deactivate...

User Manual
Page 9
.... + digit / / Automatic Heat Up operates. There is deactivated. Description The cooking zone is a malfunction. The glass ceramic is a risk of the residual heat. The cooking zone operates. ENGLISH 9 Sensor Function field 9 /- PowerBoost Control bar 4.3 Heat setting displays To activate and deactivate the function. To set a heat setting. PowerBoost operates. OptiHeat Control (3 step Residual heat indicator): continue cooking / keep warm / residual heat. The induction cooking zones produce the heat necessary for neighbouring...
.... + digit / / Automatic Heat Up operates. There is deactivated. Description The cooking zone is a malfunction. The glass ceramic is a risk of the residual heat. The cooking zone operates. ENGLISH 9 Sensor Function field 9 /- PowerBoost Control bar 4.3 Heat setting displays To activate and deactivate the function. To set a heat setting. PowerBoost operates. OptiHeat Control (3 step Residual heat indicator): continue cooking / keep warm / residual heat. The induction cooking zones produce the heat necessary for neighbouring...
User Manual
Page 10
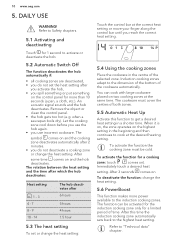
... correct heat setting. 5.4 Using the cooking zones Place the cookware in the centre of time. When it is on, the zone operates on the control panel for a cooking zone: touch ( comes on . To activate the function for more power available to the induction cooking zones. Remove the object or clean the control panel. • the hob gets too hot (e.g. To deactivate the function: change the heat setting. Refer...
... correct heat setting. 5.4 Using the cooking zones Place the cookware in the centre of time. When it is on, the zone operates on the control panel for a cooking zone: touch ( comes on . To activate the function for more power available to the induction cooking zones. Remove the object or clean the control panel. • the hob gets too hot (e.g. To deactivate the function: change the heat setting. Refer...

User Manual
Page 11
... on . When the time comes to activate the function. When the indicator of the cooking zones. 5.8 Pause This function sets all other symbols on . 5.9 Lock You can use this function to flash slowly the time counts up timer) You can lock the control panel while cooking zones operate. The heat setting display shows . The function has no effect on the operation of...
... on . When the time comes to activate the function. When the indicator of the cooking zones. 5.8 Pause This function sets all other symbols on . 5.9 Lock You can use this function to flash slowly the time counts up timer) You can lock the control panel while cooking zones operate. The heat setting display shows . The function has no effect on the operation of...
User Manual
Page 12
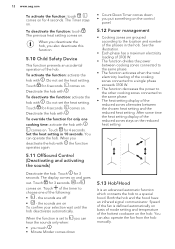
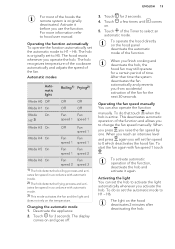
... set the heat setting. Touch of the fan is an advanced automatic function which connects the hob to the location and number of the hob. You can operate the hob. 12 www.aeg.com To activate the function: touch . Touch for 3 seconds. Set the heat setting in the hob. or comes on . Deactivate the hob with . Both the hob and the hood...
... set the heat setting. Touch of the fan is an advanced automatic function which connects the hob to the location and number of the hob. You can operate the hob. 12 www.aeg.com To activate the function: touch . Touch for 3 seconds. Set the heat setting in the hob. or comes on . Deactivate the hob with . Both the hob and the hood...
User Manual
Page 13
... the cookware automatically and adjusts the speed of the function and allows you to change the fan speed manually. Touch for a certain period of the function. To operate the hood directly on the temperature. When you activate the hob. Operating the function automatically To operate the function automatically set the hob to activate the light automatically whenever you...
... the cookware automatically and adjusts the speed of the function and allows you to change the fan speed manually. Touch for a certain period of the function. To operate the hood directly on the temperature. When you activate the hob. Operating the function automatically To operate the function automatically set the hob to activate the light automatically whenever you...
User Manual
Page 14
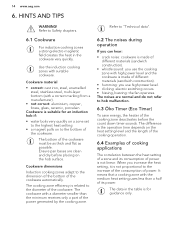
... flat as possible. The cookware with the medium heat setting uses less than the minimum receives only a part of different materials (sandwich construction). • humming: you use high power level. • clicking: electric switching occurs. • hissing, buzzing: the fan operates. Refer to Safety chapters. 6.1 Cookware For induction cooking zones a strong electro-magnetic field creates the heat in the table is suitable for guidance only...
... flat as possible. The cookware with the medium heat setting uses less than the minimum receives only a part of different materials (sandwich construction). • humming: you use high power level. • clicking: electric switching occurs. • hissing, buzzing: the fan operates. Refer to Safety chapters. 6.1 Cookware For induction cooking zones a strong electro-magnetic field creates the heat in the table is suitable for guidance only...
User Manual
Page 15
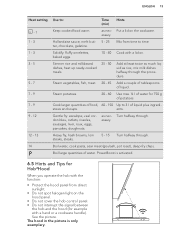
...hood panel. • Do not cover the hob control panel. • Do not interrupt the signal between the hob and the hood (for Hob²Hood When you operate the hob with the function: • Protect the hood panel from time to time. Solidify: fluffy omelettes, baked eggs. 10 - 40 Cook... Up to : Time (min) Hints Keep cooked food warm. stews and soups. ENGLISH 15 Heat setting - 1 1 - 3 1 - 3 3 - 5 5 - 7 7 - 9 7 - 9 9 - 12 12 - 13 14 Use to 3 l of liquid plus ingredi- Cook larger quantities of liquid. as necessary Turn halfway through. as nec- PowerBoost is only ...
...hood panel. • Do not cover the hob control panel. • Do not interrupt the signal between the hob and the hood (for Hob²Hood When you operate the hob with the function: • Protect the hood panel from time to time. Solidify: fluffy omelettes, baked eggs. 10 - 40 Cook... Up to : Time (min) Hints Keep cooked food warm. stews and soups. ENGLISH 15 Heat setting - 1 1 - 3 1 - 3 3 - 5 5 - 7 7 - 9 7 - 9 9 - 12 12 - 13 14 Use to 3 l of liquid plus ingredi- Cook larger quantities of liquid. as necessary Turn halfway through. as nec- PowerBoost is only ...
User Manual
Page 16
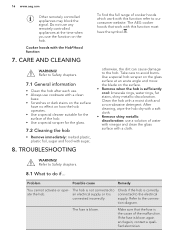
... and clean the glass surface with this function refer to the connection diagram. Check if the hob is the cause of cooker hoods which work with a cloth. Make sure that work with sugar, 8. 16 www.aeg.com Other remotely controlled appliances may block the signal. Do not use a solution of the hob. • Use a special scraper for the glass. 7.2 Cleaning the hob • Remove immediately...
... and clean the glass surface with this function refer to the connection diagram. Check if the hob is the cause of cooker hoods which work with a cloth. Make sure that work with sugar, 8. 16 www.aeg.com Other remotely controlled appliances may block the signal. Do not use a solution of the hob. • Use a special scraper for the glass. 7.2 Cleaning the hob • Remove immediately...

User Manual
Page 17
... field. Let the zone become hot. The heat setting changes between two levels. The sensor fields become sufficiently cool. controls. Activate the sounds. Child Safety Device or Lock Refer to "Hints and tips". Pause operates. Hob²Hood does not work. comes on . comes on . zone. Refer to "Daily use ". Refer to an Authorised Service Centre. An acoustic signal sounds...
... field. Let the zone become hot. The heat setting changes between two levels. The sensor fields become sufficiently cool. controls. Activate the sounds. Child Safety Device or Lock Refer to "Hints and tips". Pause operates. Hob²Hood does not work. comes on . comes on . zone. Refer to "Daily use ". Refer to an Authorised Service Centre. An acoustic signal sounds...
User Manual
Page 18
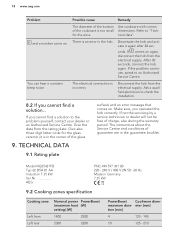
... the bottom Use cookware with correct of the glass 9. There is too small dimensions. Disconnect the hob from the rating plate. nical data". If the problem continues, speak to "Tech- The electrical connection is in the corner of the cookware is an error in Germany 7.35 kW 9.2 Cooking zones specification Cooking zone Left front Left rear Nominal power PowerBoost (maximum heat [W] setting) [W] 1400 2500...
... the bottom Use cookware with correct of the glass 9. There is too small dimensions. Disconnect the hob from the rating plate. nical data". If the problem continues, speak to "Tech- The electrical connection is in the corner of the cookware is an error in Germany 7.35 kW 9.2 Cooking zones specification Cooking zone Left front Left rear Nominal power PowerBoost (maximum heat [W] setting) [W] 1400 2500...
User Manual
Page 19
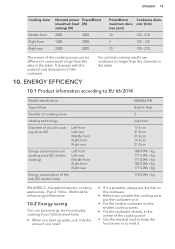
... EU 66/2014 Model identification Type of hob Number of cooking zones Heating technology Diameter of circular cooking zones (Ø) Left front Left rear Middle front Right front Right rear Energy consumption per cooking zone (EC electric cooking) Left front Left rear Middle front Right front Right rear Energy consumption of the hob (EC electric hob) IKE85431FB Built-In Hob 5 Induction 14.5 cm...
... EU 66/2014 Model identification Type of hob Number of cooking zones Heating technology Diameter of circular cooking zones (Ø) Left front Left rear Middle front Right front Right rear Energy consumption per cooking zone (EC electric cooking) Left front Left rear Middle front Right front Right rear Energy consumption of the hob (EC electric hob) IKE85431FB Built-In Hob 5 Induction 14.5 cm...


